¶ Compatibility
This article applies to the following model. Please pay attention to the details when referring to it:
- Model: Artisan
¶ Introduction
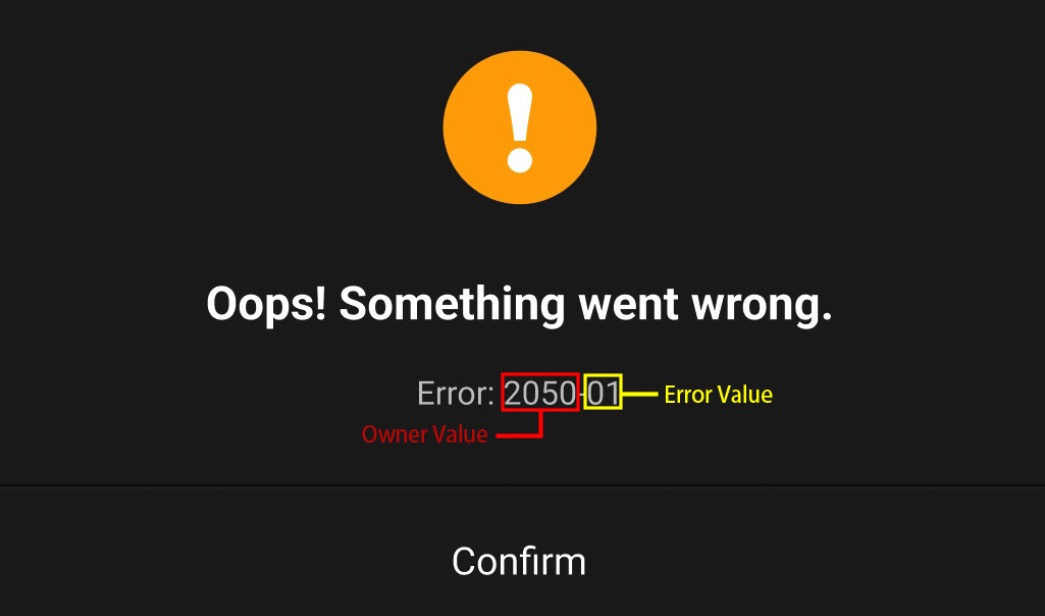
The error code consists of an owner value and an error value.
- The owner value specifies where the problem occurs.
| Owner value | Module |
|---|---|
| 1 | 50W CNC Module |
| 6 | Rotary Module |
| 7 | Air Purifier |
| 13 | 3D Printing Module |
| 14 / 2 | Laser Module |
| 15 | 200W CNC Module |
| 16 | Enclosure |
| 200 | Workflow |
| 515 | Heated Bed |
| 516 | Linear Module |
| 2050 | Controller |
- The error value specifies the problem type.
You can search for the corresponding problem and solution of the error code shown on the Touchscreen. If the solution doesn't work or the problem frequently occurs, please contact our Support at support@snapmaker.com.
¶ Error Codes
| Error Code | Issue | Cause/Solution | Troubleshooting Guide |
|---|---|---|---|
| 2050-1 | Toolhead Not Detected | Please power off the machine, plug the toolhead into the Controller, and restart. | |
| 2050-3 | Controller Overheat | Please power off the machine, wait for a while, and restart. | |
| 2050-5 | Failed to Home | Please check if any Linear Module is prevented from moving. | Troubleshooting guide for Artisan X-axis noise and unable to home |
| 2050-7 | Abnormal Power Supply for System | Please power off the machine and check if the electricity supply is normal. | |
| 2050-8 | Abnormal Power Supply for Motion | Please power off the machine and check if the electricity supply is normal. | |
| 2050-10 | Error caused by M593 F0 | M593 F0 sets the vibration suppression frequency to 0, leading to system instability. Please reset the parameters using M593 P1 X Y F38 and M500 and avoid using this specific G-code | Screen shows 2050-10 error |
| 516-1 | Linear Module Disconnected | Please power off the machine, replug all the linear modules, and restart. | |
| 516-2 | No Linear Module Detected | Please power off the machine, plug all the Linear Modules into the Controller, and restart. | |
| 516-3 | X axis Not Detected | Please power off the machine, plug the X-axis Linear Module into the Controller, and restart. | |
| 516-4 | Y axis Not Detected | Please power off the machine, plug the Y-axis Linear Modules into the Controller, and restart. | |
| 516-5 | Z axis Not Detected | Please power off the machine, plug the Z-axis Linear Modules into the Controller, and restart. | |
| 516-6 | Unable to Lower Further | The toolhead has been at its lowest point. | |
| 6-1 | Rotary Module Plugged into Wrong Socket | Please plug the rotary module into the Motion 1 socket of the Integrated Controller. | Error code 6-1 rotary module plugged into wrong socket |
| 13-1 | Abnormal Heating—Nozzle L | Please refer to the corresponding wiki for troubleshooting. If the issue persists, please contact Snapmaker support. | Dual Extrusion Module abnormal hot end and heating failure |
| 13-2 | Abnormal Heating—Nozzle R | Please refer to the corresponding wiki for troubleshooting. If the issue persists, please contact Snapmaker support. | Dual Extrusion Module abnormal hot end and heating failure |
| 13-3 | Abnormal Temp. Control—Nozzle L | Please refer to the corresponding wiki for troubleshooting. If the issue persists, please contact Snapmaker support. | Dual Extrusion Module abnormal hot end and heating failure |
| 13-4 | Abnormal Temp. Control—Nozzle R | Please refer to the corresponding wiki for troubleshooting. If the issue persists, please contact Snapmaker support. | Dual Extrusion Module abnormal hot end and heating failure |
| 13-5 | Nozzle L Underheat | Please refer to the corresponding wiki for troubleshooting. If the issue persists, please contact Snapmaker support. | Dual Extrusion Module abnormal hot end and heating failure |
| 13-6 | Nozzle R Underheat | Please refer to the corresponding wiki for troubleshooting. If the issue persists, please contact Snapmaker support. | Dual Extrusion Module abnormal hot end and heating failure |
| 13-7 | Nozzle L Overheat | Please refer to the corresponding wiki for troubleshooting. If the issue persists, please contact Snapmaker support. | Dual Extrusion Module abnormal hot end and heating failure |
| 13-8 | Nozzle R Overheat | Please refer to the corresponding wiki for troubleshooting. If the issue persists, please contact Snapmaker support. | Dual Extrusion Module abnormal hot end and heating failure |
| 13-9 | Toolhead Disconnected | Please power off the machine, replug the toolhead, and restart. | |
| 13-10 | Abnormal Hot End | Please refer to the corresponding wiki for troubleshooting. If the issue persists, please contact Snapmaker support. | Dual Extrusion Module abnormal hot end and heating failure |
| 13-12 | Calibration Sensor Abnormally Triggered | Please check if the nozzle is clogged or pushed up, or if the filament is stuck outside and cannot be pulled in successfully. | Error code: 13-12/13-18 The extruder is continuously pulled up and printing is paused |
| 13-13 | Calibration Failed | Please quit and retry. | |
| 13-15 | Extruder R Failed to Home | Please check if the right extruder is prevented from moving. | Dual Extrusion Module extruder R failed to home/cannot lift |
| 13-16 | Abnormal Toolhead Communication | Please power off the machine, replug the toolhead, and restart. | |
| 13-17 | The extruder is continuously pulled up and printing is paused | Please check if the nozzle is clogged or pushed up, or if the filament is stuck outside and cannot be pulled in successfully. If the problem persists, please contact our Support for help. | Error code: 13-12/13-18 The extruder is continuously pulled up and printing is paused |
| 13-18 | The extruder is continuously pulled up and printing is paused | Please check if the nozzle is clogged or pushed up, or if the filament is stuck outside and cannot be pulled in successfully. If the problem persists, please contact our Support for help. | Error code: 13-12/13-18 The extruder is continuously pulled up and printing is paused |
| 14-1 | Abnormal Toolhead Orientation Detection | Please contact our Support for help. | |
| 14-2 | Laser Overheat | Please power off the machine, wait for a while, and restart. | The fan of the Laser is not turning or showing an overheat warning |
| 14-3 | Slanting Toolhead | Please reinstall the toolhead and make sure it doesn't slant in any direction. | |
| 14-4 | Abnormal Laser Emitter | Please contact our Support for help. | |
| 14-5 | Abnormal Laser Heat Dissipation | Please contact our Support for help. | |
| 14-9 | Abnormal Laser Temp. Sensor | Please contact our Support for help. | |
| 14-10 | Laser PCBA Overheat | Please power off the machine, wait for a while, and restart. | |
| 14-11 | Toolhead Plugged into Wrong Socket | Please plug the toolhead into the correct socket of the Integrated Controller. | |
| 14-12 | Toolhead Disconnected | Please power off the machine, replug the toolhead, and restart. | |
| 14-13 | Enclosure Not Detected | Please power off the machine, plug the Enclosure into the Controller, and restart. | |
| 15-1 | Spindle Locked-rotor Protection Triggered | Possible causes: 1. Improperly set parameters. 2. Improperly set work origin or improperly positioned material. 3. Blocked revolution of the ER 11 nut. 4. Collision. If the CNC bit is damaged or a collision occurs, stop the job immediately. | |
| 15-2 | CNC Motor Driver Protection Triggered | Possible cause: Improperly set parameters lead to excessive load on the spindle. | |
| 15-3 | CNC Motor Driver Protection Triggered | Possible cause: Improperly set parameters lead to excessive load on the spindle. | |
| 15-4 | CNC Driver Board Overheat | Please power off the machine, wait for a while, and restart. | |
| 15-5 | Spindle Overheat | Possible causes: 1. Improperly set parameters. 2. Prevented rotation of the ER 11 nut. You can continue the job only after it's confirmed safe to do so. | |
| 15-6 | Abnormal Spindle Voltage | Please plug the toolhead into the correct socket of the Integrated Controller. | |
| 15-7 | Toolhead Plugged into Wrong Socket | Please plug the toolhead into the correct socket of the Integrated Controller. | |
| 15-8 | Toolhead Disconnected | Please power off the machine, replug the toolhead, and restart. | |
| 16-1 | Enclosure Disconnected | Please power off the machine, replug the Enclosure, and restart. | |
| 7-1 | Air Purifier Disconnected | Please power off the machine, replug the Air Purifier, and restart. | |
| 515-1 | Abnormal Bed Heating | Please power off the machine, replug the heated bed, and restart. | |
| 515-2 | Abnormal Bed Heating | Please power off the machine, replug the heated bed, and restart. | |
| 515-3 | Abnormal Bed Temp. Control | Please power off the machine, replug the heated bed, and restart. | |
| 515-4 | Abnormal Bed Temp. Control | Please power off the machine, replug the heated bed, and restart. | |
| 515-5 | Heated Bed Underheat | Possible causes: 1. The ambient temperature is too low. 2. The temperature sensor is abnormal. | Error 515-10 or 515-6 appears on the screen when using 3D printing |
| 515-6 | Heated Bed Underheat | Possible causes: 1. The ambient temperature is too low. 2. The temperature sensor is abnormal. | Error 515-10 or 515-6 appears on the screen when using 3D printing |
| 515-7 | Heated Bed Overheat | Please contact our Support for help. | Error 515-10 or 515-6 appears on the screen when using 3D printing |
| 515-8 | Heated Bed Overheat | Please contact our Support for help. | Error 515-10 or 515-6 appears on the screen when using 3D printing |
| 515-9 | Toolhead and Work Platform Mismatched | The current toolhead is not the 3D Printing Module. Please power off the machine, replace the toolhead or the work platform, and restart. | |
| 515-10 | Heated Bed Not Detected | Please power off the machine, plug the heated bed into the Controller, and restart. | Error 515-10 or 515-6 appears on the screen when using 3D printing |
| 515-11 | Abnormal Bed Self-check | Please contact our Support. | |
| 204 | The Gcode file is unavailable | Please check if the Gcode contains any corrupted characters or if the file name is too long. | |
| 213 | Recovery Failed | Possible causes: 1. Inconsistent toolhead. 2. Hardware malfunction. | |
| 214 | Inconsistent Toolhead | The current toolhead is not consistent with the one before the job pauses. | |
| 217 | Toolhead Disconnected | Please power off the machine, replug the toolhead, and restart. | |
| 218 | Unavailable Operation | Please check if there's any other problem being unsolved. | |
| 219 | Abnormal Extruder | If this occurs frequently, contact our Support for help. | |
| 220 | Abnormal Hot End | Please power off the machine, wait for the hot end to cool down, and check if it's installed correctly. | |
| 223 | Excessive Spindle Current | If this occurs frequently, contact our Support for help. | |
| 224 | CNC PCBA Overheat | Please power off the machine, wait for a while, and restart. | |
| 225 | Spindle Overheat | Possible causes: 1. Improperly set parameters. 2. Prevented rotation of the ER 11 nut. You can continue the job only after it's confirmed safe to do so. | |
| 226 | Abnormal Spindle Voltage | If this occurs frequently, contact our Support for help. | |
| 227 | Enclosure door is still open. | If this occurs frequently, contact our Support for help. | |
| 228 | Abnormal Toolhead Orientation Detection | Please reinstall the toolhead and make sure it doesn't slant in any direction. | |
| 229 | Laser Overheat | Please power off the machine, wait for a while, and restart. | |
| 230 | Slanting Toolhead | Please check if the toolhead has been installed vertically. | |
| 231 | Abnormal Laser Emitter | Please contact our Support for help. | |
| 232 | Abnormal Laser Temp. Sensor | Please power off the machine, replug the toolhead, and restart. | |
| 233 | Laser PCBA Overheat | Please power off the machine, wait for a while, and restart. | |
| 234 | Laser Fan Malfunction | Please power off the machine, wait for a while, and restart. | |
| 235 | Laser is unavailable without the enclosure. | Please make sure the enclosure is properly installed when using the laser. | |
| 236 | Flame sensor triggered. | Please check if the power is too high or if the laser is being used under strong light. | Introduction to the 20W/40W laser flame sensor and solutions for abnormal triggering |