¶ 01 What is Snapmaker Luban?
Snapmaker Luban (Luban hereinafter) is a free, all-in-one open-source software tailored for Snapmaker machines. Whether you're working with 3D printing, laser engraving, or CNC carving, Luban provides a user-friendly interface to seamlessly manage your creative projects. Get ready to unlock the full potential of your Snapmaker with Luban!
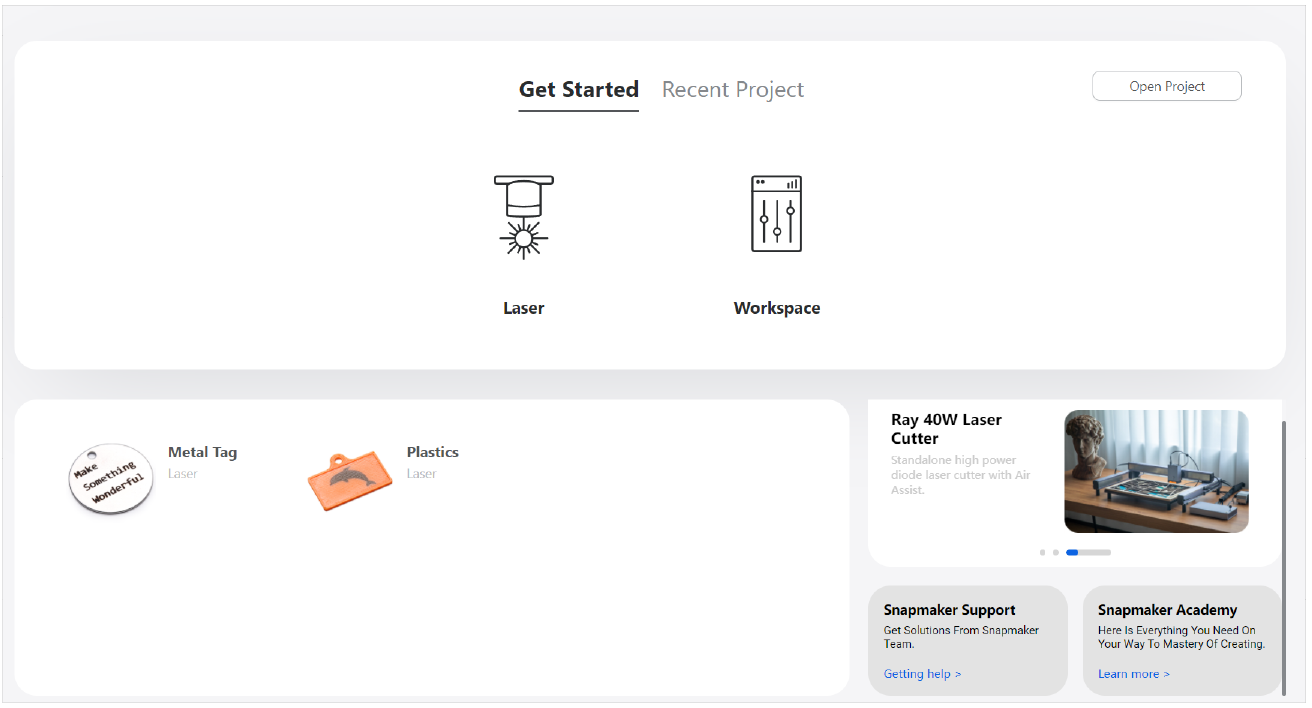
When you select different module types in Machine Settings, the homepage will look slightly different.
¶ 02 Download, Install & Update
If you have already installed Luban, we recommend you to update it to the latest version for the best user experience.
¶ 03 Configuration Wizard
If you are installing Luban for the first time, Luban will automatically pop up the Configuration Wizard, guiding you through the initial setup.
If you want to change these settings later on, click Settings on the top hidden menu.
¶ Step 1 Select Language
Please select a preferred language for your Luban interface.
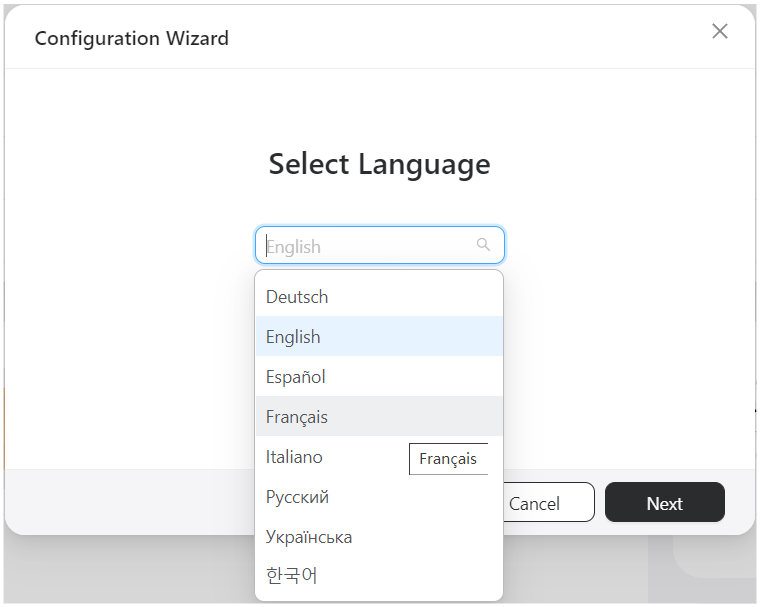
Currently, English, Chinese and German interface languages are well-developed, while other languages are still actively being improved.
¶ Step 2 Select Machine
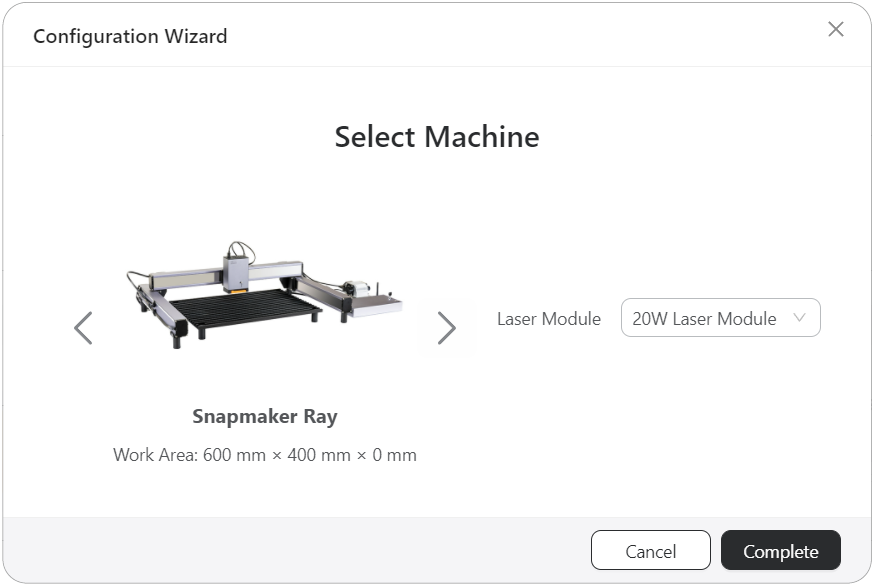
Please select the correct machine type and module type. Then click Complete when finished.
¶ 04 Connect the machine to Luban
It is recommended to connect the machine to Luban before starting your first job. Luban supports the connection via Wi-Fi or via the serial port. For details, please refer to the following instructions:
For Snapmaker Ray, the Wi-Fi connection can only be established upon the serial-port connection.
¶ 05 Start Your First Job
- Click Laser > 3-axis to enter Laser G-code Generator.
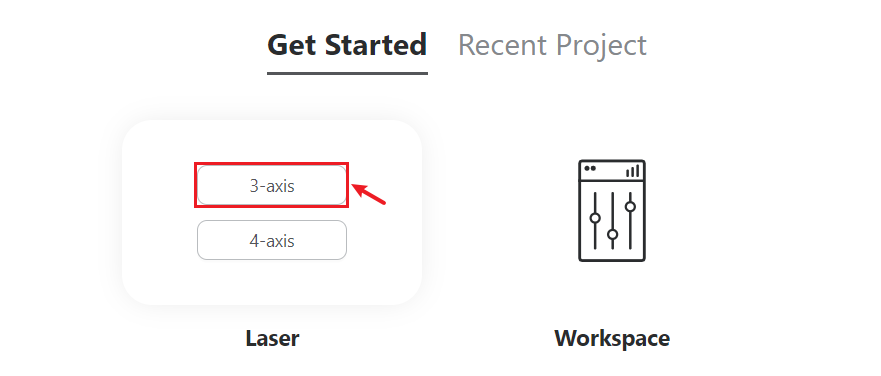
If you are using laser function for the first time in Luban, Luban will automatically pop up the Beginner's Guide to guide you through the first job. You can follow Luban's Beginner's Guide to get familiar with Luban's laser workflow. To access Beginner's Guide later on, click Help > Beginner's Guide on the top hidden menu.
Since V4.9.1, Luban fully supports inline mode for laser work. Under this mode, laser power can be perfectly synchronized with every move and allows for real-time adjustments to the laser power during motion, which is useful especially for high-speed image engraving. Luban enables it by default, however, you need to ensure that you have upgraded the firmware to the latest.
- Before importing the design into Luban, you need to finish the Job Setup for your laser project. First input the width and height of your workpiece, select an Origin Mode and Origin Position, and select a Job Offset Mode. Click Confirm when finished.
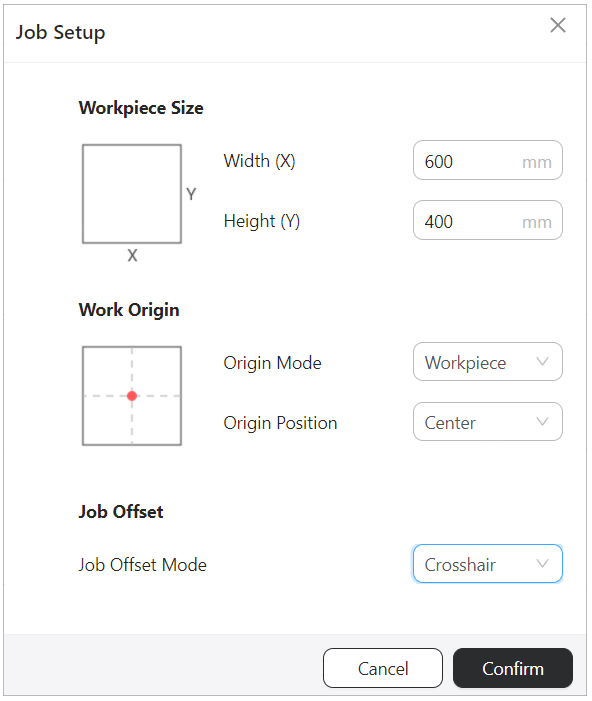
For more details in Job Setup, you can refer to - Laser Job Setup > 3-axis.
If you are using 2W IR laser module, Job Offset Mode is set as Crosshair by default.
- Click
 to import an object file into Luban. Luban-supported file formats include: .stl, .svg, .jpeg, .png, .jpg, .bmp, .dxf, .amf and .3mf.
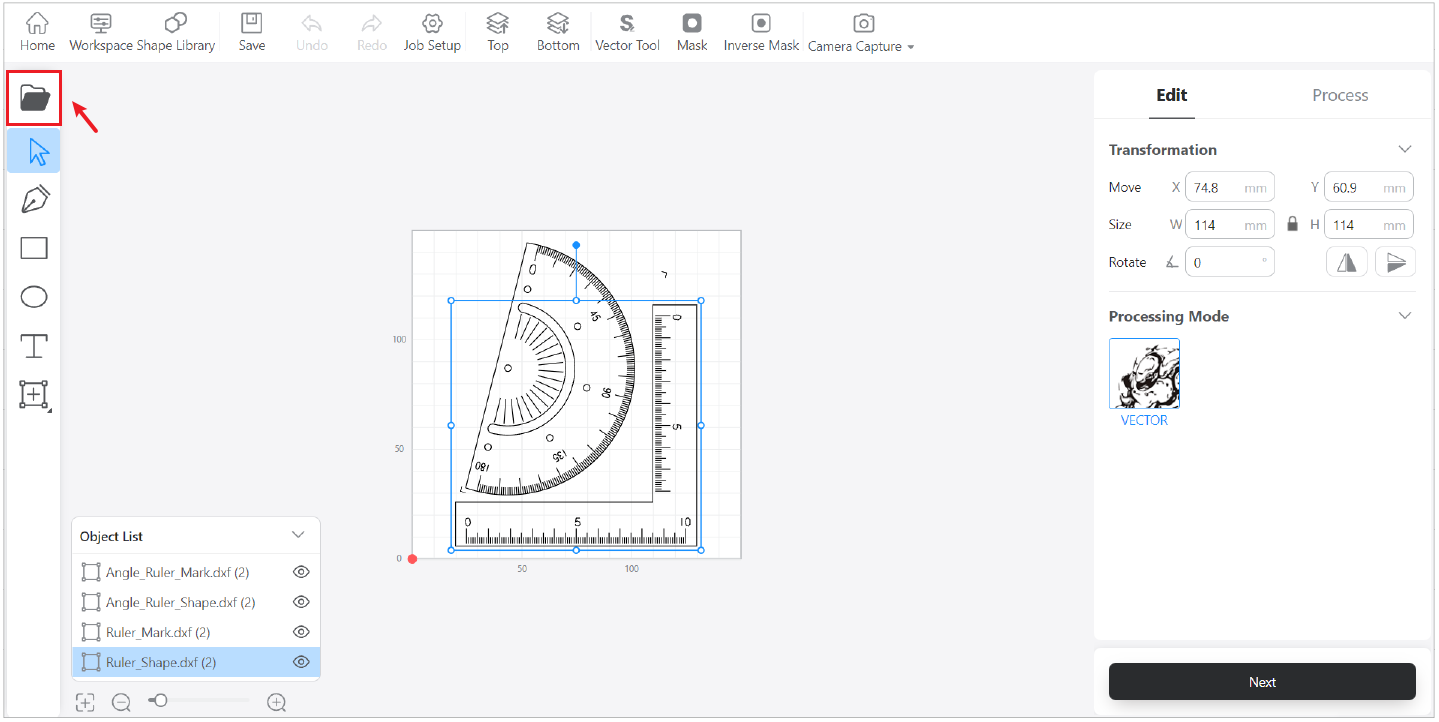
Please note that there may be bugs when importing files in .amf and .3mf. If you encounter any problems, please submit a support ticket to contact our technical support team.
Snapmaker Luban cannot guarantee compatibility with all .dxf files exported from various software. For those .dxf files that are compatible, the parsing results may vary depending on the software used for export.
-
Alternatively, you can draw simple objects, add text or insert vector shapes for laser work.
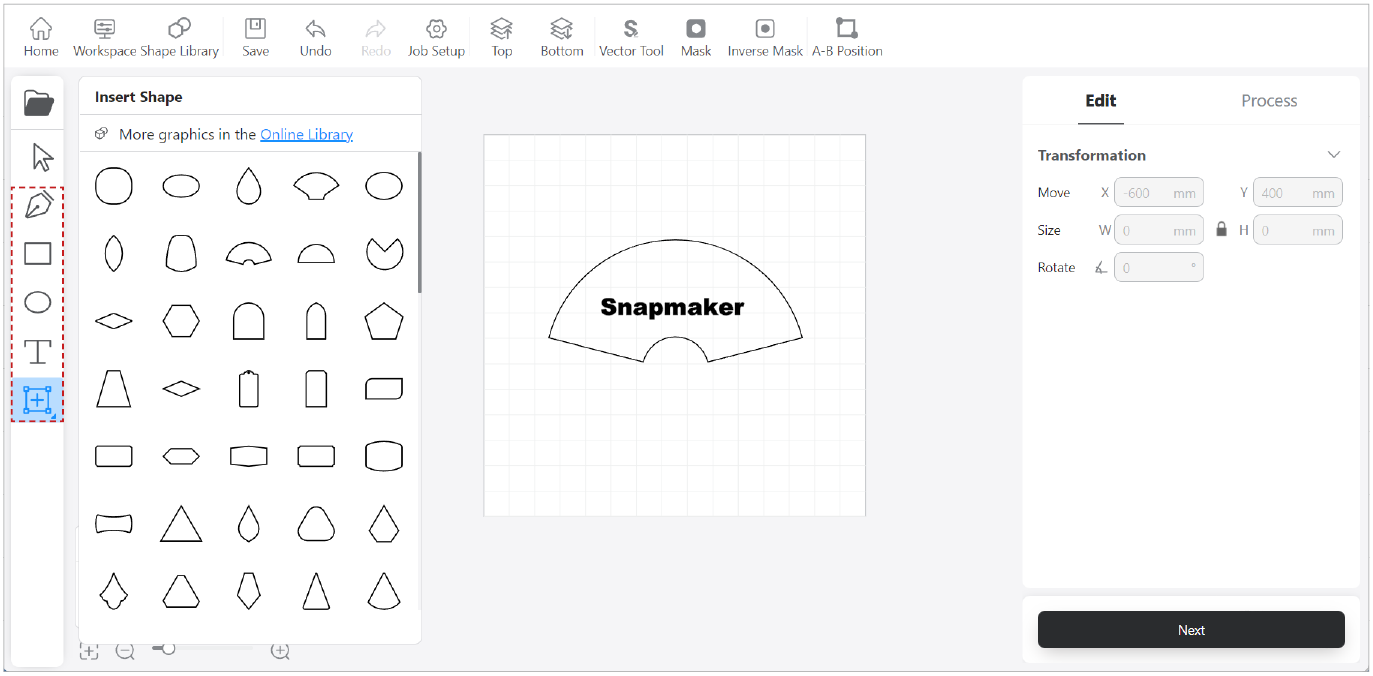
-
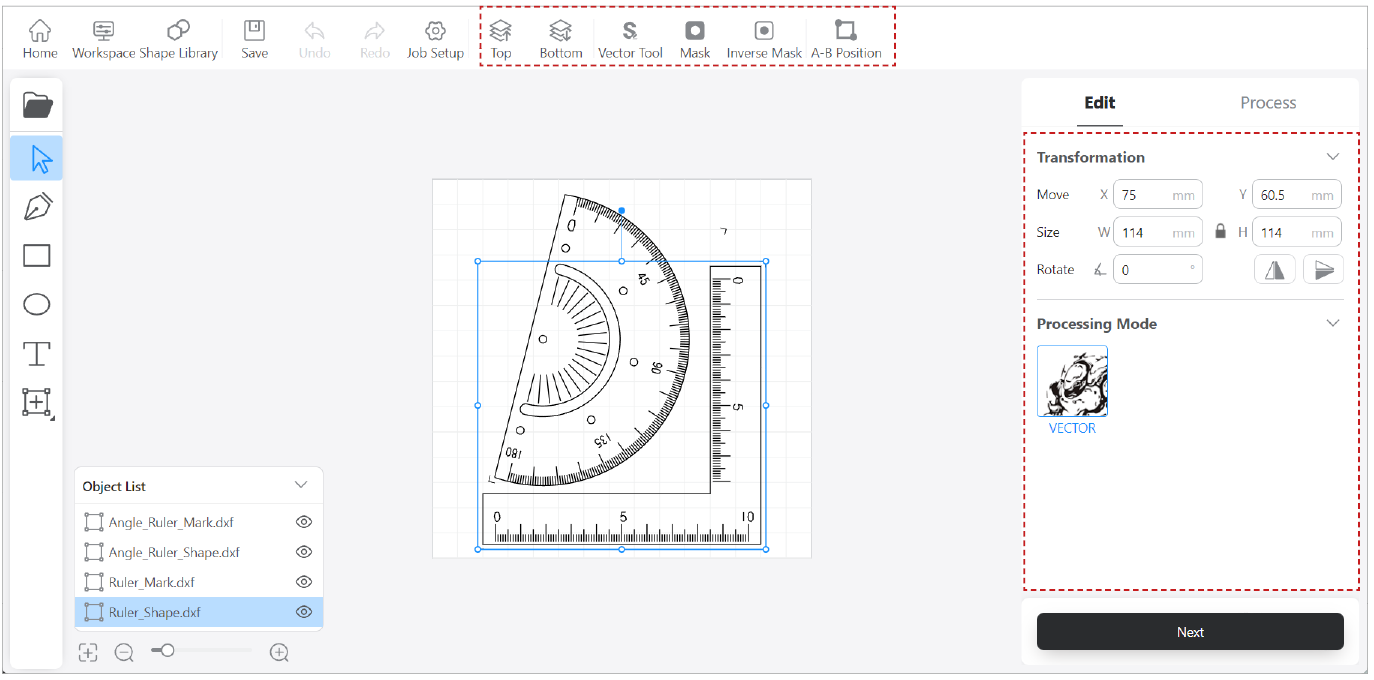
Select the object, then Luban will display the Edit Panel where you can transform the object, switch the Processing Mode. Besides, you can also edit the objects with the tools in the top toolbar, e.g., vector tool. Then click Next when you finish editting, Luban will direct you to Process Panel.
-
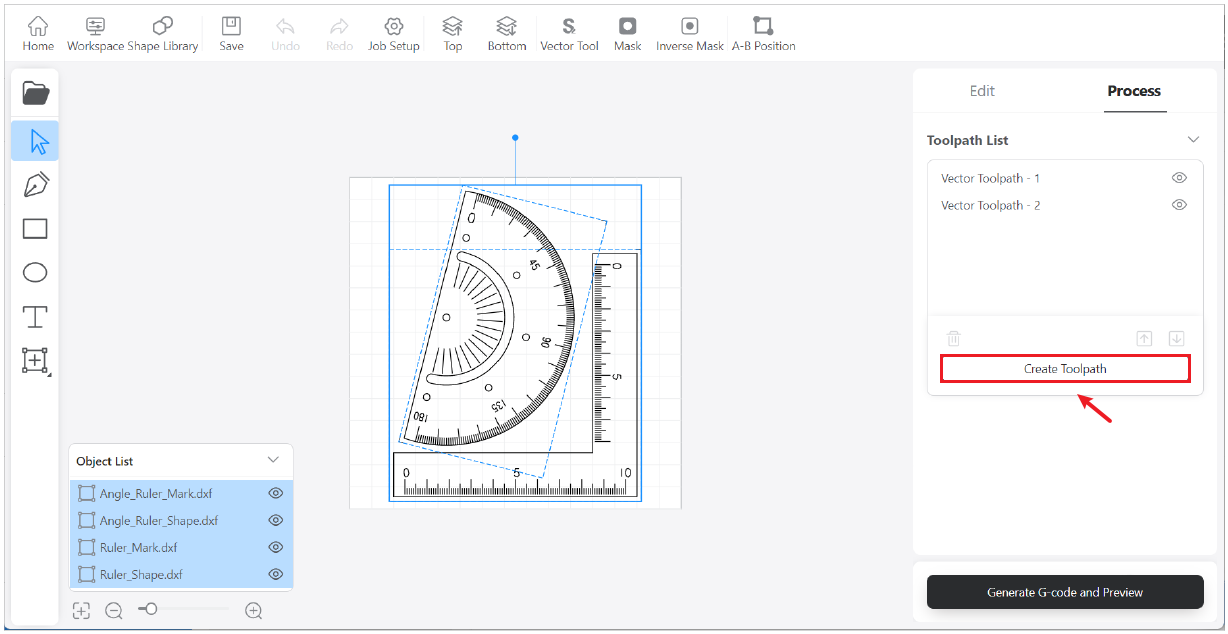
In the Process Panel, select the object, then click Create Toolpath to create a toolpath for the object.
-
In the pop up Toolpath Settings, use Luban's default settings, then click Save.
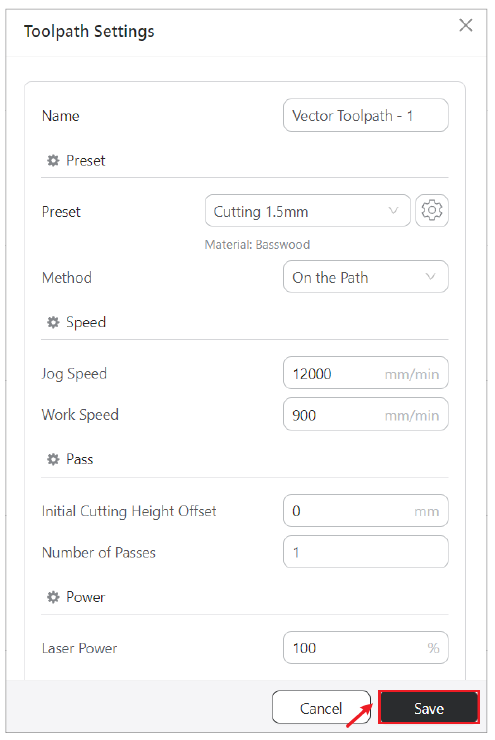
You can also modify the parameters based on your needs.
- Click Generate G-code. Once done, Luban will direct you to the Preview pane to preview the sliced effect.
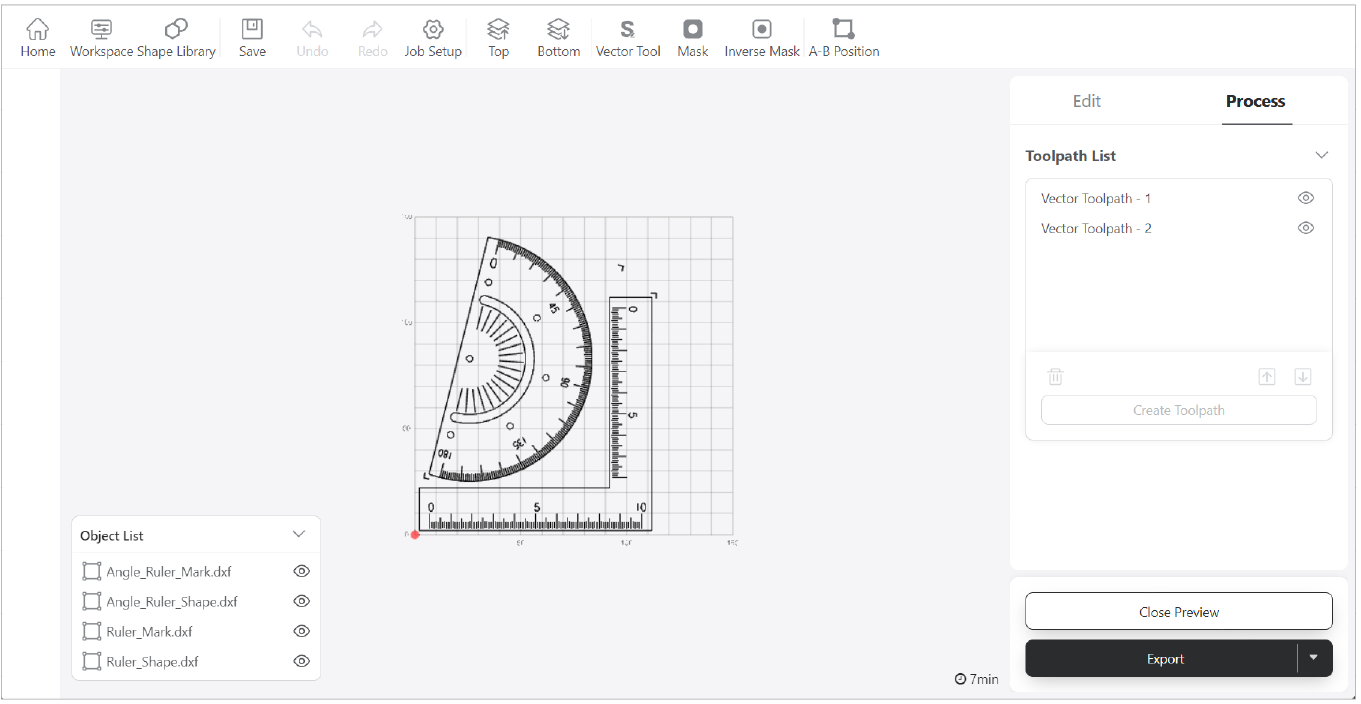
- Click Export > Load G-code to Workspace.
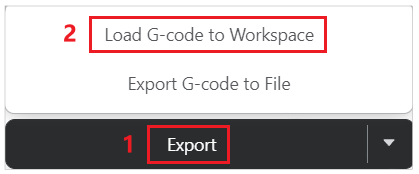
Alternatively, you can also click Export G-code to File to export it to the local directory of your computer, rename it to
ray.ncand save it into the card reader. Then insert the microSD card into the machine to start laser work.
- Click Upload Job, Once the transfer is successful, Luban will display a notification.
Before clicking Upload Job, make sure that you have adjusted the laser height and set the work origin.
Each time you transfer a new G-code file, the previously transferred file will be replaced in the microSD card.
- Check the state of the Enclosure.
- IF you have installed the Enclosure, make sure the Enclosure door is closed and will stay closed throughout the task.
- IF the Enclosure is not installed or purchased, be sure to turn off Door Detection in Luban's Workspace > Settings in the top menu bar. Otherwise, the machine will not start the task.

- Press and hold the work switch on the integrated controller until the machine starts the task.
Keep the machine attended throughout the task!
During laser machining, you can control the task using the following methods:
-Work switch: Press to pause/resume; Press and hold to stop.
-Luban: Click Pause/Resume/Stop to perform the corresponding operation.
The Ray Enclosure supports Door Detection, which can detect the real-time opening and closing status of the Enclosure door. When the sensor detects that the Enclosure door is opened:
-If the machine is on standby, new tasks can not be started until the Enclosure door is closed.
-If the machine is performing tasks, it will immediately pause the ongoing task. To resume, you need to first close the Enclosure door, then press the work switch or click the Resume button on Luban.
For 1.6W and 10W Laser Module, if you don't want to set the work origin, you can use Luban's Camera Capture function; For 2W IR/20W/40W Laser Module, if you don't want to set the work origin, you can use Luban's A-B position function.
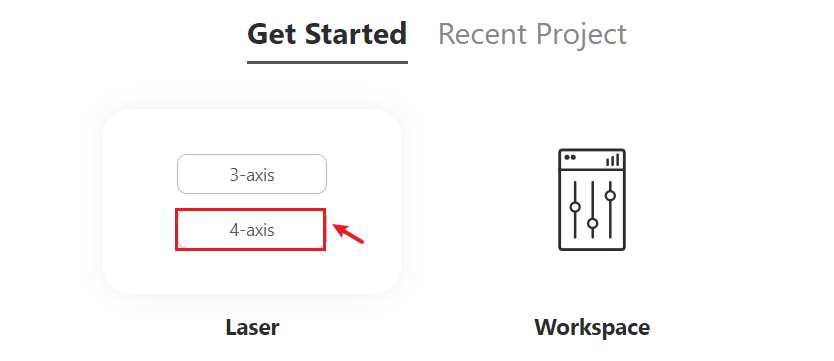
- Click Laser > 4-axis to enter Laser G-code Generator.
If you are using laser function for the first time in Luban, Luban will automatically pop up the Beginner's Guide to guide you through the first job. You can follow Luban's Beginner's Guide to get familiar with Luban's laser workflow. To access Beginner's Guide later on, click Help > Beginner's Guide on the top hidden menu. To access Beginner's Guide later on, click Help > Beginner's Guide on the top hidden menu.
Since V4.9.1, Luban fully supports inline mode for laser work. Under this mode, laser power can be perfectly synchronized with every move and allows for real-time adjustments to the laser power during motion, which is useful especially for high-speed image engraving. Luban enables it by default, however, you need to ensure that you have upgraded the firmware to the latest.
- Before importing the design into Luban, you need to finish the Job Setup for your laser project. Input the length and diameter of your workpiece. Click Confirm when finished.
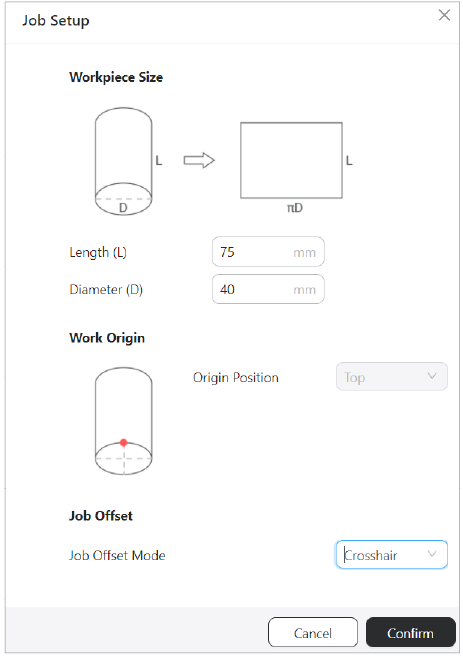
For more details in Job Setup, you can refer to - Laser Job Setup > 4-axis.
If you are using 2W IR laser module, Job Offset Mode is set as Crosshair by default.
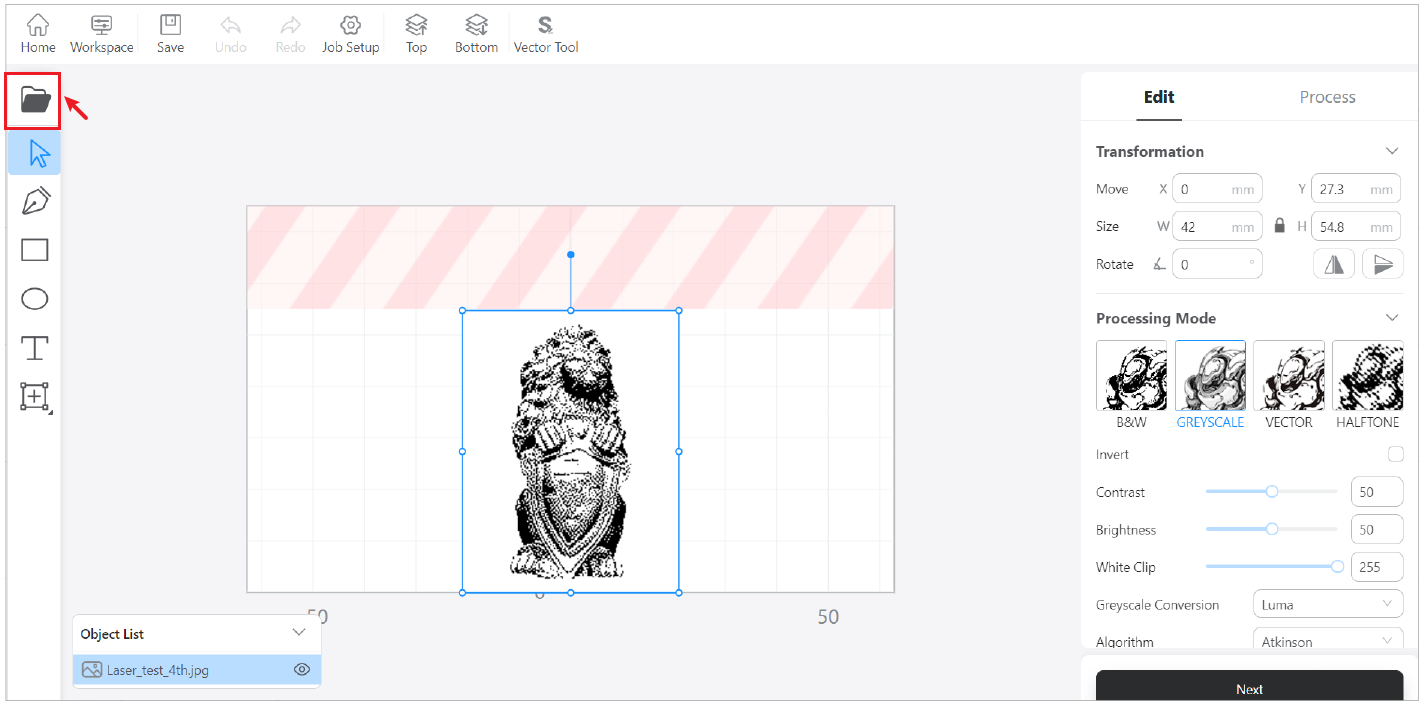
- Click
 to import an object file into Luban. Luban-supported file formats include: .stl, .svg, .jpeg, .png, .jpg, .bmp, .dxf, .amf and .3mf.
Please note that there may be bugs when importing files in .amf and .3mf. If you encounter any problems, please submit a support ticket to contact our technical support team.
Snapmaker Luban cannot guarantee compatibility with all .dxf files exported from various software. For those .dxf files that are compatible, the parsing results may vary depending on the software used for export.
- Alternatively, you can draw simple objects, add text or insert vector shapes for laser work.

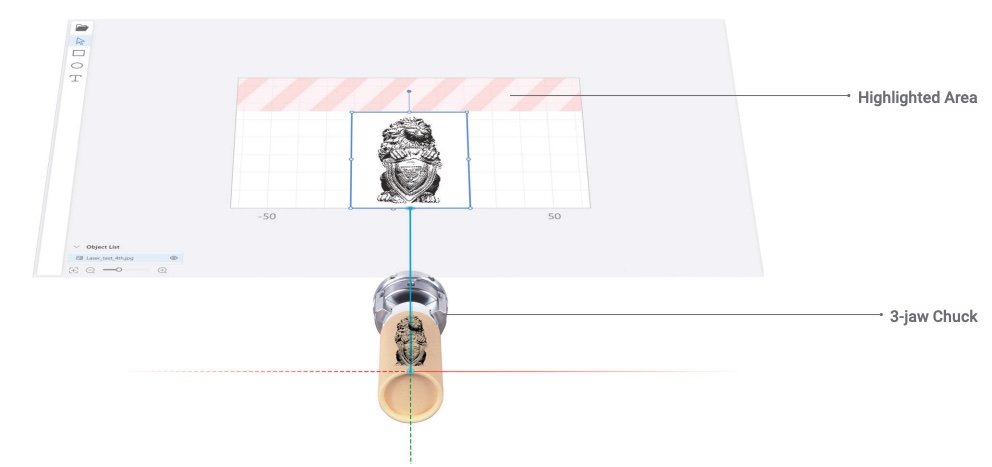
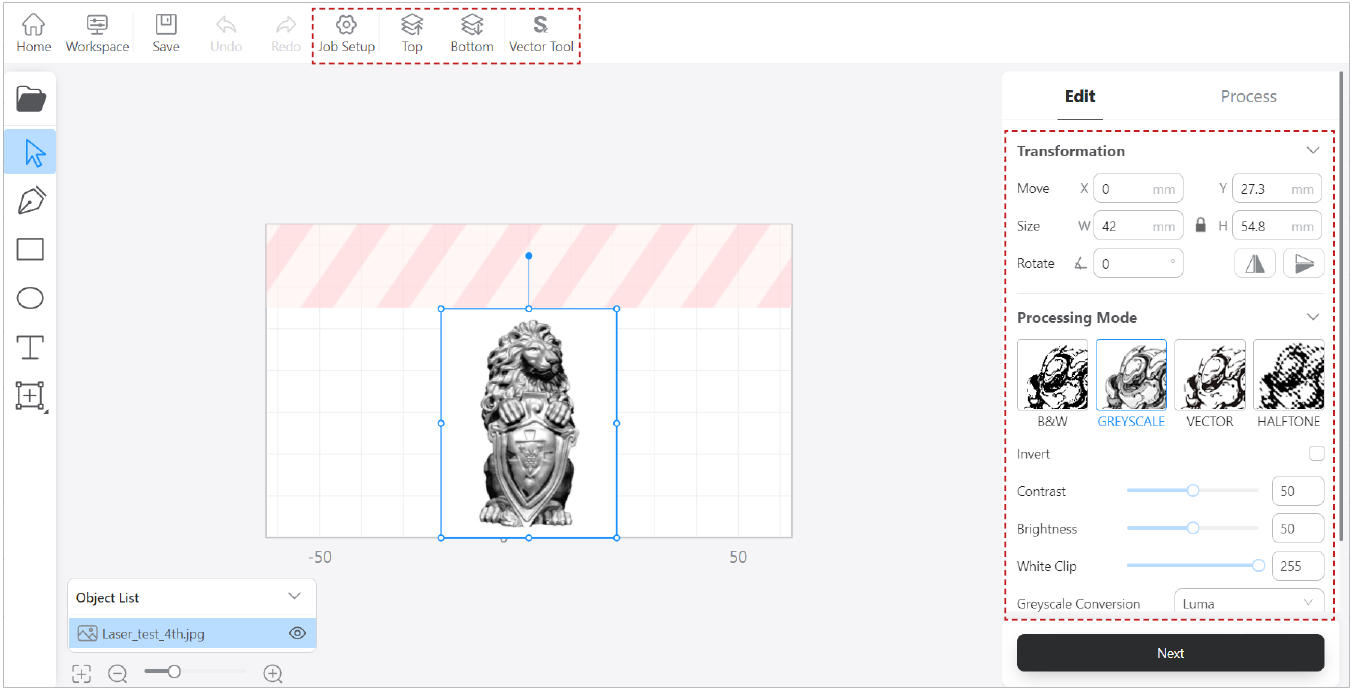
The canvas in the Snapmaker Luban equals the lateral area of your material. After you input the diameter and length of your material, Luban will adjust the size of the canvas. You should put your object within the canvas. The stripe-highlighted area is where the material is clamped by the 3-jaw chuck.
- Select the object, then Luban will display the Edit Panel where you can transform the object, switch the Processing Mode. Besides, you can also edit the objects with the tools in the top toolbar, e.g., vector tool. Then click Next when you finish editting, Luban will direct you to Process Panel.
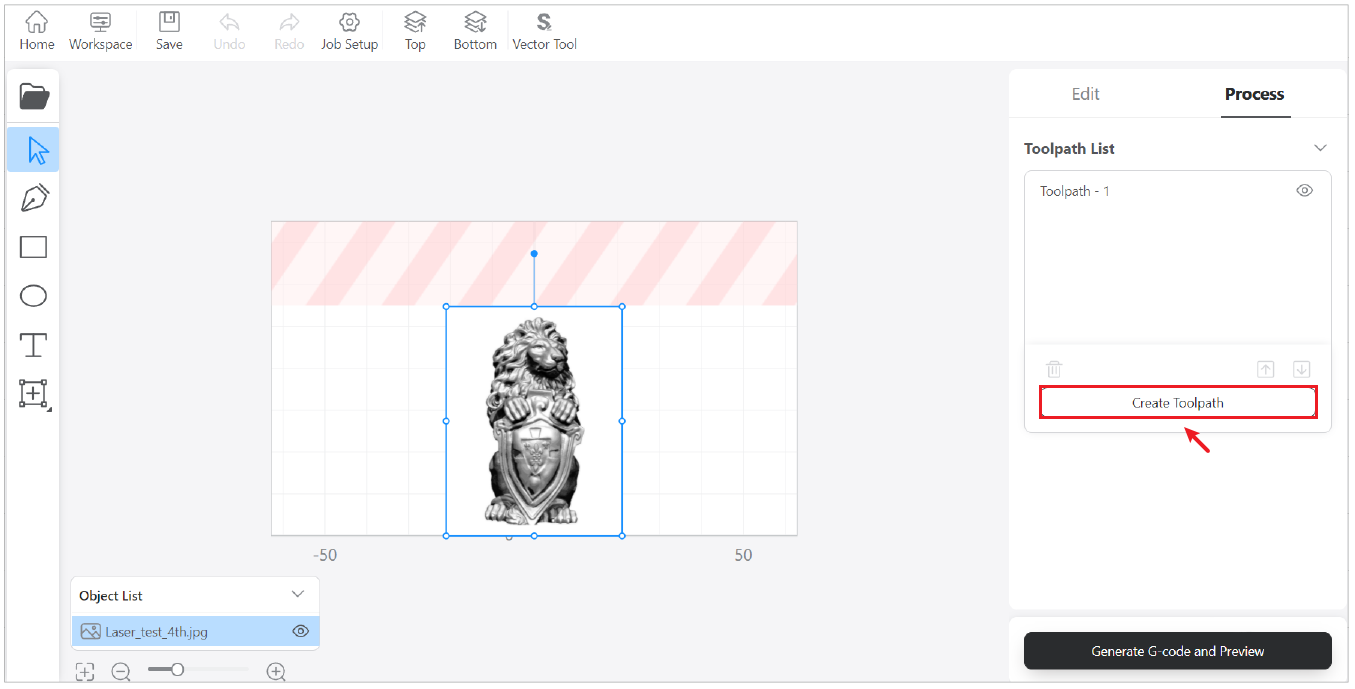
- In the Process Panel, select the object, then click Create Toolpath to create a toolpath for the object.
- In the pop up Toolpath Settings, use Luban's default settings, then click Save.
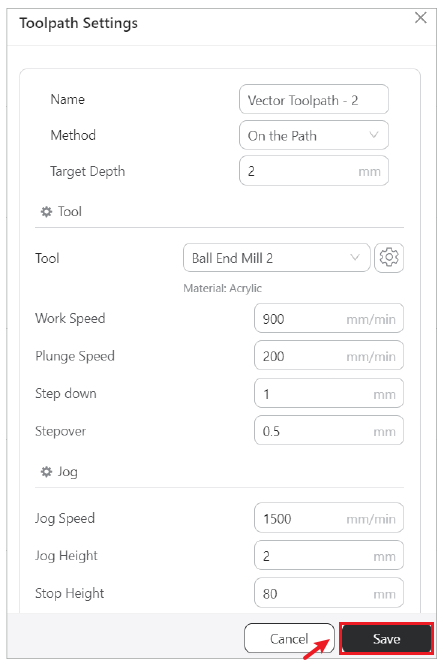
You can also modify the parameters based on your needs.
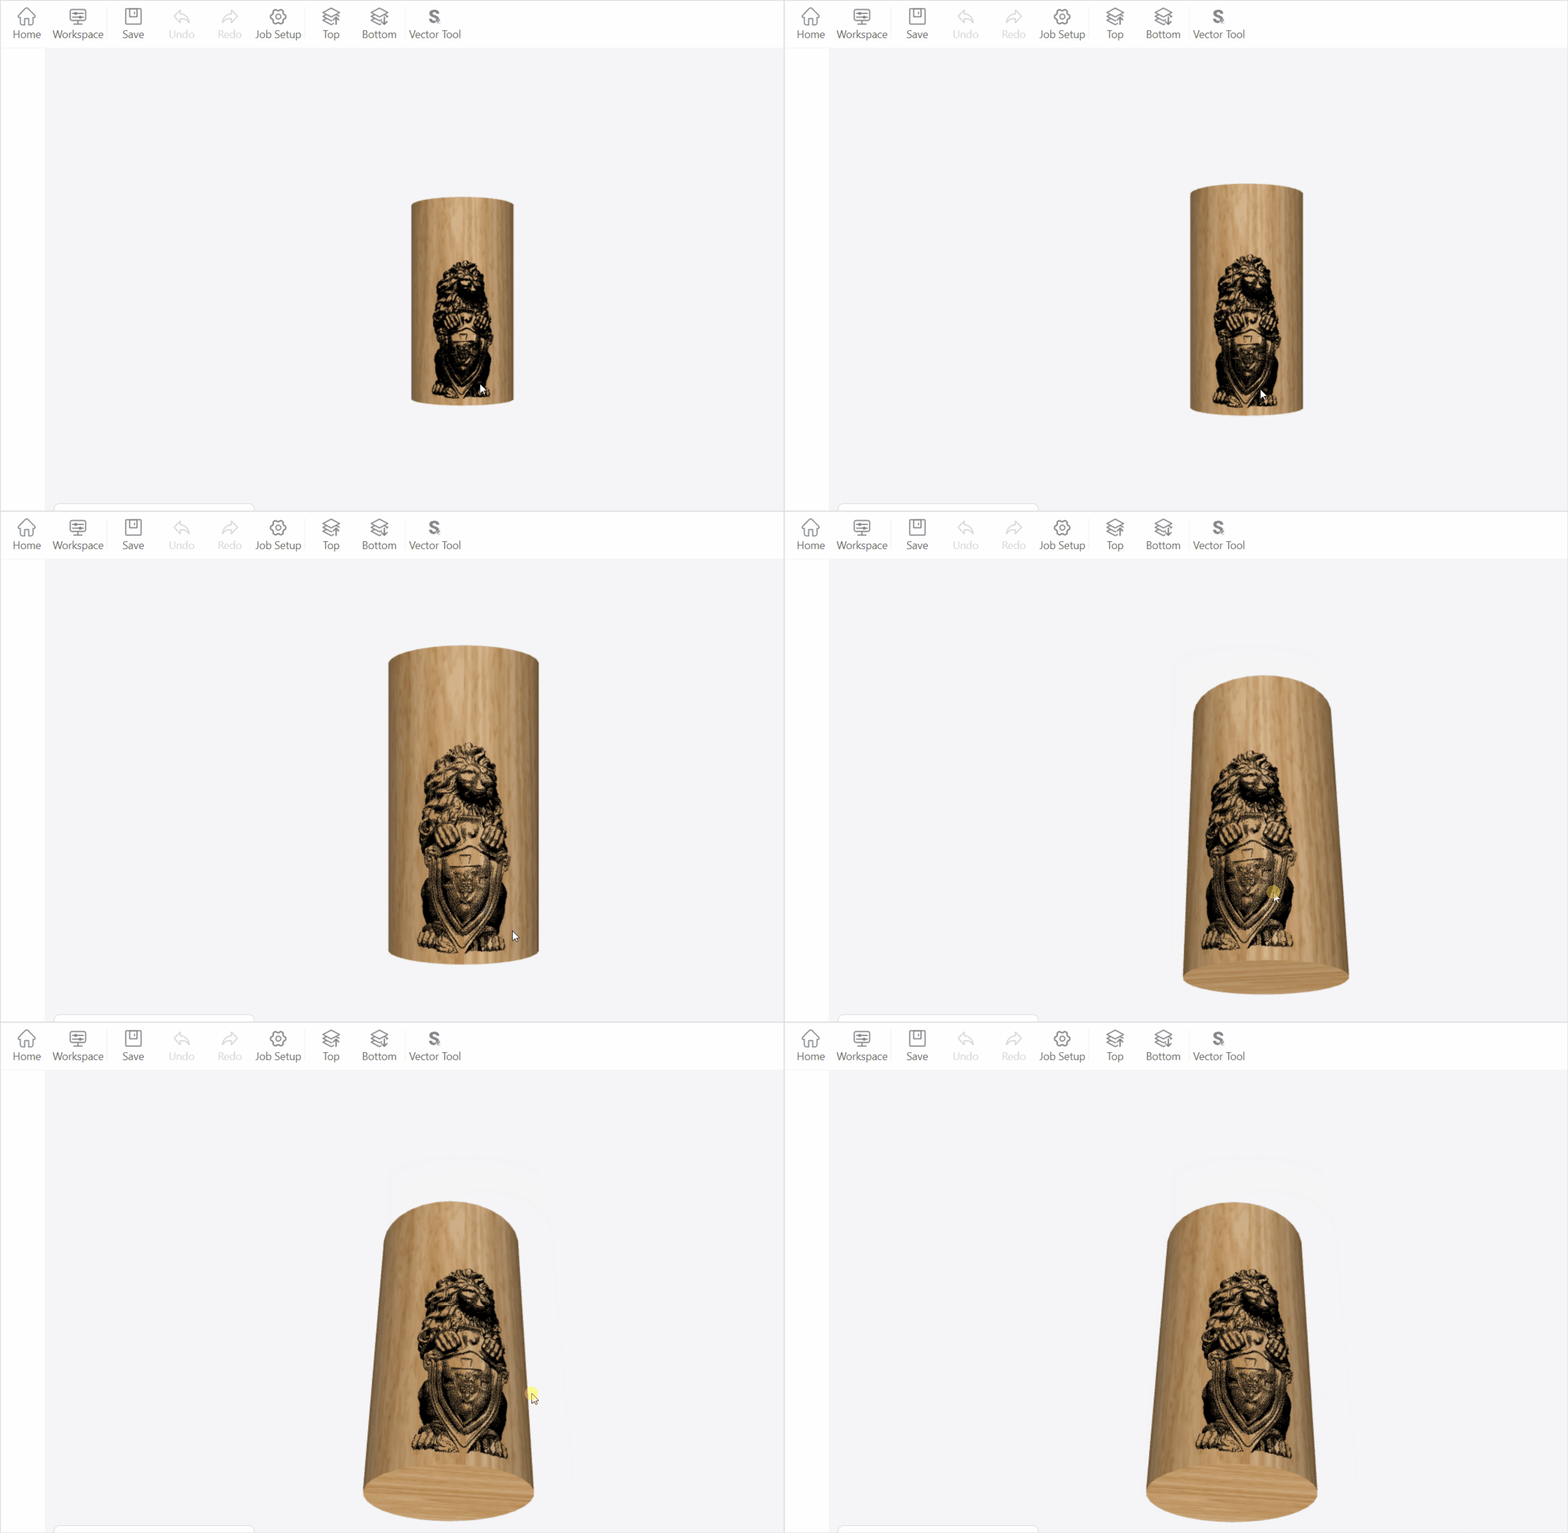
- Click Generate G-code. Once done, Luban will direct you to the Preview pane to preview the sliced effect.
- Click Export > Load G-code to Workspace.

Alternatively, you can also click Export G-code to File to export it to the local directory of your computer, rename it to
ray.ncand save it into the card reader. Then insert the microSD card into the machine to start laser work.
- Click Upload Job, Once the transfer is successful, Luban will display a notification.
Before clicking Upload Job, make sure that you have adjusted the laser height and set the work origin.
Each time you transfer a new G-code file, the previously transferred file will be replaced in the microSD card.
- Check the state of the Enclosure.
- IF you have installed the Enclosure, make sure the Enclosure door is closed and will stay closed throughout the task.
- IF the Enclosure is not installed or purchased, be sure to turn off Door Detection in Luban's Workspace > Settings in the top menu bar. Otherwise, the machine will not start the task.

- Press and hold the work switch on the integrated controller until the machine starts the task.
Keep the machine attended throughout the task!
During laser machining, you can control the task using the following methods:
-Work switch: Press to pause/resume; Press and hold to stop.
-Luban: Click Pause/Resume/Stop to perform the corresponding operation.
The Ray Enclosure supports Door Detection, which can detect the real-time opening and closing status of the Enclosure door. When the sensor detects that the Enclosure door is opened:
-If the machine is on standby, new tasks can not be started until the Enclosure door is closed.
-If the machine is performing tasks, it will immediately pause the ongoing task. To resume, you need to first close the Enclosure door, then press the work switch or click the Resume button on Luban.
For 1.6W and 10W Laser Module, if you don't want to set the work origin, you can use Luban's Camera Capture function; For 2W IR/20W/40W Laser Module, if you don't want to set the work origin, you can use Luban's A-B position function.
