¶ 💡 Compatibility
This guide applies to the following machine. Please note when referencing:
- Machine model: U1
¶ ⏰ When to Use This Guide
When your printer has filament loaded and its type and color have been set via the screen, yet no material extrudes from the nozzle during printing, please refer to this guide for troubleshooting.
A video guide is also available if you prefer! U1 Video Guide: Abnormal Extrusion/Air Printing Troubleshooting
¶ 📋 Quick Info Card
- Difficulty: ⭐⭐⭐☆☆ (Normal)
- Estimated Time: 30 minutes
¶ 🔧Tools List
The following tools can be found in your Tool and Accessory Box:
-
H2.0 and H1.5 hex key
-
Nozzle cleaning needle
-
Diagonal pliers
-
Spare hot end kit

¶ 🔁 Troubleshooting Flowchart
¶ 🔍 Quick Diagnosis
Which situation are you experiencing?
¶ Partial clog
If you are experiencing under-extrusion (inconsistent flow/thin layers), try to unclog the hotend using one of the following method:
- Heat Creep/Flow Check - Use the touchscreen controls to raise the nozzle temperature slightly above the filament's standard print temp. Load/extrude filament. The purge line should fall straight and consistent. If it has curls, inconsistency or it comes out thin, use next step.
- Needle/Cold Pull - Use a nozzle cleaning needle (acupuncture needle) to break up the blockage inside the nozzle, then manually push filament through. Repeat this process until the extrusion comes out straight and stable. Please reach out to support if you need additional information about Cold Pull method.
¶ Full clog
Please start with Scenario 1 to troubleshoot and remove the clog.
¶ ⚠️ Important Notes
When disassembly of the extruder is required, exercise caution when handling its components, as the wiring may be delicate.
¶ 🛠️ Troubleshooting Steps
¶ Scenario 1: Drive gear is slipping
As a critical component of the extruder, the drive gear feeds filament into the nozzle through friction during printing. When the drive gear slips, the motor continues to rotate but fails to push the filament effectively, resulting in under-extrusion or intermittent extrusion. For example, the stepper motor may be instructed to feed 10 mm of filament, but due to insufficient friction between the drive gear and the filament, the filament advances only 8 mm or less, leading to a range of extrusion-related issues.
- The drive gear is located inside the extrusion unit of the toolhead. During the initial troubleshooting stage, you do not need to disassemble the extrusion unit. You can observe part of the gear assembly from the right side of the toolhead.
- After unloading the filament, verify the operating status of the drive gear by performing an extrusion test.
- On the touchscreen home screen, go to Control Page >
Toolheads> Select the toolhead to be inspected >Nozzle Temp.
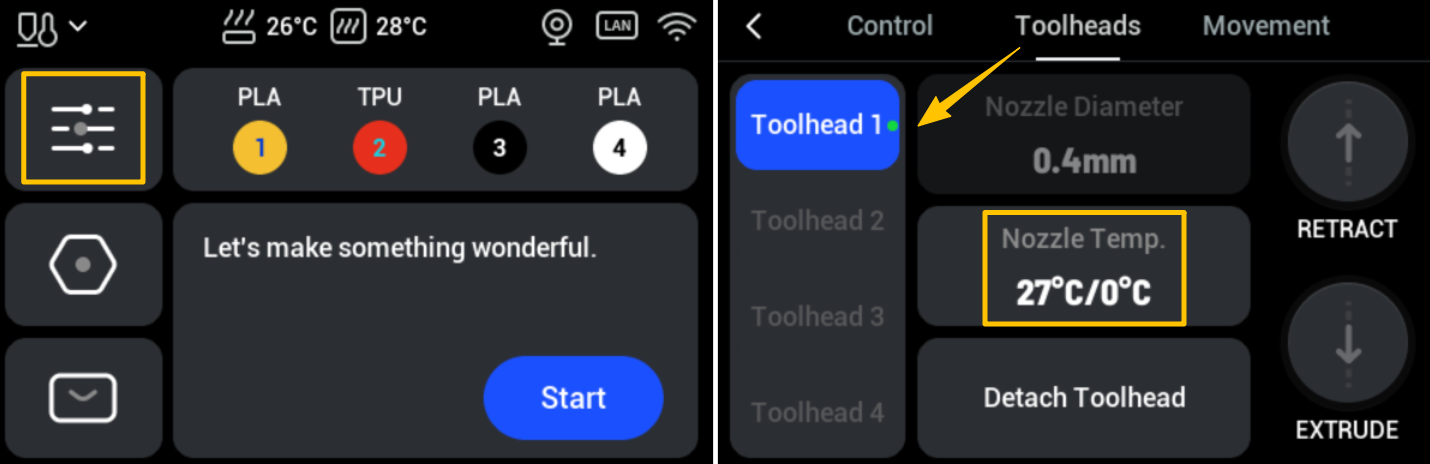
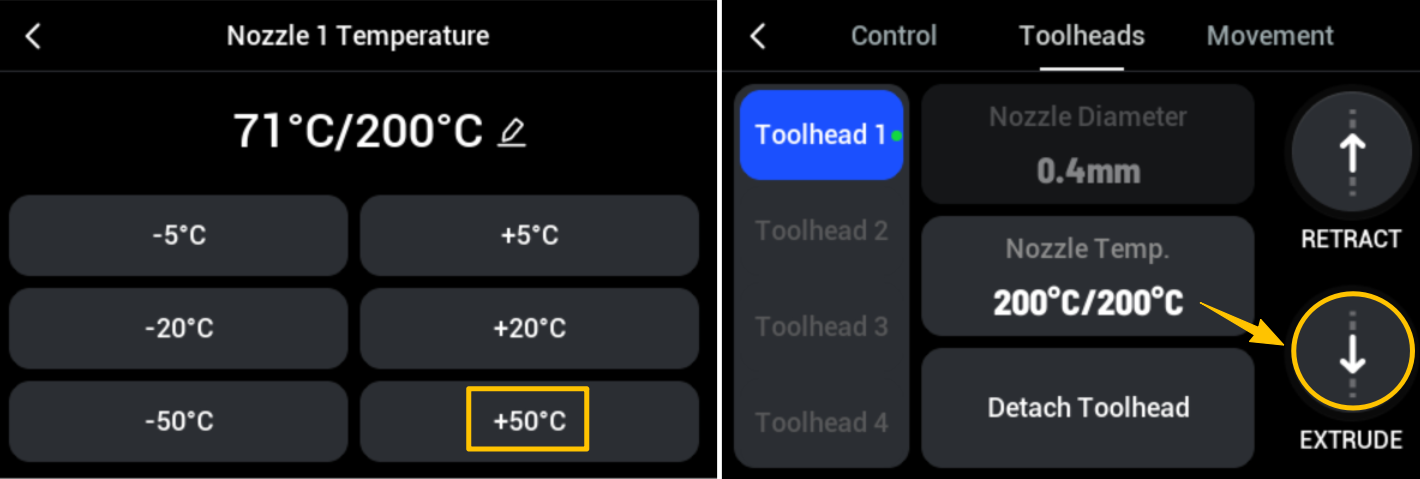
- Increase the temperature of the corresponding nozzle to 200°C. Once heating is complete, return to the previous page and tap
EXTRUDE.
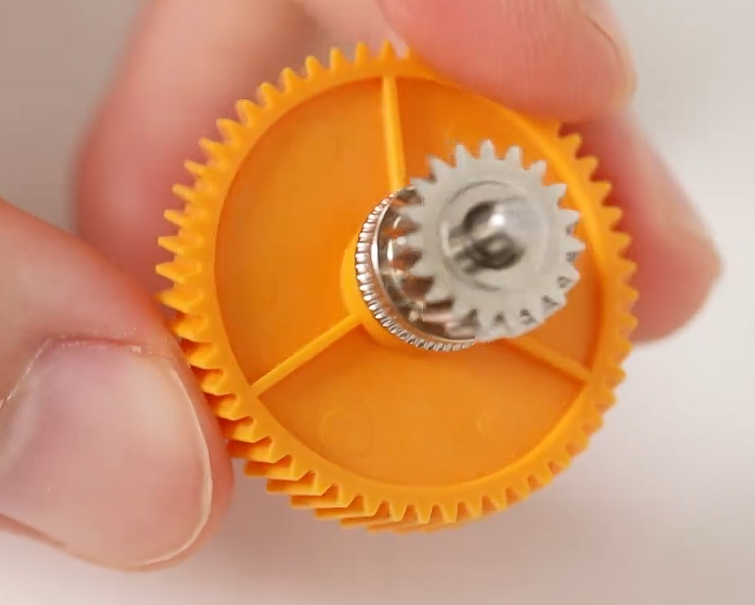
- Then, move to the right side of the printer and observe the gears:
- If the yellow gear rotates while the silver gear on the left remains stationary, the drive gear is slipping. Contact technical support to replace the drive gear assembly, and refer to U1 active extruder gear assembly replacement guide to complete the procedure.
- If all drive gear assemblies rotate synchronously, the mechanical transmission is functioning properly. Continue troubleshooting Scenario 2.
¶ Scenario 2: Hot End Blockage
The core components of the U1 hot end, from top to bottom, are the heatsink, heatbreak, heater block, and nozzle. A blockage at any point can obstruct the filament path and result in extrusion failure.
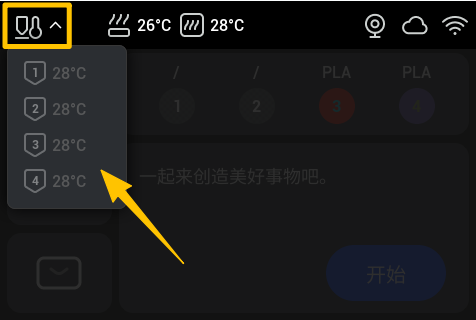
- After unloading the filament, check the temperature of the corresponding nozzle in the upper-left corner of the touchscreen. Once it has cooled below 40°C, proceed to the next step.
- On the touchscreen home screen, go to Control Page >
Toolheads> Select the toolhead to be inspected >Detach Toolhead.
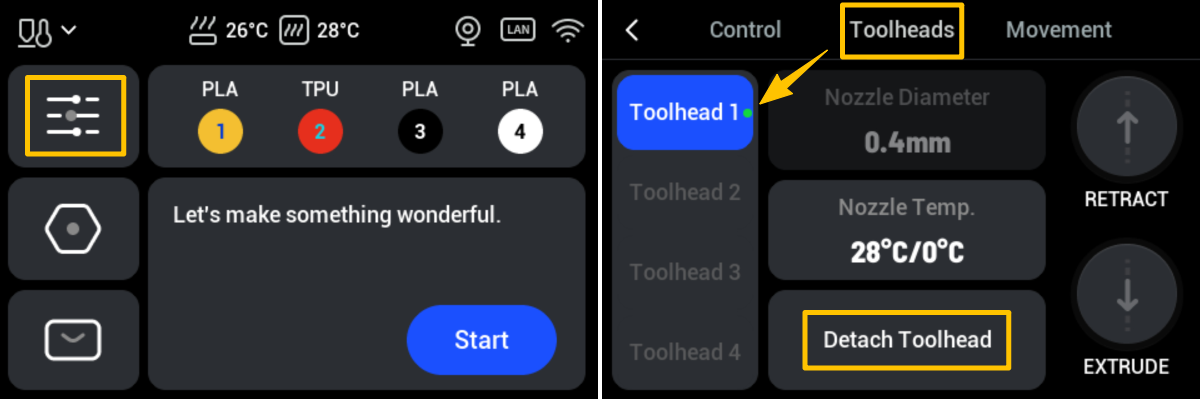
Be sure to turn off the power before proceeding with the next step.
- Using an H2.0 hex key, loosen the three screws indicated in the illustration and remove the toolhead top cover. Then, remove the toolhead from the docking station.

- Remove the hot end. Refer to the U1 Video Guide: Abnormal Extrusion/Air Printing Troubleshooting for instructions.
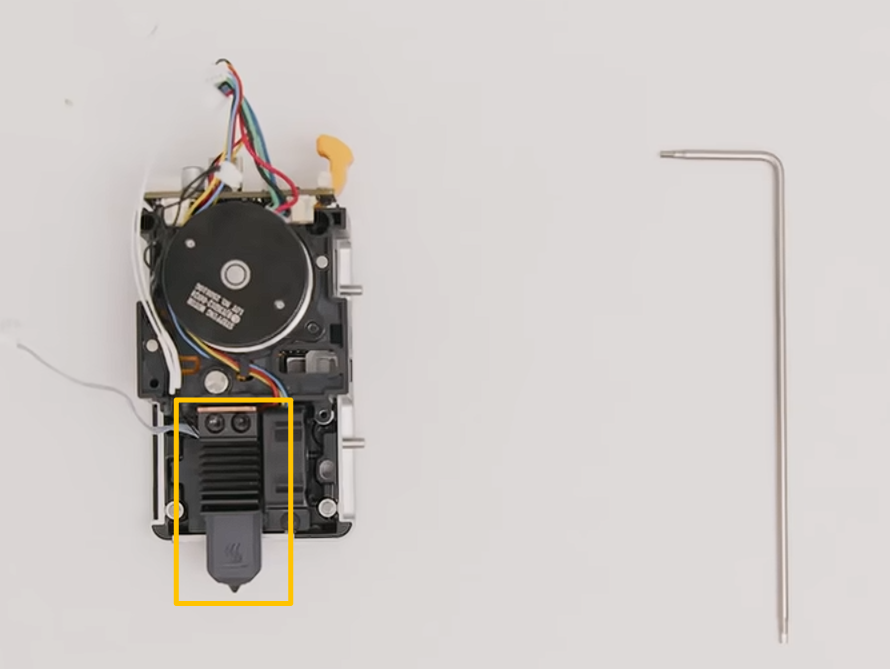
- Inspect the entire hot end filament path for any residue filament.
Hot end inlet blockage
The hot end inlet refers to the top of the heatbreak or the connection between the heatbreak and the heatsink. First, check this area for any debris.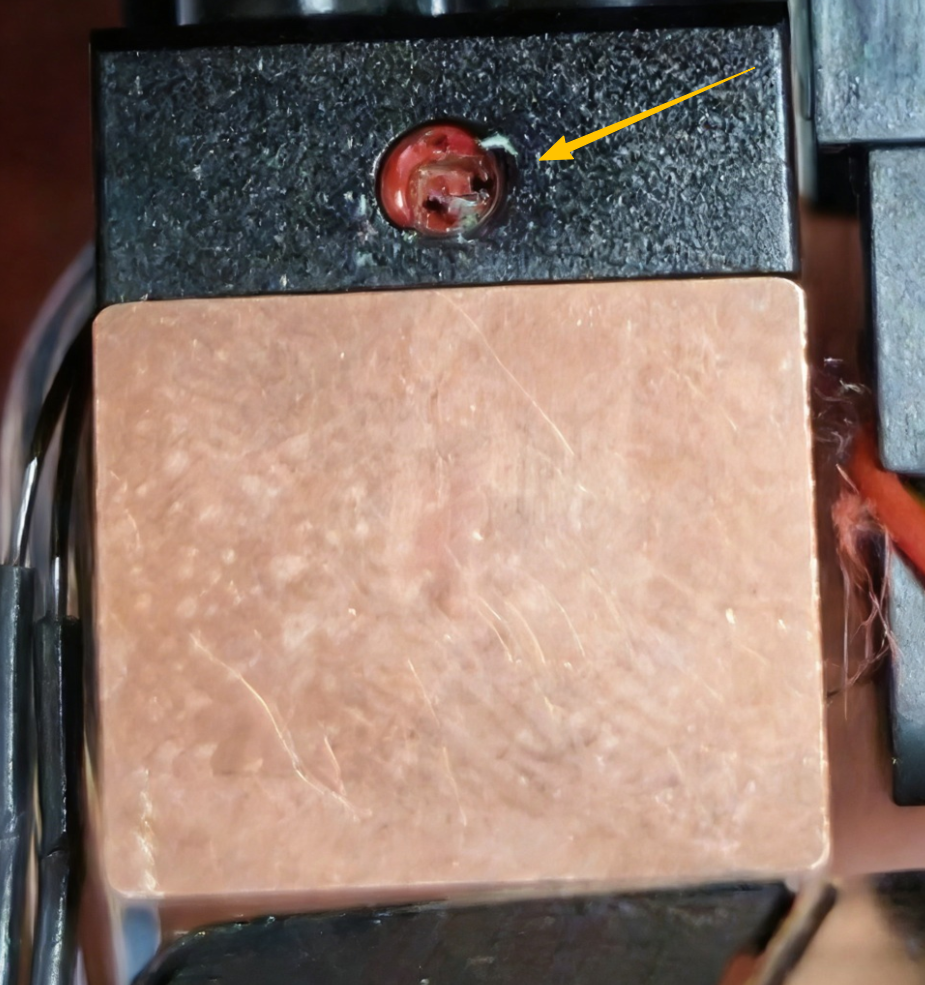
- If residual filament is present, remove it using a hard, pointed tool, such as the tip of diagonal pliers.
- If no debris is found, continue troubleshooting further down the filament path.
Heatbreak or nozzle blockage
The heatbreak is the narrow tube connecting the heatsink and the heater block, while the nozzle is the outlet at the end of the hot end assembly. Insert the cleaning needle through the hot end inlet toward the nozzle and observe:- If you encounter significant resistance or the cleaning needle cannot pass through the nozzle, a blockage is present. Follow the steps below to clear it.
Wear heat-resistant gloves during this procedure to avoid burns from the hot nozzle.
(1)Reinstall the hot end and use the touchscreen to heat the nozzle to approximately 10–20°C above the filament's recommended printing temperature.
(2)Once the target temperature is reached, gently insert the cleaning needle through the nozzle opening and move it up and down repeatedly to help remove any residual material.
(3)After cleaning, set the nozzle temperature to 0°C and wait for the hot end to cool down.
- If the cleaning needle passes through the nozzle smoothly, there is no blockage. Continue troubleshooting the next scenario.
If the blockage cannot be cleared, you may replace the hot end with a spare one. Refer to the U1 Video Guide: Ceramic Heater & NTC Thermistor Replacement to transfer the original thermistor and ceramic heater to the replacement hot end.
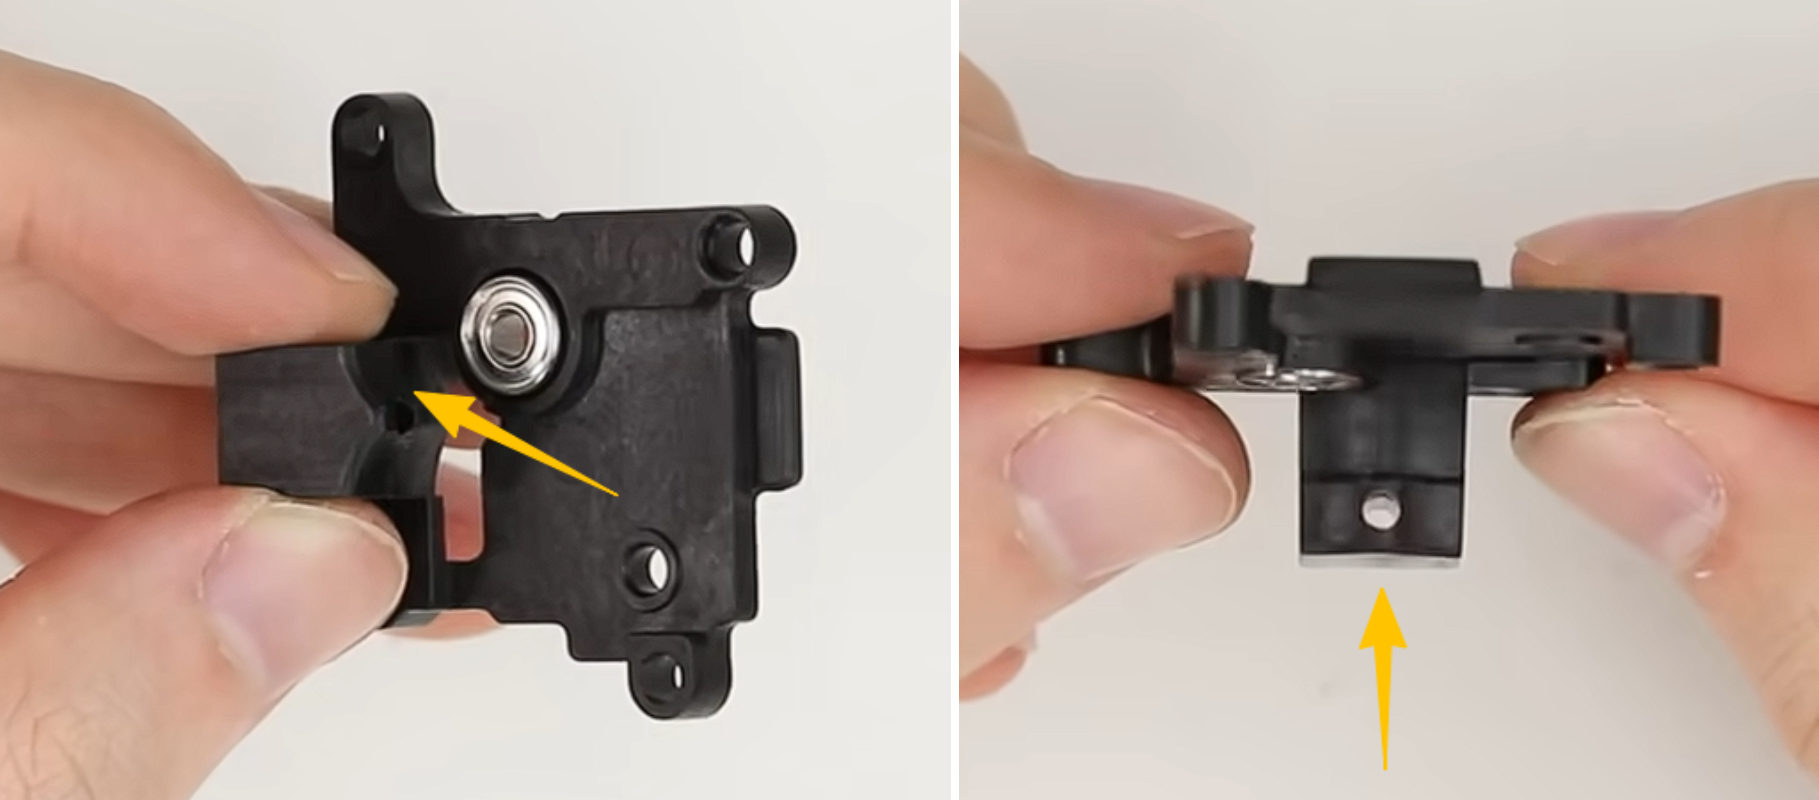
¶ Scenario 3: Debris at the extruder bearing housing
The extruder bearing housing stabilizes the rotation shaft of the driven gear and provides consistent, smooth pressure to keep the filament firmly engaged. If the extruder bearing housing malfunctions, it can directly affect feeding stability and lead to a range of extrusion-related issues.
- You can refer to the U1 Video Guide: Abnormal Extrusion/Air Printing Troubleshooting to disassemble the extrusion unit.
During disassembly, take care not to lose the bearing highlighted in the boxed area of the illustration.
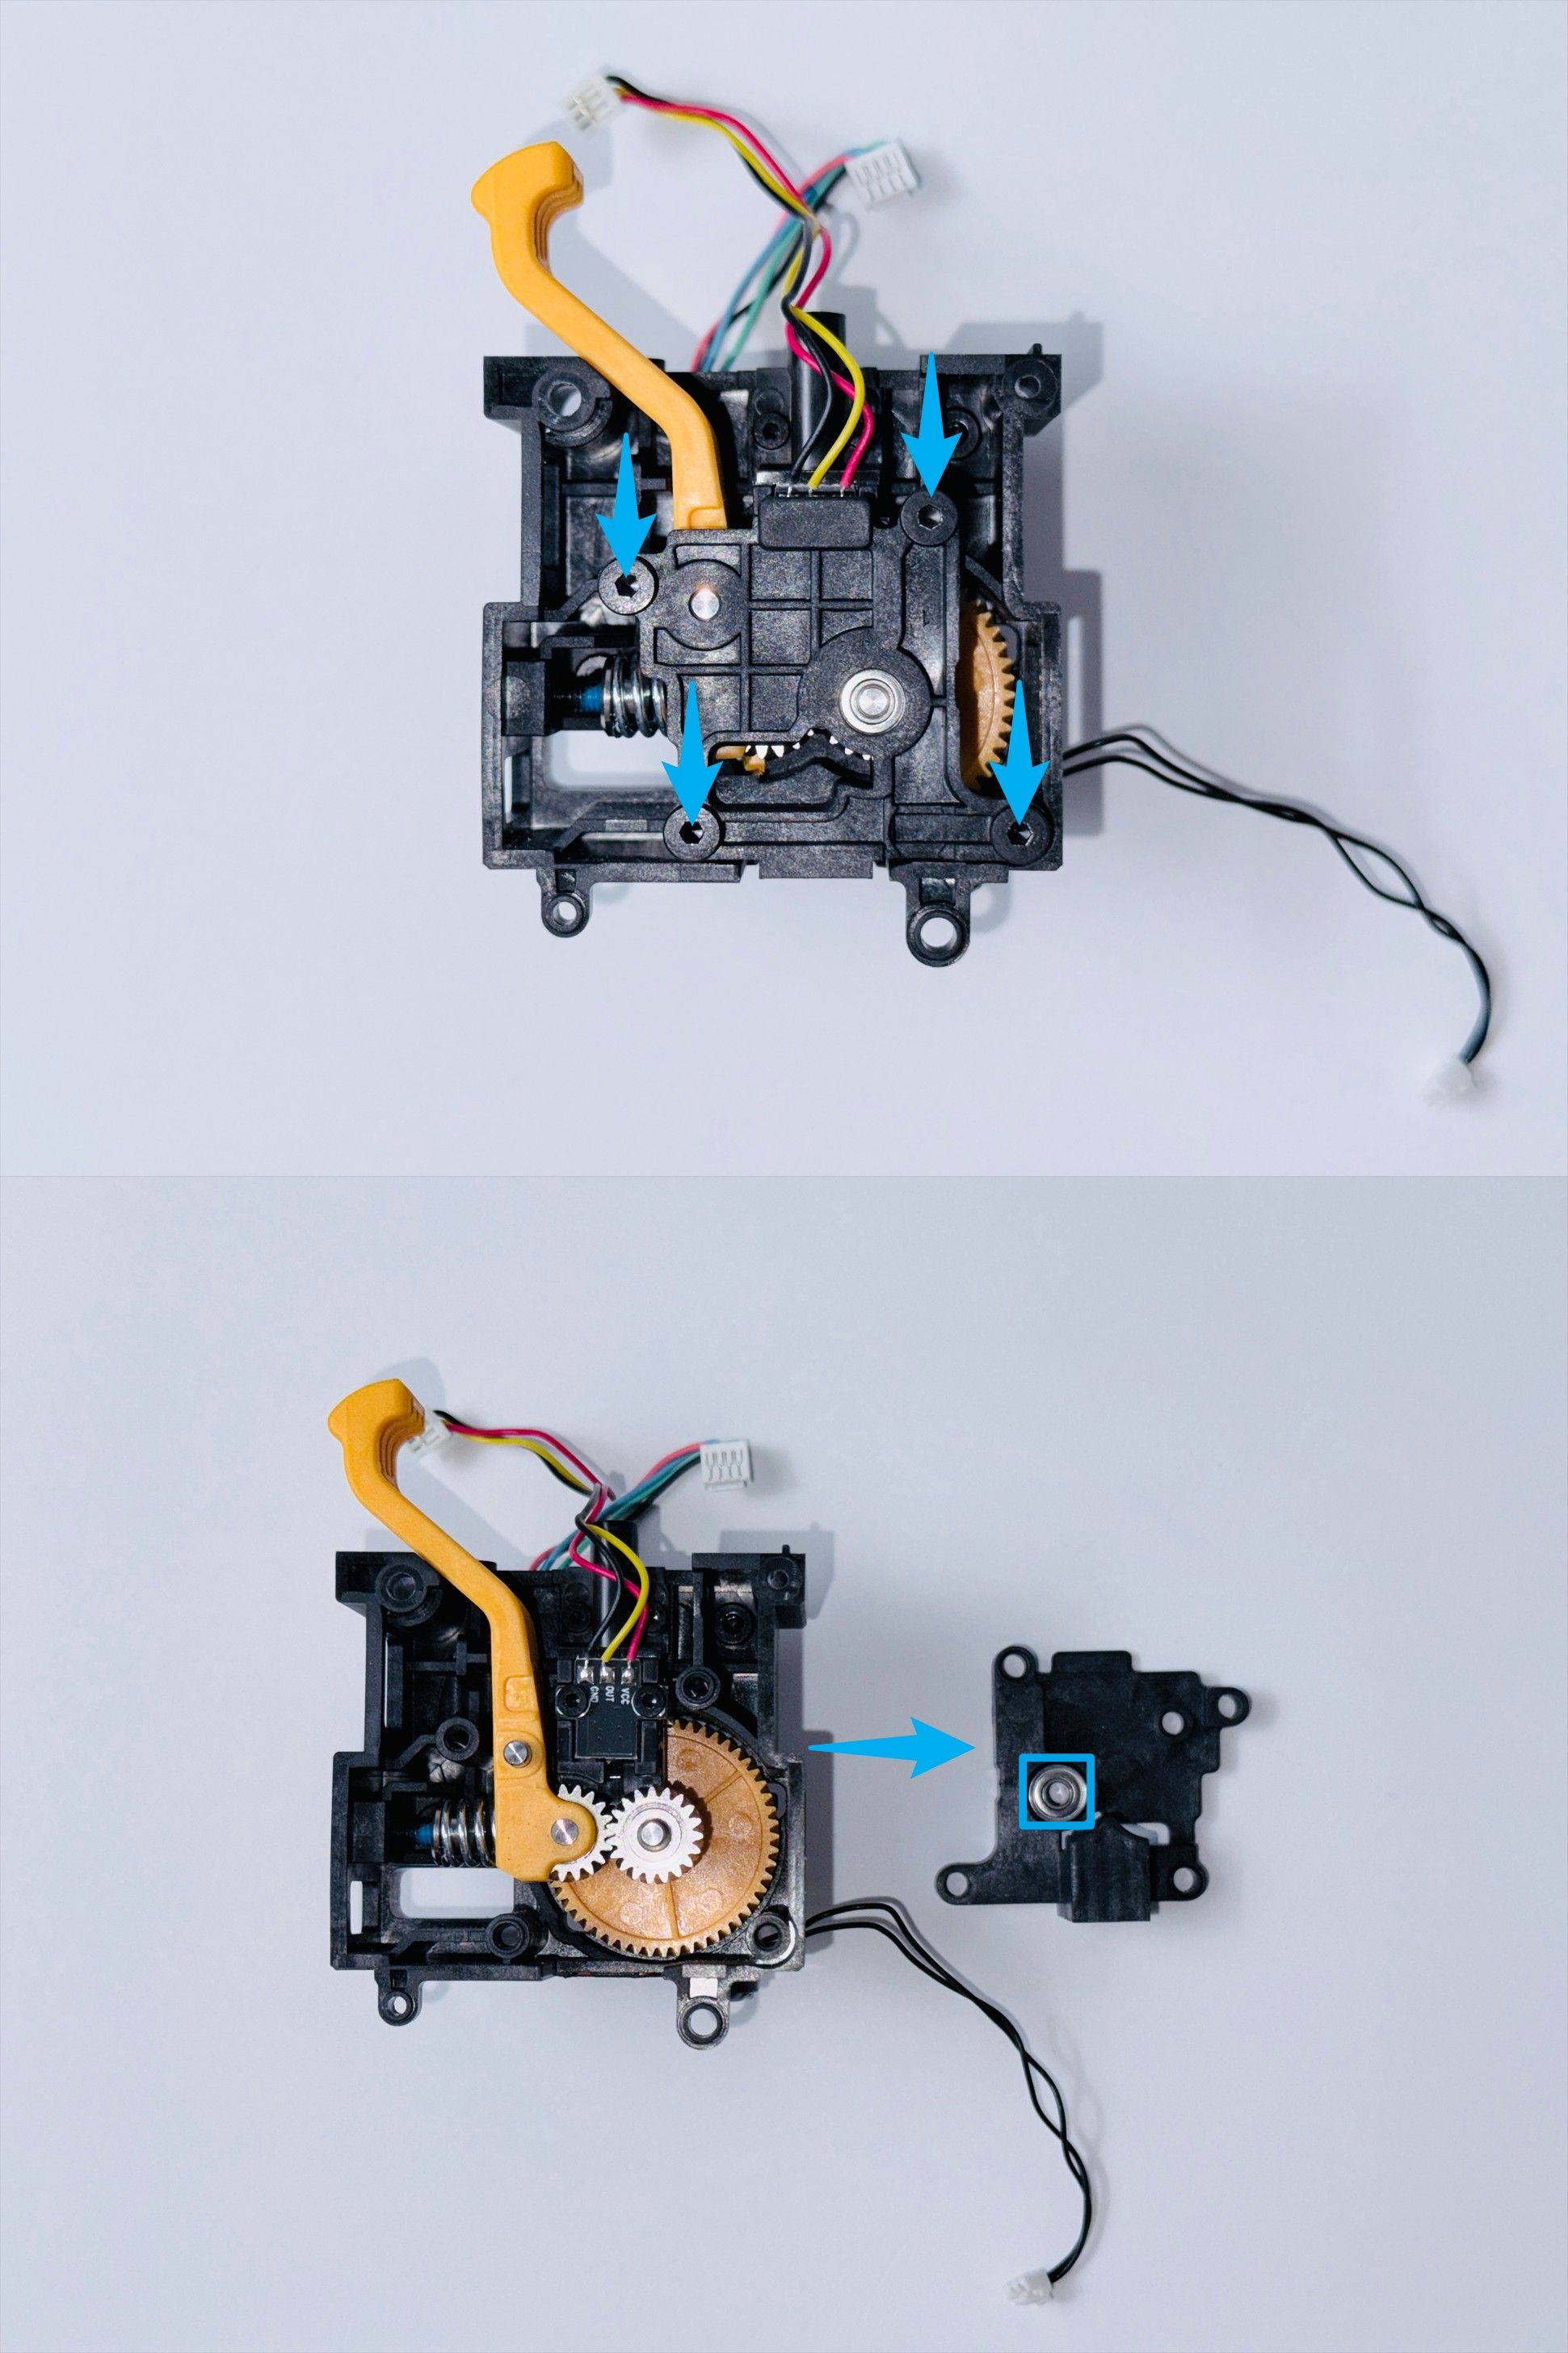
- Inspect the housing.
- If any residual filament is found, remove it promptly.
- If no residual filament is present and the inlet is clear, continue troubleshooting Scenario 4.
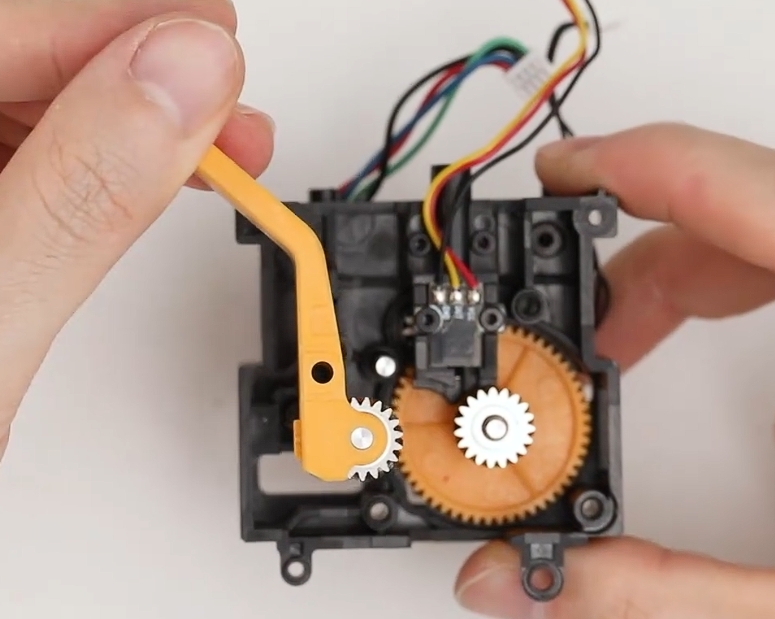
¶ Scenario 4: Debris at the driven gear
The driven gear provides stable and smooth clamping force, ensuring that the drive gear can feed the filament accurately. If the driven gear malfunctions, it may cause filament slipping or poor extrusion.
- The driven gear is located inside the extrusion unit of the toolhead. Continuing from the previous step, remove the driven gear assembly from the extrusion unit.
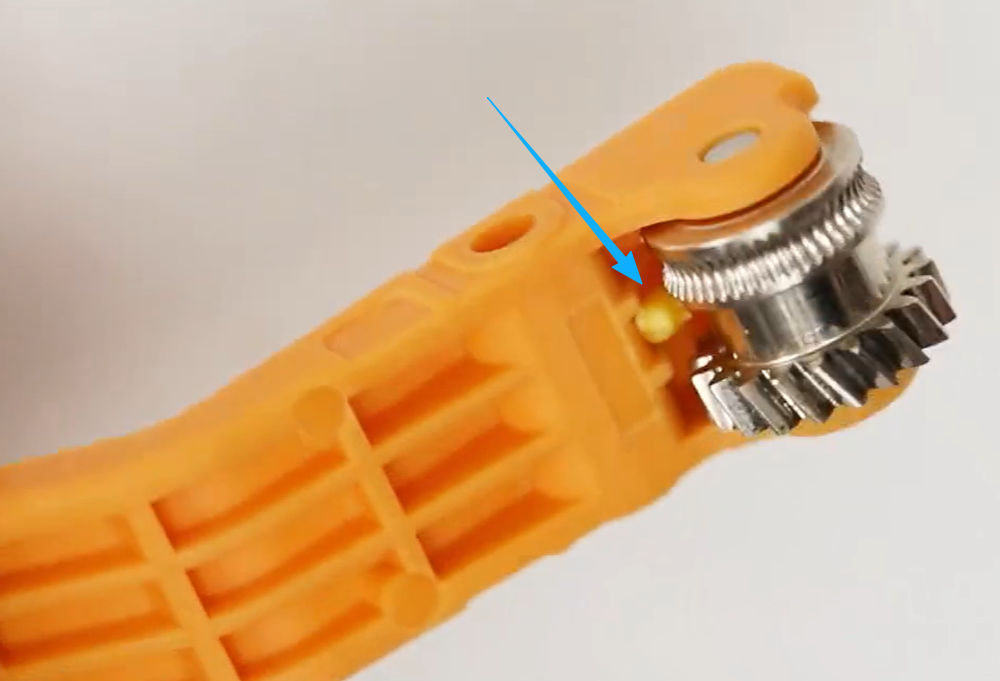
- Inspect the driven gear.
-
If any debris is lodged between the driven gear and the driven gear holder, use an appropriate tool to remove it.
-
After clearing the debris, check again to ensure that the driven gear rotates freely.
¶ ✅ Verification
- Assemble the extruder using relevant guide mentioned above.
- Complete filament preloading using either Automatic Loading or Manual Loading.
- Heat the nozzle to approximately 10–20°C above the filament's recommended printing temperature.
- Observe the filament extrusion. If the extruded filament is consistent, straight, and smooth, the issue has been successfully resolved.
¶ 📚 Related Resources
- U1 active extruder gear assembly replacement guide.
- U1 hot end replacement guide
- U1 filament runout sensor replacement guide
- U1 Video Guide: Abnormal Extrusion/Air Printing Troubleshooting
- U1 Video Guide: Ceramic Heater & NTC Thermistor Replacement
- Automatic Loading
- Manual Loading
¶ 💬 Reach out to Snapmaker Support
After following the troubleshooting steps, if you find it difficult to resolve your issue, kindly submit a support ticket through https://snapmaker.formcrafts.com/u1-troubleshooting-request and share your troubleshooting results with some pictures/videos.
Our dedicated support team will be more than willing to assist you in resolving the issue.