¶ Before You Start
¶ 1.1 Disclaimer
Make sure that anyone who uses this product knows and understands the contents of the Quick Start Guide. Failure to observe this guide may lead to personal injury, inferior results, or damage to the Snapmaker products. Snapmaker does not assume responsibility and expressly disclaims liability for any personal injury, inferior results, or damage to the product arising out of or in connection with your improper operations or failure to follow the instructions of the guide.
The conditions or methods of using Snapmaker products are beyond the control of Snapmaker. For this reason, Snapmaker does not assume responsibility and expressly disclaims liability for any consequences resulting from:
- your improper methods, failure to follow the instructions of this guide or impacts of other uncertain factors when operating this product;
- personal injury, inferior results, or damage to the product arising out of or in connection with the assembly, handling, storage, use, maintenance, or disposal of this product.
This manual is provided for reference purposes only. We do not warrant the absolute accuracy or completeness of the information provided by this manual. No part of this guide may be reproduced, edited, or revised by any means without the prior written permission of Snapmaker. We reserve the right to modify or revise this manual in our sole discretion at any time without notice. You can download the most up-to-date version of this manual at our Support Center (https://support.snapmaker.com/): go to Modules & Addons > Quick Swap Kit > Quick Start Guide.
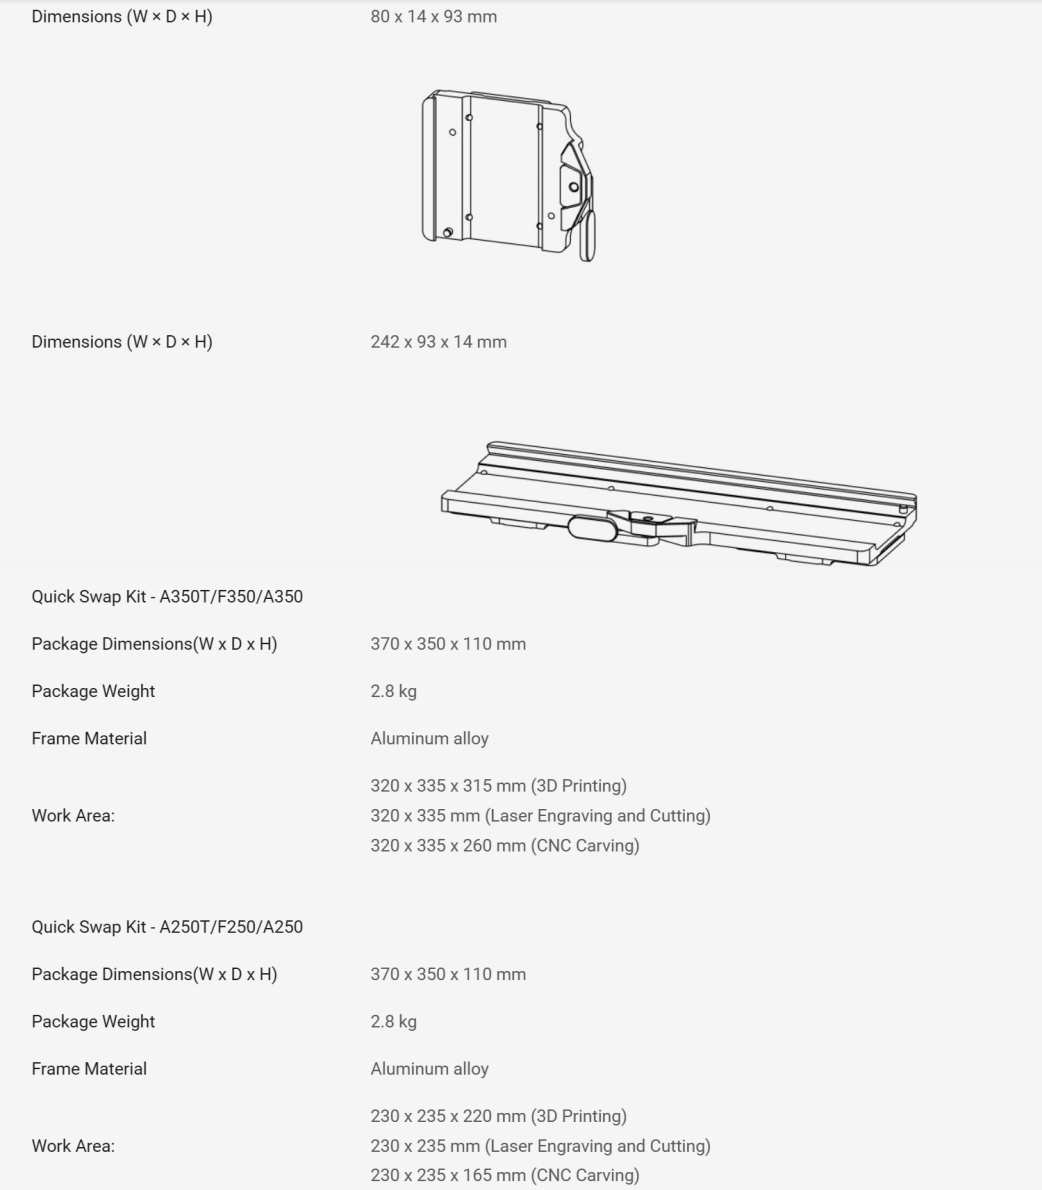
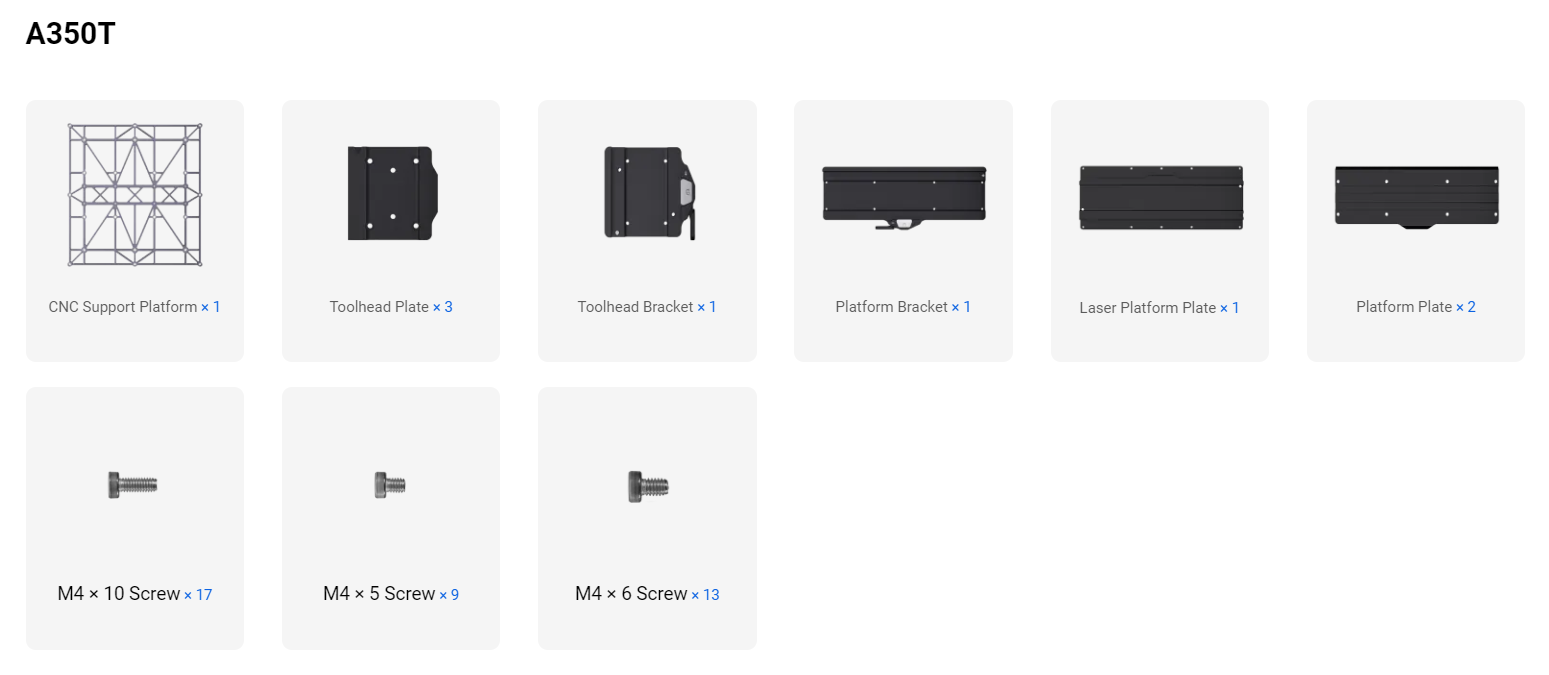
¶ 1.2 Specifications
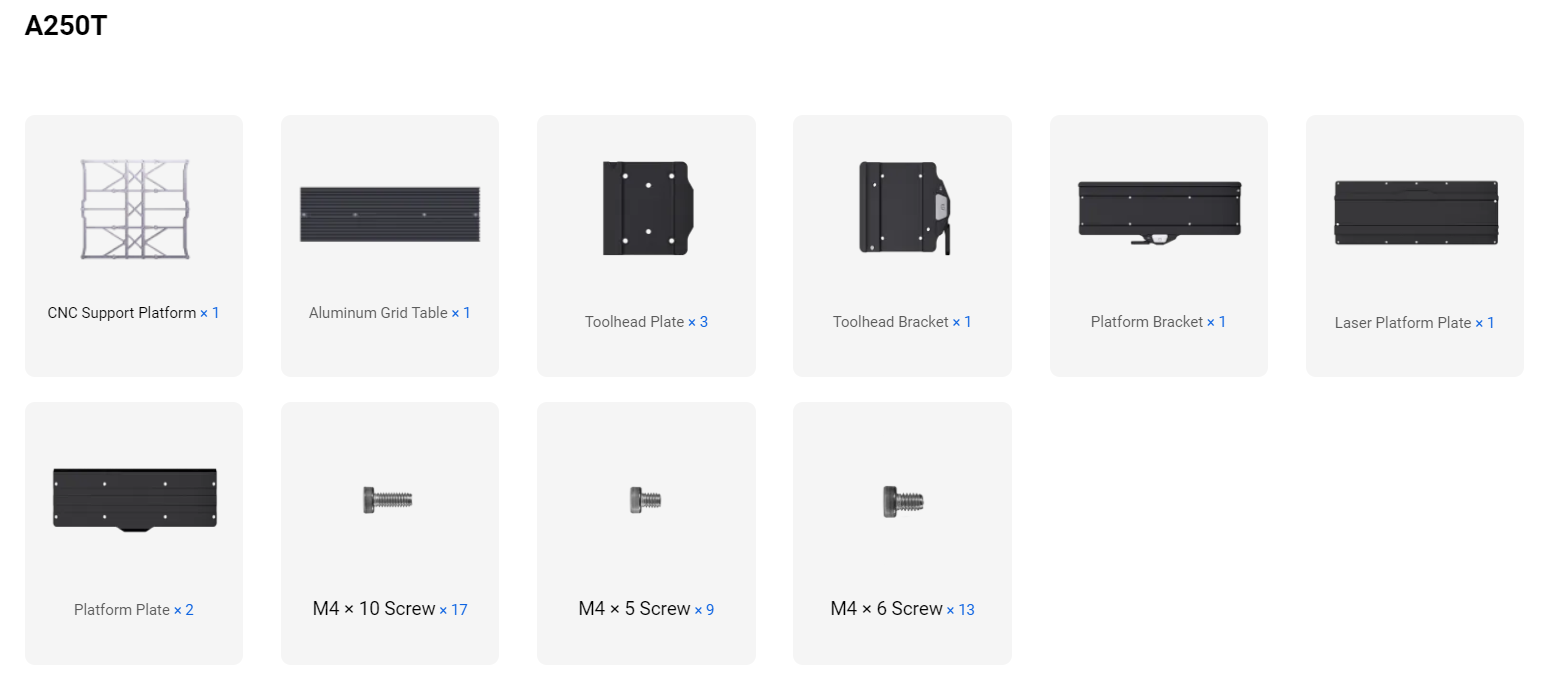
¶ 1.3 Parts List
Before shipment, we have pre-assembled one toolhead plate and one toolhead bracket, as well as one platform plate and one platform bracket.
Before shipment, we have pre-assembled one toolhead plate and one toolhead bracket, as well as one platform plate and one platform bracket.
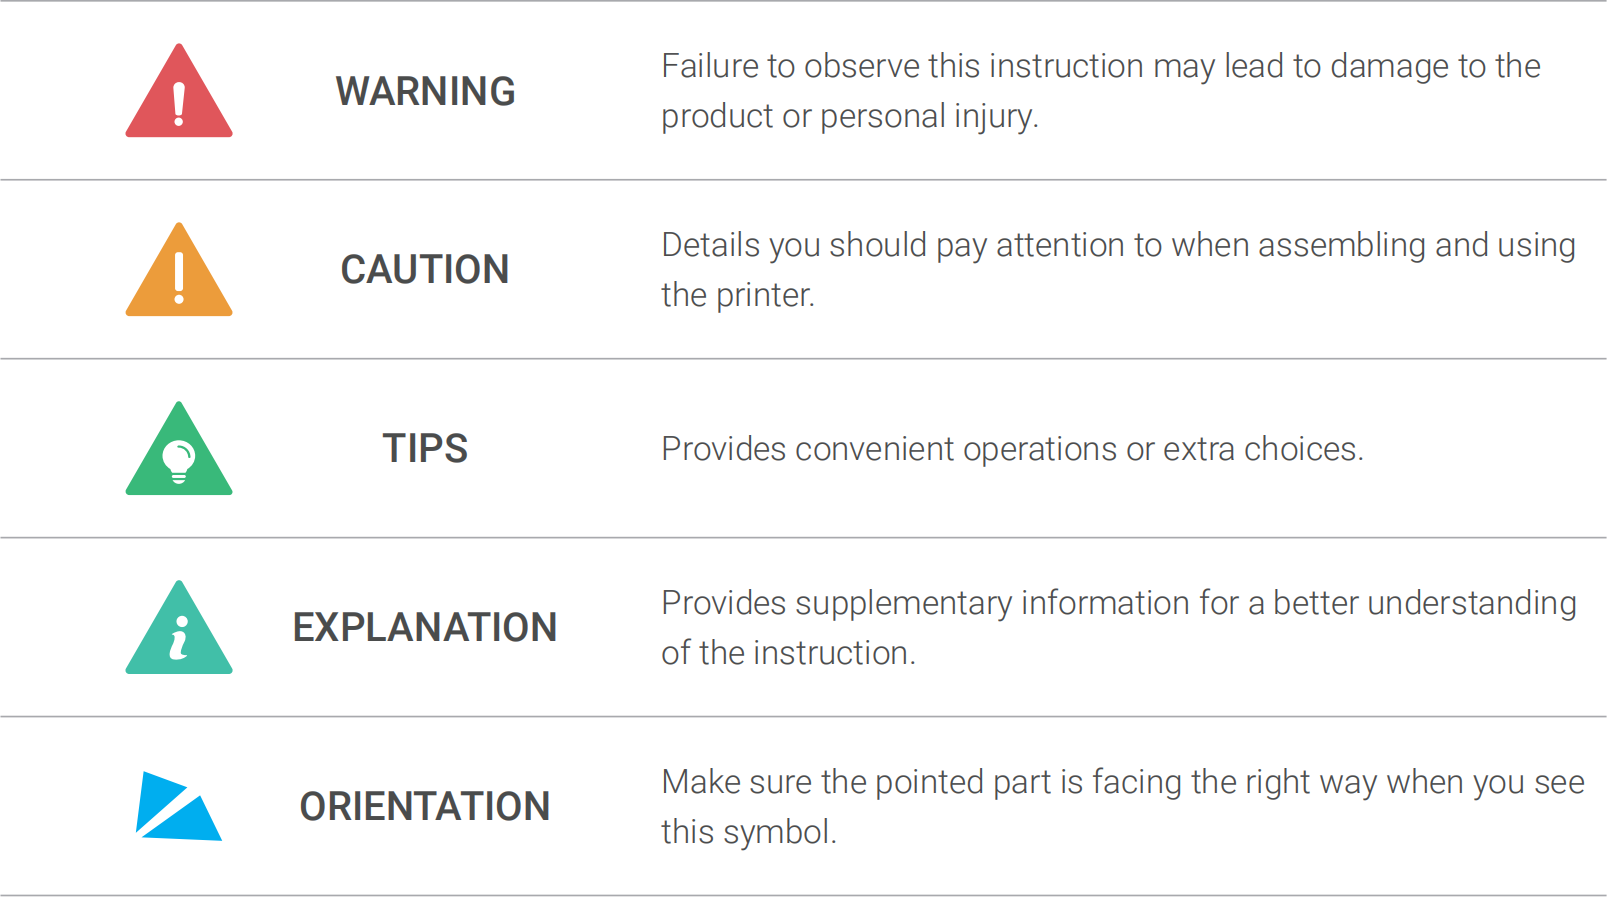
¶ 1.4 Used Symbols
¶ 1.5 Get the Screwdriver Ready
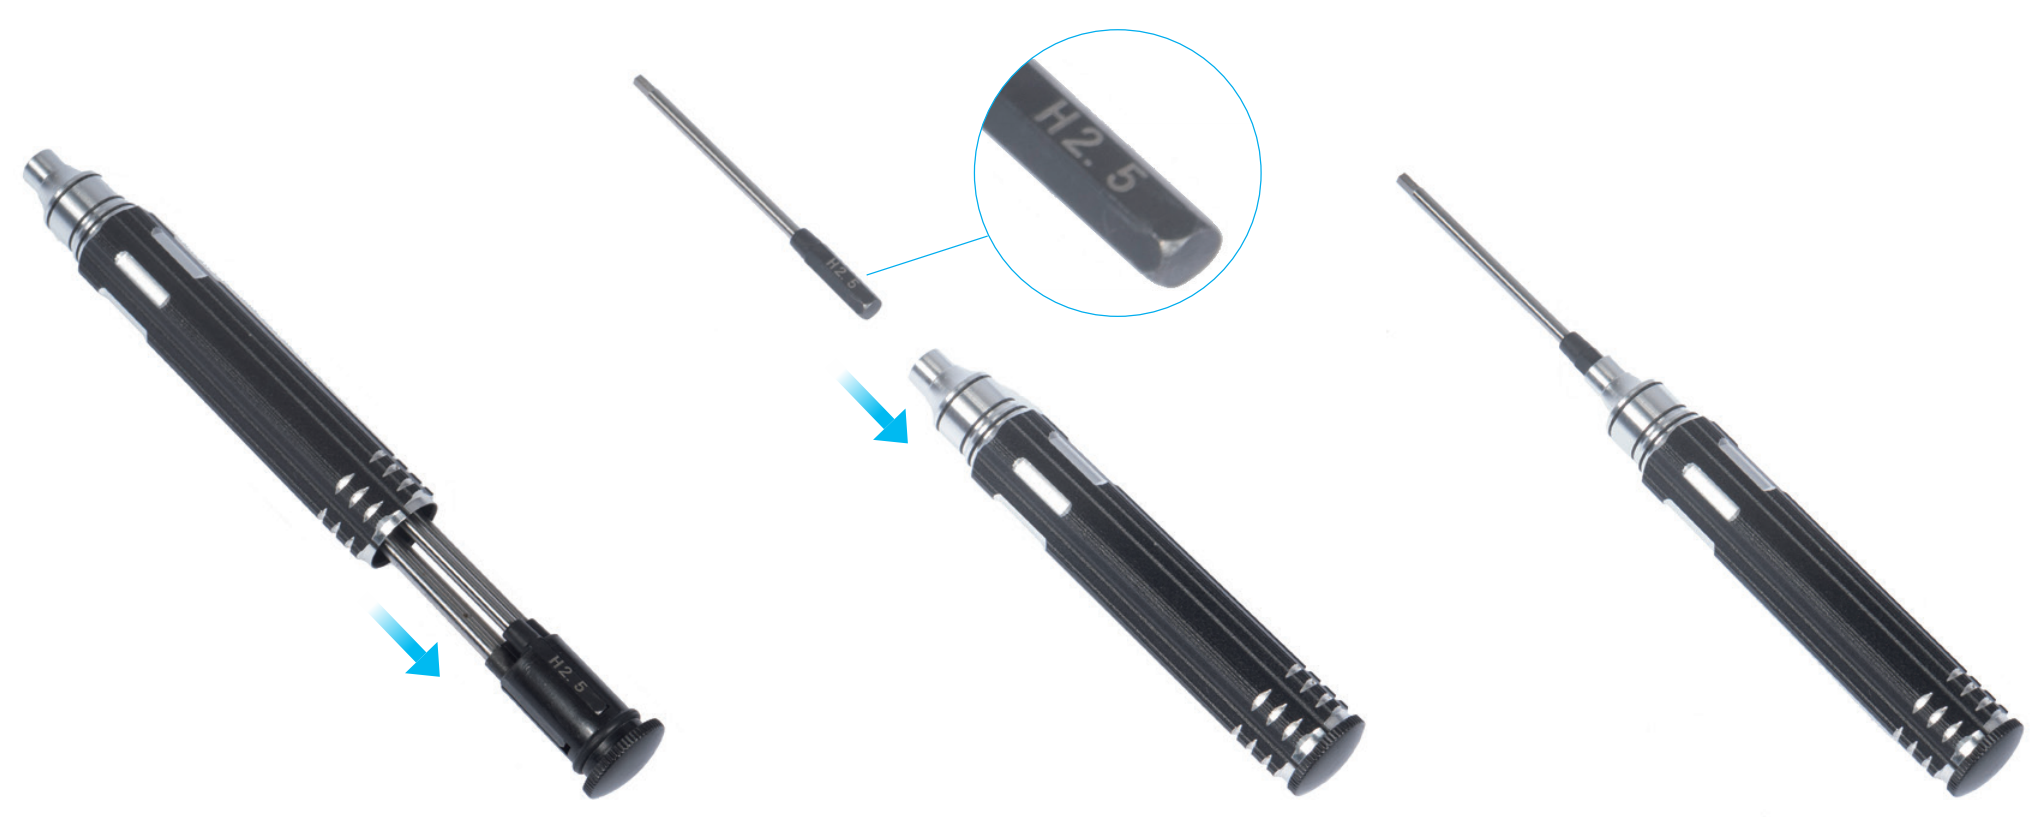
The screwdriver head H 2.5 is used for assembling the machine. The other heads are used for maintenance.
Make sure the screw head holder has been put back inside of the handle before use.
¶ Machine Assembly
- Turn on the machine.
- On the touchscreen, swipe left, then tap Controls > Jog Mode.
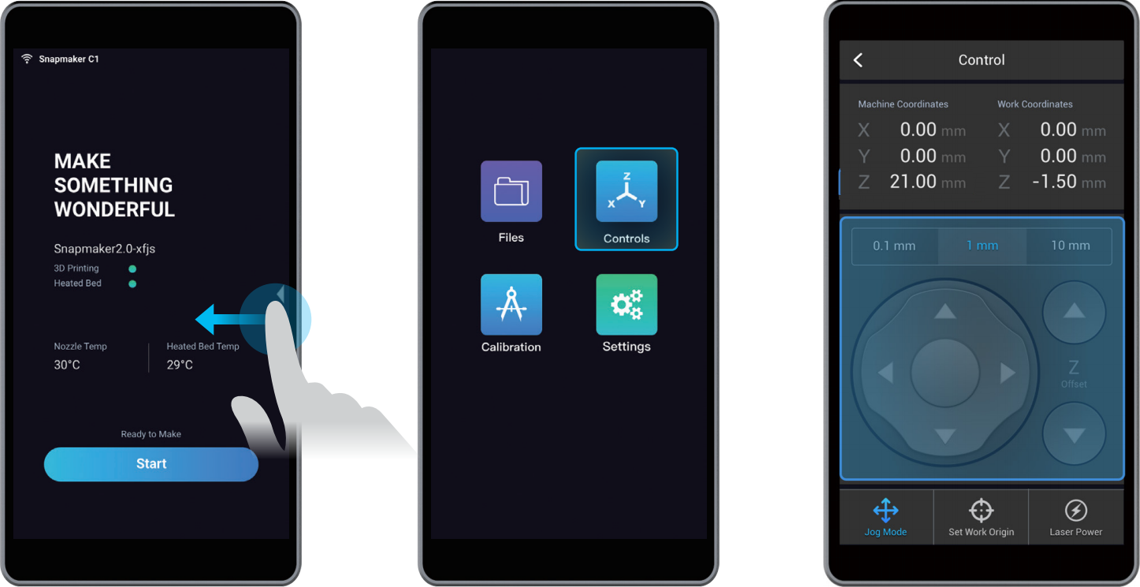
- Move the toolhead to the middle of the X axis, then align the support platform with the screw holes on the base plate.

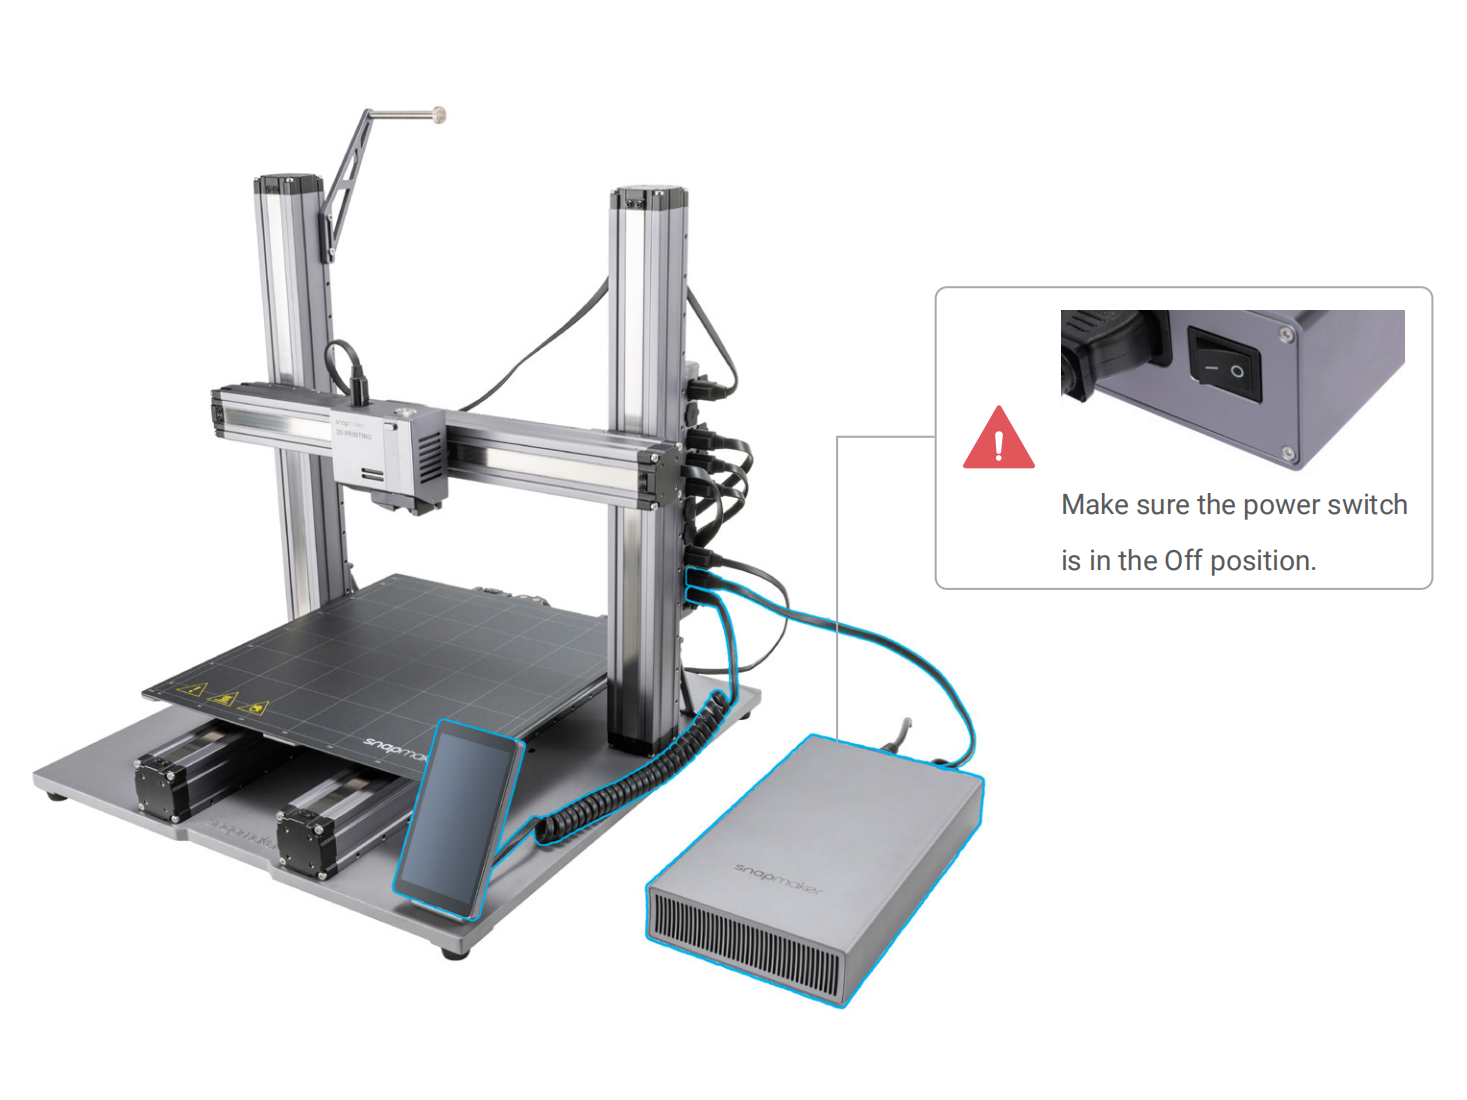
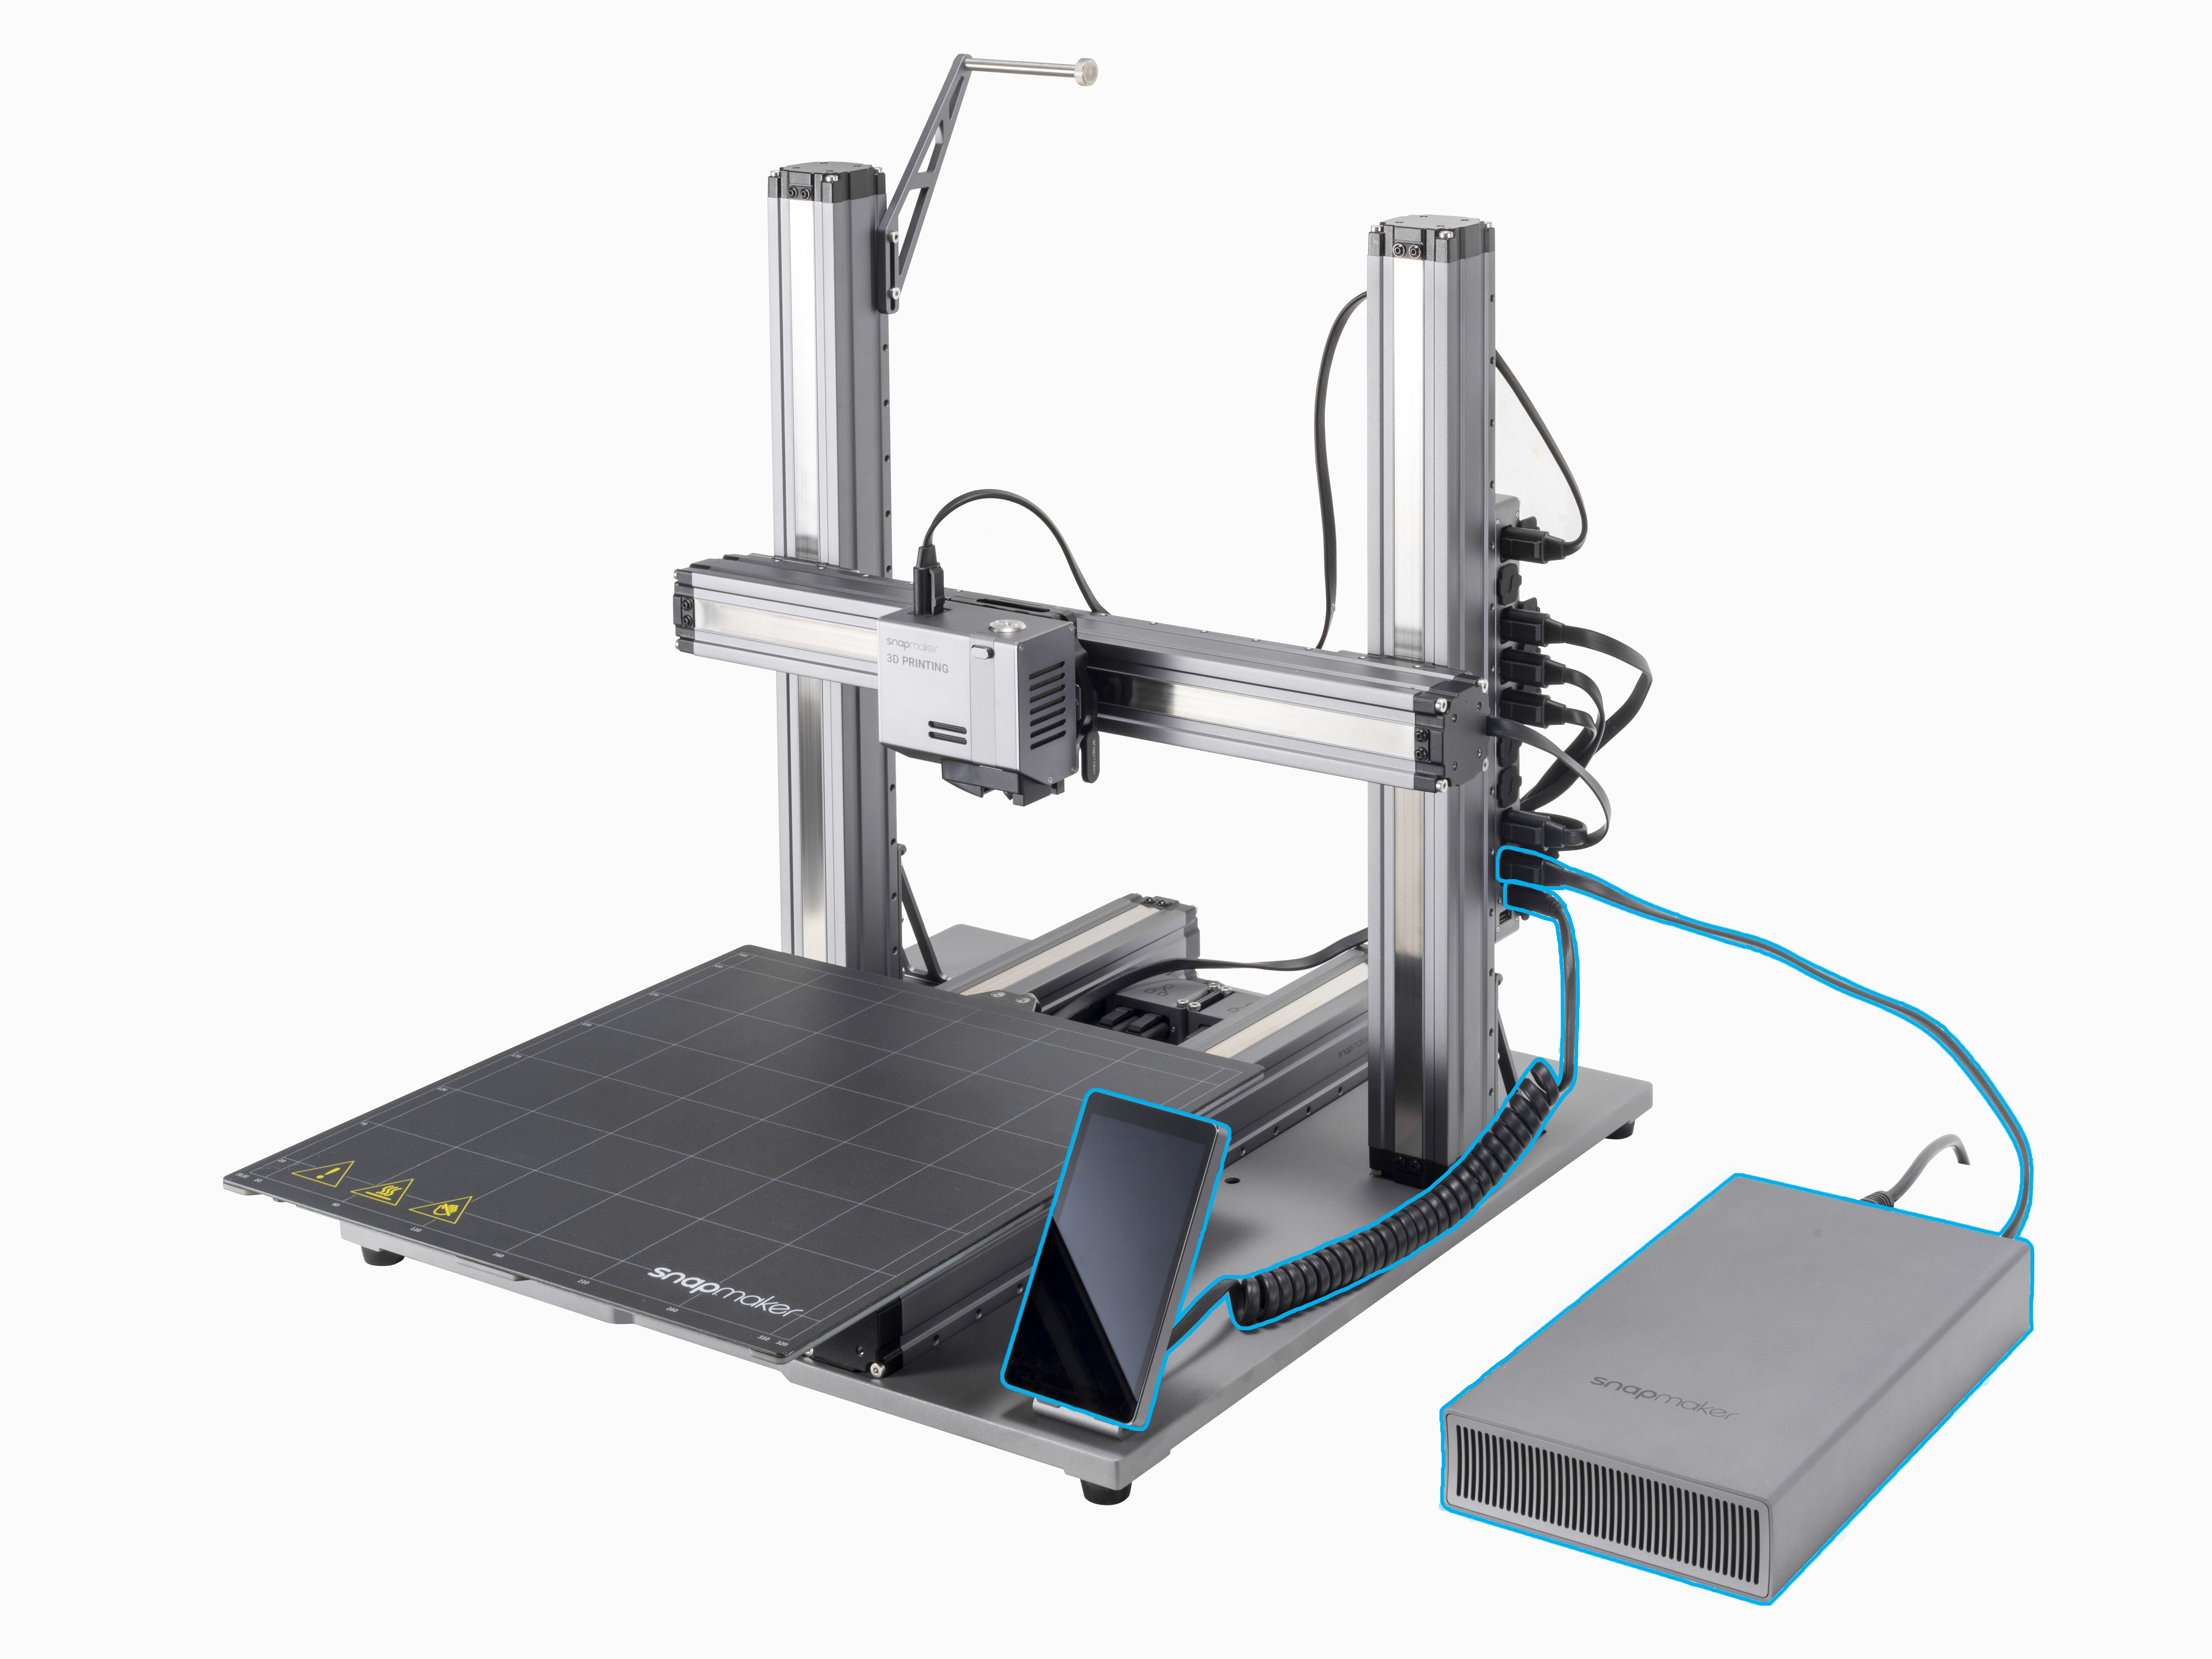
- Turn off the power switch, unplug the DC power cable and the touchscreen cable from the controller, remove the touchscreen.
If you have installed the enclosure, you need to:
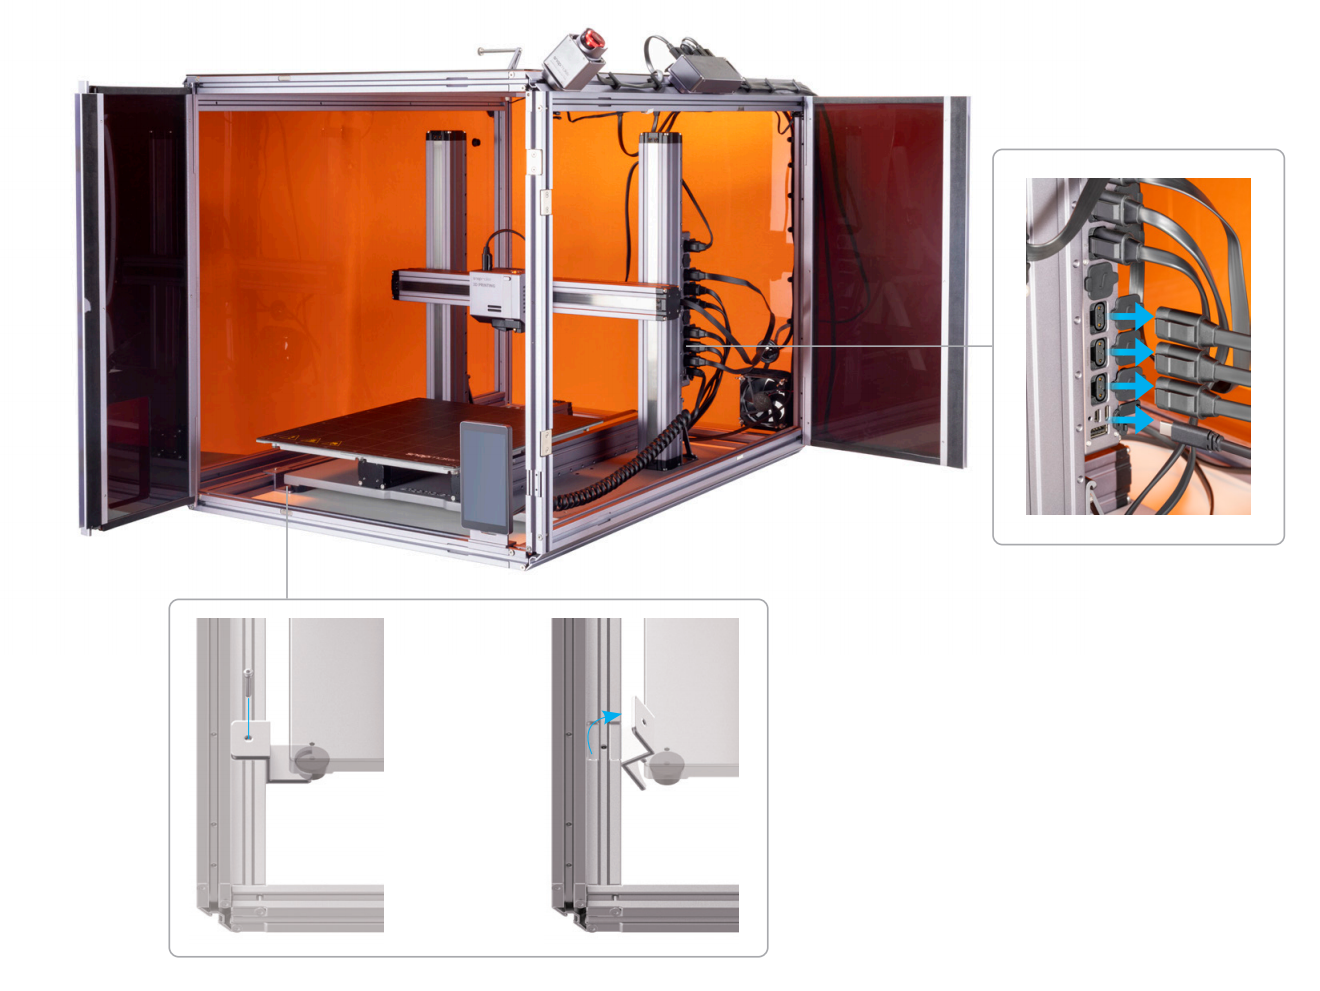
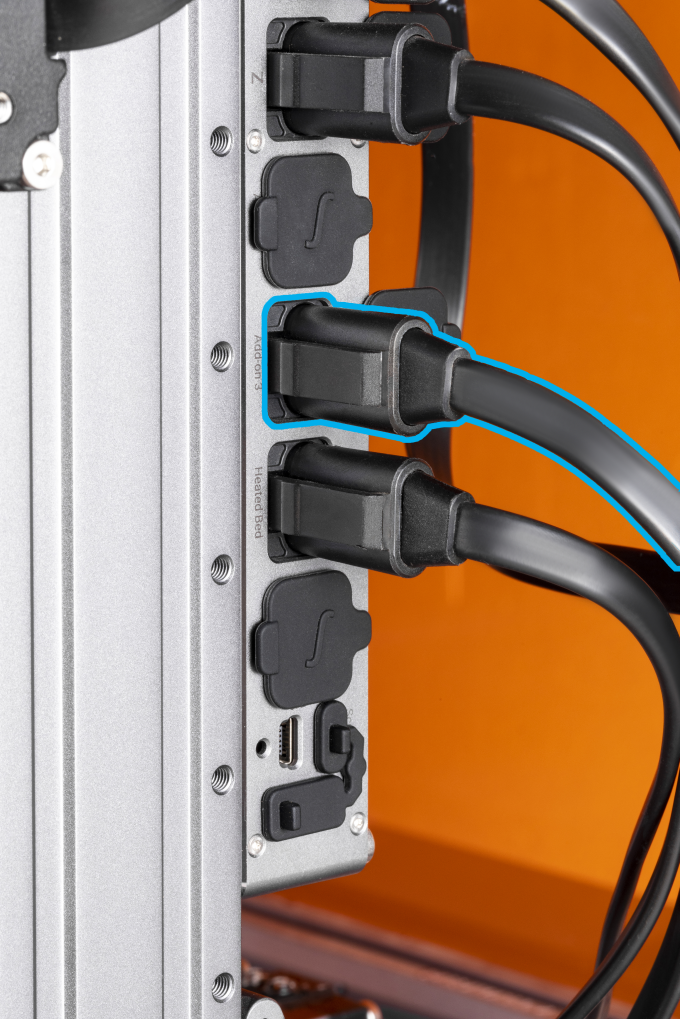
- Unplug the DC power cable, the touchscreen cable and the connecting cables in the Addon 3 port, then remove the touchscreen.
- Detach the foot fixtures, then remove the enclosure.
- Unplug the toolhead cable, then detach the toolhead.
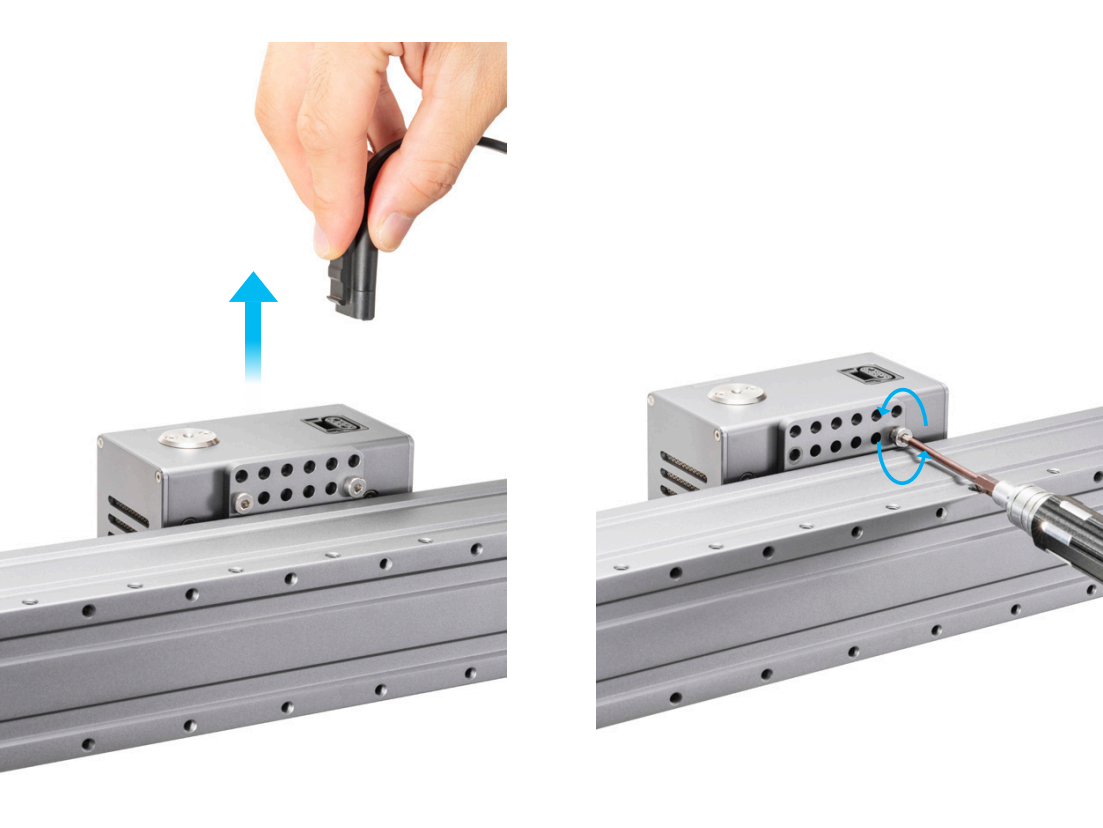
- Place the machine laterally, and disassemble the support platform.
If the screws on the slider are not aligned with the holes on the base plate, please move the support platform to the appropriate position.
If your machine is installed with 3D printing module, you can simply unplug the heated bed instead of disassemble the heated bed.
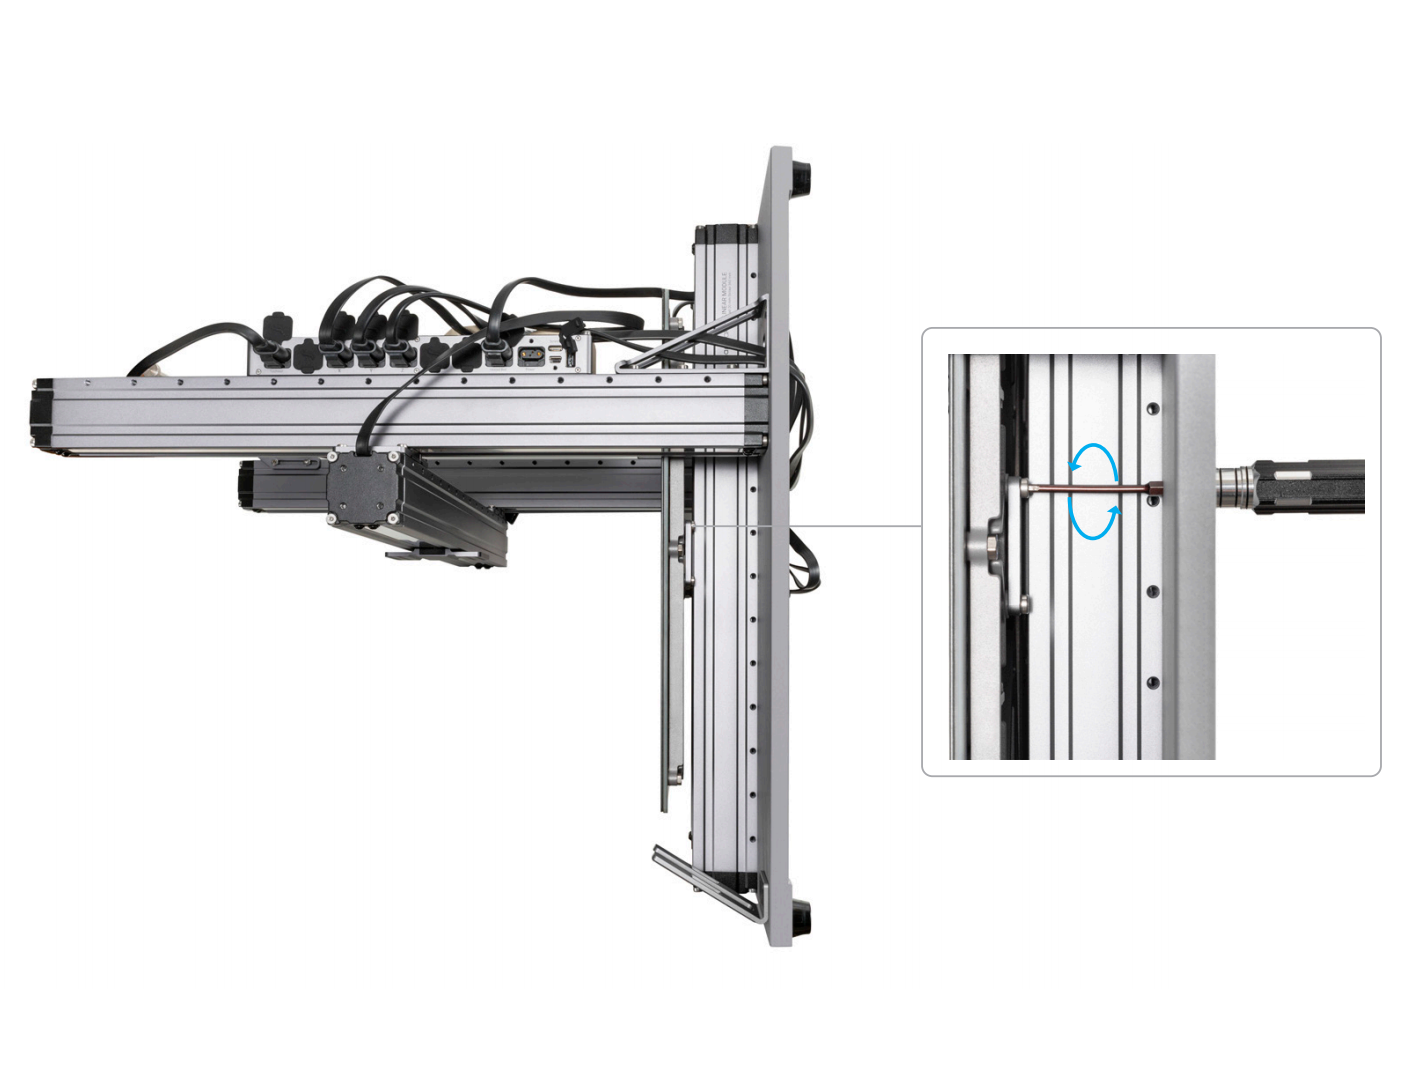
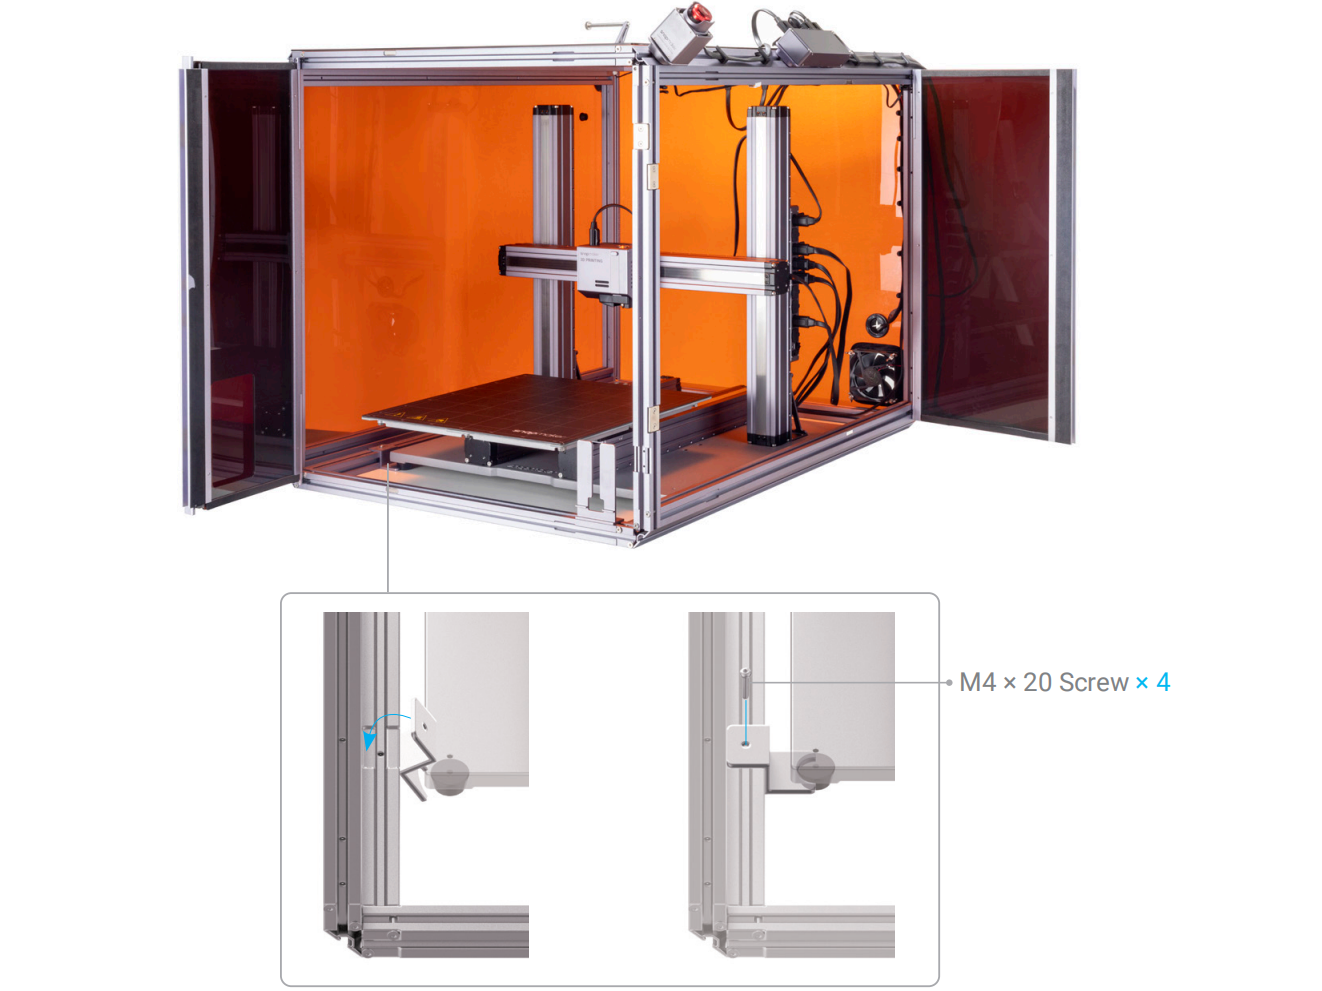
- Replace the machine, then attach the platform bracket to the Y axes.
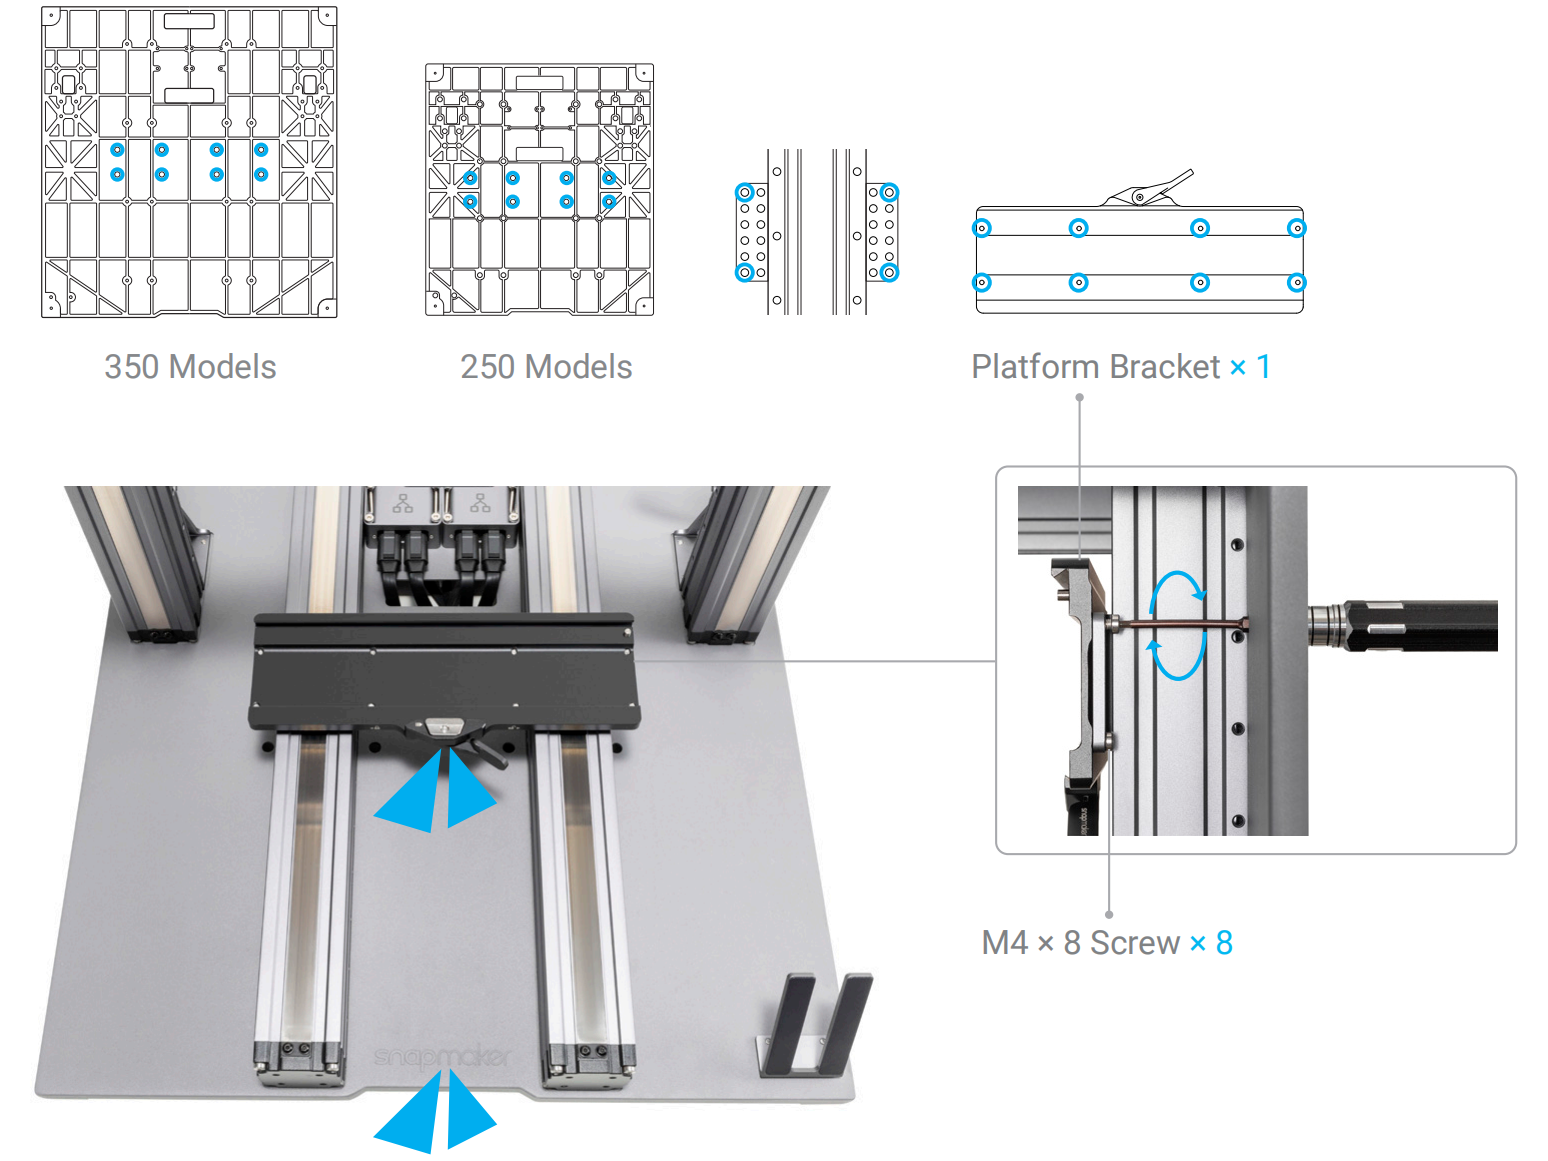
Use the original M4 × 8 screws that came with the machine.
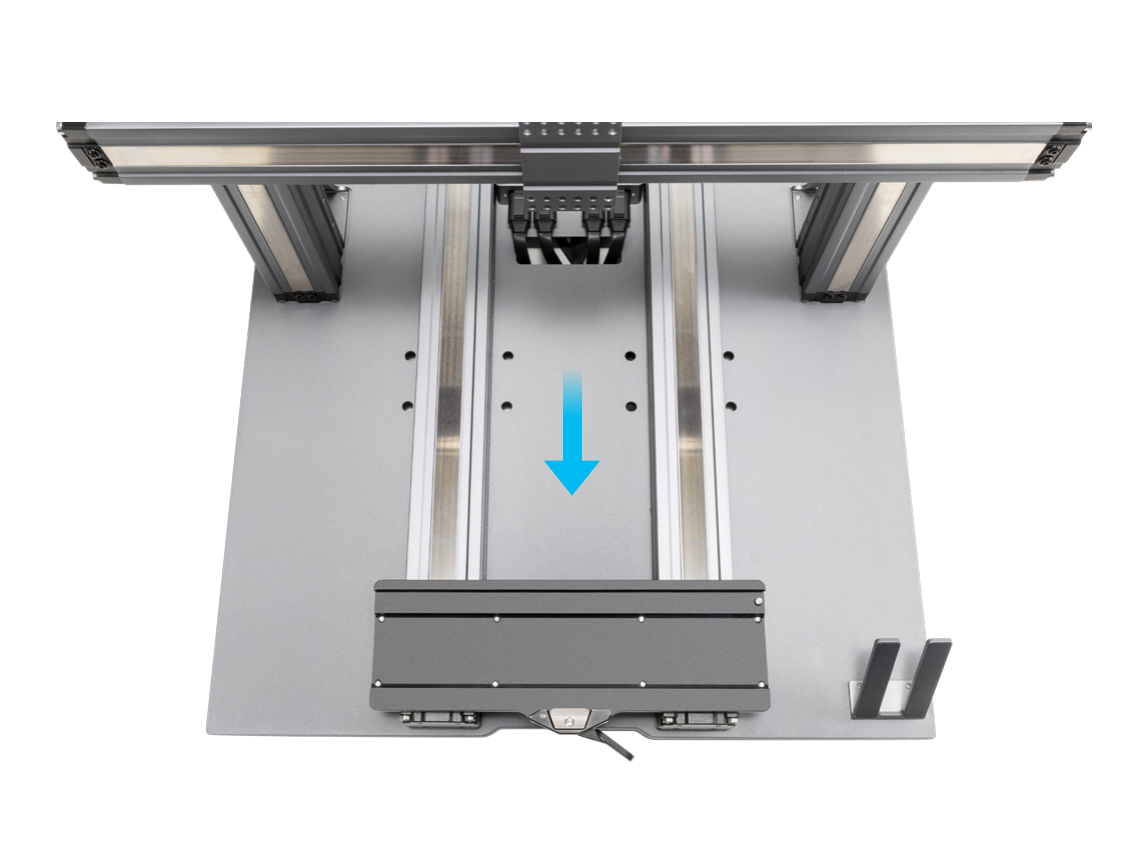
- Move the platform bracket to the illustrated position.
- Attach the toolhead bracket to the X axis.
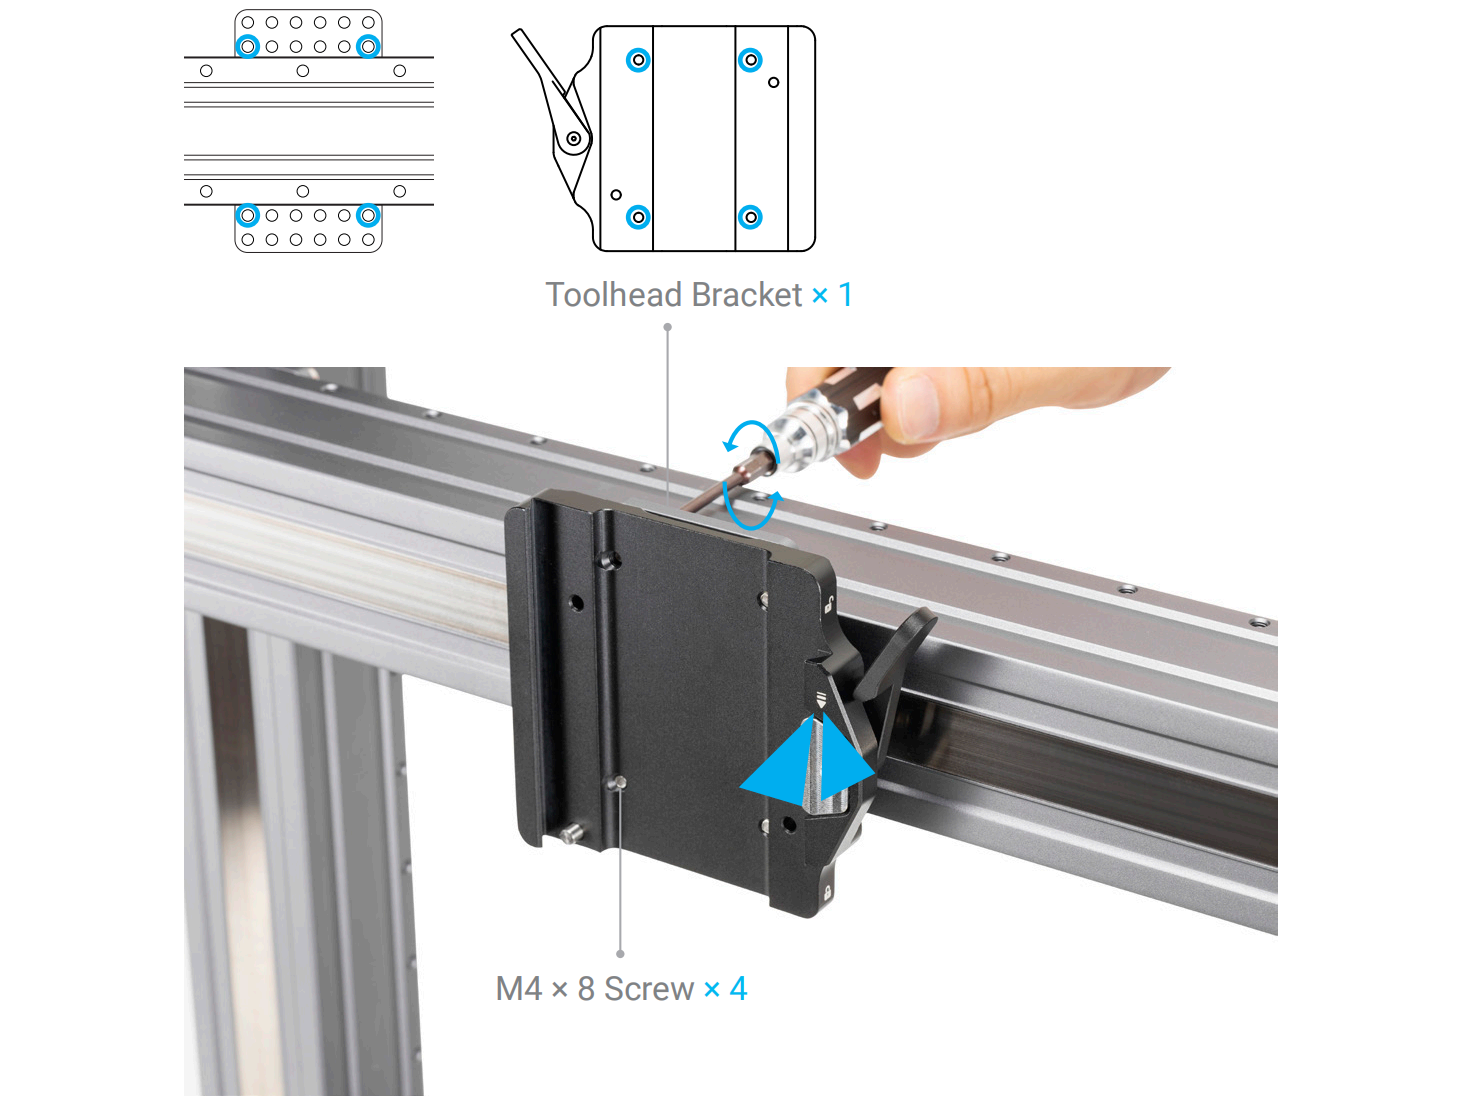
Use the original M4 × 8 screws that came with the machine.
¶ 2.1 Toolhead Assembly
This chapter takes 3D printing as an example, and all instructions are applicable to both laser and CNC modules.
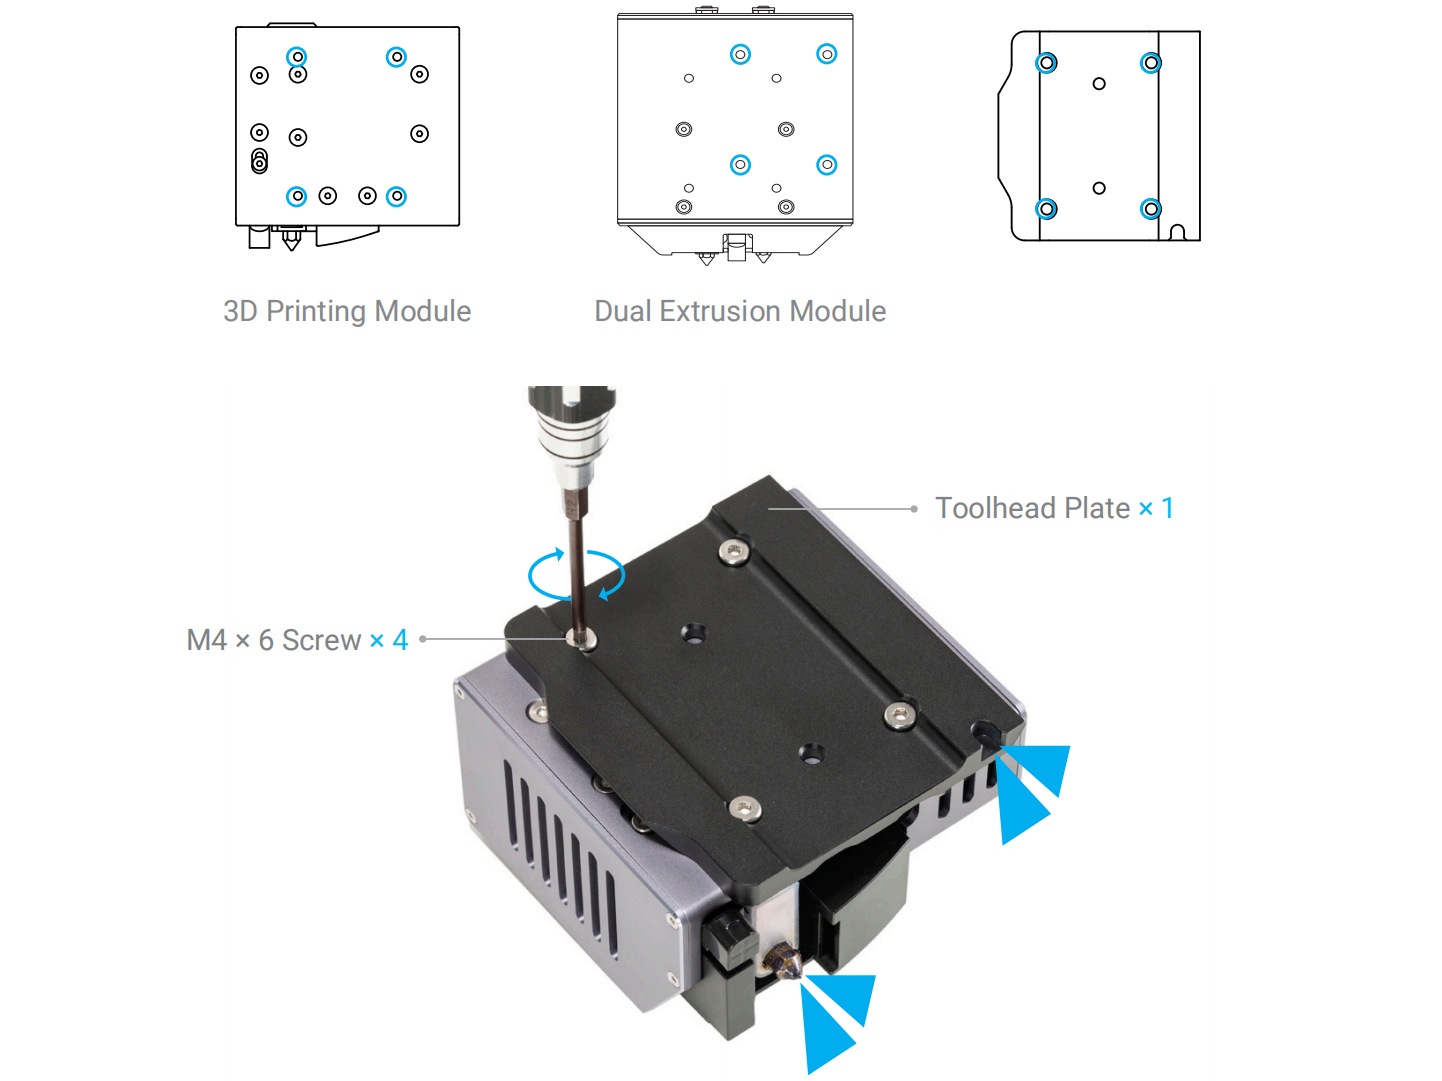
- Attach the toolhead plate to the 3D printing module .
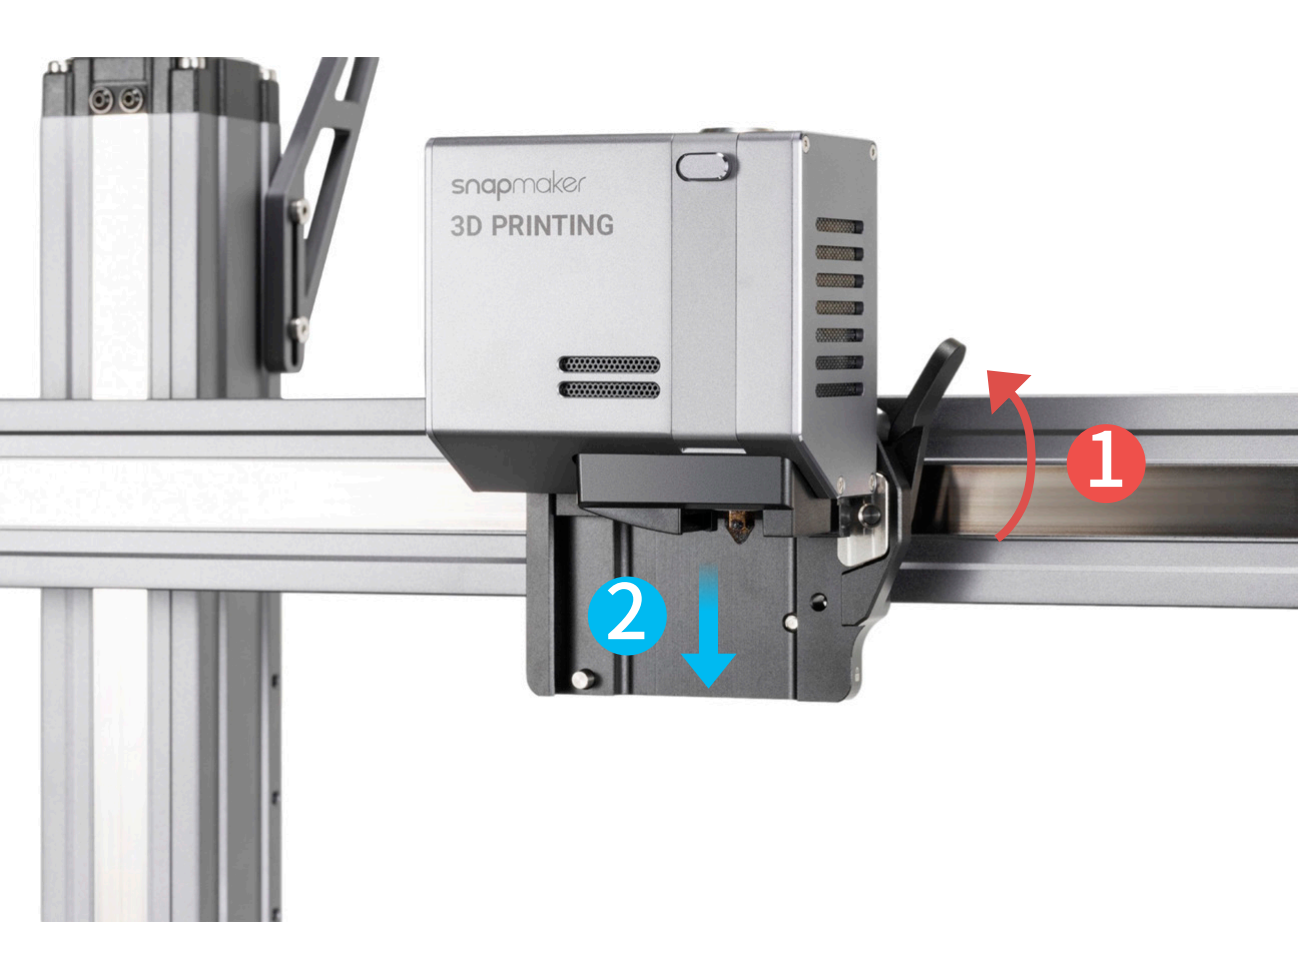
- Loosen the handle of the toolhead bracket, then slide the plate into the bracket.
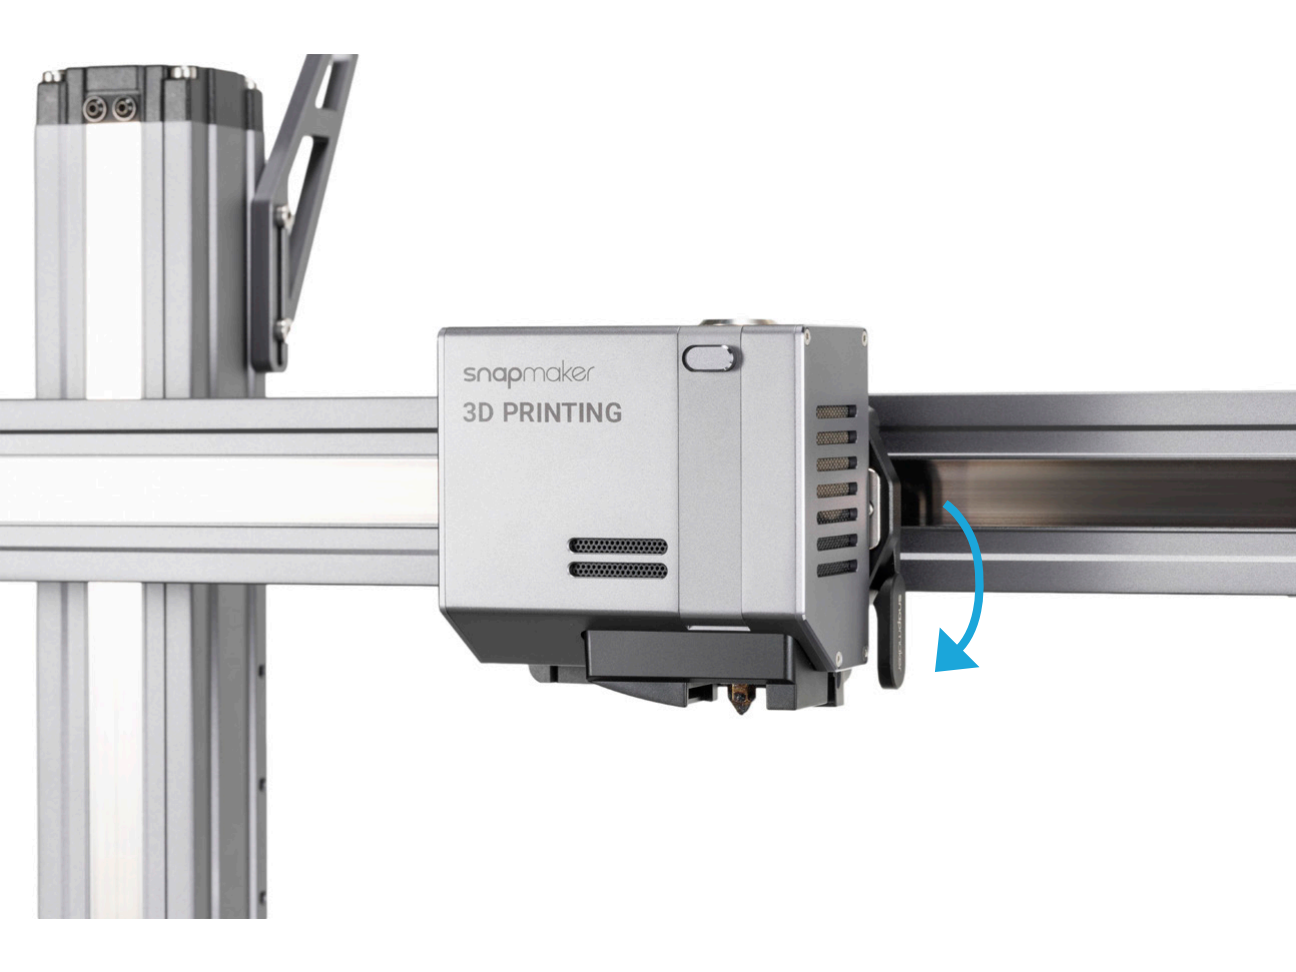
- Tighten the handle of the toolhead bracket.
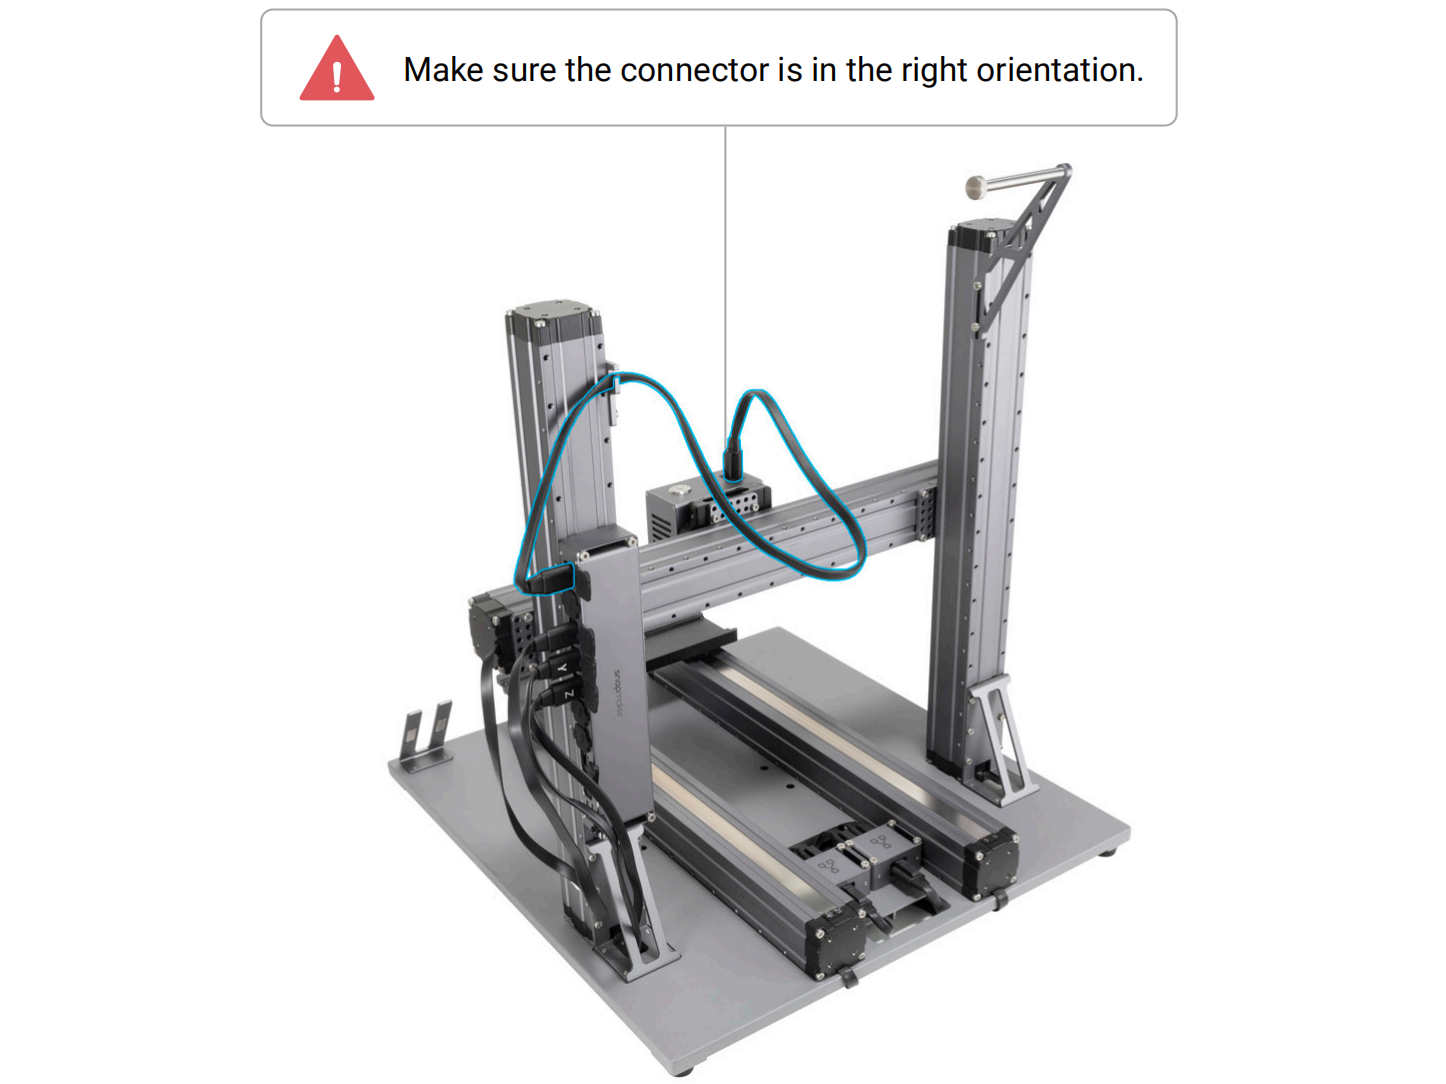
- Connect the toolhead with the controller.
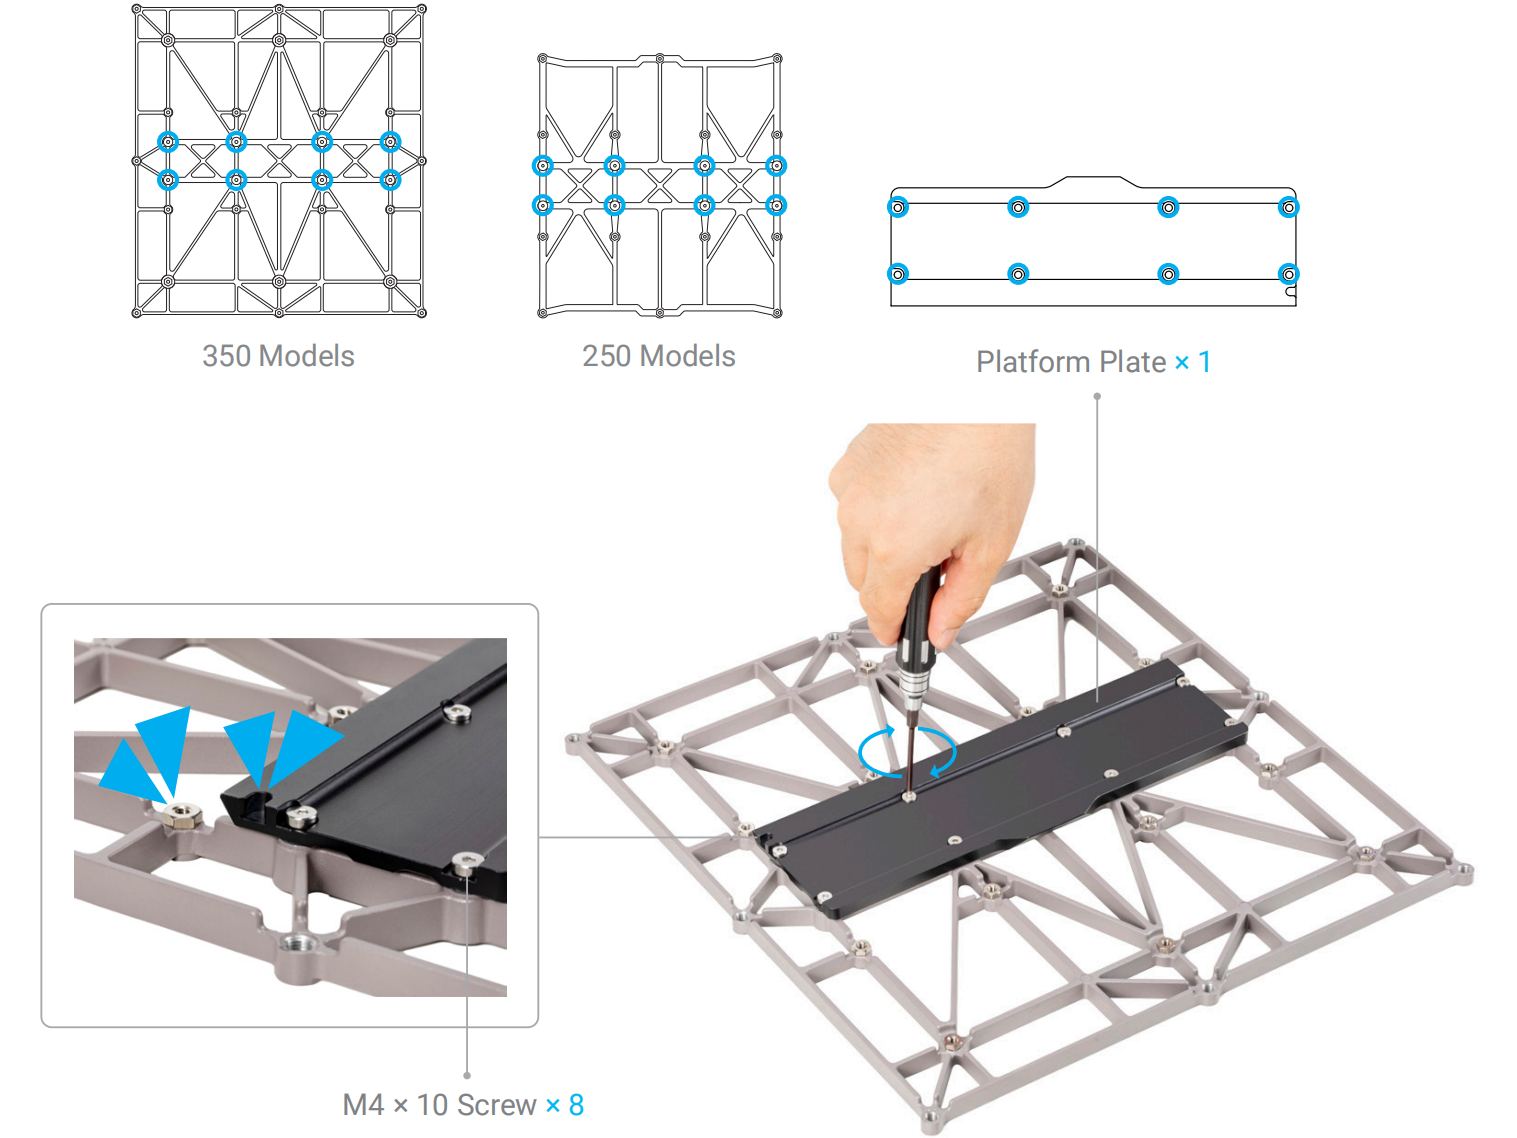
¶ 2.2 Platform Assembly
¶ 2.2.1 3D Printing
- Attach the platform plate to the original support platform that came with the machine.
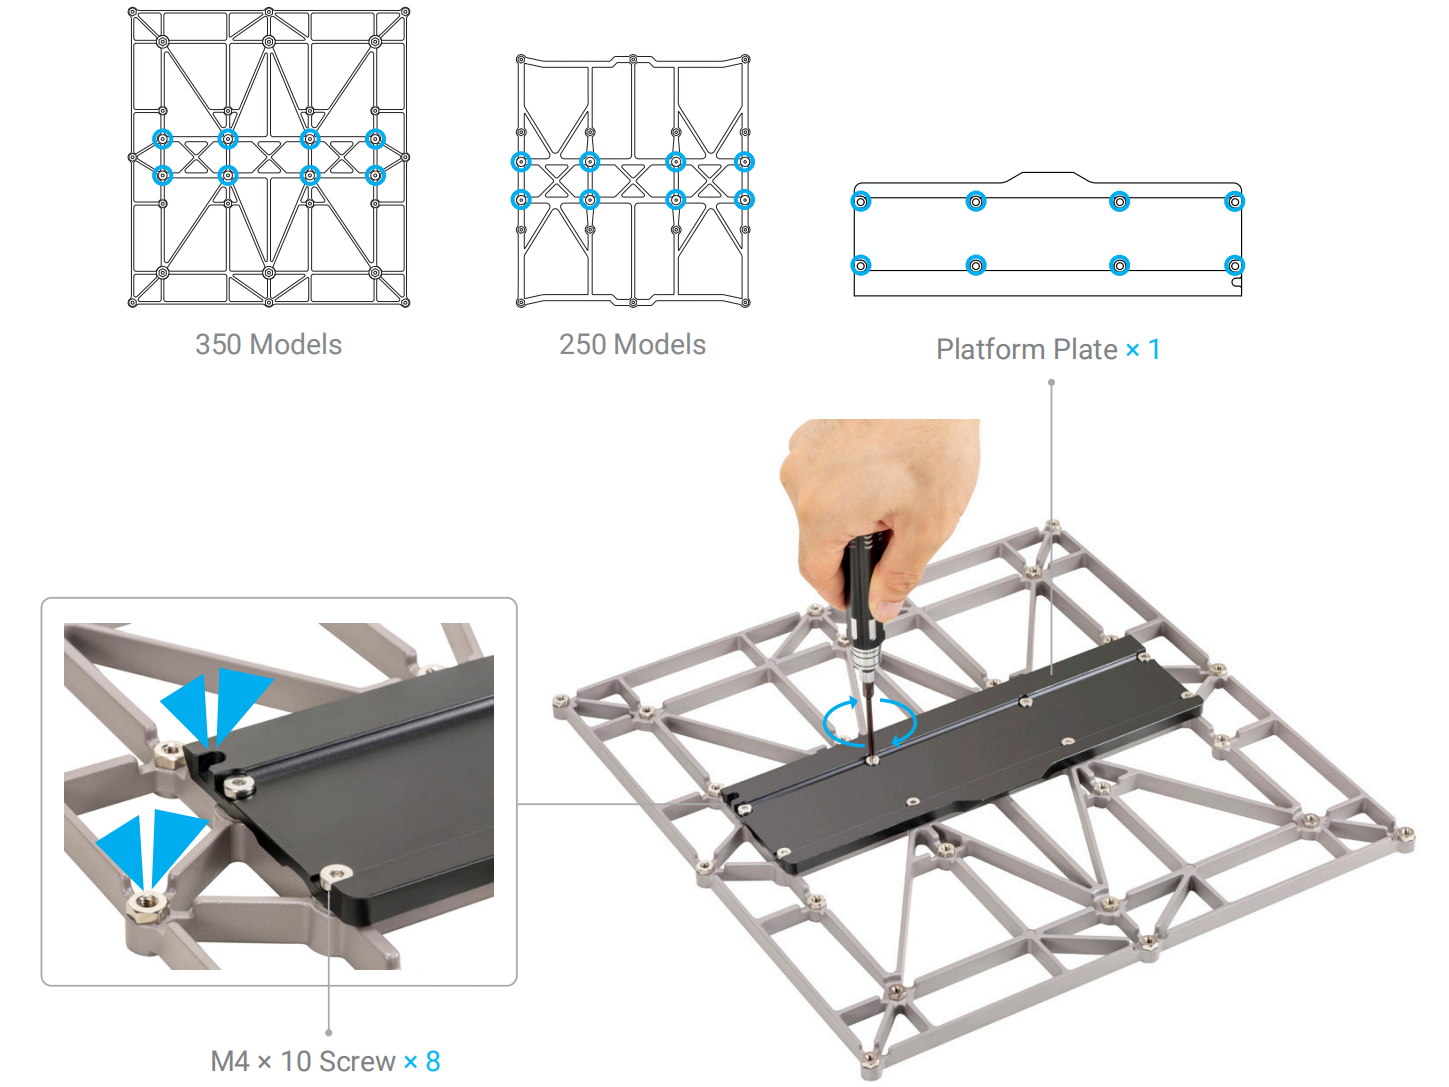
The original support platform that came with the machine should be used with the 3D printing function.
If you already have the 3D printing module installed on your machine, there is no need to detach the heated bed.
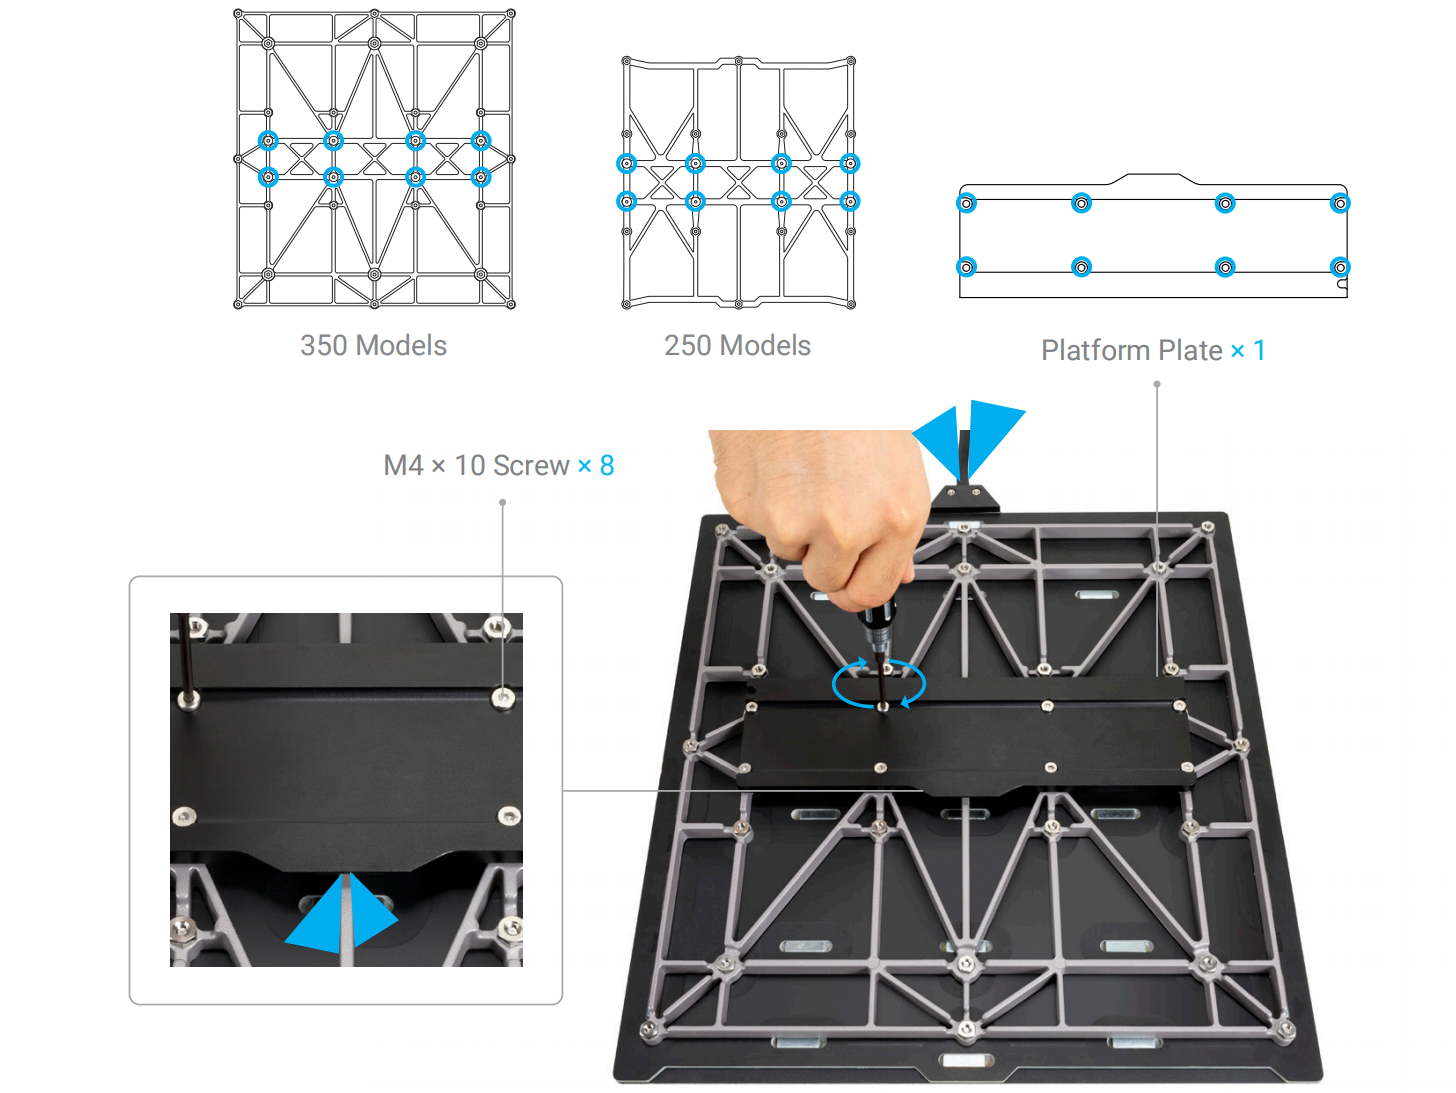
- Attach the heated bed to the support platform.
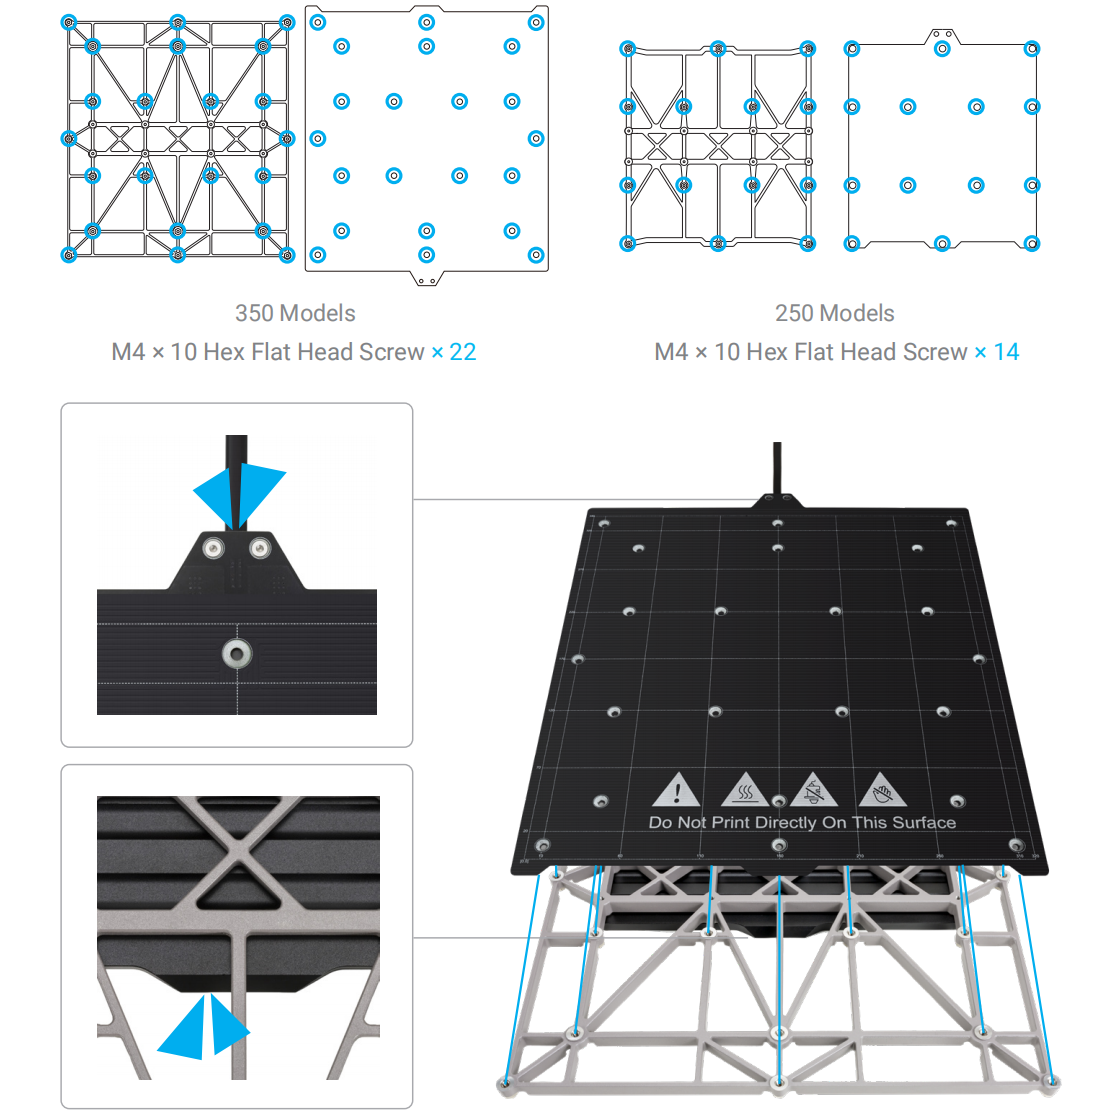
- Place the print sheet.
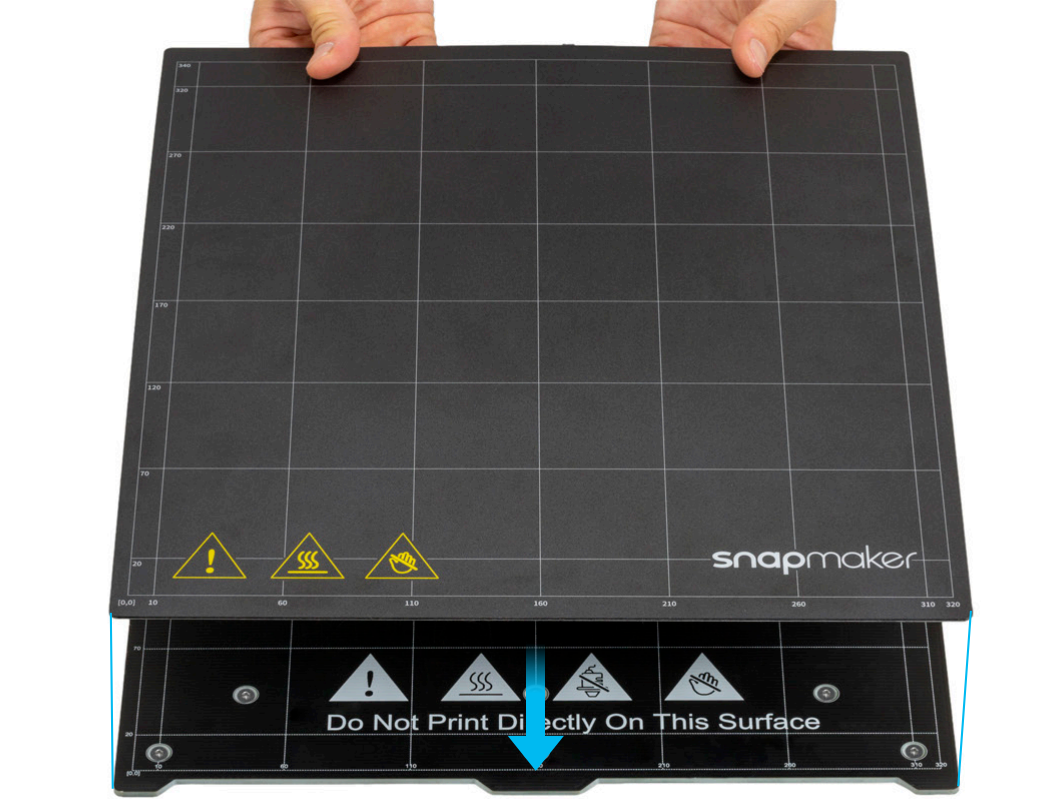
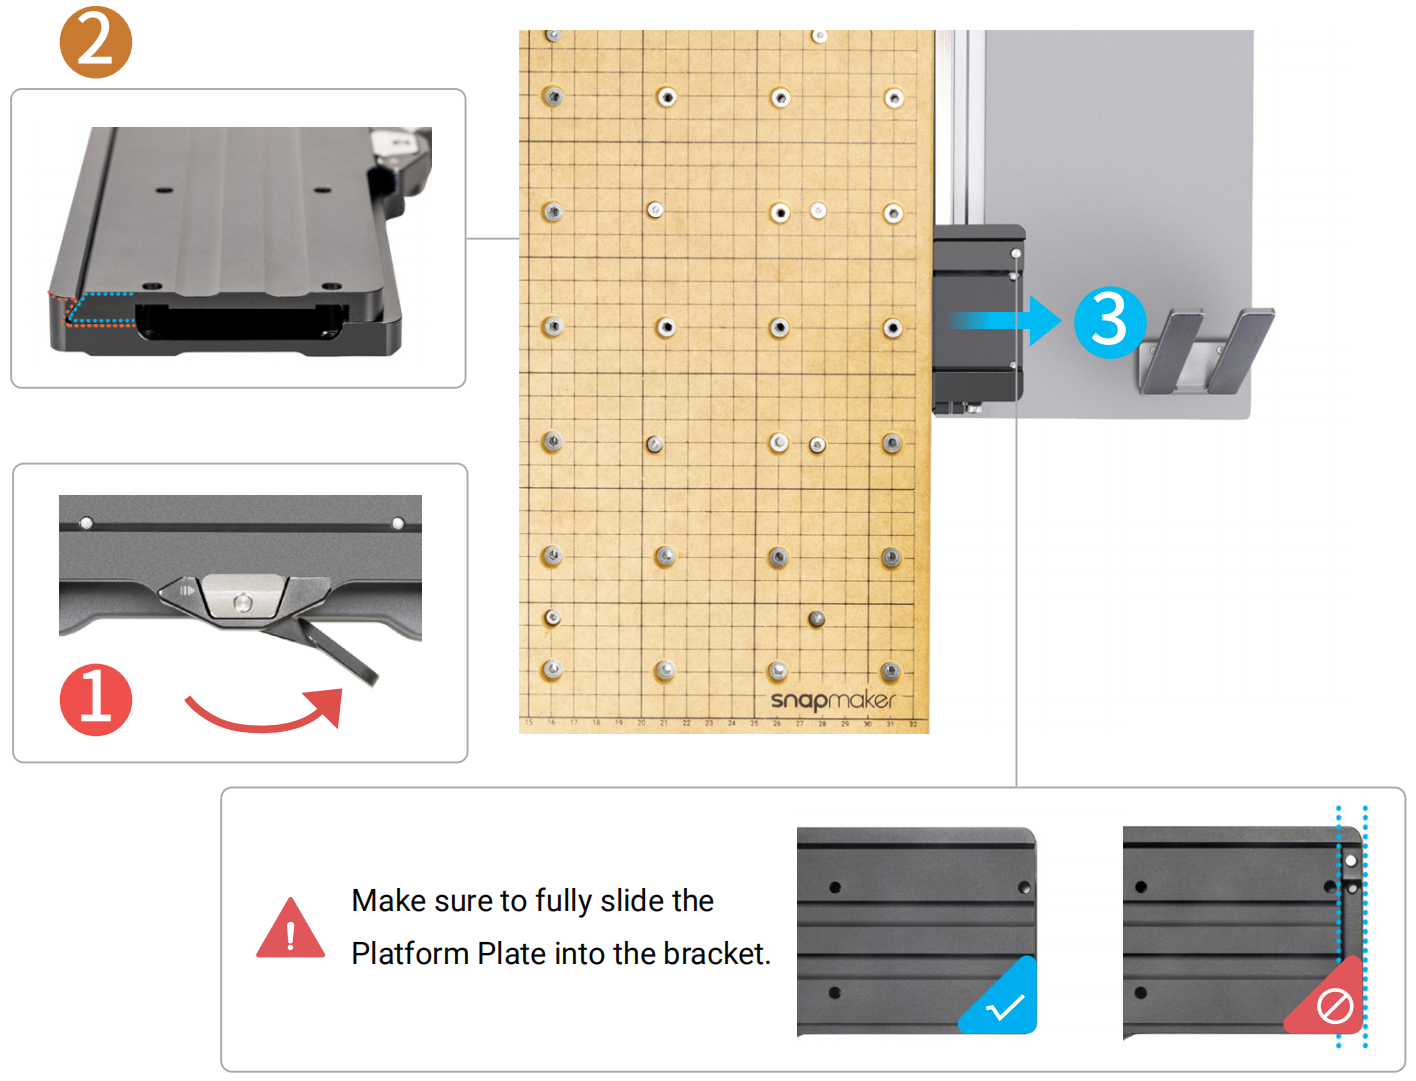
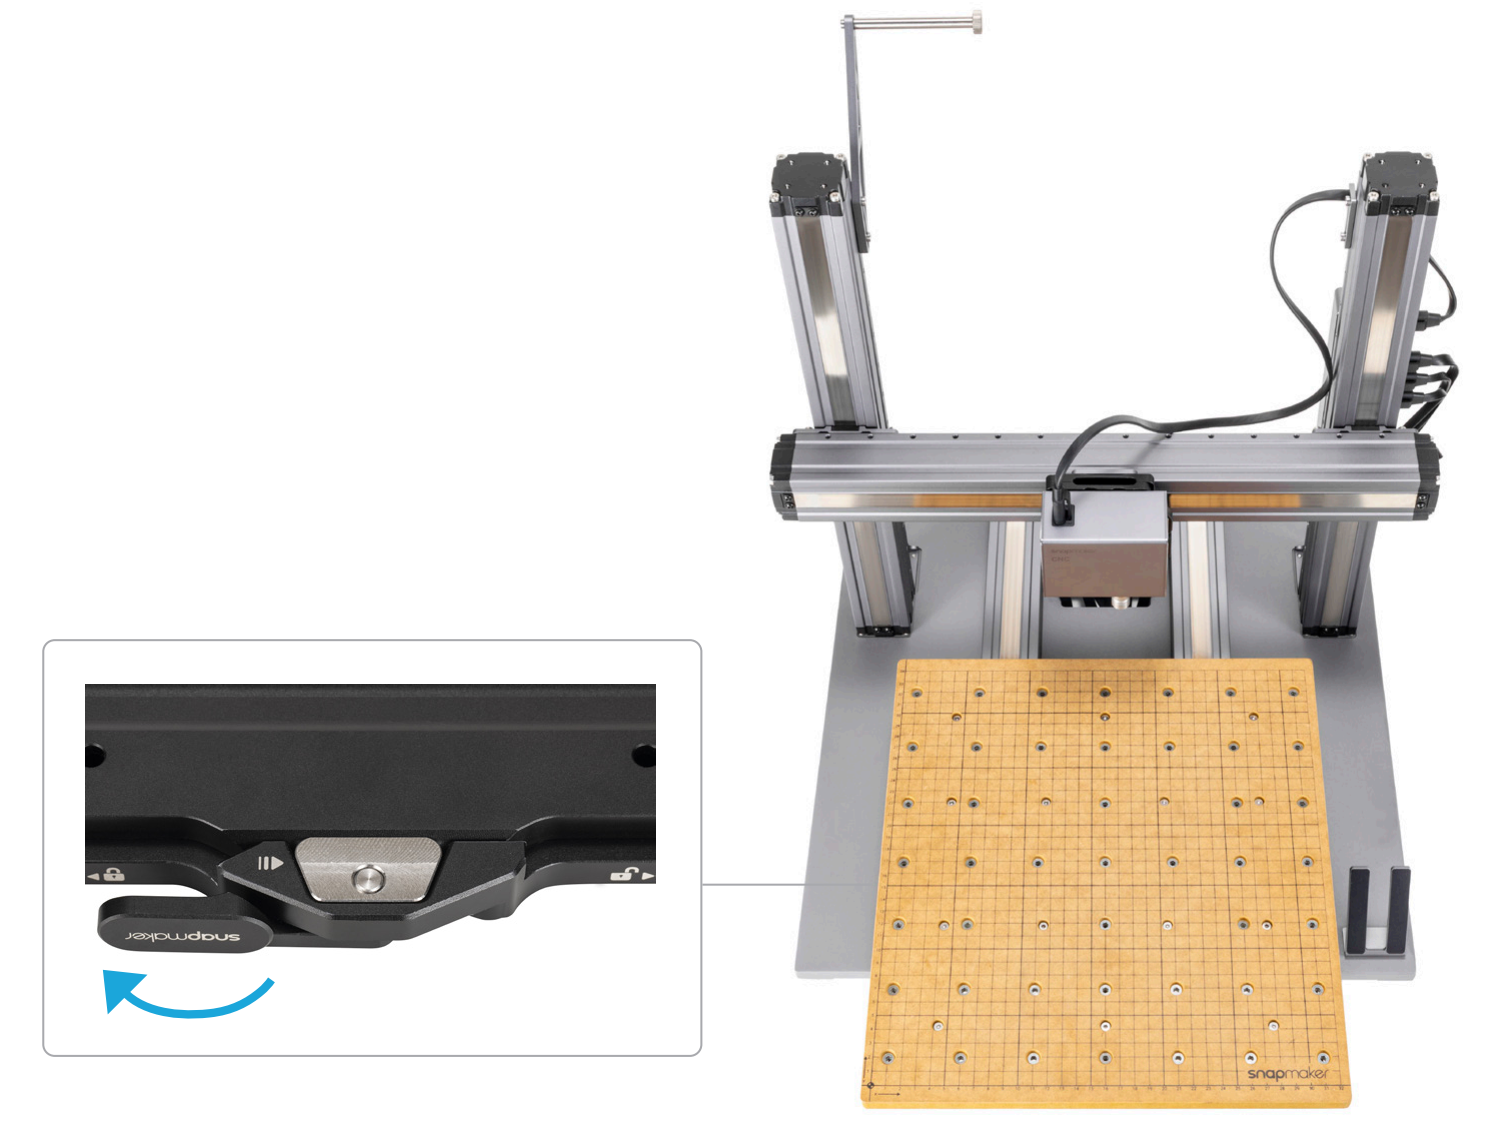
- Loosen the handle of the platform bracket. Fit the platform plate into the platform bracket, then slide the plate into the bracket.
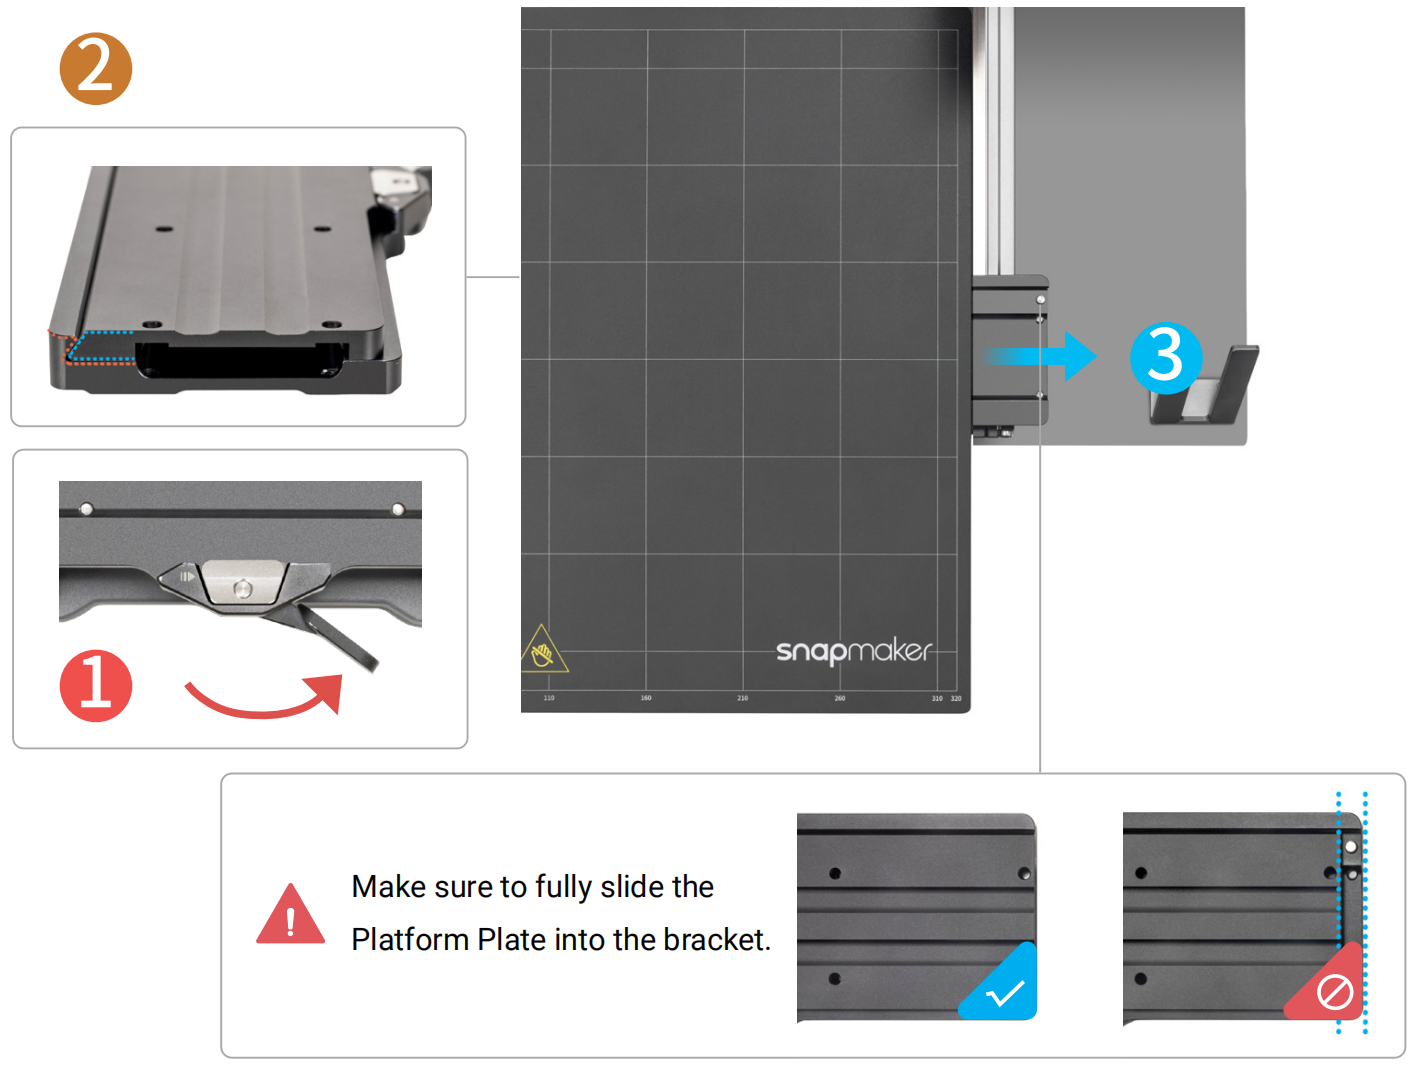
If there is limited space for fitting the platform plate into the platform bracket, you can place the platform plate slightly closer to the right.
- Tighten the handle of the platform bracket.
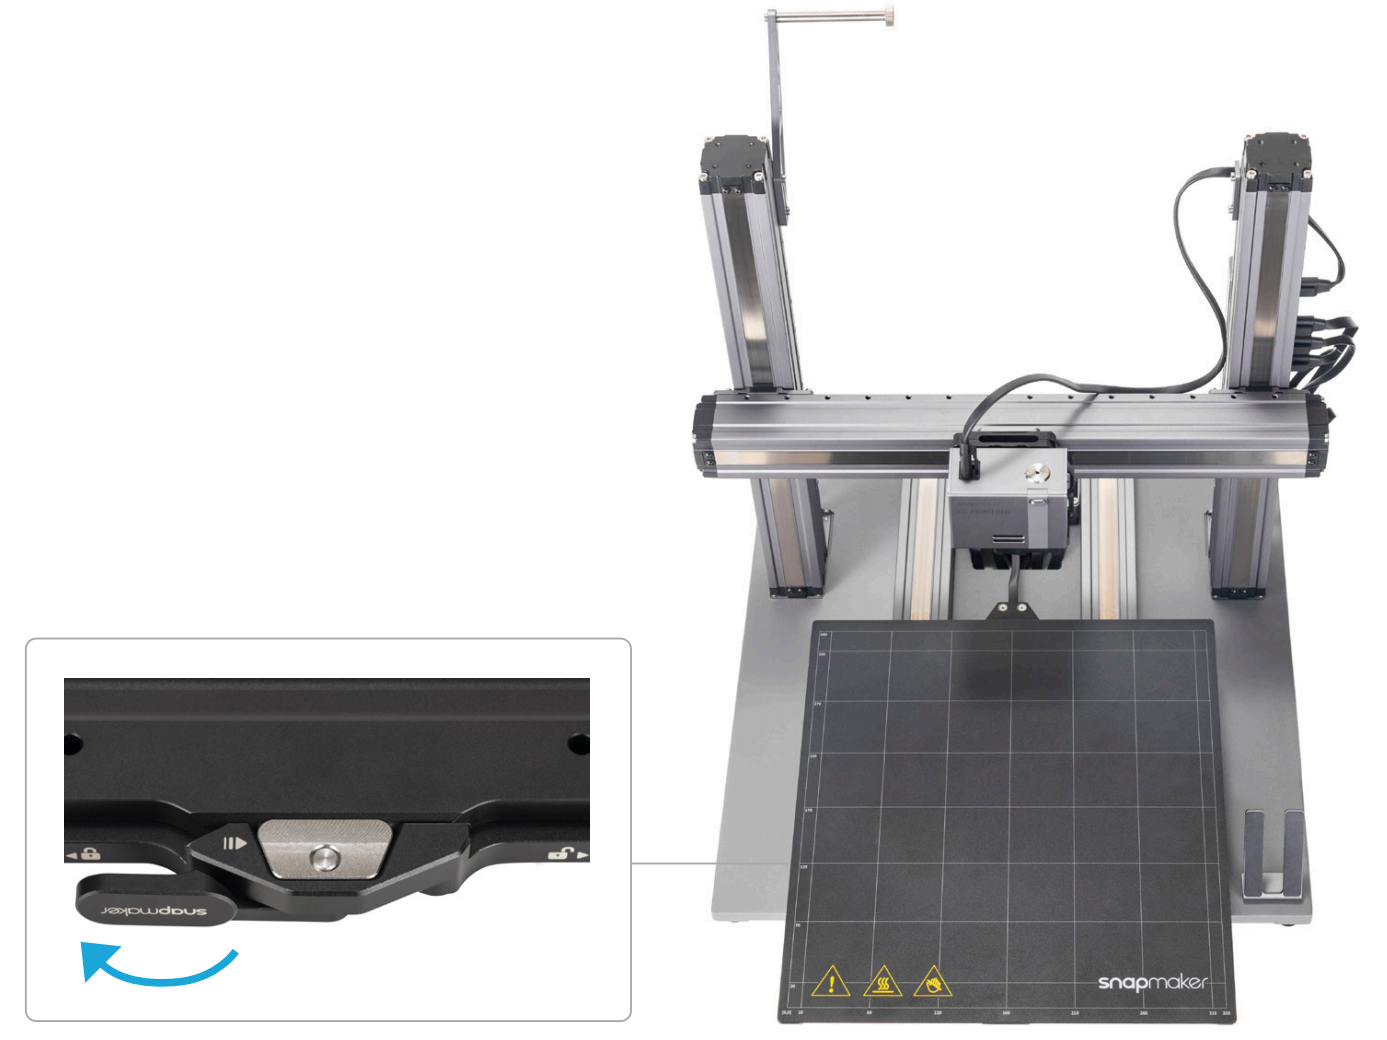
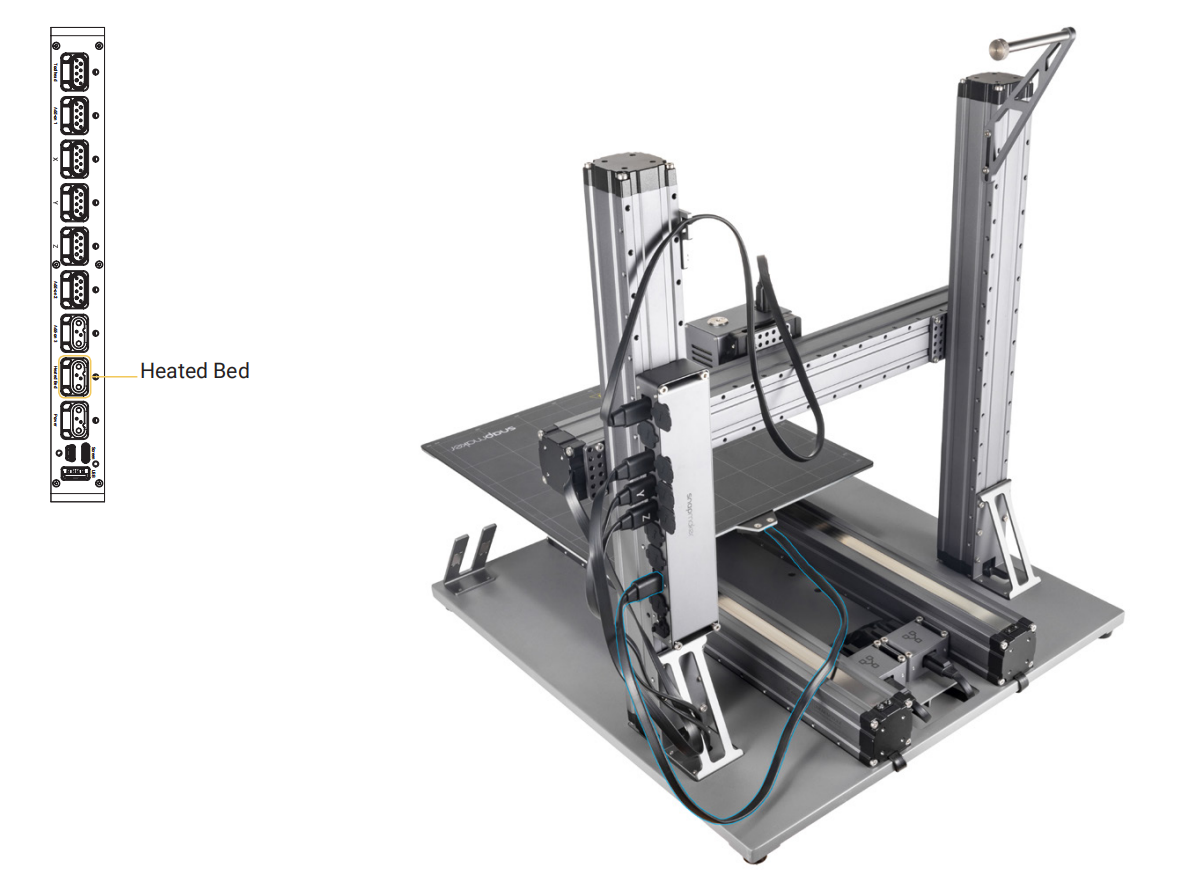
- Connect the heated bed with the controller.
¶ 2.2.2 Laser Engraving and Cutting
- Attach the laser platform plate to the laser engraving/cutting platform.
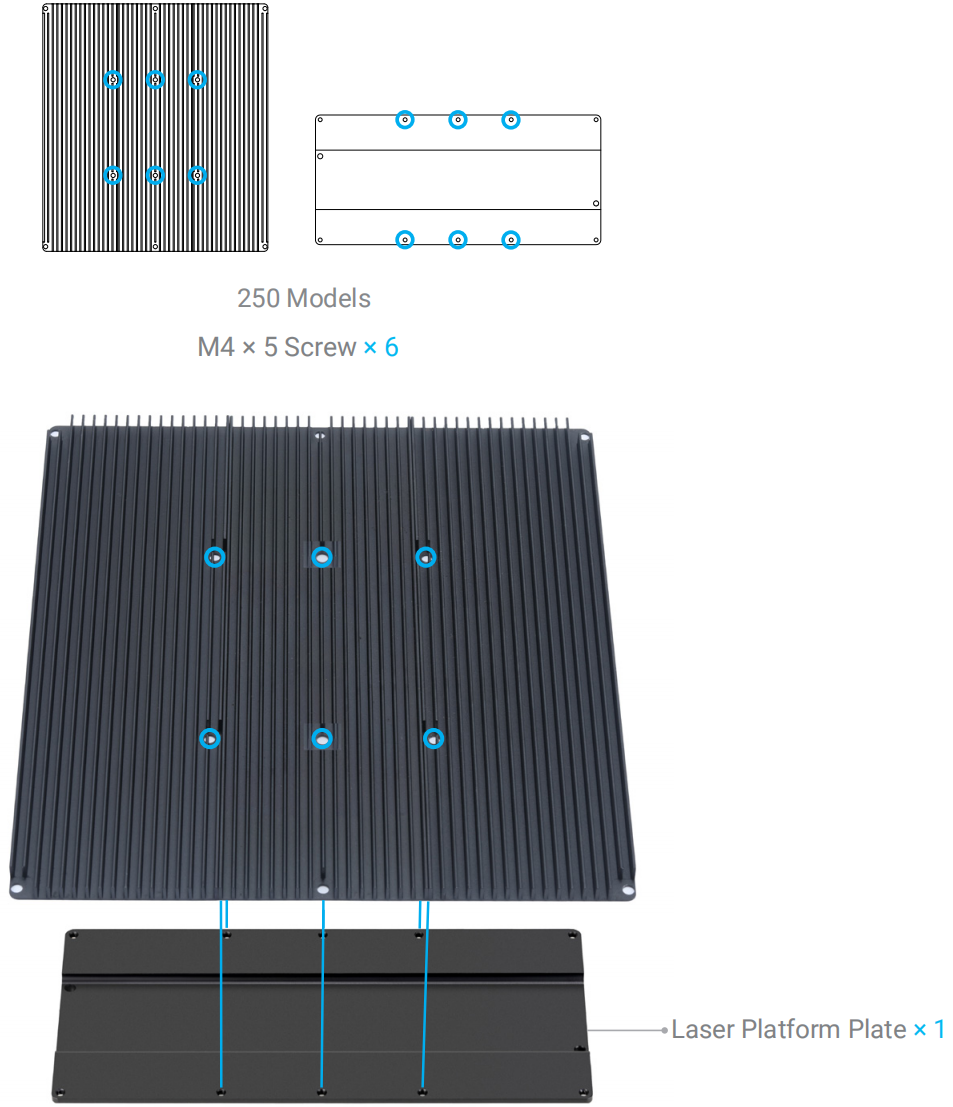
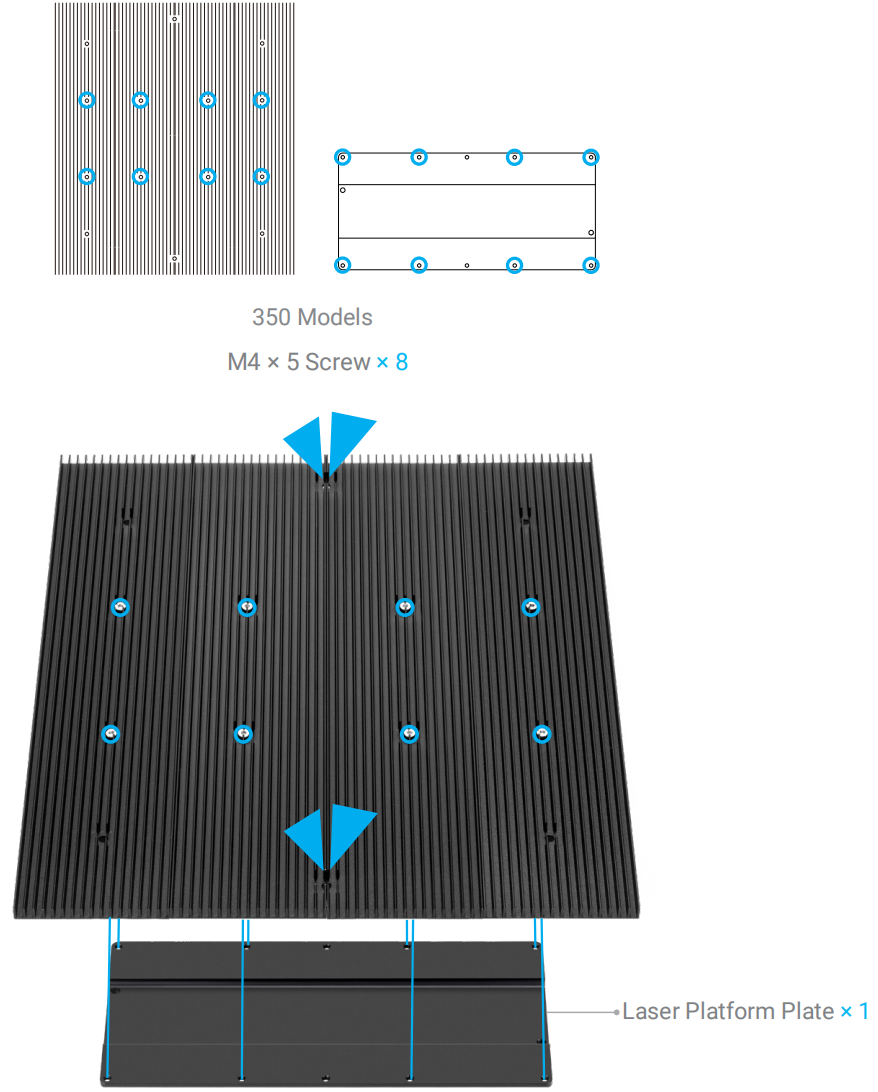
- Loosen the handle of the platform bracket. Fit the laser platform plate into the platform bracket, then slide the plate into the bracket.
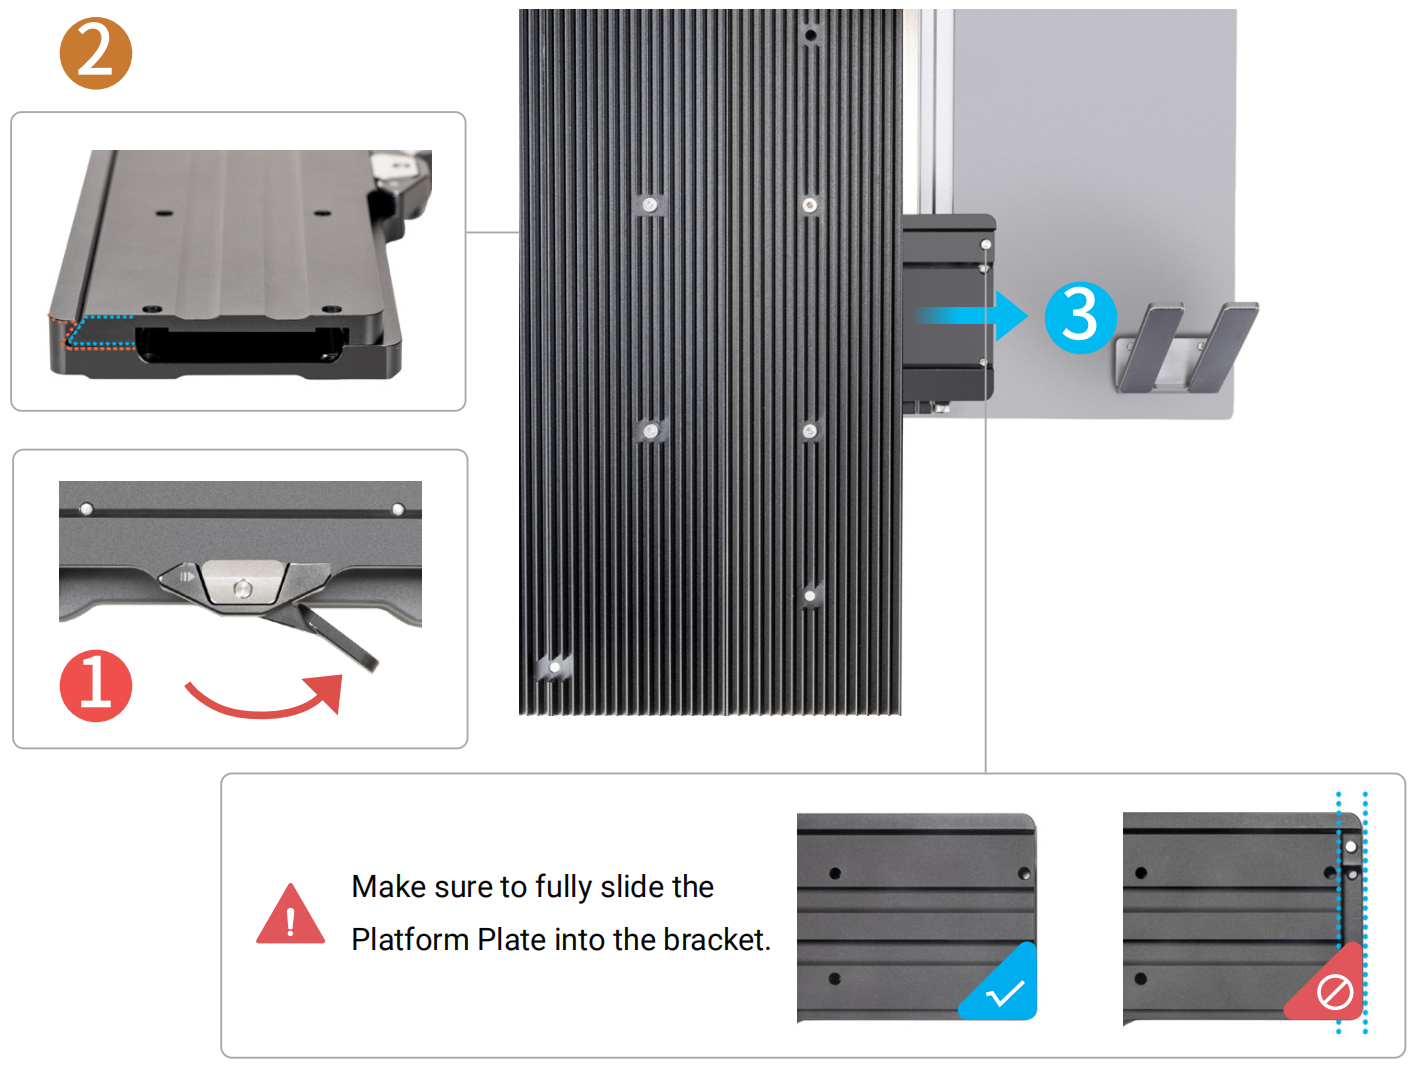
If there is limited space for fitting the platform plate into the platform bracket, you can place the platform plate slightly closer to the right.
- Tighten the handle of the platform bracket.
¶ 2.2.3 CNC Carving
- Attach the platform plate to the support platform.
The new support platform is only compatible with the CNC module, please do not use it with 3D printing module.
- Attach the CNC carving platform to the support platform.
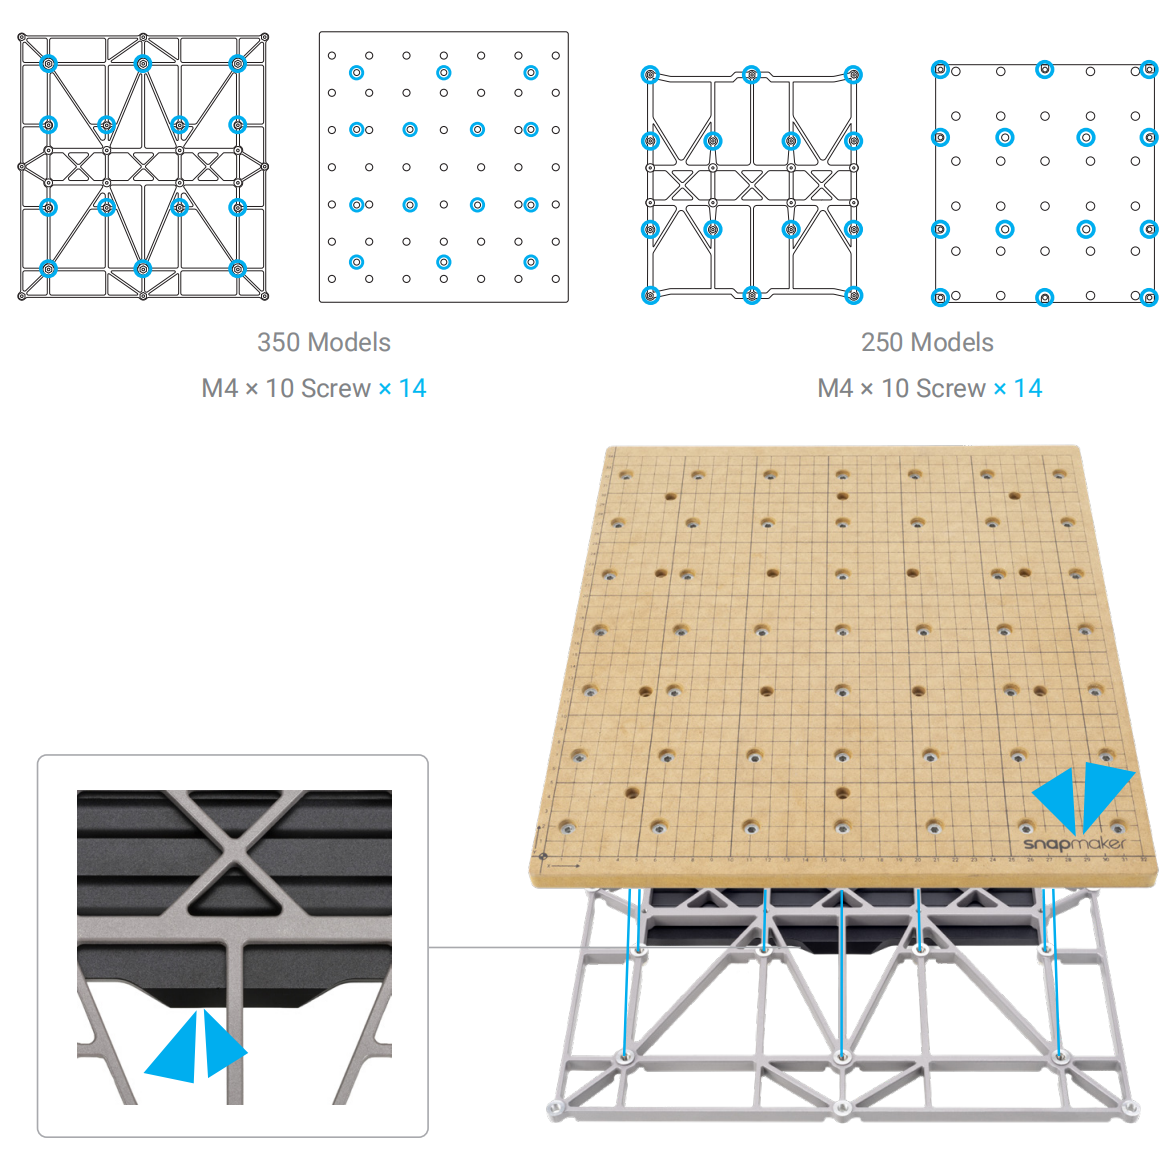
- Loosen the handle of the platform bracket. Fit the platform plate into the platform bracket, then slide the plate into the bracket.
If there is limited space for fitting the platform plate into the platform bracket, you can place the platform plate slightly closer to the right.
- Tighten the handle of the platform bracket.
¶ 2.3 Reconnecting Cables
If you are using the enclosure, replace the machine into the enclosure, then clamp the foot fixtures onto the four feet of the machine.
If you are using the enclosure, replug the connecting cable of the Addon 3 port.
Place the touchscreen, then reconnect the touchscreen cable and the DC power cable.
¶ Machine Configurations
¶ 3.1 Software Updating
- Download the latest version of Snapmaker Luban from https://snapmaker.com/snapmaker-luban.
If you have already installed Snapmaker Luban on your computer, ensure that its version is 4.8.1 or later.
- Launch Snapmaker Luban, click Settings > Machine Settings in the menu bar to select Snapmaker 2.0 Quick Swap Kit and save the settings.

¶ 3.2 Firmware Updating
Before use, update the firmware to version 1.16.5 or later. For Touchscreen installed with the firmware of V1.9.0 or later, you can update via Wi-Fi or USB flash drive. For firmware previous to V1.9.0, update only via USB flash drive.
Wi-Fi Updating
- Turn on the machine.
- Connect your machine to a Wi-Fi network.
- Swipe left on the touchscreen, then tap Settings > Firmware Update > Check for Updates > Update Now > Complete.
- Turn off the machine. Wait for 5 seconds, then restart the machine.
USB Flash Drive Updating
- Download our firmware from https://support.snapmaker.com.
- Insert the USB flash drive into the controller, then turn on the machine.
- Swipe left on the touchscreen, then tap Files > USB, select the the firmware file to update.
- Turn off the machine. Wait for 5 seconds, and then restart the machine.
¶ 3.3 Enabling Quick Swap Feature
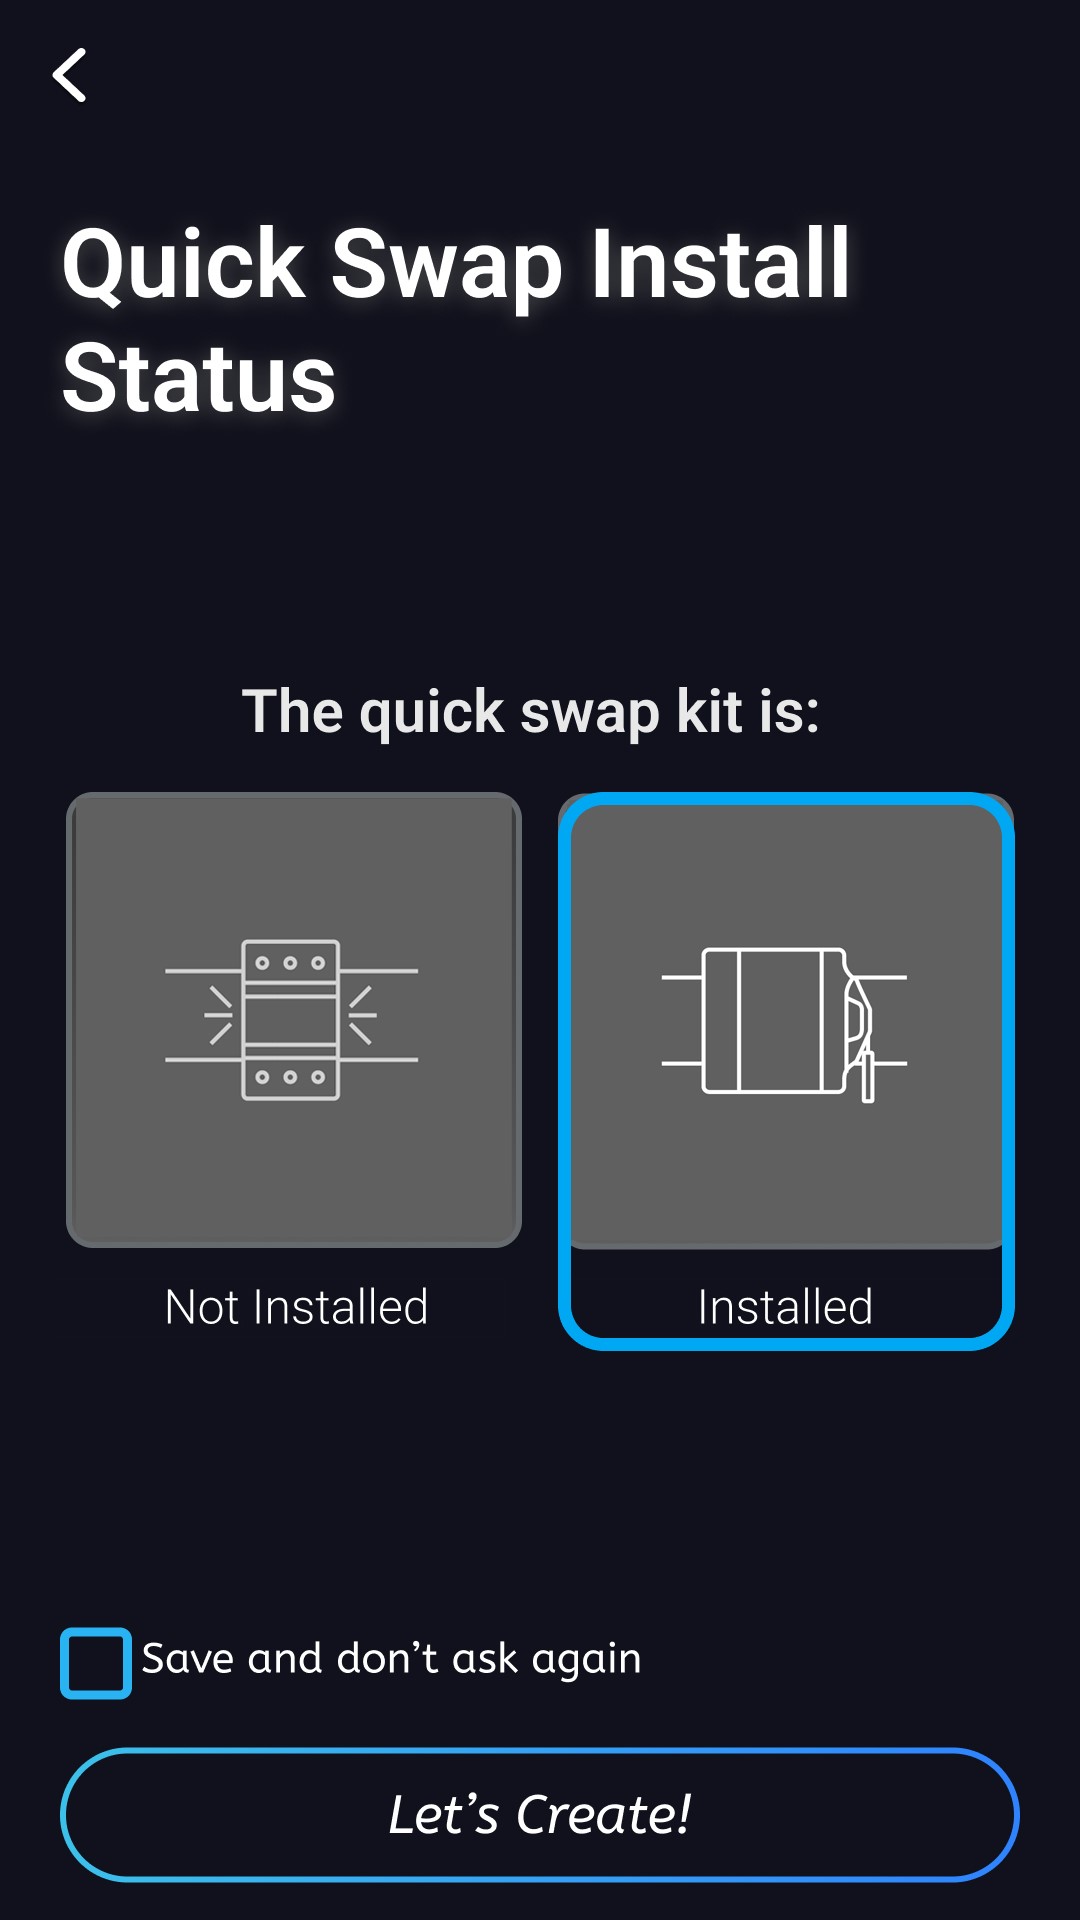
The touchscreen will prompt a pop-up window to confirm the installation status of the quick swap kit. Tap Installed > Let's Create!
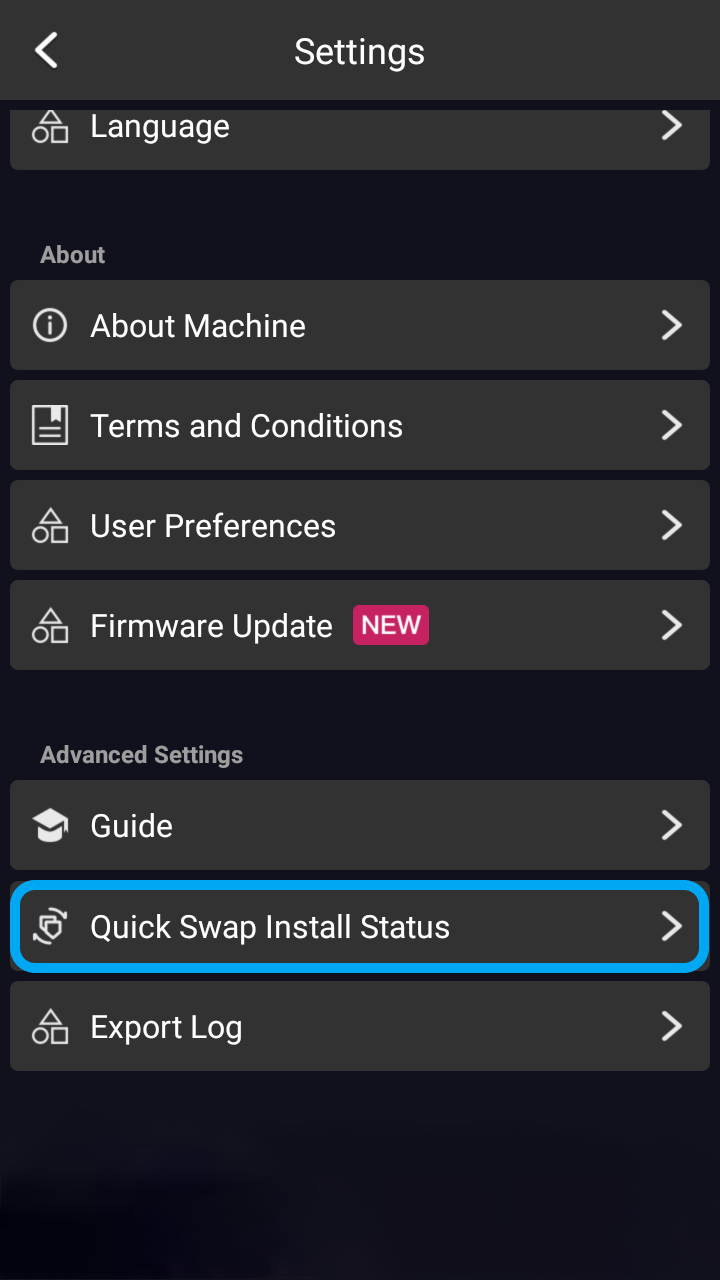
Before using the quick swap kit, if you have already updated the firmware to version 1.16.5 or later and disabled the quick swap feature, swipe left on the touchscreen > tap Settings > Quick Swap Install Status to enable this feature.
¶ 3.4 Recalibrating
After installing the quick swap kit, the stroke of the Y axes and Z axis will be reduced by approximately 15 mm. Therefore, it is necessary to recalibrate the 3D printing and laser function. Refer to the respective Quick Start Guides based on the installed toolhead.
3D Printing Module
Dual Extrusion 3D Printing Module
1600mW Laser Module
2W Infrared Laser Module
10W Laser Module
20W/40W Laser Module
If you need to use the machine after removing the quick swap kit, swipe left on the touchscreen, tap Settings > Quick Swap Install Status > Not Installed > Let's Create to disable this feature, then recalibrate the 3D printing and laser function.
¶ Switching Functions
When switching functions, you can use the Park for Easy Swap feature.
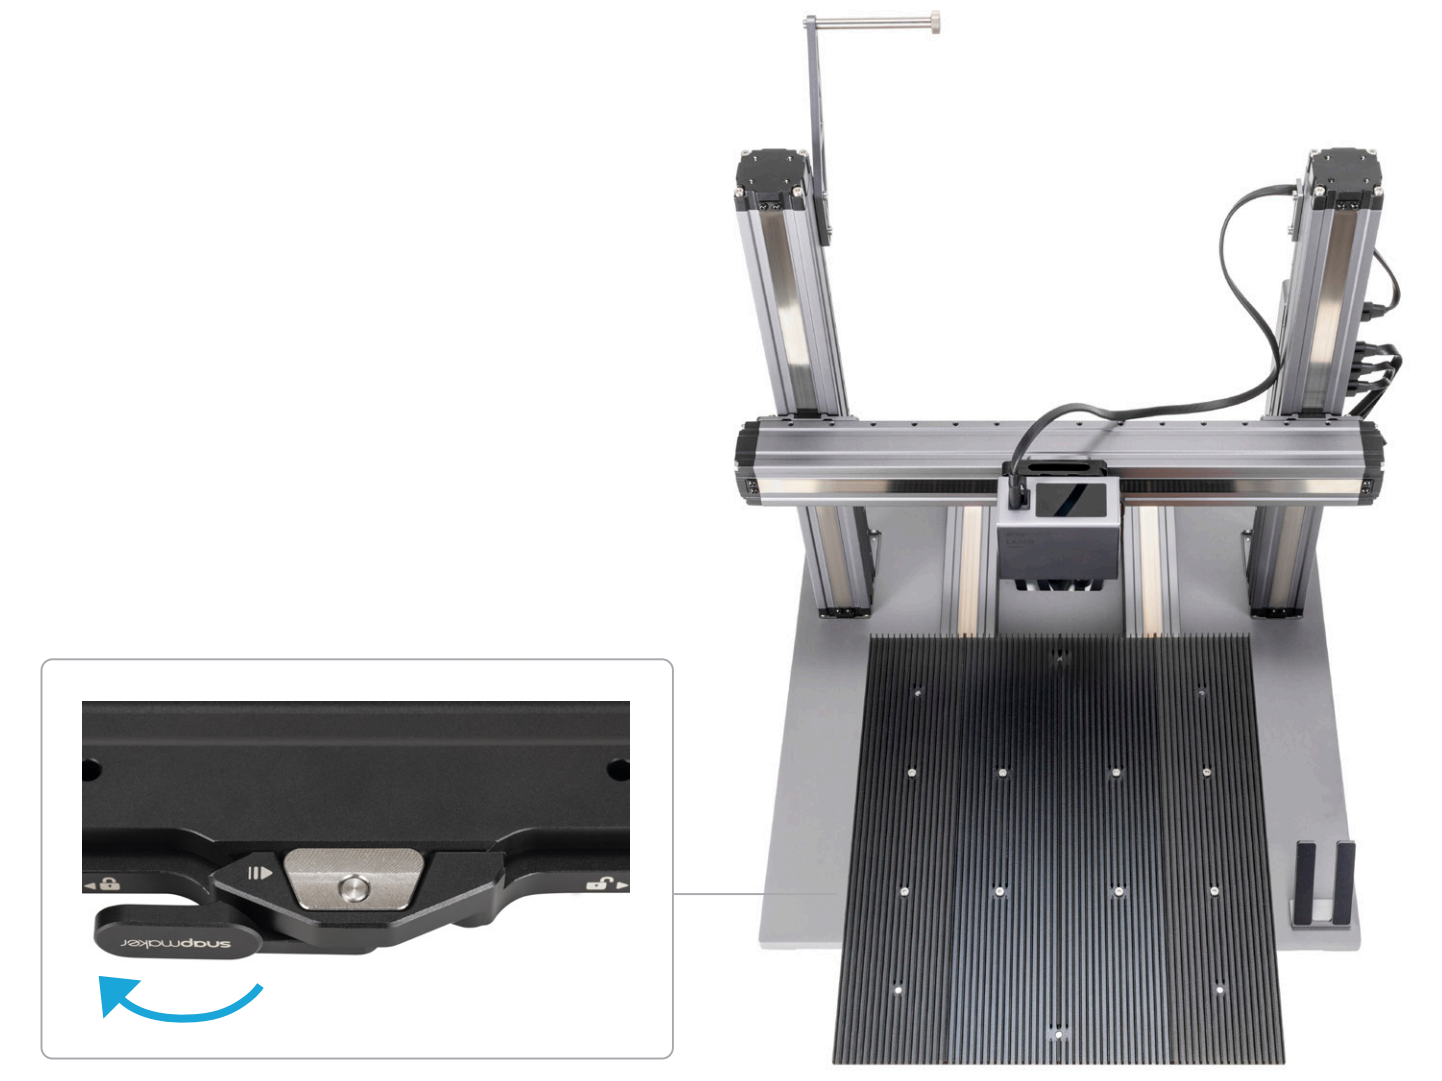
- Swipe left on the touchscreen, then tap Settings > Park for Easy Swap, the toolhead and the work platform will move to positions easy to swap or replace.
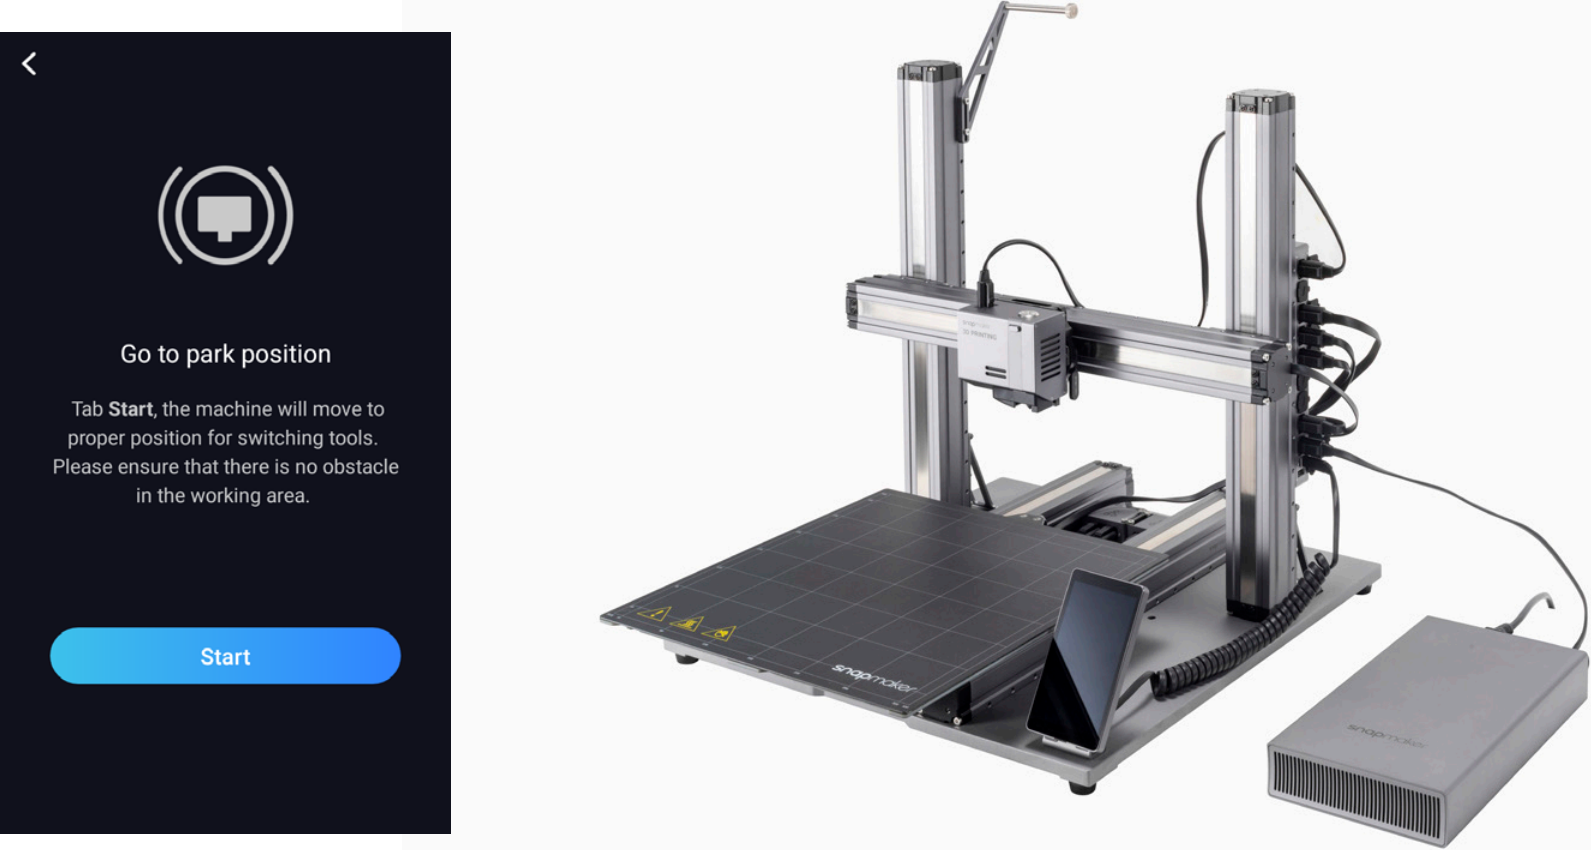
- Turn off the printer, unplug the power cable, then switch the toolhead and the work platform.