Snapmaker Artisan/2.0 allows you to flexibly switch between laser and CNC functions, offering the unique ability to precisely engrave detailed designs before seamlessly transitioning to cutting operations.
¶ 01 Tools & Accessories Required
This guide will walk you through a common practice of combining laser with CNC: first use laser to engrave a picture on the surface of basswood, then use CNC to cut out the engraved piece. During machining, you will need the tools and materials listed below.
- Basswood ×1 (or any material that is suitable for both laser engraving and CNC cutting)
- 14mm open end wrench ×1
- 17mm open end wrench ×1
- 3.175mm flat end mill

¶ 02 Procedures
The following flowchart outlines the procedures for using laser engraving and CNC cutting:

¶ 2.1 Analyze how to combine laser engraving and CNC cutting
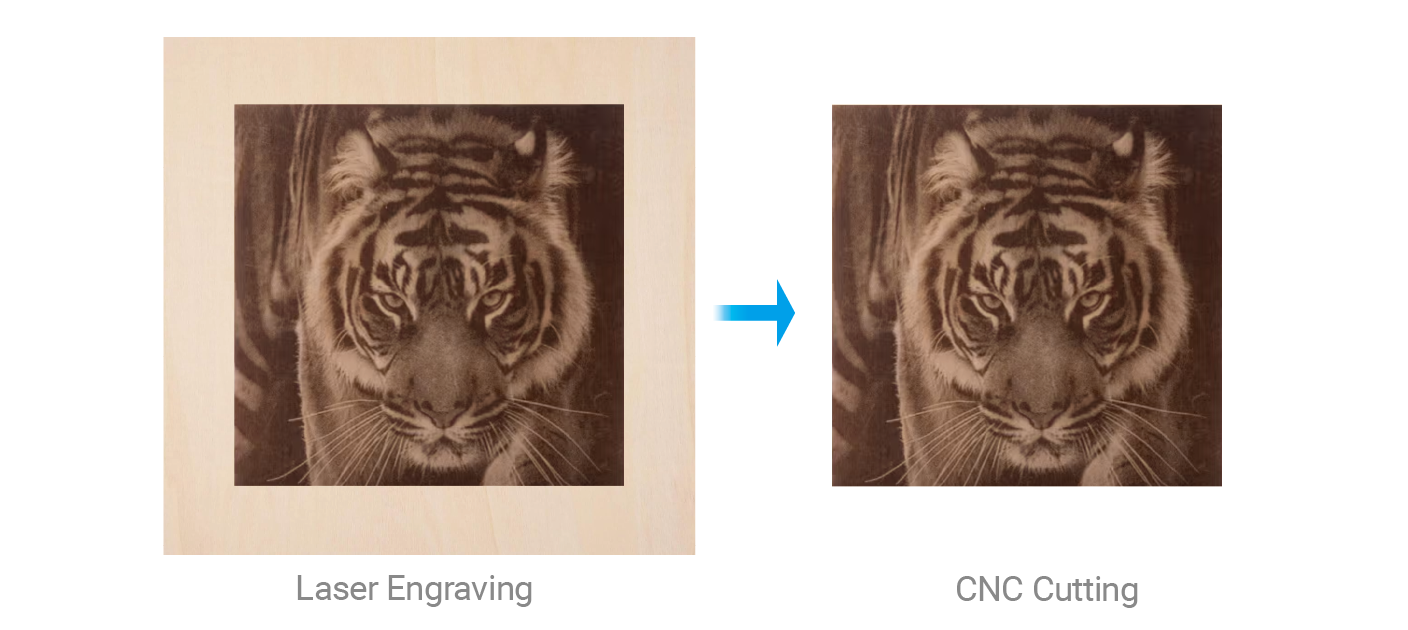
In this project, we will use the laser module to engrave a tiger image on the basswood, then use the CNC module to cut away the extra material.
- For the laser module, you can use what is available for you, whether it be 10W, 20W or 40W.
- For the CNC part, we use the 200W CNC module and a 3.175mm flat end mill to do a 2D contour to remove the outer material.
¶ 2.2 Laser engraving process
If you are using the 20W/40W laser module, please refer to the brief instructions below.
¶ Prepare G-code file
Please prepare your G-code file in advance.
Luban supports the following formats of the design file: .stl, .svg, .jaeg, .png, .jpg, .bmp, .dxf, .snaplzr.
Snapmaker Luban cannot guarantee compatibility with all .dxf files exported from various software. For those .dxf files that are compatible, the parsing results may vary depending on the software used for export.
Please record the size you set for the laser work, which would be helpful in configuring CNC 2D contour size settings later on.
¶ Transfer G-code file to the machine
- Copy the exported .cnc G-code file to USB flash drive.
- Insert USB flash drive into the Controller.
- On Touchscreen, you will find your .cnc G-code file.
¶ Install laser engraving and cutting platform
- Loosen the cam handle of the support platform, then install the laser engraving and cutting platform onto the support platform.
- Tighten the cam handle of the support platform.
¶ Install laser module
- Loosen the cam handle of the toolhead bracket, remove the current module.
- Slide 20W/40W laser module into the bracket, then tighten the toolhead bracket.
- Plug the toolhead cable into the 20W/40W laser module.
¶ Clamp the material
Please read the following instructions to clamp the material onto the laser engraving and cutting platform.
¶ Adjust the laser height
To ensure that the laser is best focused during machining, you need to adjust the Z-axis height of the laser module.
¶ Set the work origin
Please refer to the instructions below to set the work origin for your laser job.
¶ Start laser engraving
- Make sure the Enclosure door is closed and will stay closed throughout the task.
- Tap Start Job to start the laser task.
Keep the machine attended throughout the task!
If you are using the 10W laser module, please refer to the instructions here to get your laser work ready.
¶ 2.3 CNC cutting process
¶ Prepare 2D contour G-code file
- Launch Luban, click CNC > 3-axis to enter 3-axis G-code Generator.

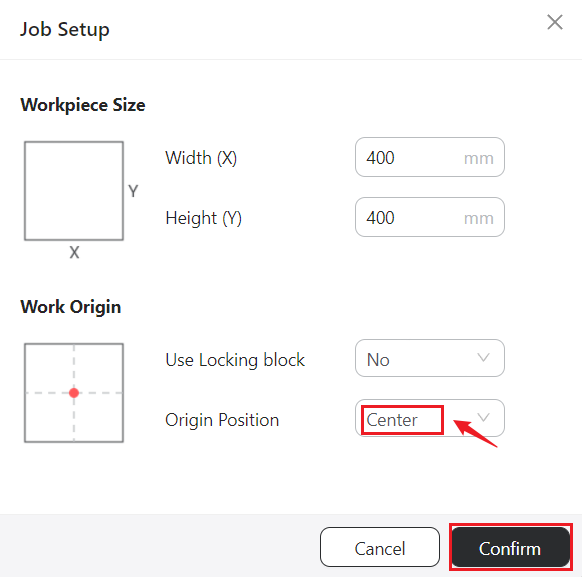
- Select Center as the Origin Position, then click Confirm.
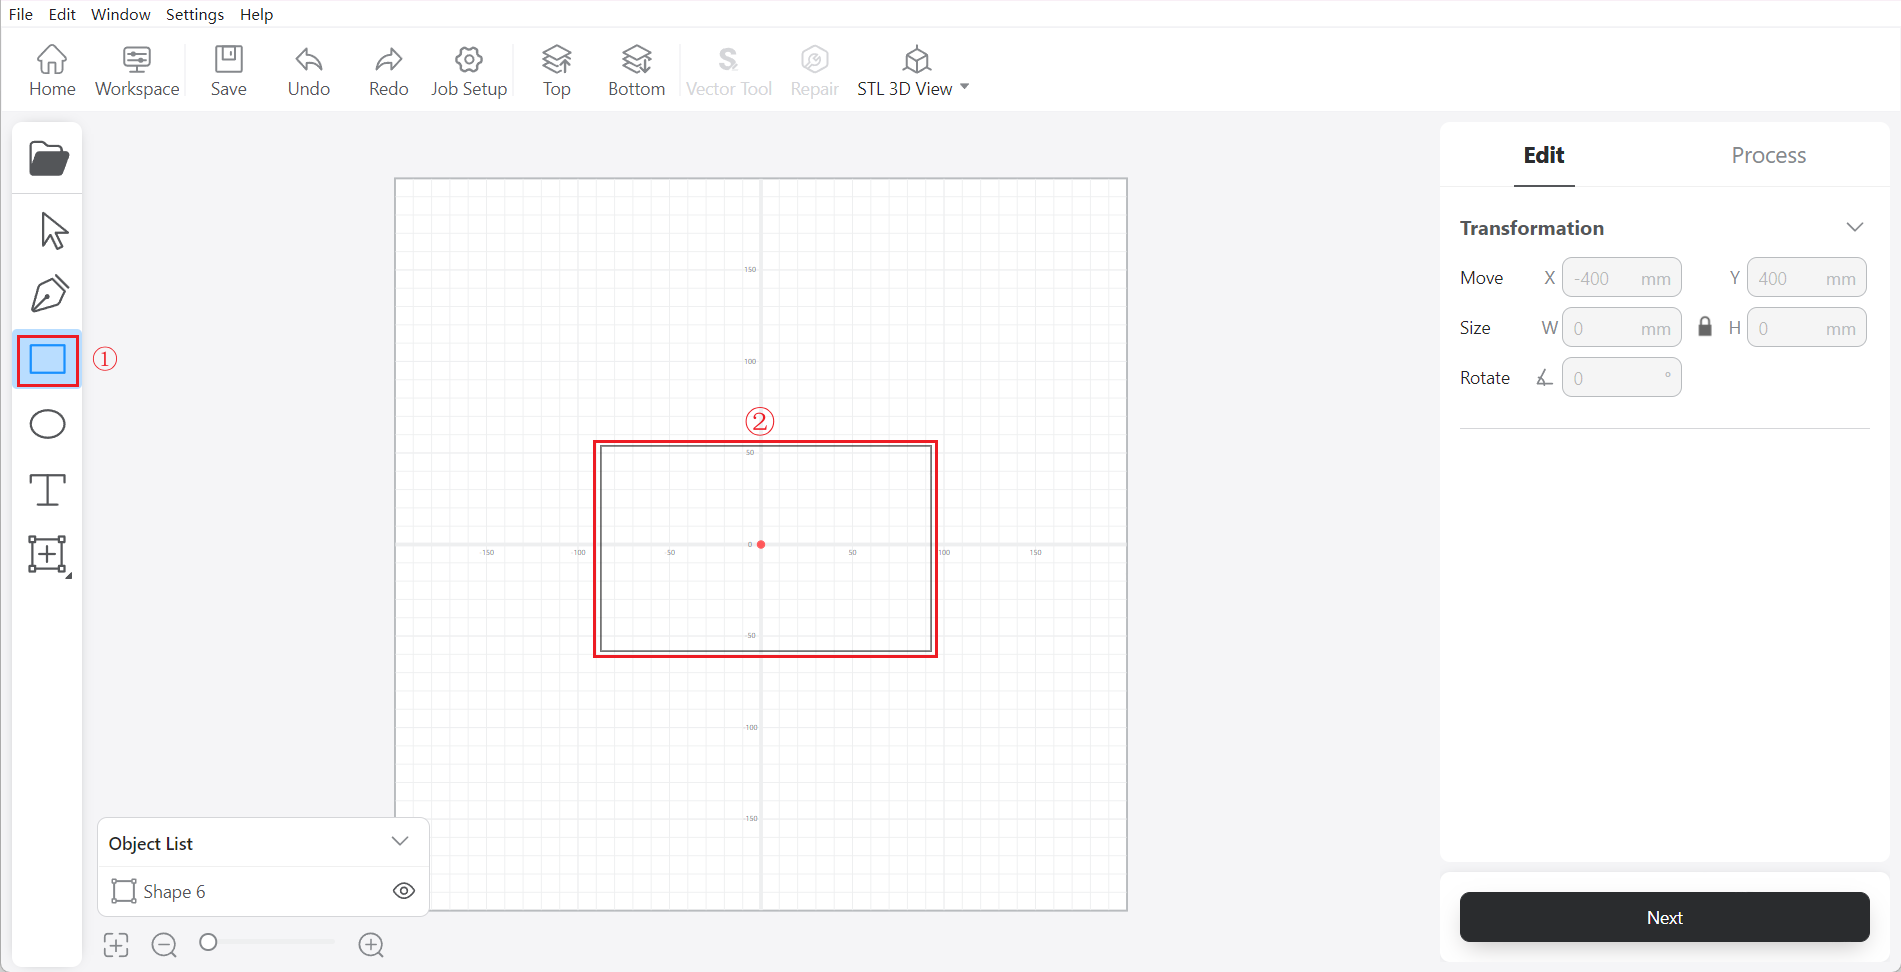
- Click the rectangle tool, drag to draw a rectangle.
- Click selection tool, select the rectangle, then set the Width and Height of the rectangle based on the size of your laser work.
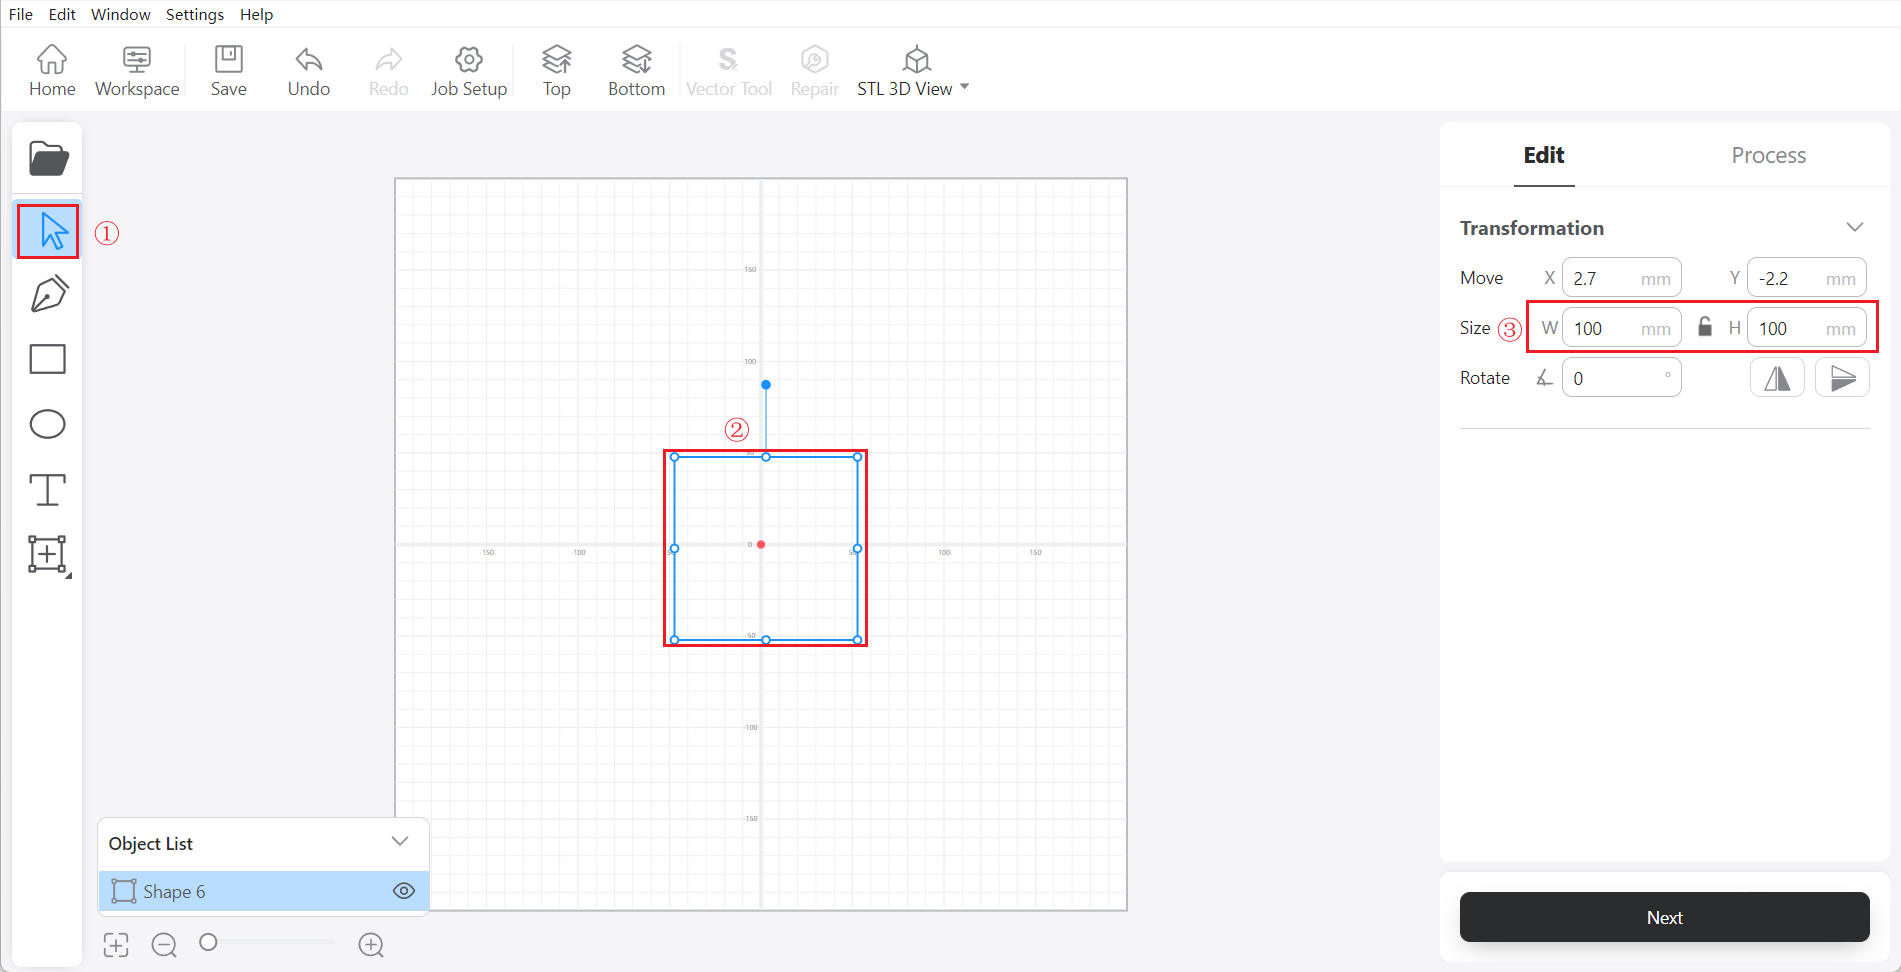
In the illustrated example, the width and height of laser work are both 100mm, so we set the width and height of the 2D contour also to 100mm. However, if you prefer to leave some space around your laser work to make the edges untouched, you can set the 2D contour size to be slightly bigger than that of the laser work.
You can click the lock button to lock and unlock the width-height ratio.
-
Click either Next to switch to Process Panel.
-
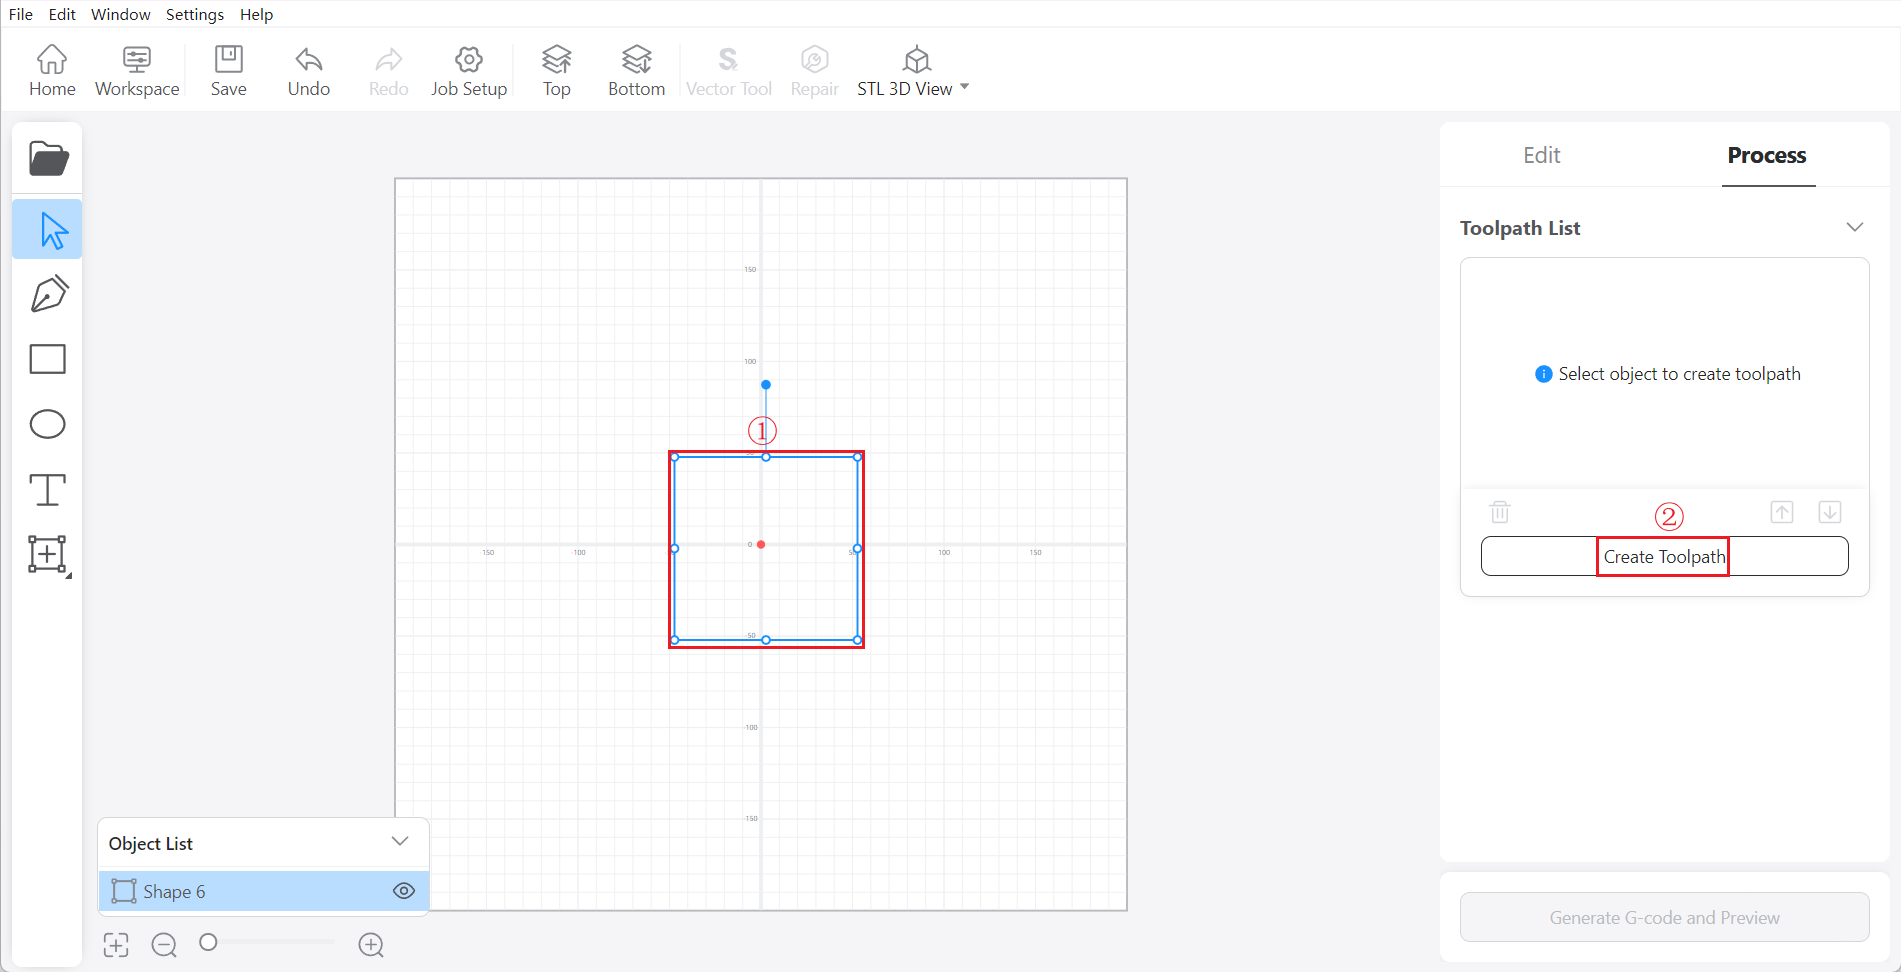
Select the rectangle and click Create Toolpath.
- Set Outline as Method, set Target Depth to 10mm, and select Flat End Mill 3.175 as the Tool and set Step down to 1mm.
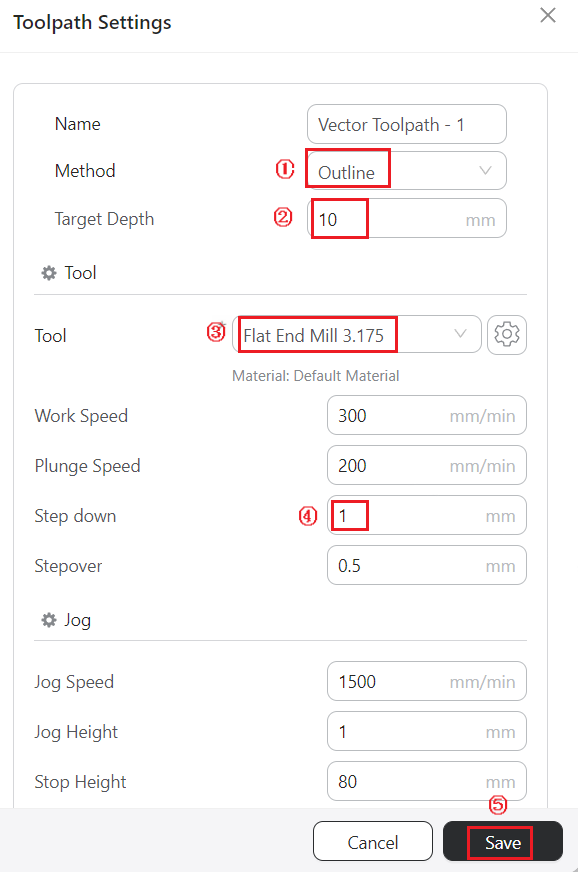
The height of the basswood used in the example is 10mm. We want it to be cut through, so here we need to set the Target Depth to 10mm. For parameters like work speed, you can also refer to our officially recommended parameters for 200W CNC Module.
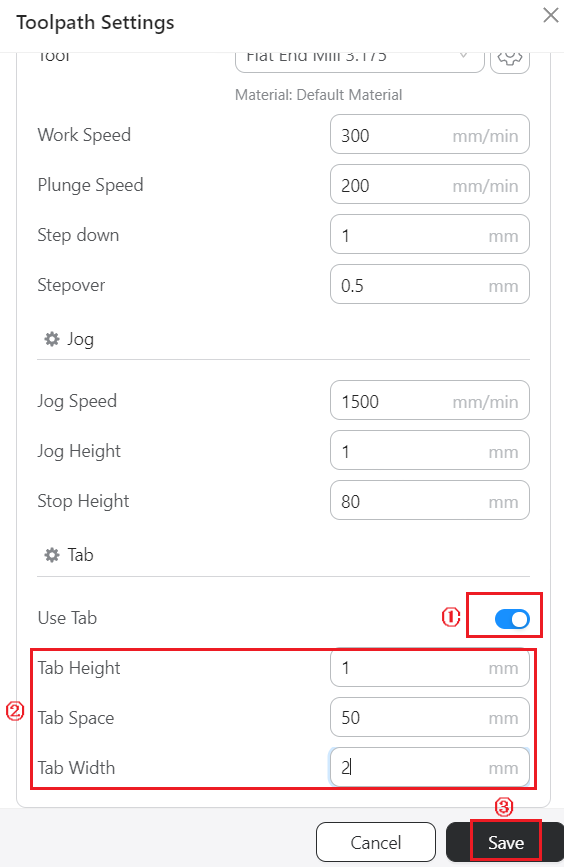
- Slide down and tick Use Tab, then set several tabs according to your preference. Click Save when finished.
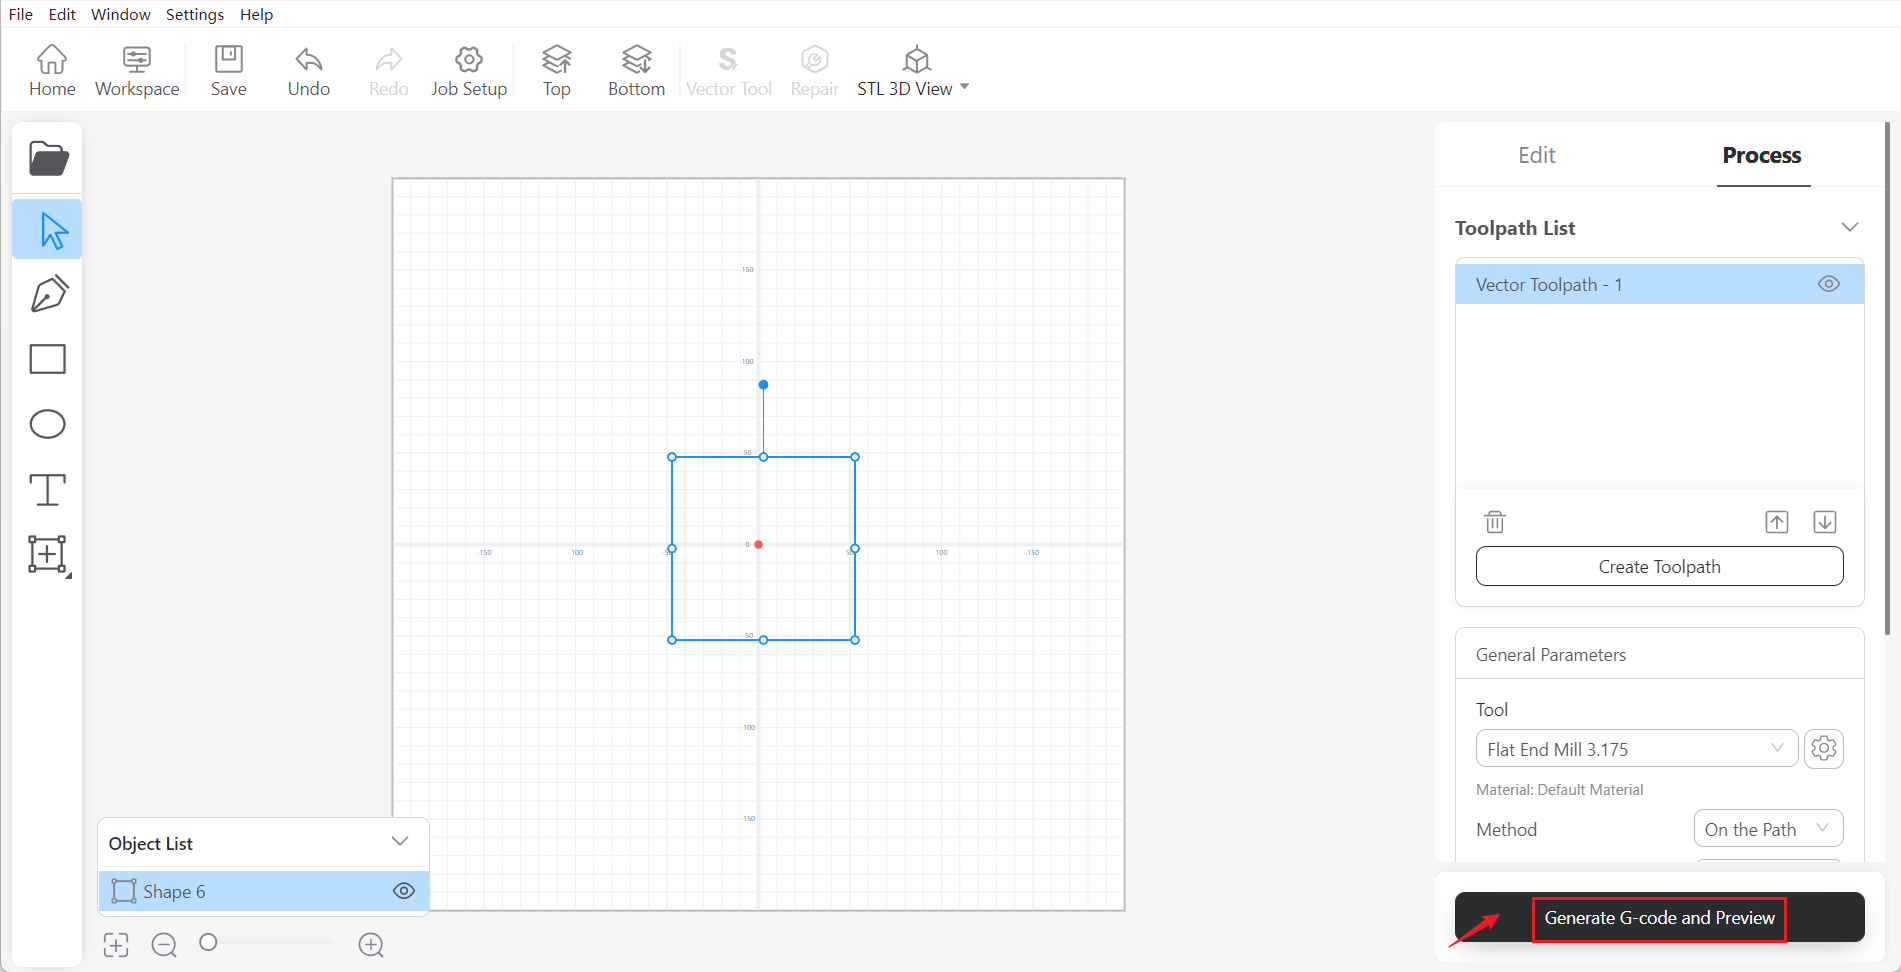
- Click Generate G-code and Preview.
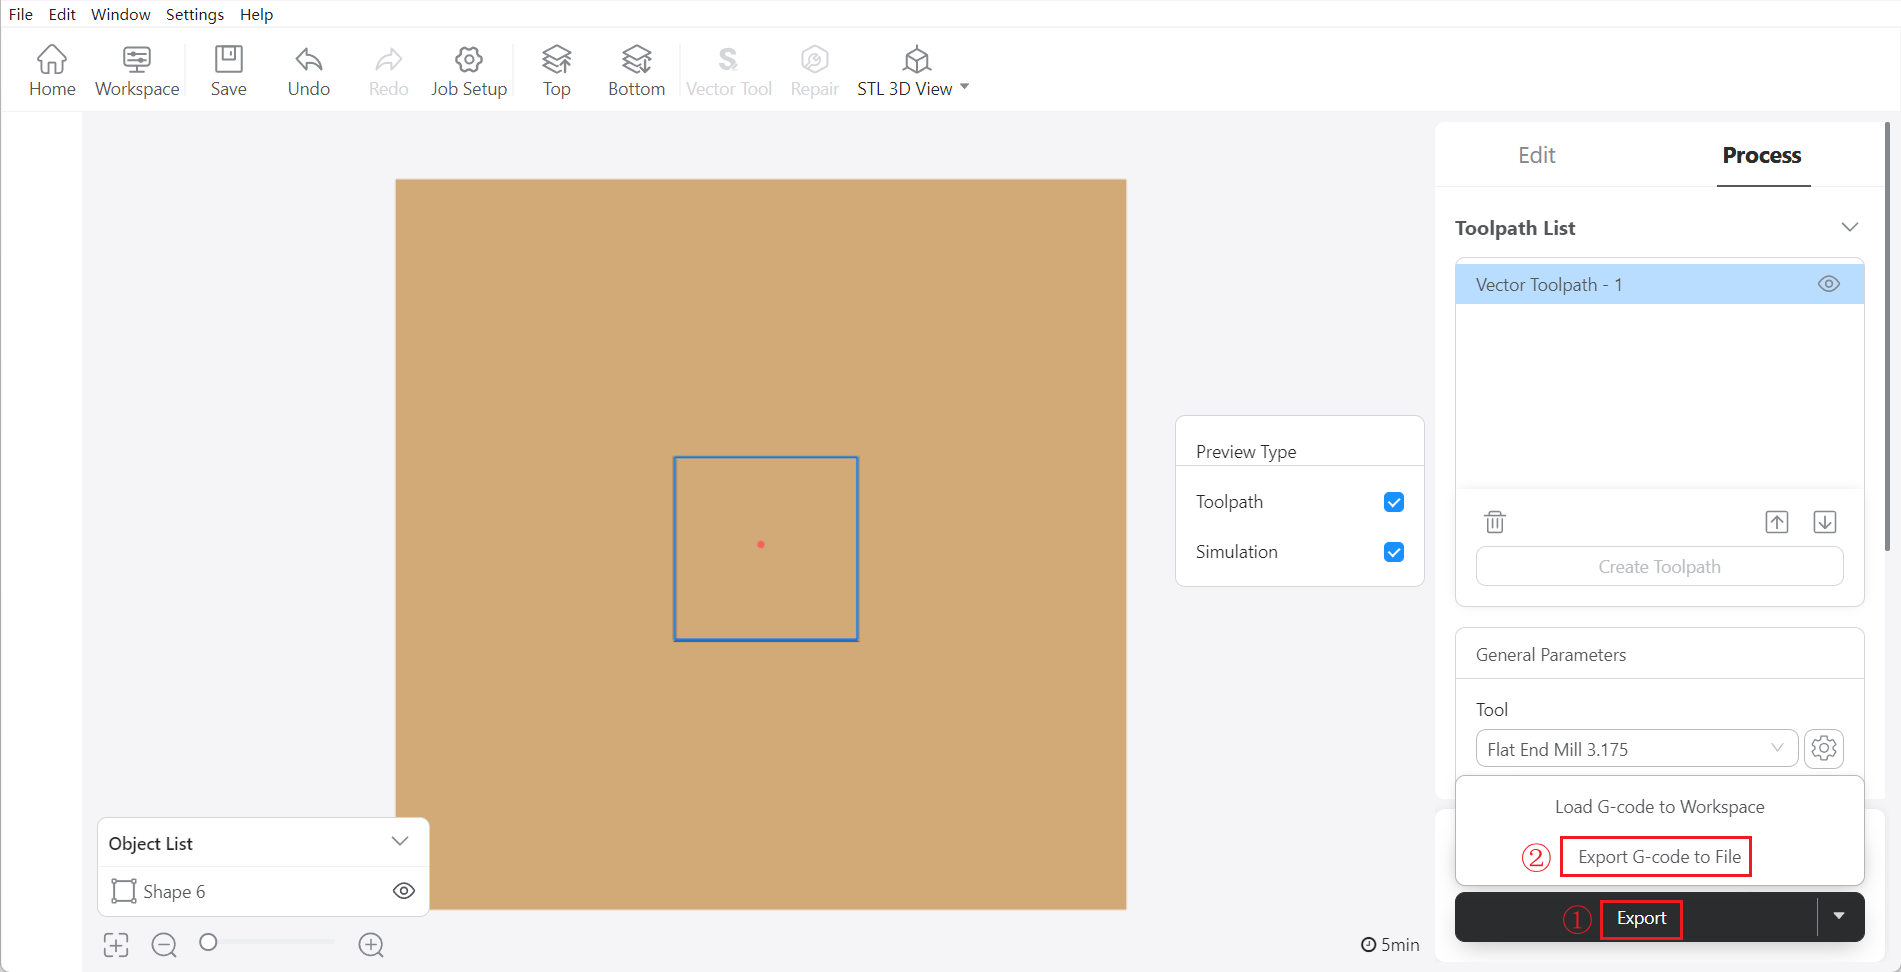
- Click Export > Export G-code to File.
¶ Transfer G-code file to the machine
- Copy the exported .cnc G-code file to USB flash drive.
- Insert USB flash drive into the Controller.
- On Touchscreen, you will find your .cnc G-code file.
¶ Change the toolhead to CNC Module
- Loosen the cam handle of the toolhead bracket, remove the laser module.
- Slide 200W CNC module into the bracket, then tighten the toolhead bracket.
- Plug the toolhead cable into the 200W CNC module.
¶ Install CNC carving and cutting platform
- Loosen the cam handle of the support platform, remove the laser engraving and cutting platform, then install the CNC carving and cutting platform onto the support platform.
- Tighten the cam handle of the support platform.
¶ Install the CNC bit
Please read the instructions below to install 3.175mm flat end mill onto your CNC module.
¶ Clamp the material
- Remove the material from the laser engraving and cutting platform.
- Read the following instructions to clamp the material onto the CNC carving and cutting platform.
¶ Set the work origin
On Touchscreen, open the G-code file, and set the work origin.
After setting the work origin, run boundary to make sure that the future machining area is as expected.

On Touchscreen, open the G-code file, and refer to section 5.6 Set the Work Origin and Start Carving to set the work origin.
After setting the work origin, run boundary to make sure that the future machining area is as expected.

¶ Start CNC cutting
Tap Start Job on Touchscreen to start the 2D contour process.
Ensure that you place the Integrated Controller within easy reach. In case of an emergency, press the emergency stop button on top of the Integrated Controller to stop the job immediately. After you have handled the emergency, rotate the emergency stop button clockwise to release it.
It is not recommended to turn on the exhaust fan of the Enclosure during a CNC process, or the dust and wood chips generated will attach to the inner surfaces of the Enclosure and the exhaust fan.
¶ 2.4 Clean the finished work and the machine
Gently remove the tabs around it, then your laser-CNC work is ready!