¶ 💡 Compatibility
This guide applies to the following machine. Please note when referencing:
- Machine model: U1
¶ ⏰ When to Use This Guide
When using the U1 for printing, if you observe any of the following issues, please refer to this guide for troubleshooting:
- One or more layers of the model show noticeable misalignment in the horizontal direction (X-axis and/or Y-axis).
- Your print remains structurally intact, but exhibits visible “staircase” layer offsets.
- The toolhead produces abnormal knocking, collision, or sharp noises during movement.
¶ 📋 Quick Info Card
- Difficulty: ⭐⭐⭐☆☆ (Normal)
- Estimated Time: 20 minutes
- Tools Needed: Hex key, wiping cloth, alcohol, wire brush
¶ 🔁 Troubleshooting Flowchart
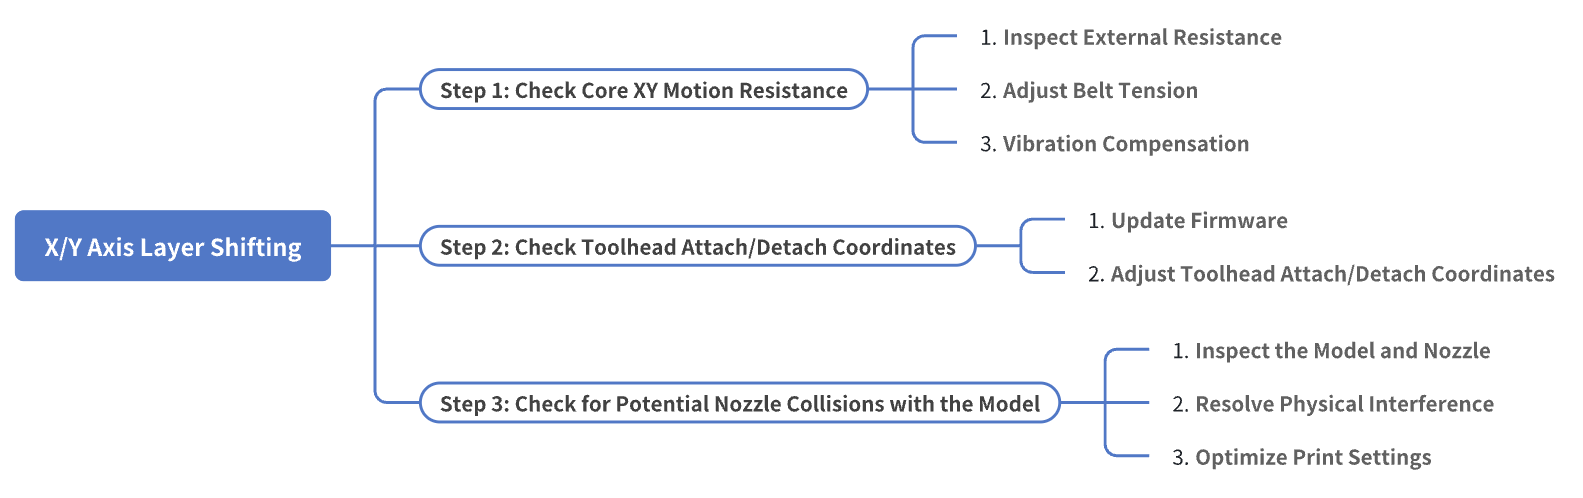
¶ 🔍 Quick Diagnosis
Which situation are you experiencing?
- Excessive Core XY motion resistance → Go to Step 1
- Toolhead attach/detach coordinate issues → Go to Step 2
- Nozzle scraping the model → Go to Step 3
¶ ⚠️ Important Notes
¶ Safety First
Always make sure the machine is fully powered off and unplugged before inspecting or adjusting any hardware.
¶ Avoid Collisions
Always handle the components with care. Avoid applying excessive force, as this may cause missed steps in the motors or potential mechanical damage.
¶ 🪄 Preparation
- Before you begin troubleshooting, note down the current key print settings (such as print speed) for reference.
- To help document the issue and assist with root cause analysis, we recommend enabling time-lapse feature during printing.
¶ 🛠️ Troubleshooting Steps
¶ Step 1: Check Core XY Motion Resistance
The U1 utilizes a Core XY motion system, which relies on the geometric arrangement of crossed belts. This configuration allows the toolhead to move at high speed and with high precision along the X and Y axes through the coordinated operation of two motors. In a Core XY system, motion in any direction depends on the simultaneous action of both motors, making the system particularly sensitive to motion resistance and mechanical consistency.
¶ 1. Inspect External Resistance
If the XY axes encounter foreign objects while moving back and forth, the toolhead's path and printing accuracy can be affected. Therefore, start by inspecting the surface condition of the carbon rods.
- If there is dirt or debris, clean the surfaces using a wiping cloth and alcohol.
- If the surfaces are clean and free of dust, filament particles, or other debris, proceed to the verification steps below.
¶ 2. Adjust Belt Tension
Belt tension is a critical mechanical factor affecting 3D printing accuracy. A loose belt can slip when the motor rotates, preventing the system from achieving accurate motion. Conversely, a belt that is too tight increases friction and load, which may cause motor stalling or missed steps, indirectly leading to layer shifting or other issues.
(1) Locate the XY Belts
The XY axis uses two belts, one on the top and one on the bottom. Both belts start at one end of the toolhead swapper, loop around the XY frame, and attach to the other end of the toolhead swapper.
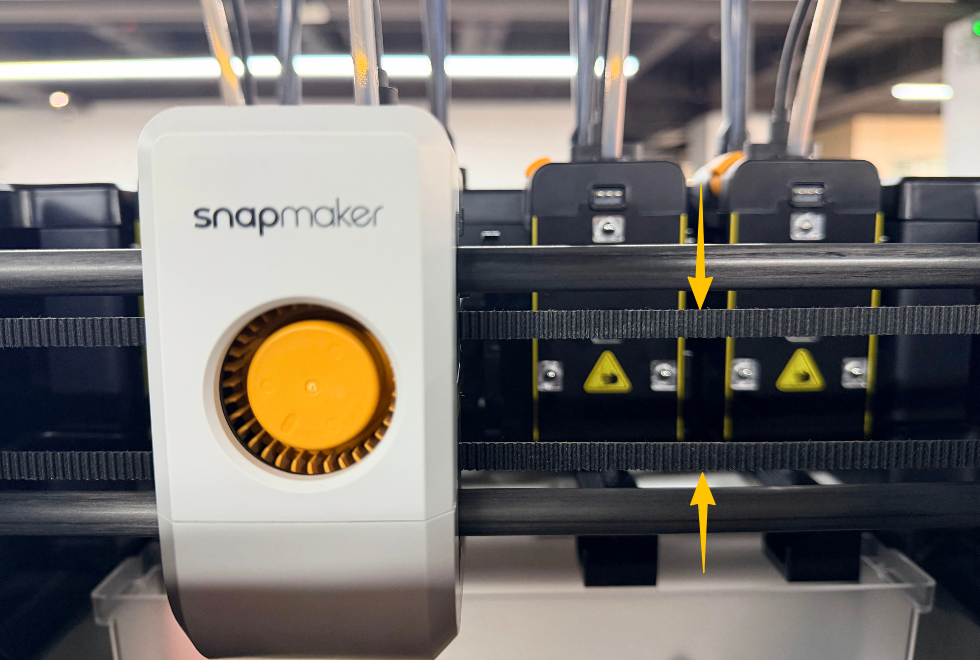
(2) Check the Belt Tension
Press the midpoint of each belt with your finger and observe the rebound:
- If the belt is too loose, proceed with the adjustment steps below.
- If the belt tension is appropriate, skip to Step 2 for further inspection.
(3) Manually Adjust the Belt Tension
- Loosen the two screws on the back of the toolhead swapper by turning them counterclockwise.
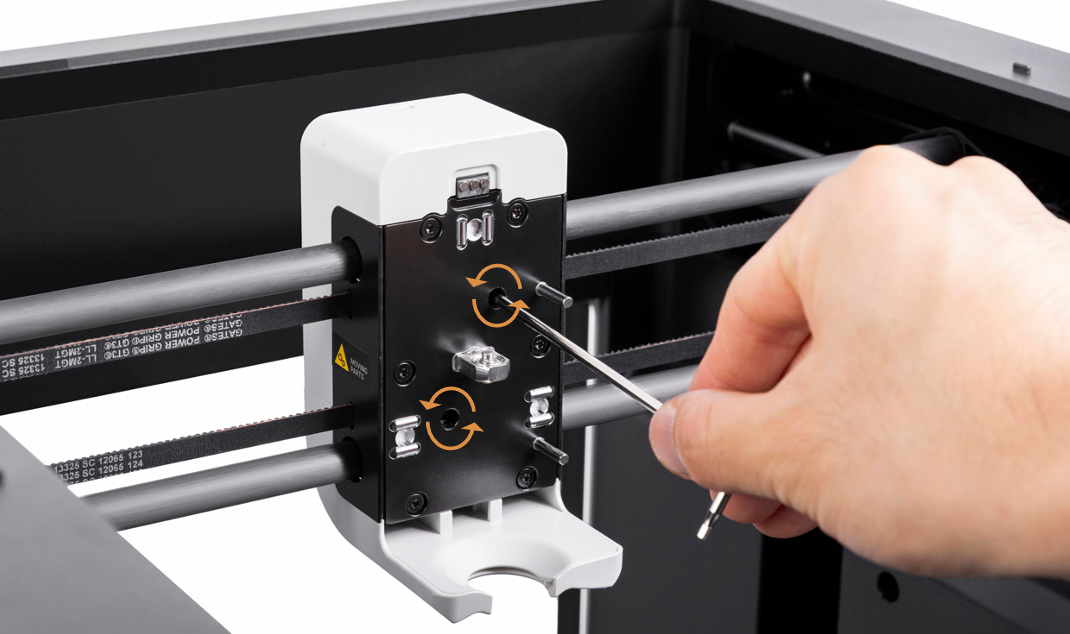
- Hold the toolhead swapper and move it along the path indicated below for two full loops. Resistance during movement is normal.
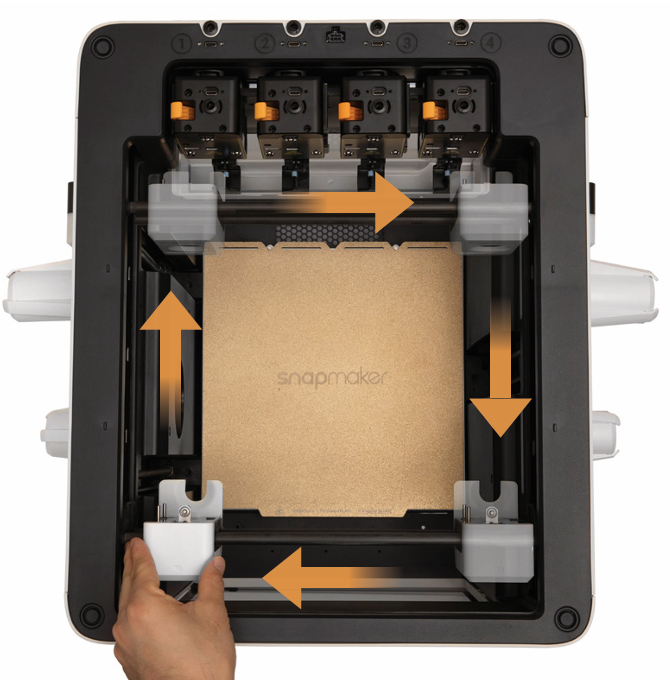
Do not apply any lubricant on the X-axis carbon rods, as this may affect motion accuracy or damage components.
- Finally, tighten the two screws clockwise to secure the toolhead swapper.
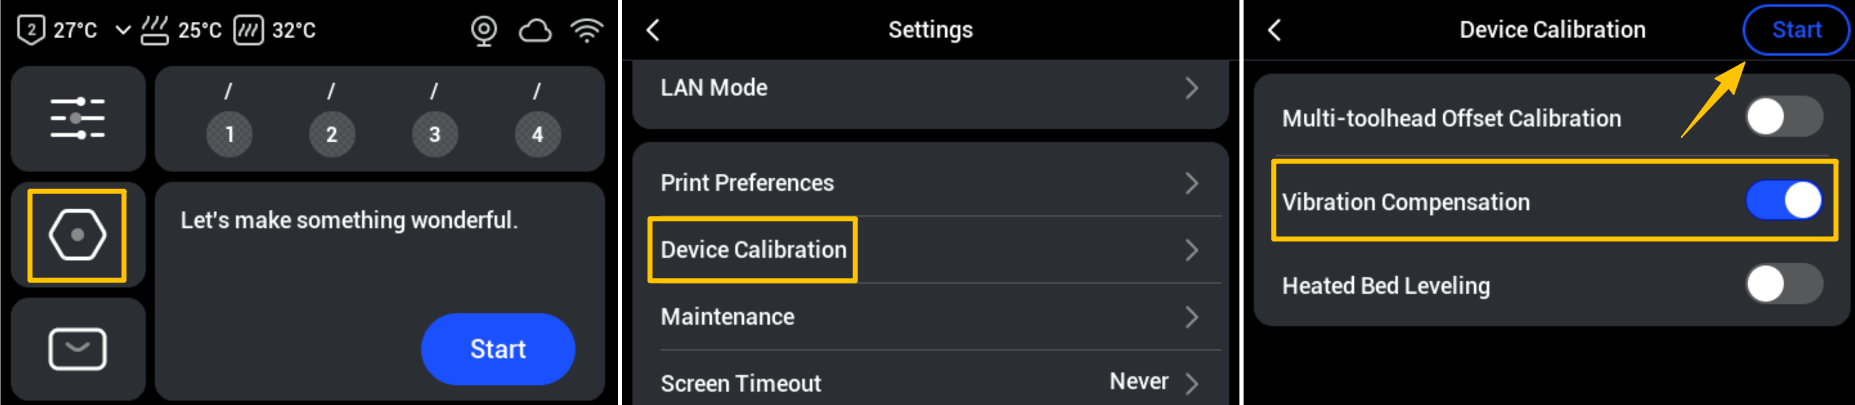
¶ 3. Vibration Compensation
After adjusting the belt tension, we recommend performing Vibration Compensation. On the touchscreen main interface, go to Settings > Device Calibration > Enable Vibration Compensation > Start.
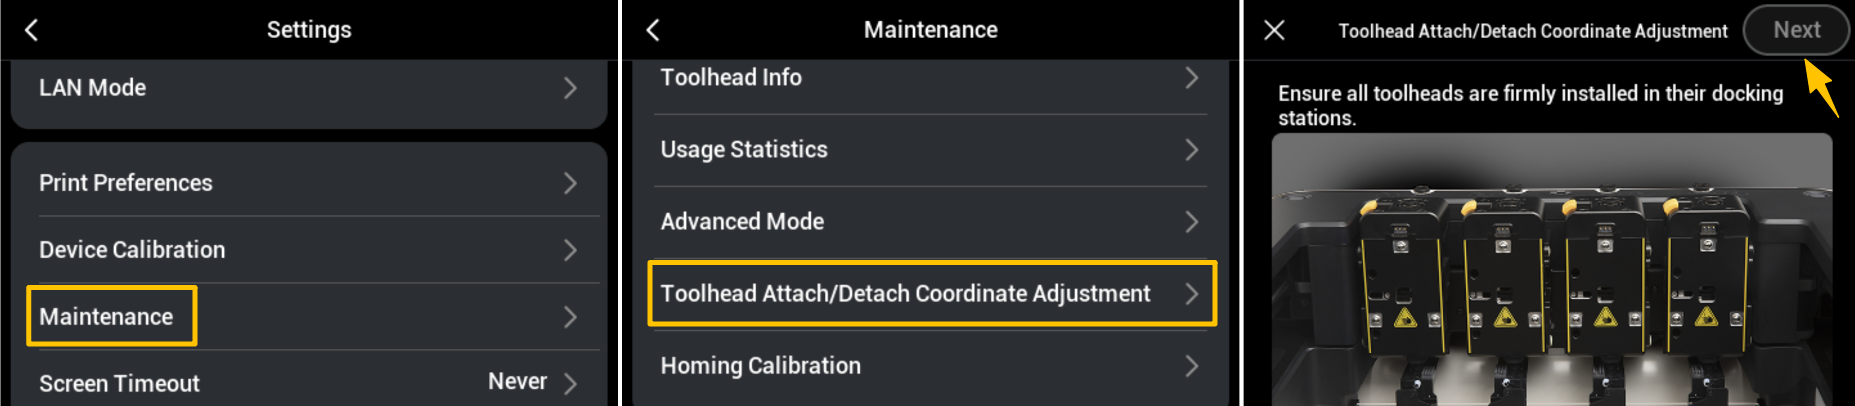
¶ Step 2: Check Toolhead Attach/Detach Coordinates
Toolhead attach/detach coordinates define the logical positions of the toolhead along the X, Y, and Z axes, including the offset of the toolhead relative to the machine’s origin and the relative positions between different toolheads. If the toolhead coordinates are incorrect, the system may think the toolhead is at point A while it is actually at point B, causing layer misalignment during printing.
- Make sure your U1 firmware is updated to V0.9.4 or later to enable the toolhead coordinate adjustment feature. Please refer to U1 Firmware Release Notes for the latest updates.
- On the touchscreen main interface, go to Settings > Maintenance > Toolhead Attach/Detach Coordinate Adjustment > Next, and follow the on-screen instructions to complete the coordinate adjustment step by step.
¶ Step 3: Check for Potential Nozzle Collisions with the Model
If the nozzle collides with the model during toolhead movement, it may cause sudden skipped steps, leading to layer shifting.
¶ 1. Inspect the Model and Nozzle
- Check whether the model is lifting or warping, including overhang warping and edge lifting. Warping can cause local heights to exceed the expected slicer path, which is the most common cause of collisions.
- Check the nozzle for filament residue. This can alter the nozzle’s actual physical profile, causing unintended scraping when passing over the model surface.
¶ 2. Resolve Physical Interference
(1) Overhang Warping: If there is warping in overhang areas, it indicates insufficient support during printing, causing molten filament to sag under gravity and curl upward. It is recommended to add supports to the affected overhang areas.
(2) Edge Lifting at the Model Base: If the model’s bottom edges lift, this indicates poor adhesion to the build plate. We recommend:
- Clean the PEI sheet to remove dirt or debris. You can refer to How to clean your PEI steel sheet for detailed instructions.
- Apply a thin, even layer of 3D printing glue if necessary to improve adhesion.
- Slightly increase the heated bed temperature within the recommended range for the filament being used.
(3) Filament Residue on the Nozzle: Carefully remove residue using the wire brush provided with the machine. To prevent recurrence:
- Pre-dry filaments that are highly sticky or prone to stringing before use.
- Enable the wipe tower feature to reduce the likelihood of filament dragging on the nozzle during movement.
¶ 3. Optimize Print Settings
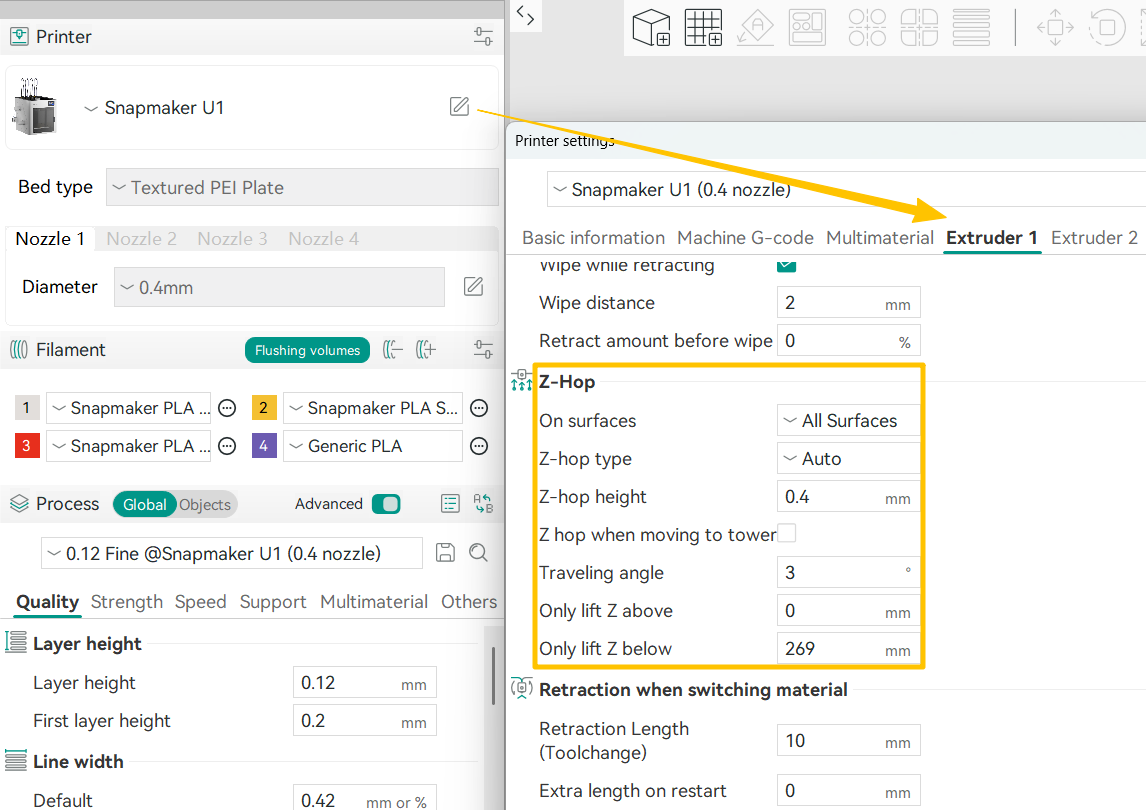
(1) Enable Z Hop
In Snapmaker Orca, click the Edit button on the right side of the printer interface > select the corresponding extruder > enable Z Hop. This will cause the nozzle to lift slightly when moving over the model, effectively preventing collisions.
(2) Reduce Print Speed
Lowering the print speed can reduce the instantaneous impact force when the nozzle contacts the model, while giving each layer sufficient time to cool and solidify, minimizing the risk of the model being scraped.
(3) Add Supports
For steep overhangs (typically greater than 45°), it is recommended to add support structures to prevent curling and collisions. You can also adjust the model’s orientation on the build plate and rotate it to reduce long unsupported spans.
¶ ✅ Verification
After completing the above inspections and adjustments, print the same model again and observe whether the surface patterns or textures are clear and free of misalignment. If the issue is resolved, gradually restore the original print speed (e.g. increase by 10% each time) and print test models to determine the machine’s stable performance limits under the current settings.
¶ 📚 Related Resources
- U1 Adjusting the XY-Axis Timing Belt Tension
- U1 Firmware Release Notes
- How to clean your PEI steel sheet
¶ 💬 Reach out to Snapmaker Support
After following the troubleshooting steps, if you find it difficult to resolve your issue, kindly submit a support ticket through https://snapmaker.formcrafts.com/u1-troubleshooting-request and share your troubleshooting results with pictures or videos. Our dedicated support team will be more than willing to assist you in resolving the issue.