¶ 💡 Compatibility
This guide applies to the following machine. Please note when referencing:
- Machine model: U1
¶ ⏰ When to Use This Guide
Filament adhesion to nozzle refers to a condition during printing where molten filament abnormally adheres to the external wall or surrounding area of the nozzle. This can lead to surface defects on the printed part such as stringing, under-extrusion, or roughness. In severe cases, it may cause nozzle clogging or extrusion interruption, ultimately resulting in print failure and negatively affecting printing efficiency and part quality.
¶ 📋 Quick Info Card
- Difficulty: ⭐⭐☆☆☆
- Estimated Time: 10-20 minutes
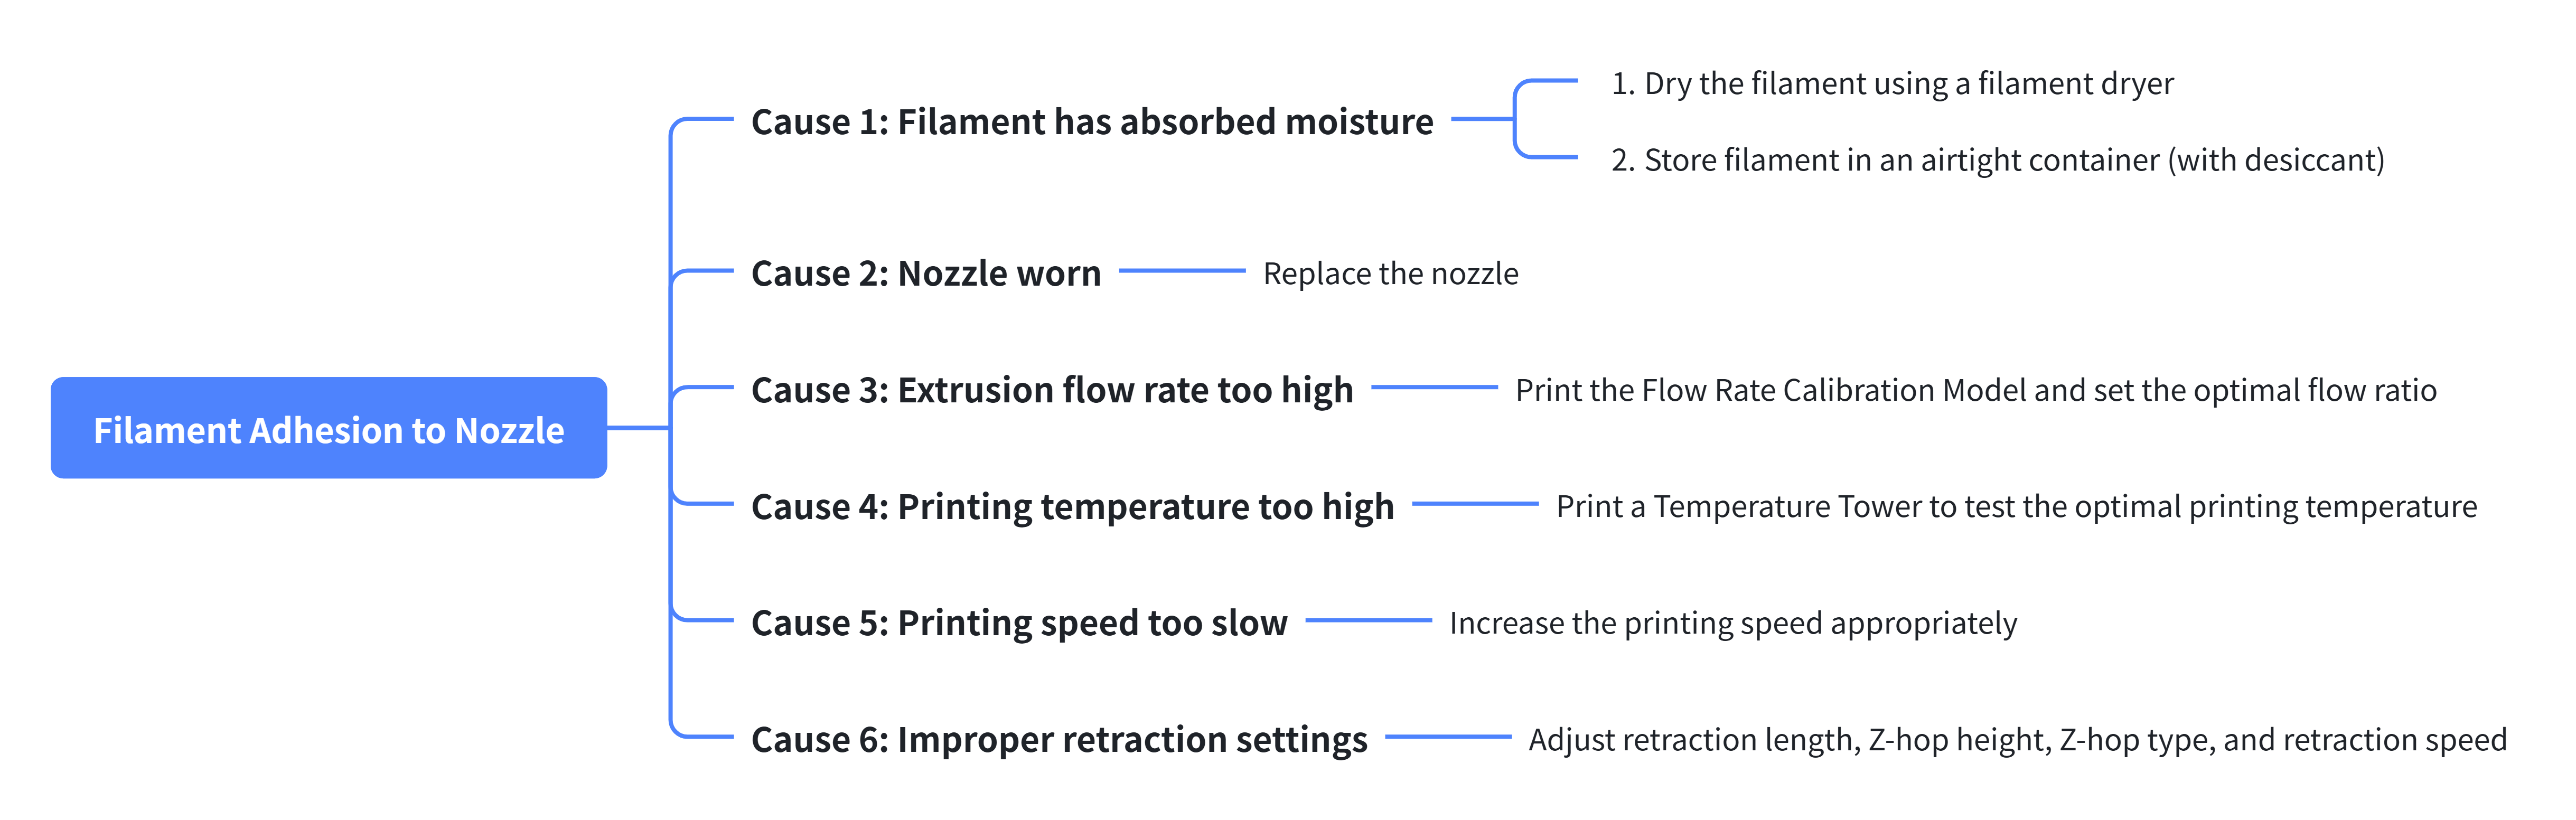
¶ 🔁 Troubleshooting Flowchart
¶ ⚠️ Important Notes
- Before performing any hardware checks or adjustments, ensure the printer is completely powered off and unplugged.
¶ 🪄 Preparation
¶ Tools Required
- H2.0 Hex Key
- Snapmaker SnapDryer filament dryer (purchase separately if needed)
¶ 🛠️ Troubleshooting Steps
¶ Cause 1: Filament Has Absorbed Moisture
If you are using the official Snapmaker SnapDryer filament dryer, thoroughly dry the filament according to the recommended drying settings before printing.
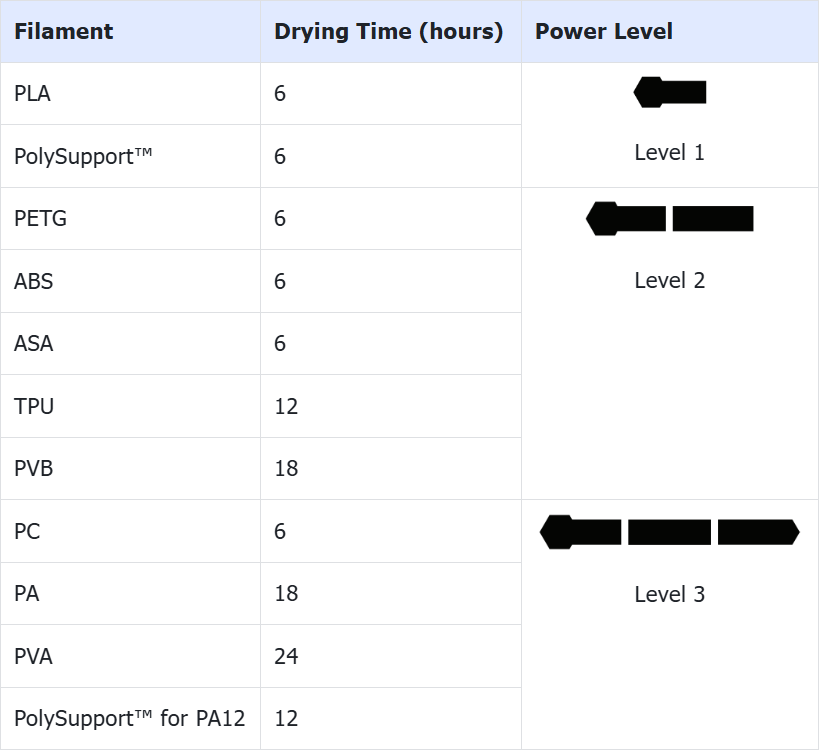
You can purchase the Snapmaker SnapDryer from the official Snapmaker store as needed.
For a video guide on how to use the Snapmaker U1 with the SnapDryer, refer to How to Use the SnapDryer with the Snapmaker U1。
Opened filament should be promptly stored in a sealed bag or dedicated container. Adding desiccant (e.g., silica gel) is recommended to improve moisture protection.
¶ Cause 2: Nozzle Worn
If the nozzle is worn, refer to U1 Hot End replacement and configuration for replacement procedures.
¶ Cause 3: Extrusion Flow Rate Too High
Theoretically, the filament extrusion amount is determined by the flow rate setting. However, in reality, the flow rate value in the slicing software may differ from the actual extrusion amount. Therefore, you can perform a test to calibrate the software settings, achieving better print results.
¶ 1. Print the "Flow Rate Calibration Model" to Test the Best Flow Correction Value for Your Filament
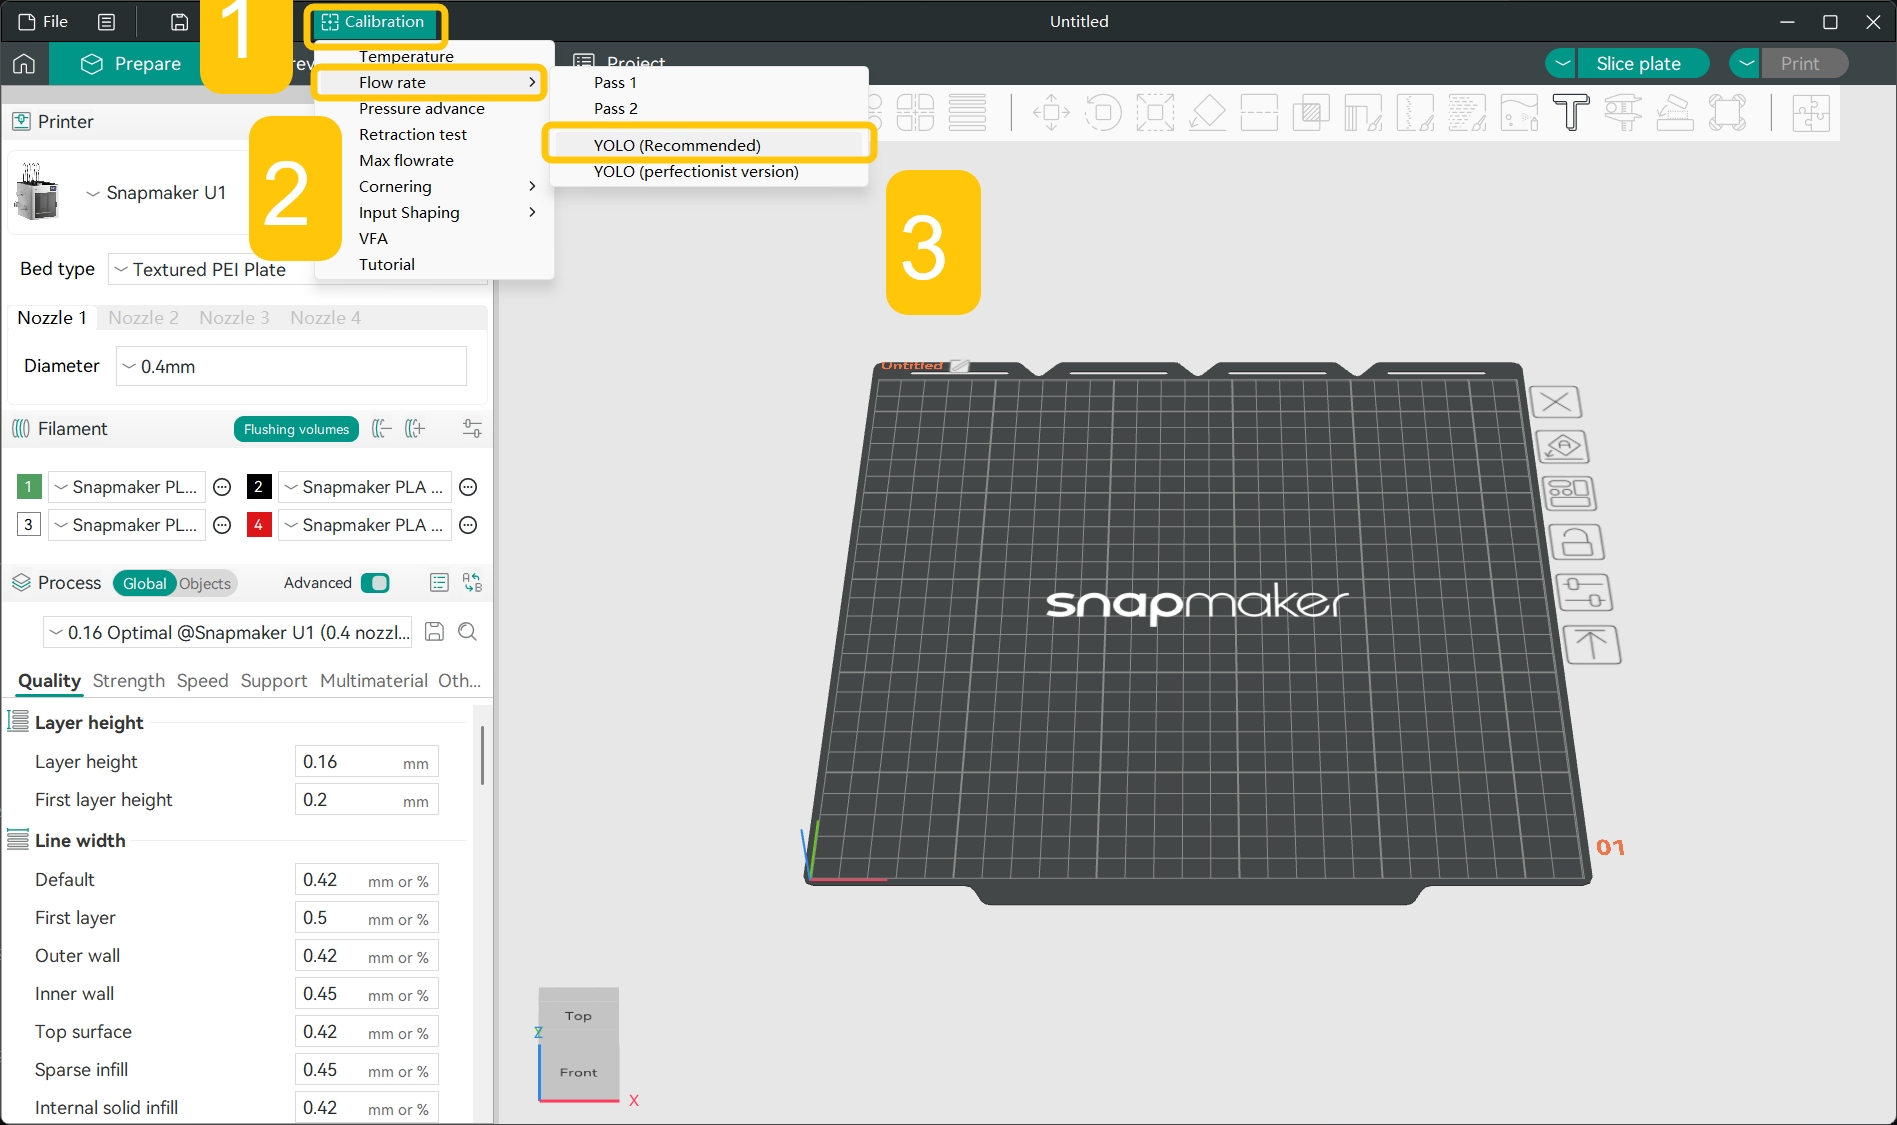
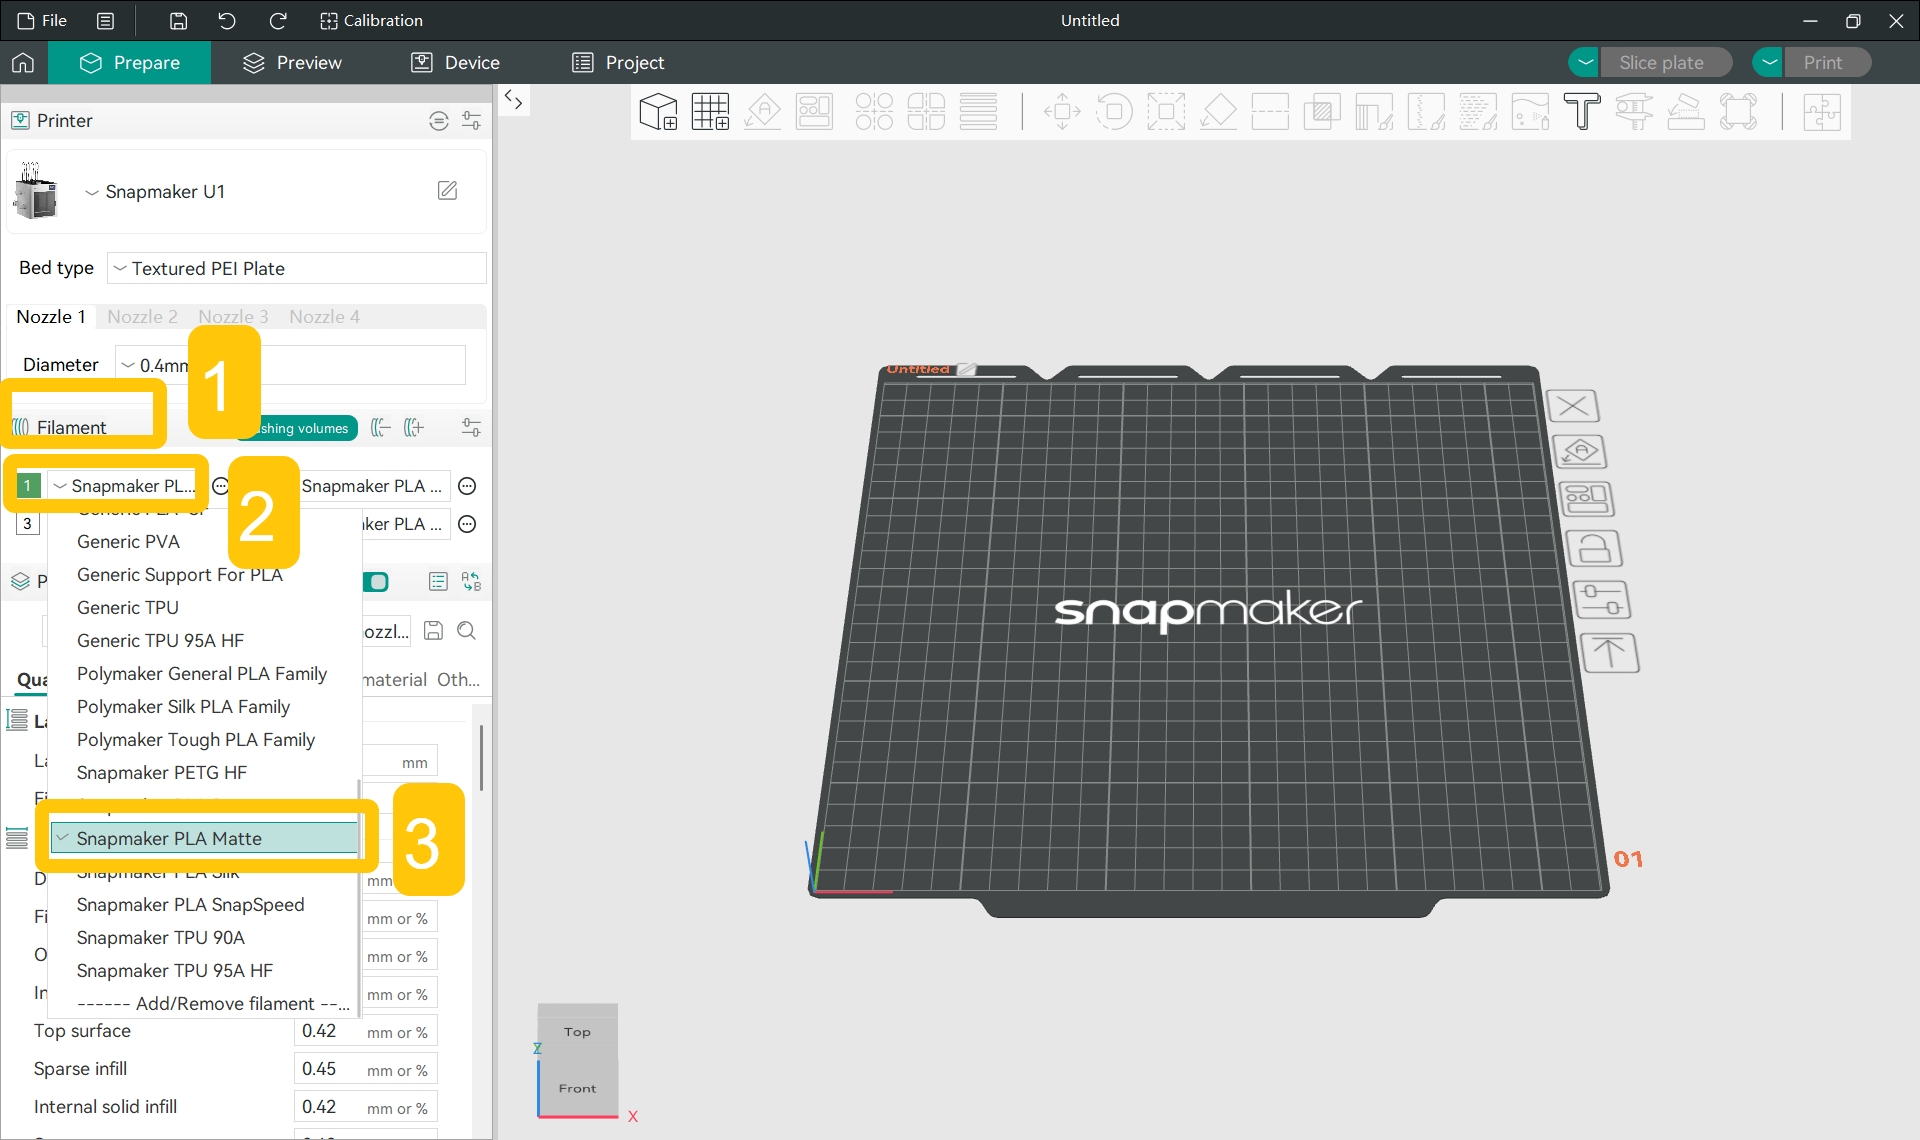
- In the top menu bar, click
Calibration>Flow rate>YOLO (Recommended)to automatically generate a flow calibration model.
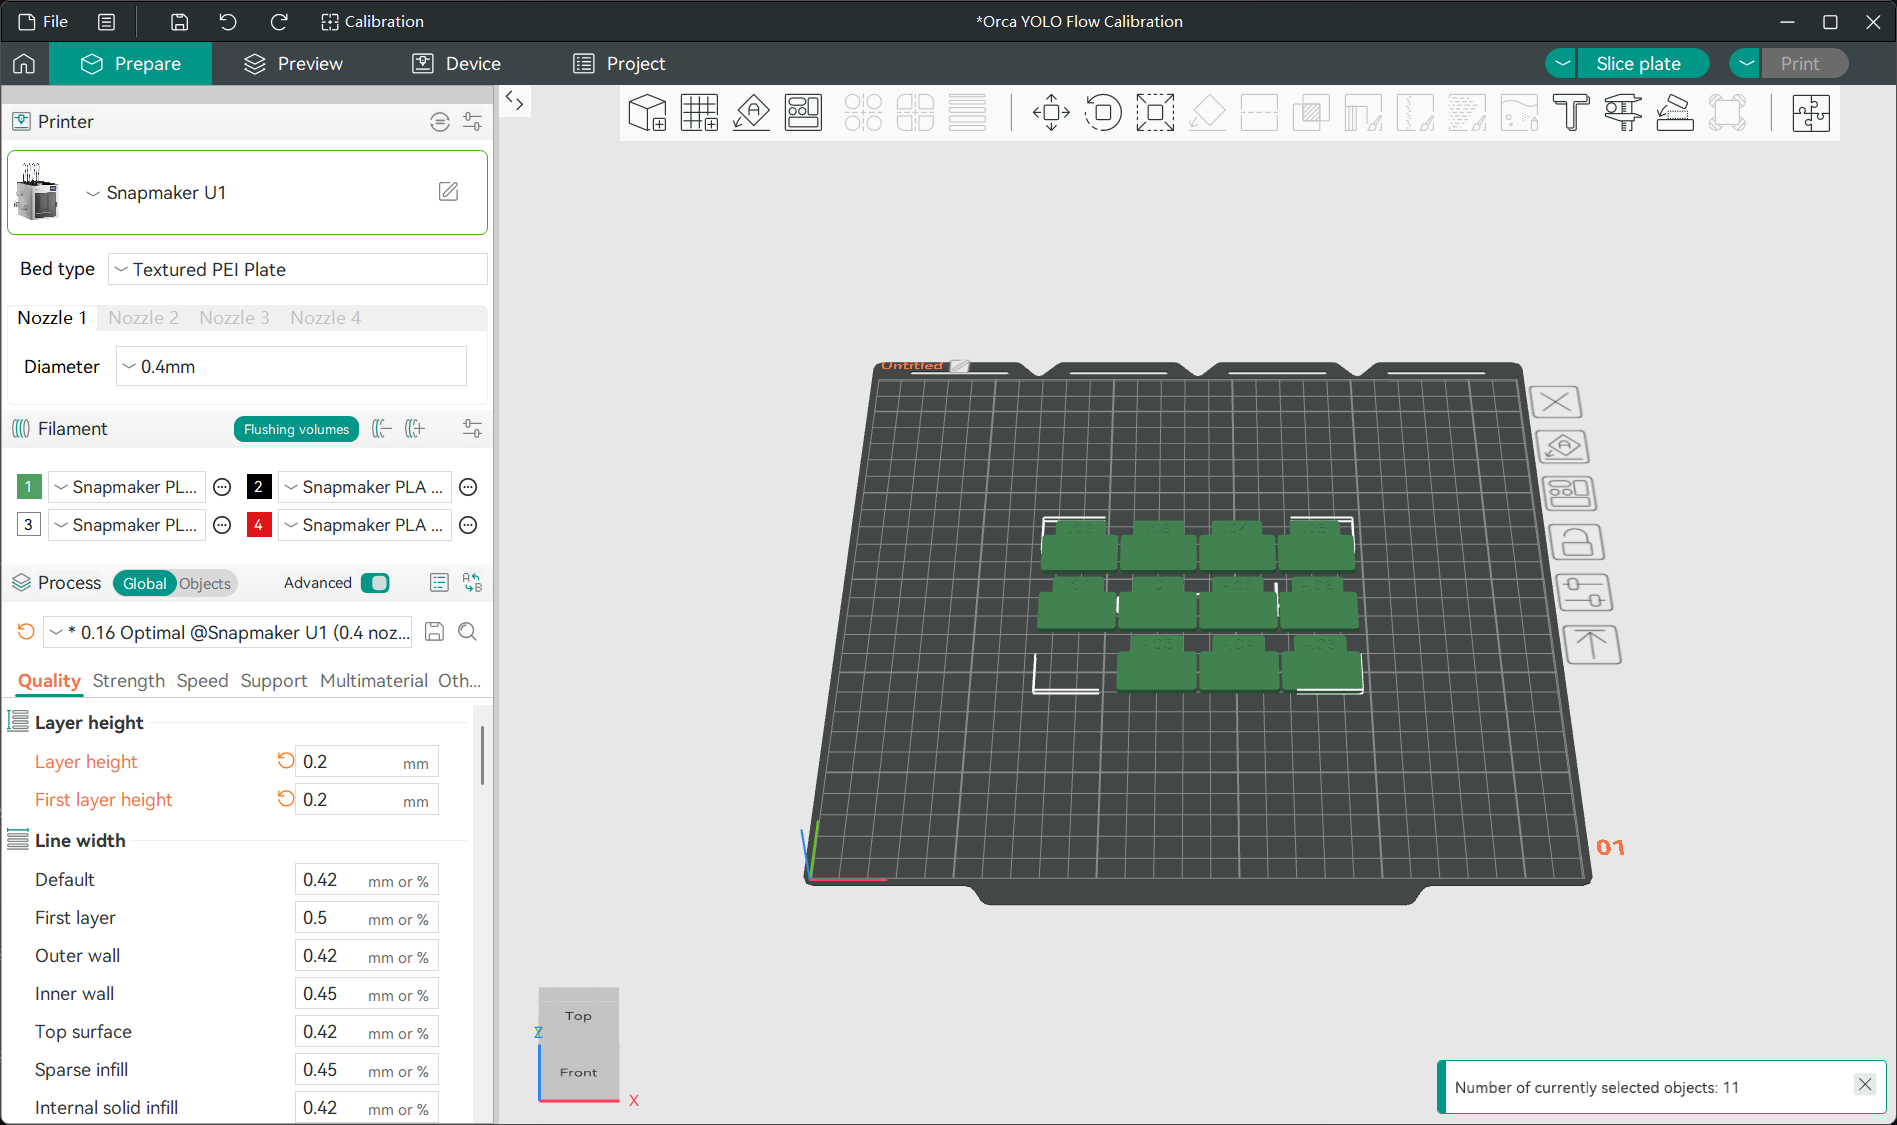
- In the
Filamentsection of the left sidebar, click the specific filament name and select the filament type you used for printing from the drop-down menu.
- Slice the model and print it.
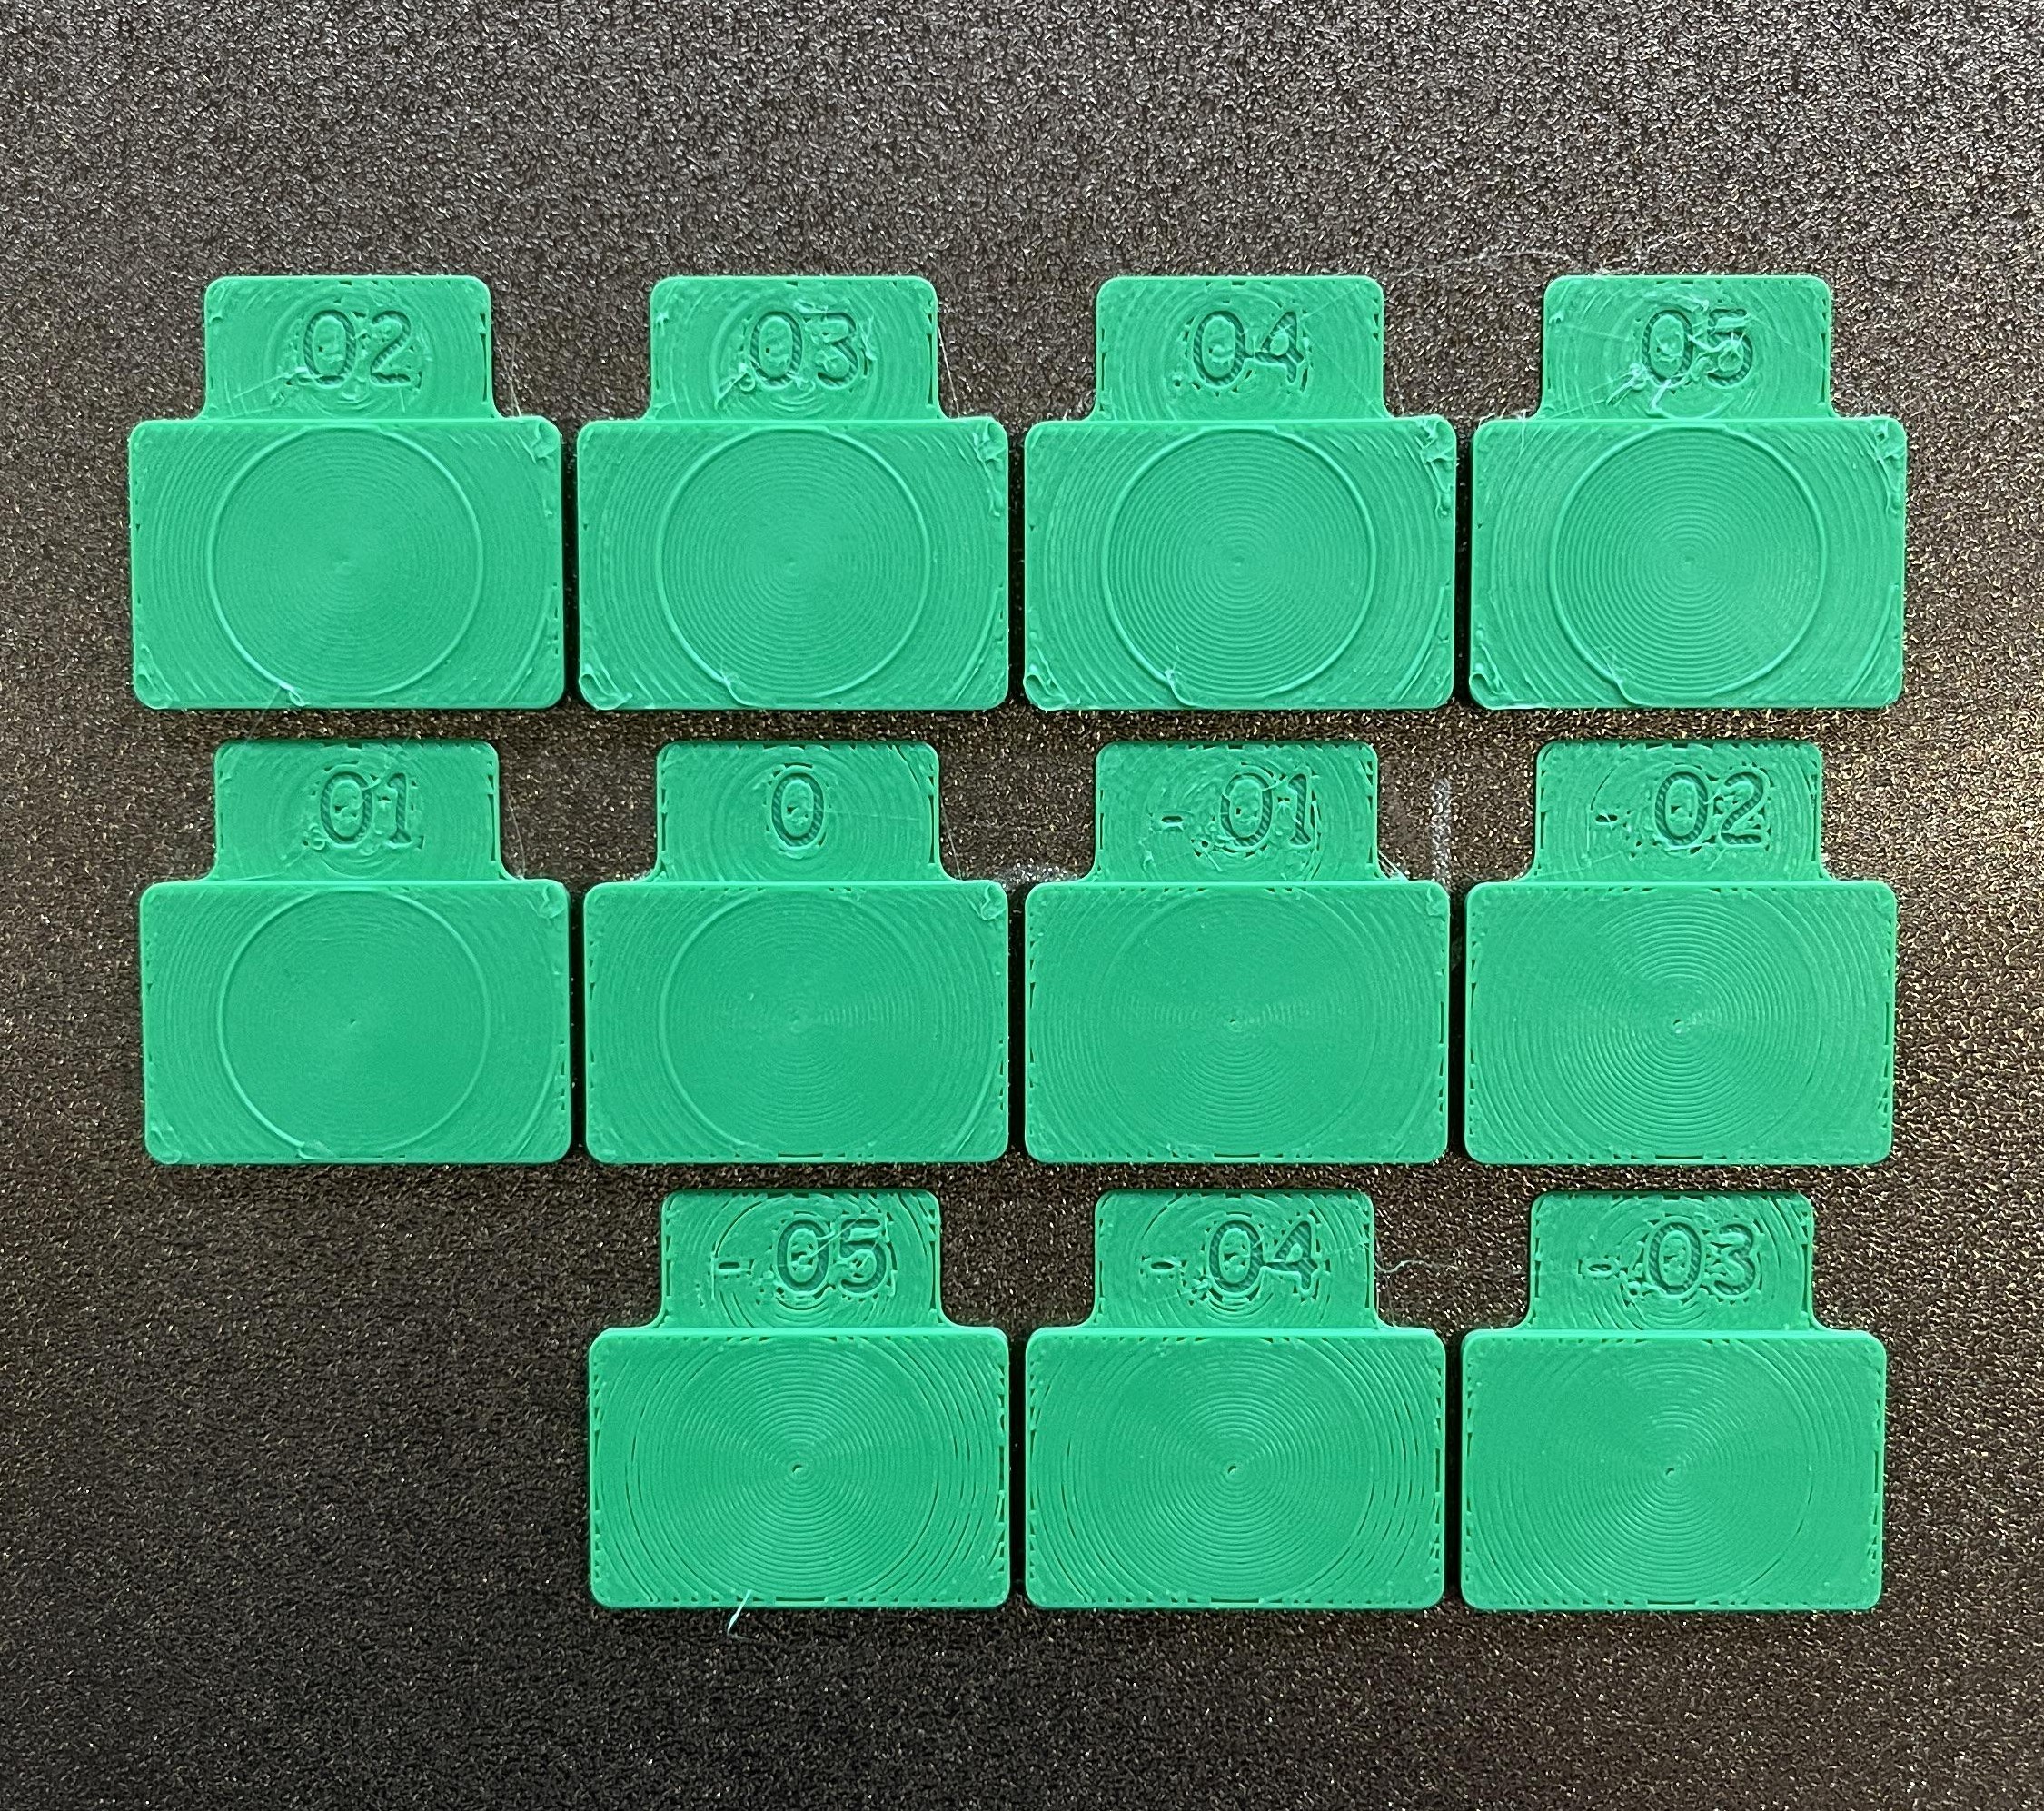
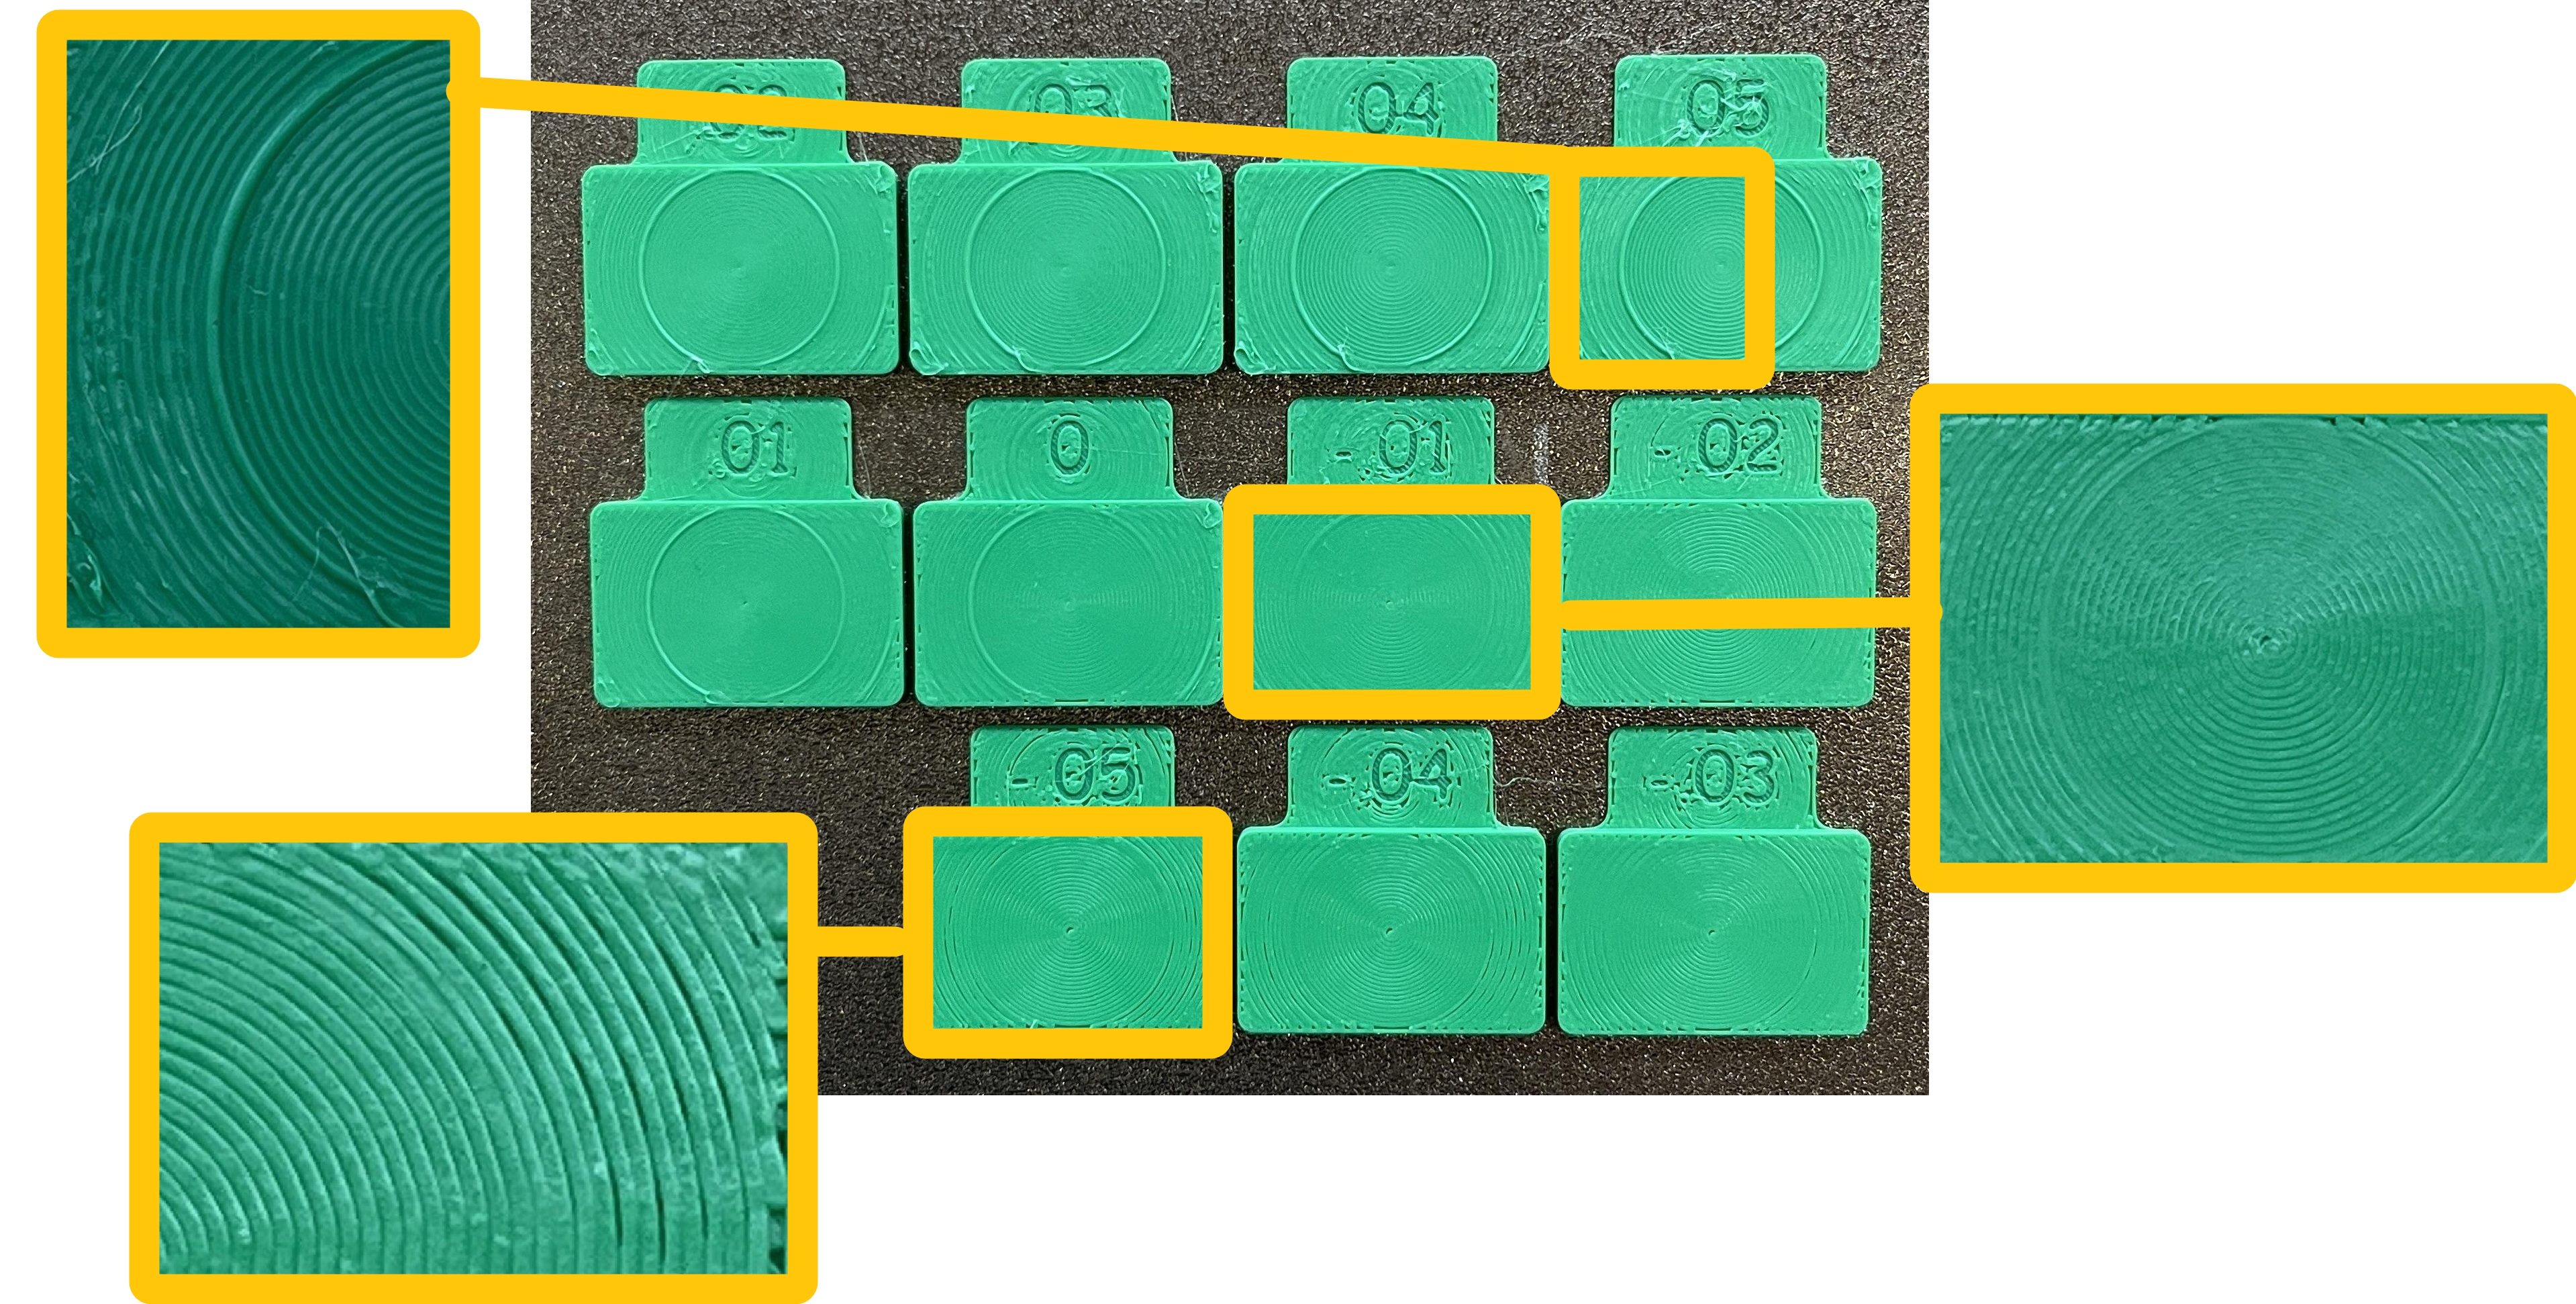
- Observe the print result, and select the block with a surface that has the fewest bulges and gaps. The number on that block is the best flow correction value.
For example, in this case, the block marked -.01 (i.e. 0.01) can be considered the flattest, giving the best flow correction value.
¶ 2. Set the Best Flow Correction Value for Your Filament
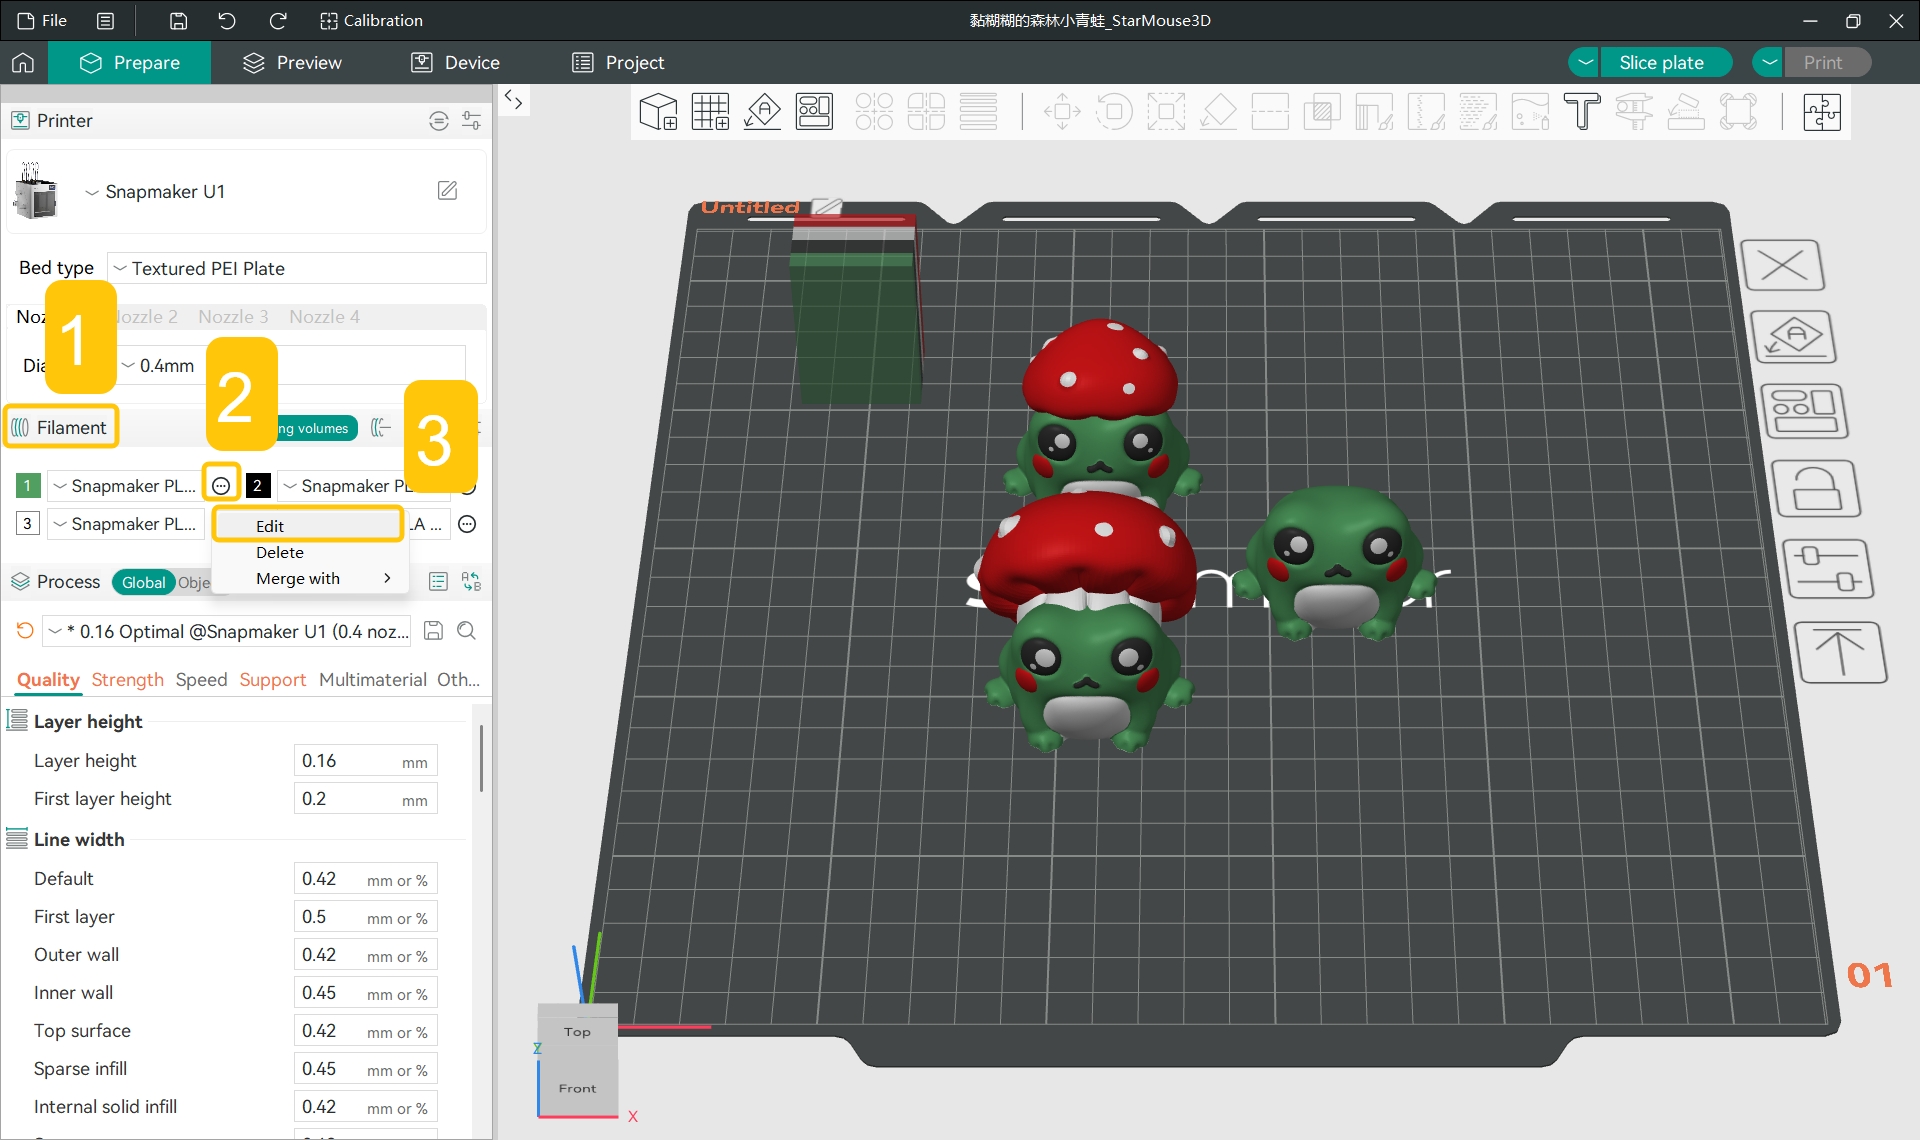
- In the
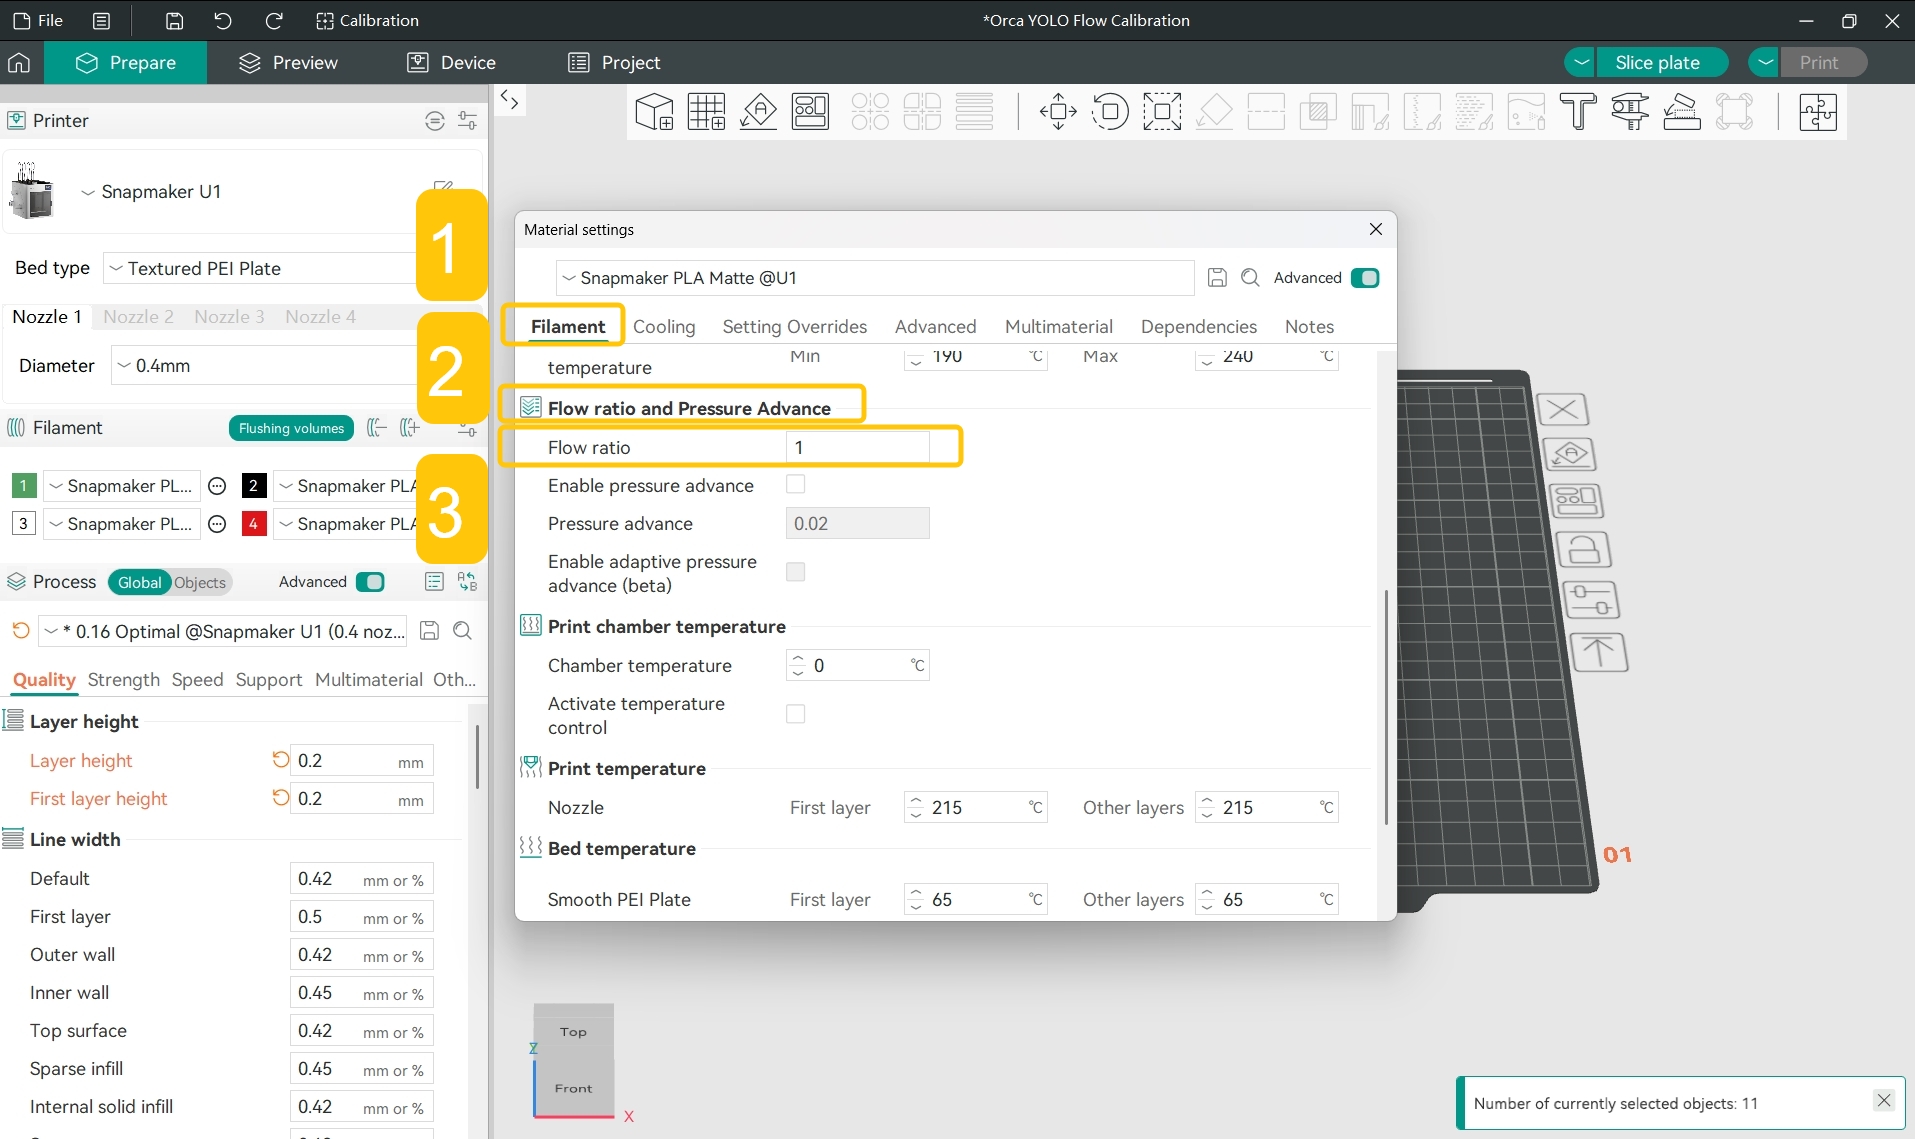
Filamentsection of the left sidebar, click the...>Editnext to the specific filament.
- In the pop-up window, find
Filament>Flow ratio and Pressure Advance>Flow ratio; you can see that the current flow ratio is 1.
- Calculate what the adjusted flow ratio should be:
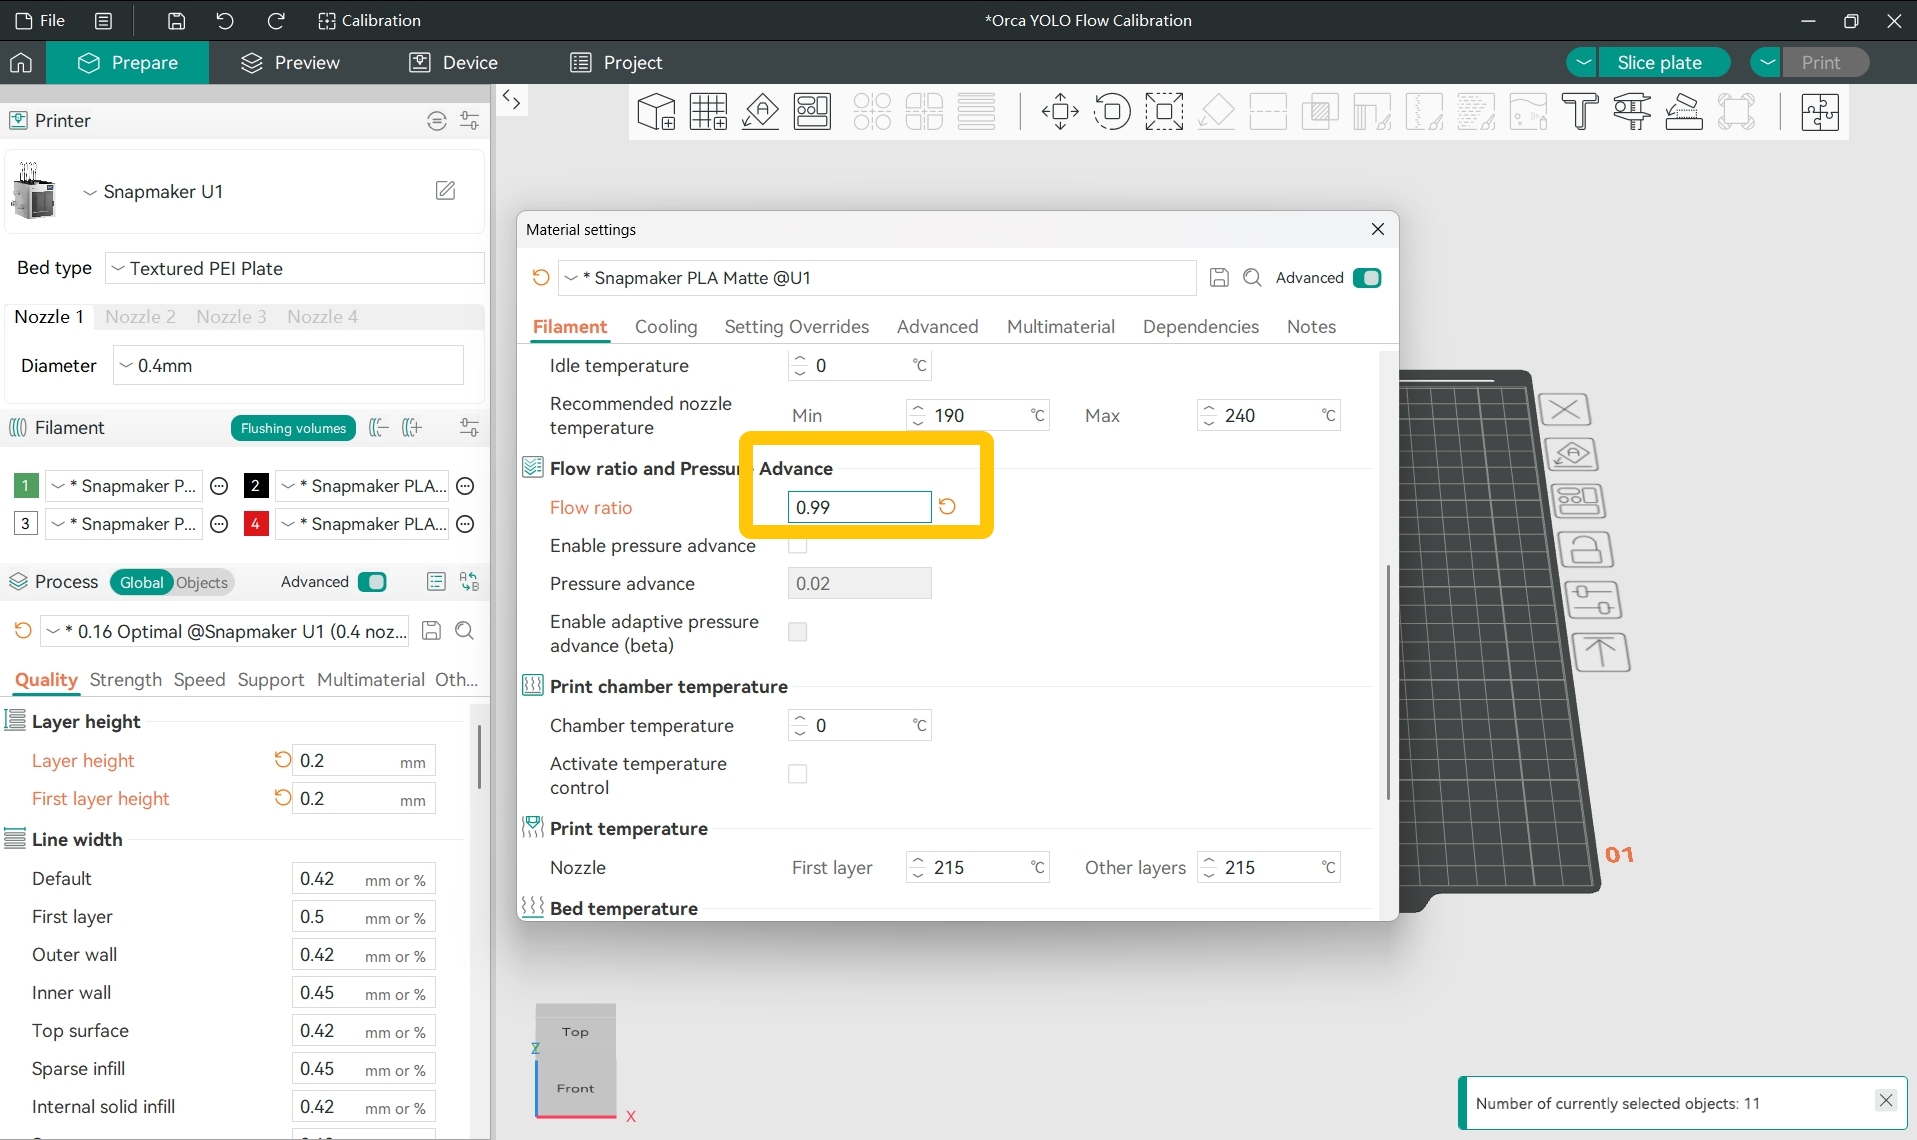
For example, if the current flow ratio preset in the software is 1 and the flow correction value is -0.01, the adjusted flow ratio should be 0.99, i.e.:
- Set the flow ratio to the adjusted value.
¶ Cause 4: Printing Temperature Too High
¶ 1. Print a Temperature Tower to Test the Best Printing Temperature for Your Filament
The best printing temperature can vary for each filament. It is recommended to perform this test for the specific filament you are using.
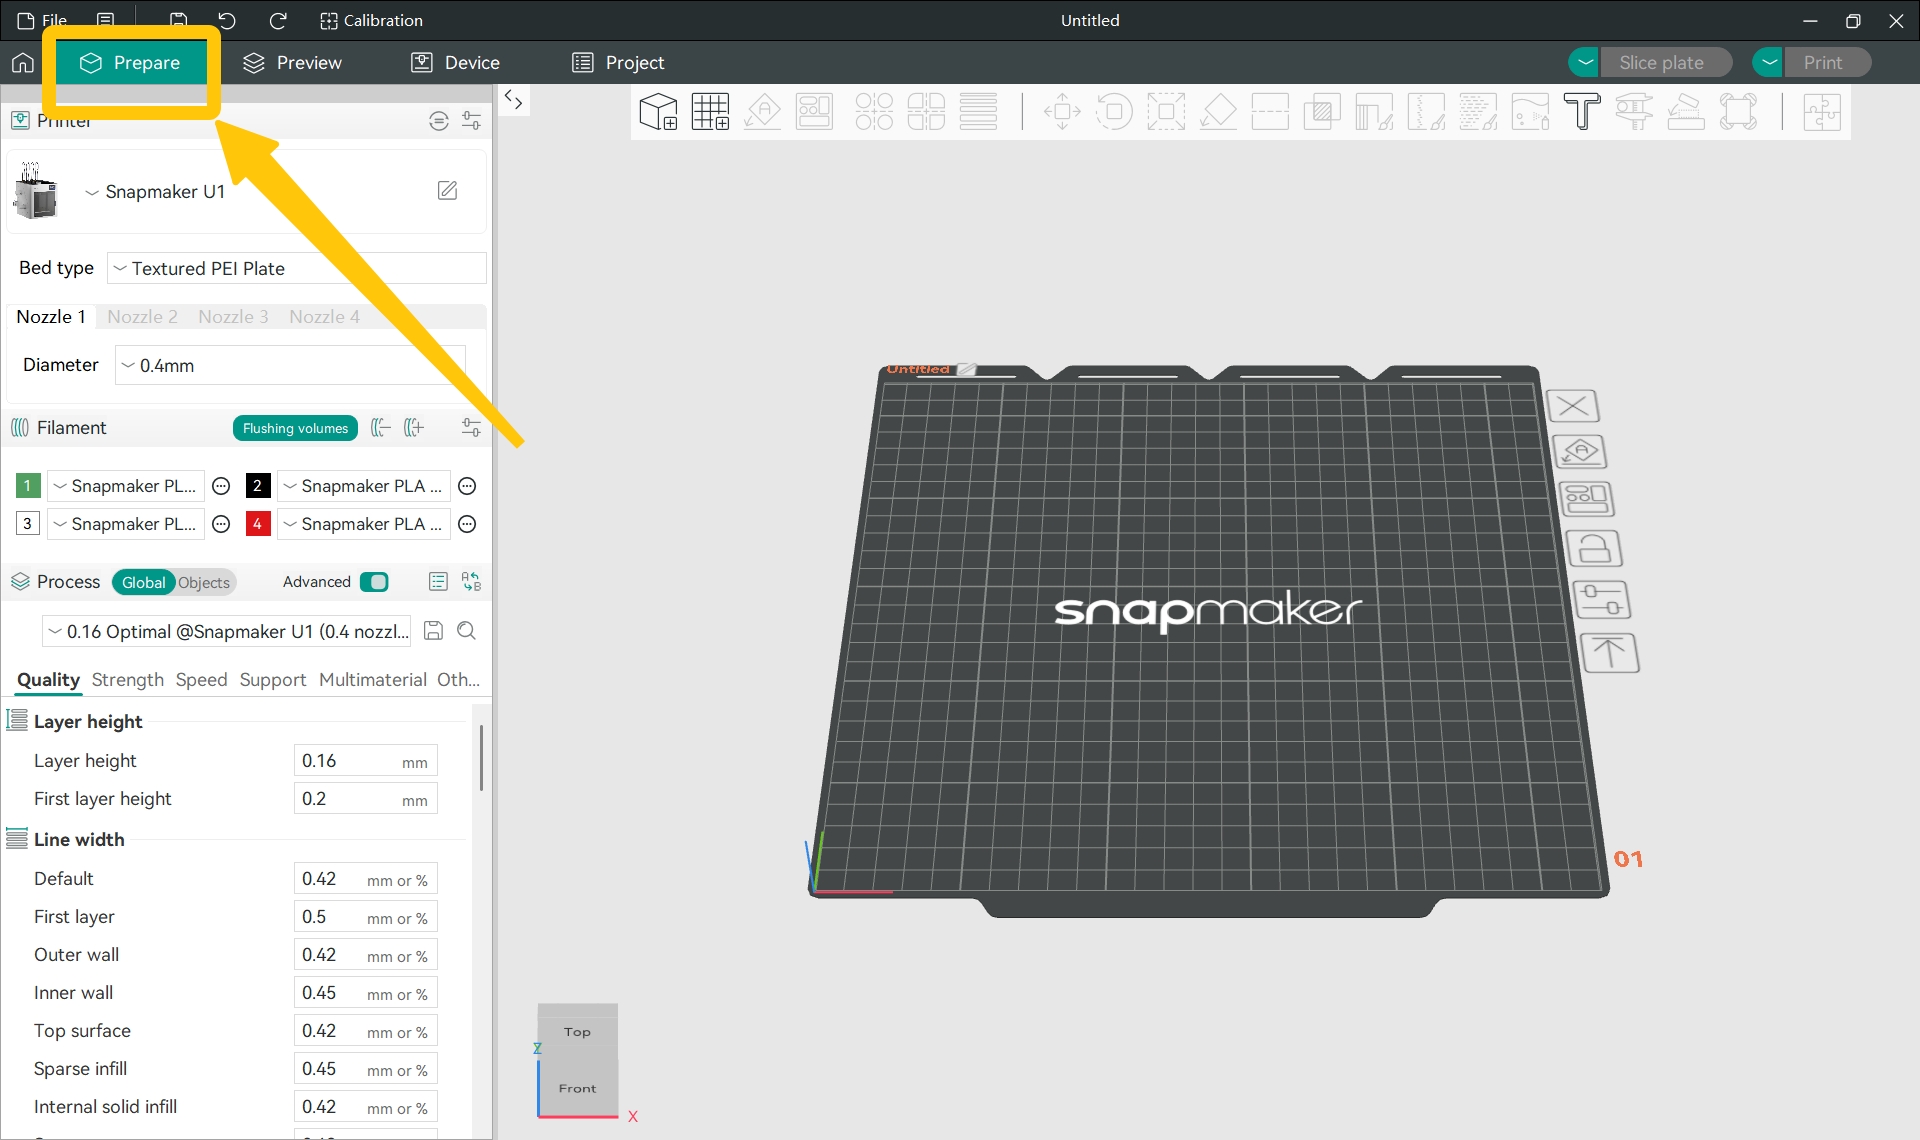
- Open Snapmaker Orca and switch to the
Preparetab.
- In the
Filamentsection of the side list, click the filament name and select the filament used for printing from the drop-down menu.
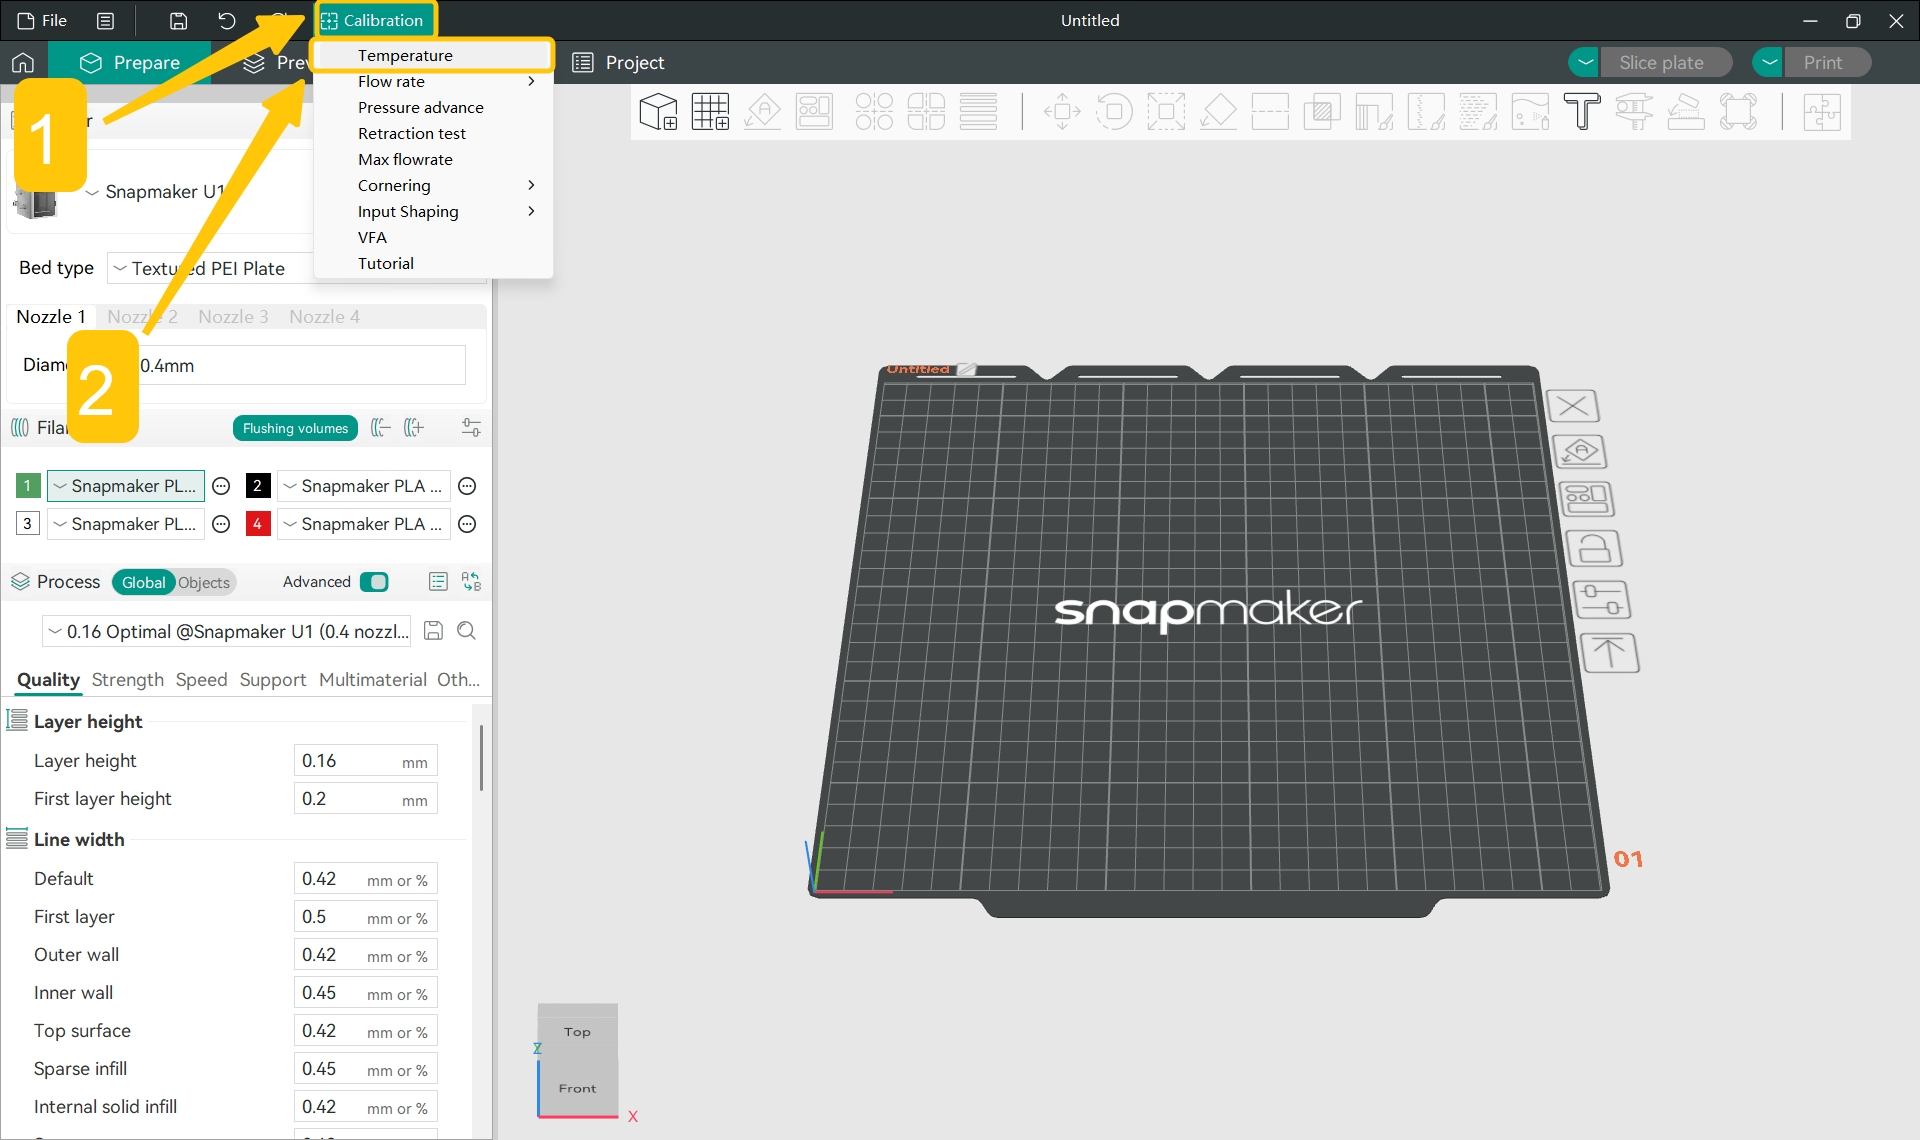
- In the top menu bar, click
Calibration>Temperature.
- In the pop-up window, select your filament type and set the start temperature (
Start temp) and end temperature (End temp).
Snapmaker Orca has different default start and end temperatures for various filament types. You can directly use the software's preset start and end temperatures to test and calibrate your filament.
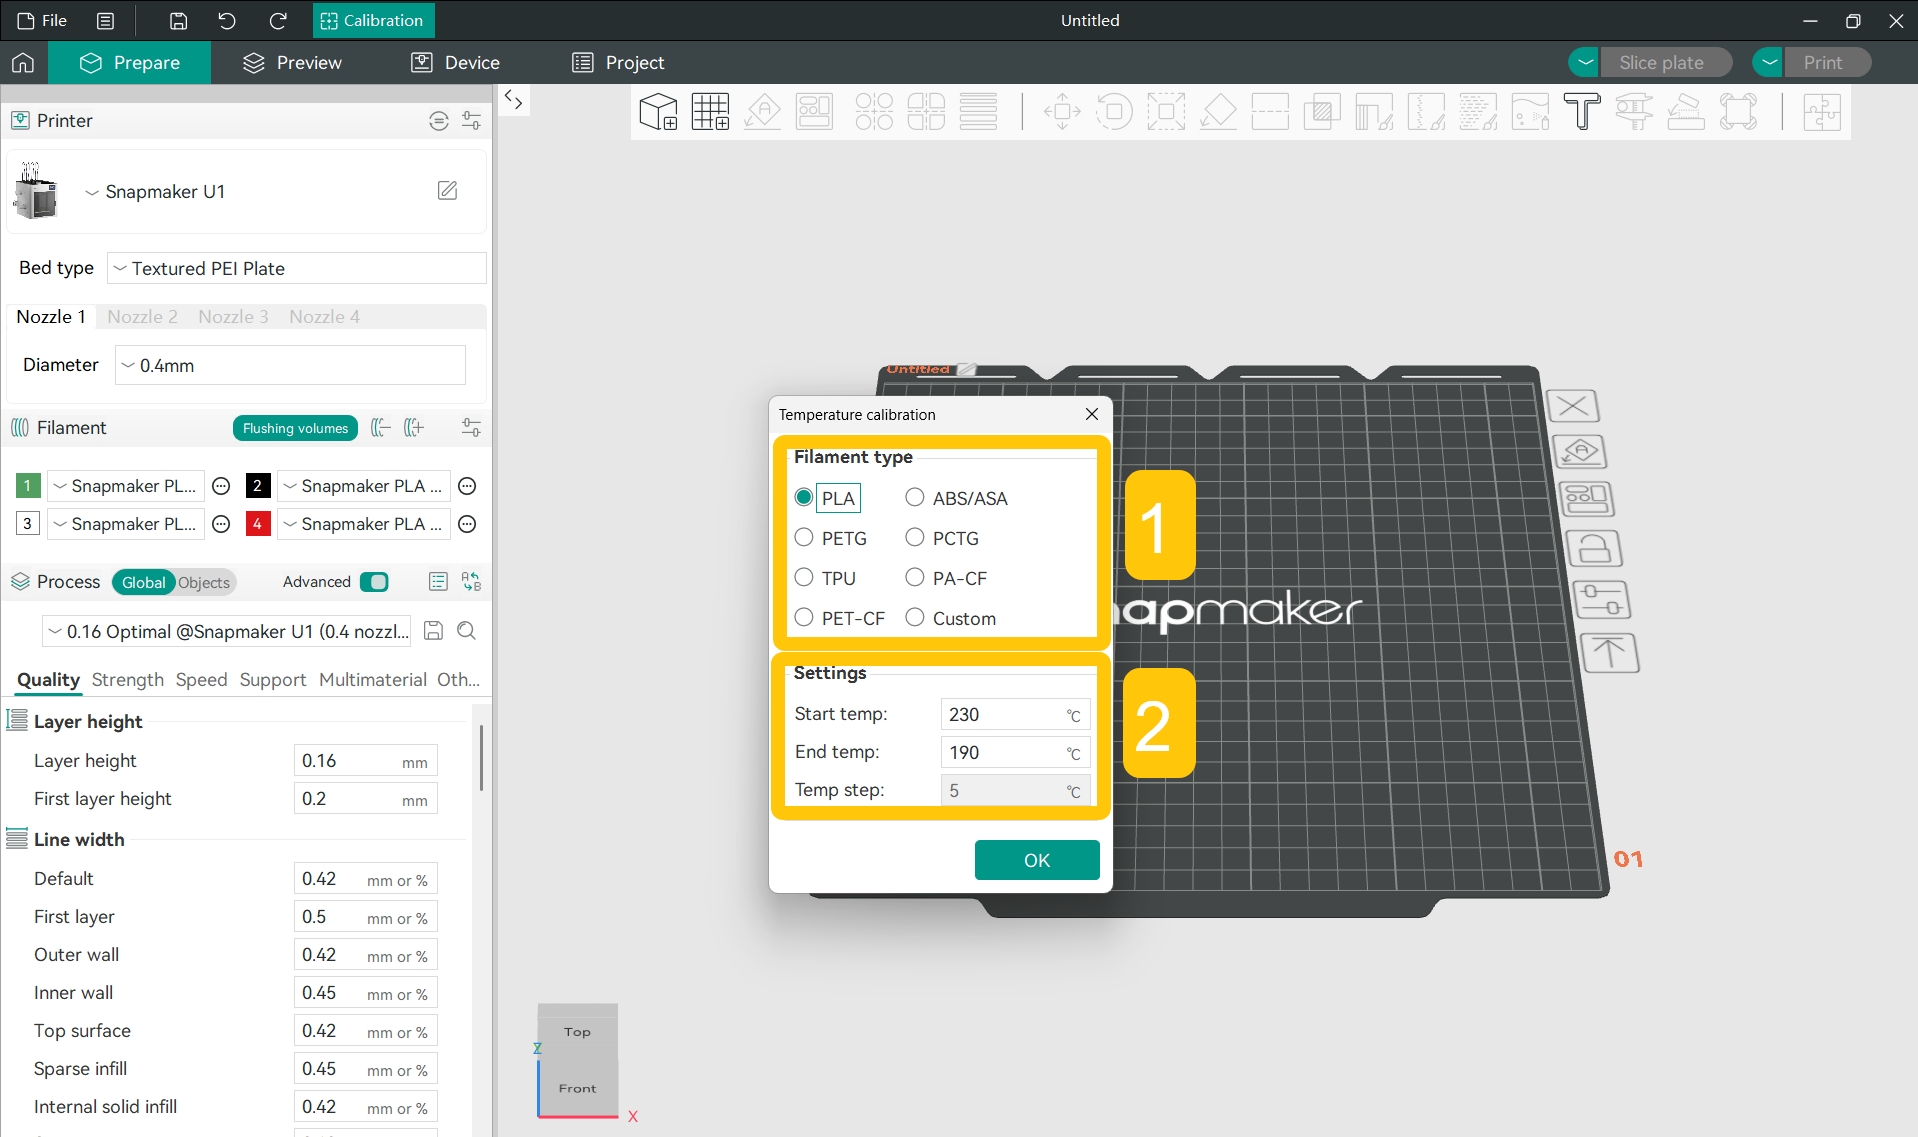
- Click
OKand the software will automatically generate a temperature tower model.
Temperature Tower Model: Every layer of the temperature tower looks exactly the same, but each layer is printed at a different temperature. The temperature of each layer is determined by the start and end temperatures set previously and the default temperature step of the software.
Therefore, a temperature tower is a common calibration tool. You simply need to observe which layer of the printed temperature tower has the best quality to find out the best print temperature for your current filament.
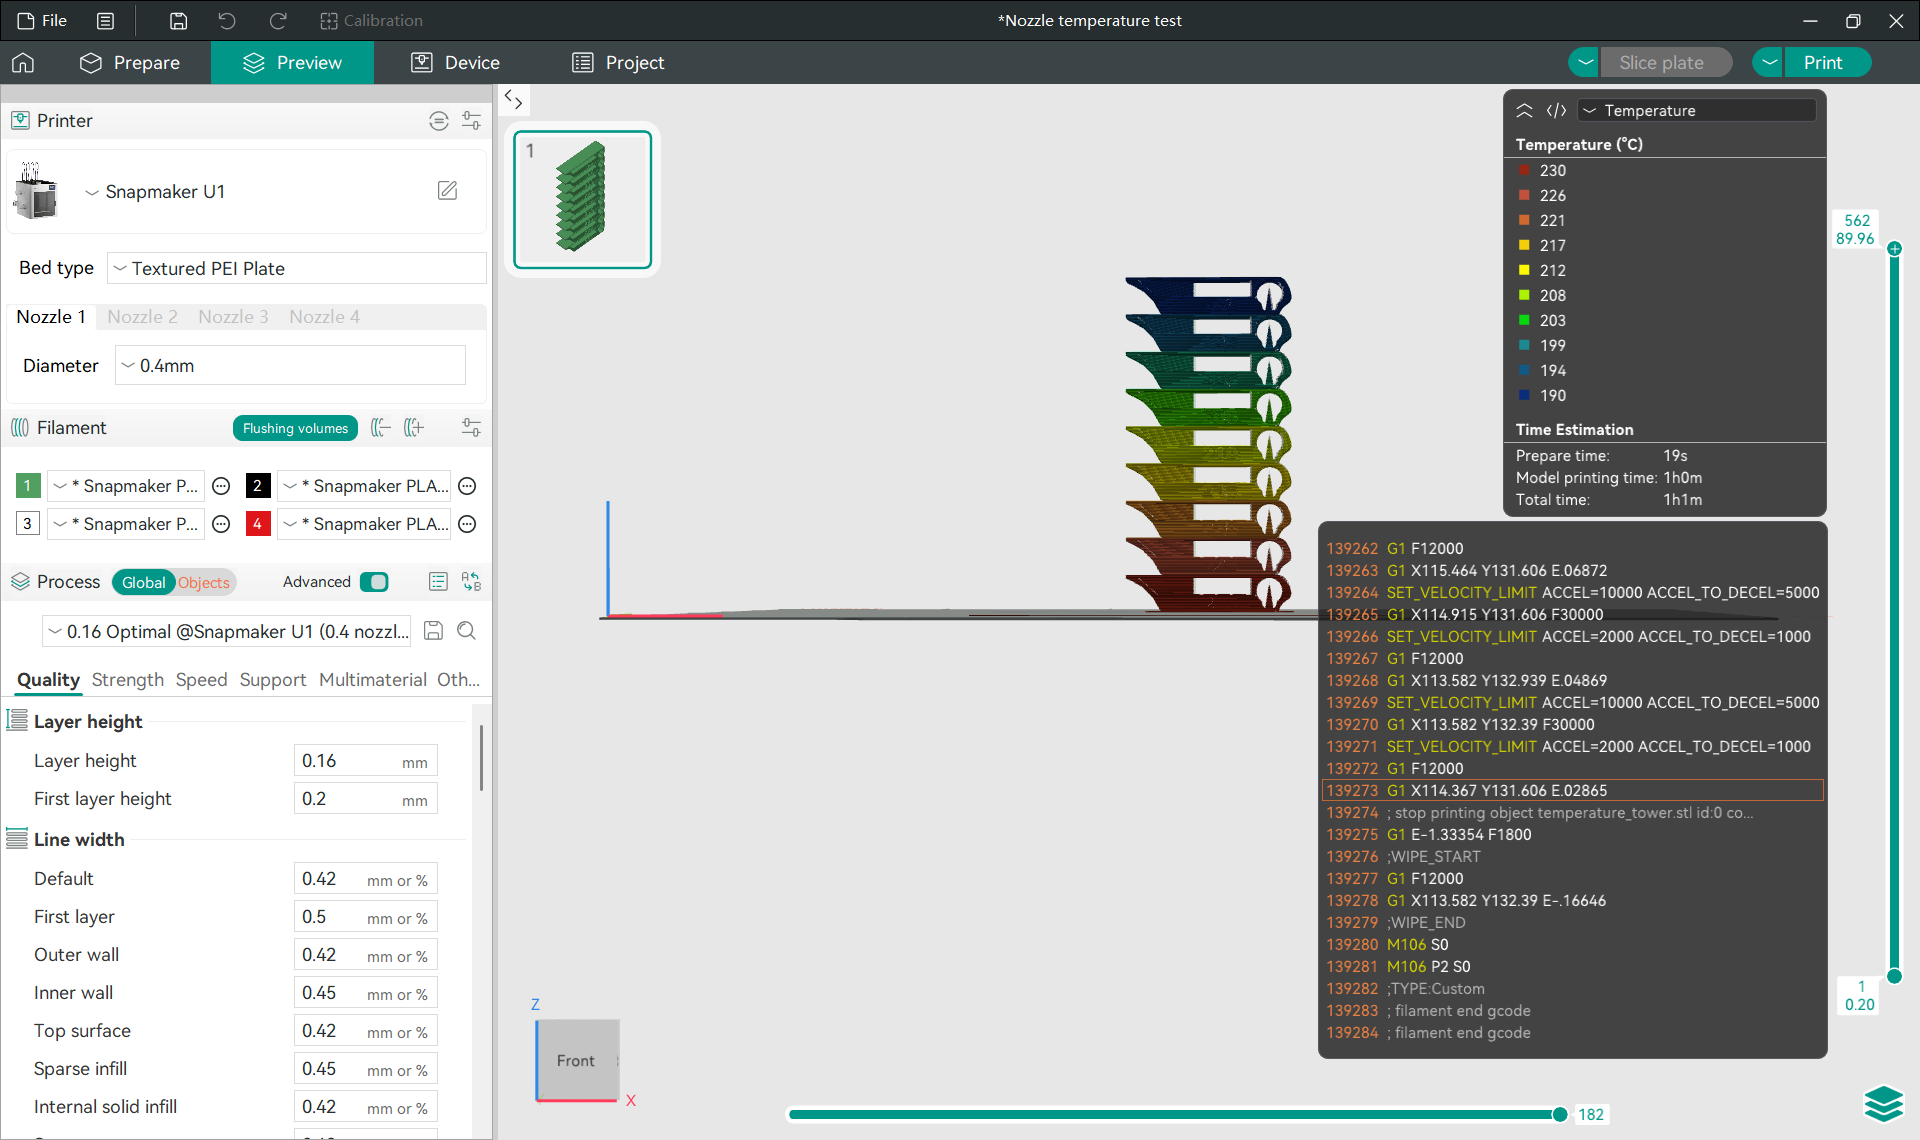
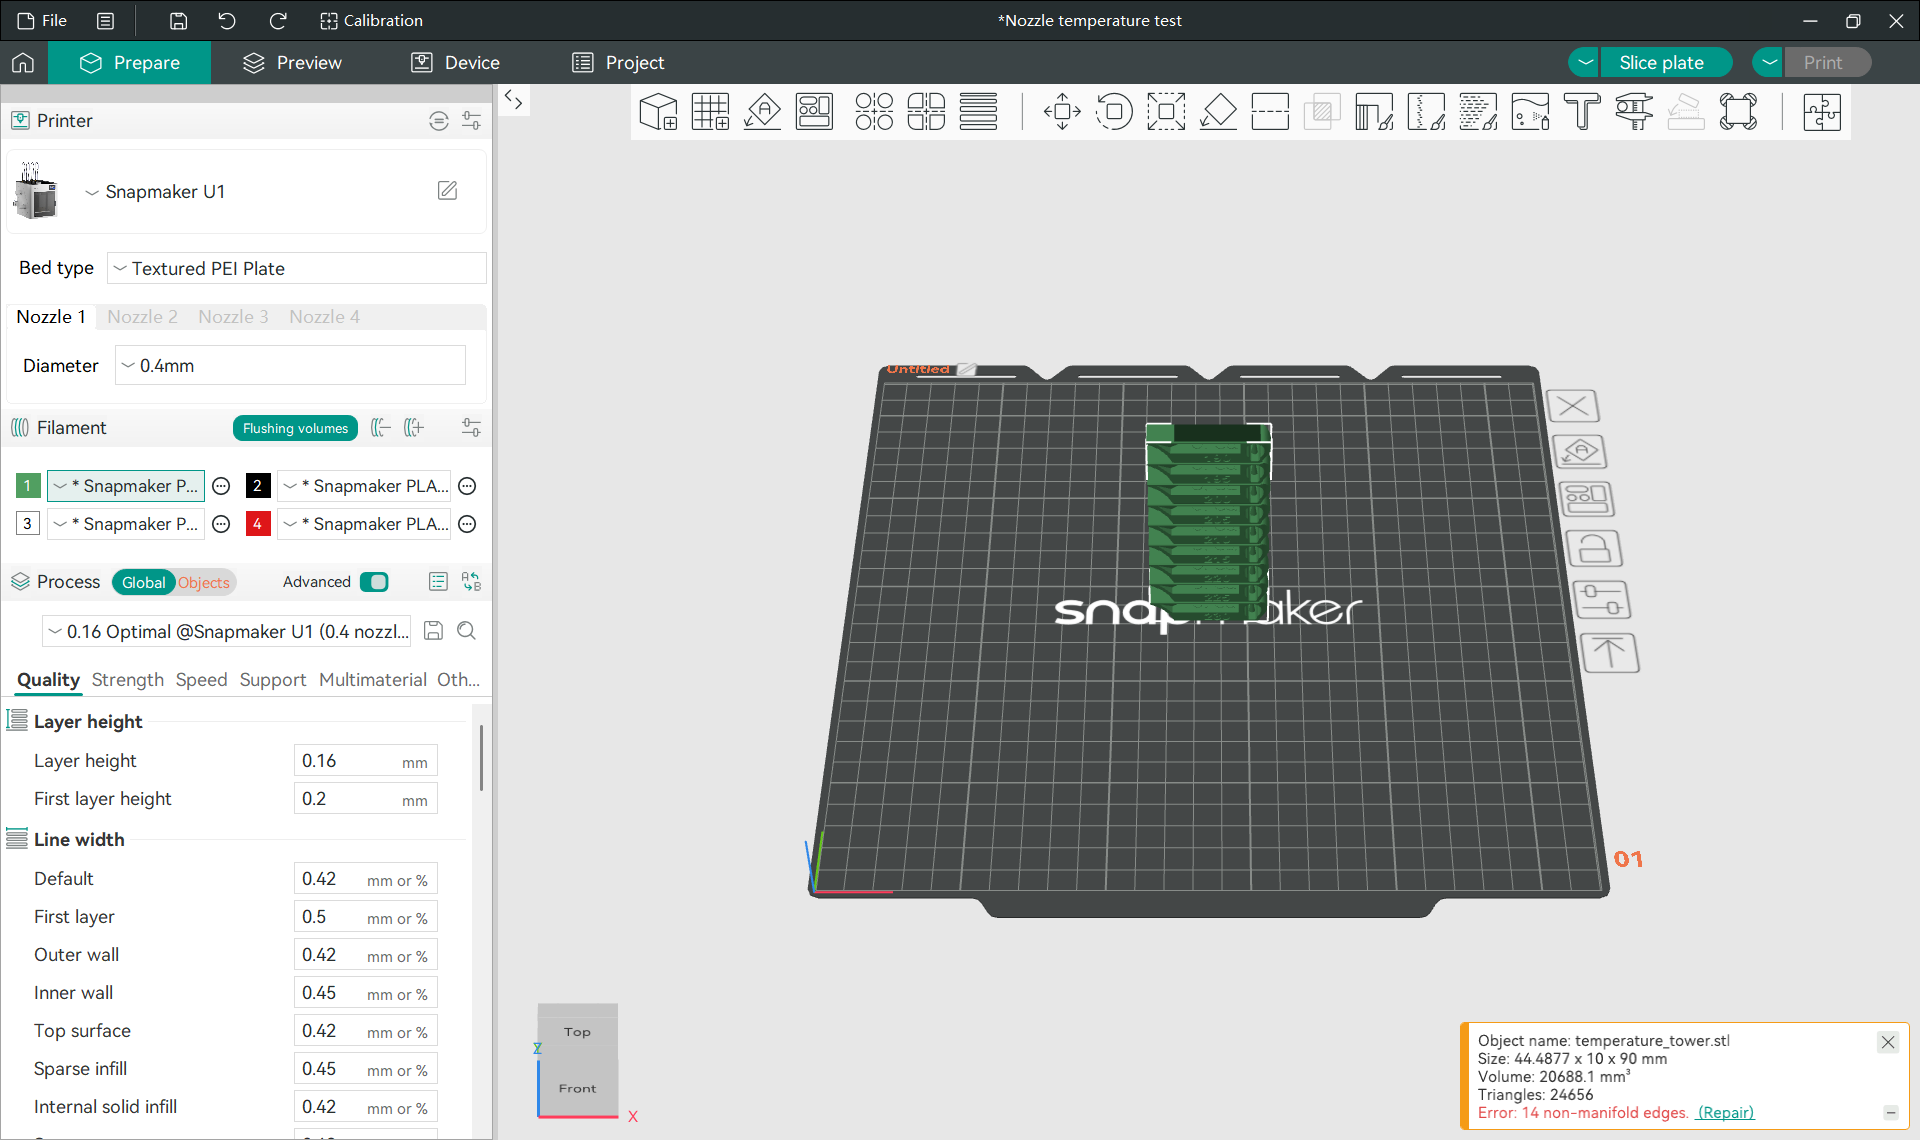
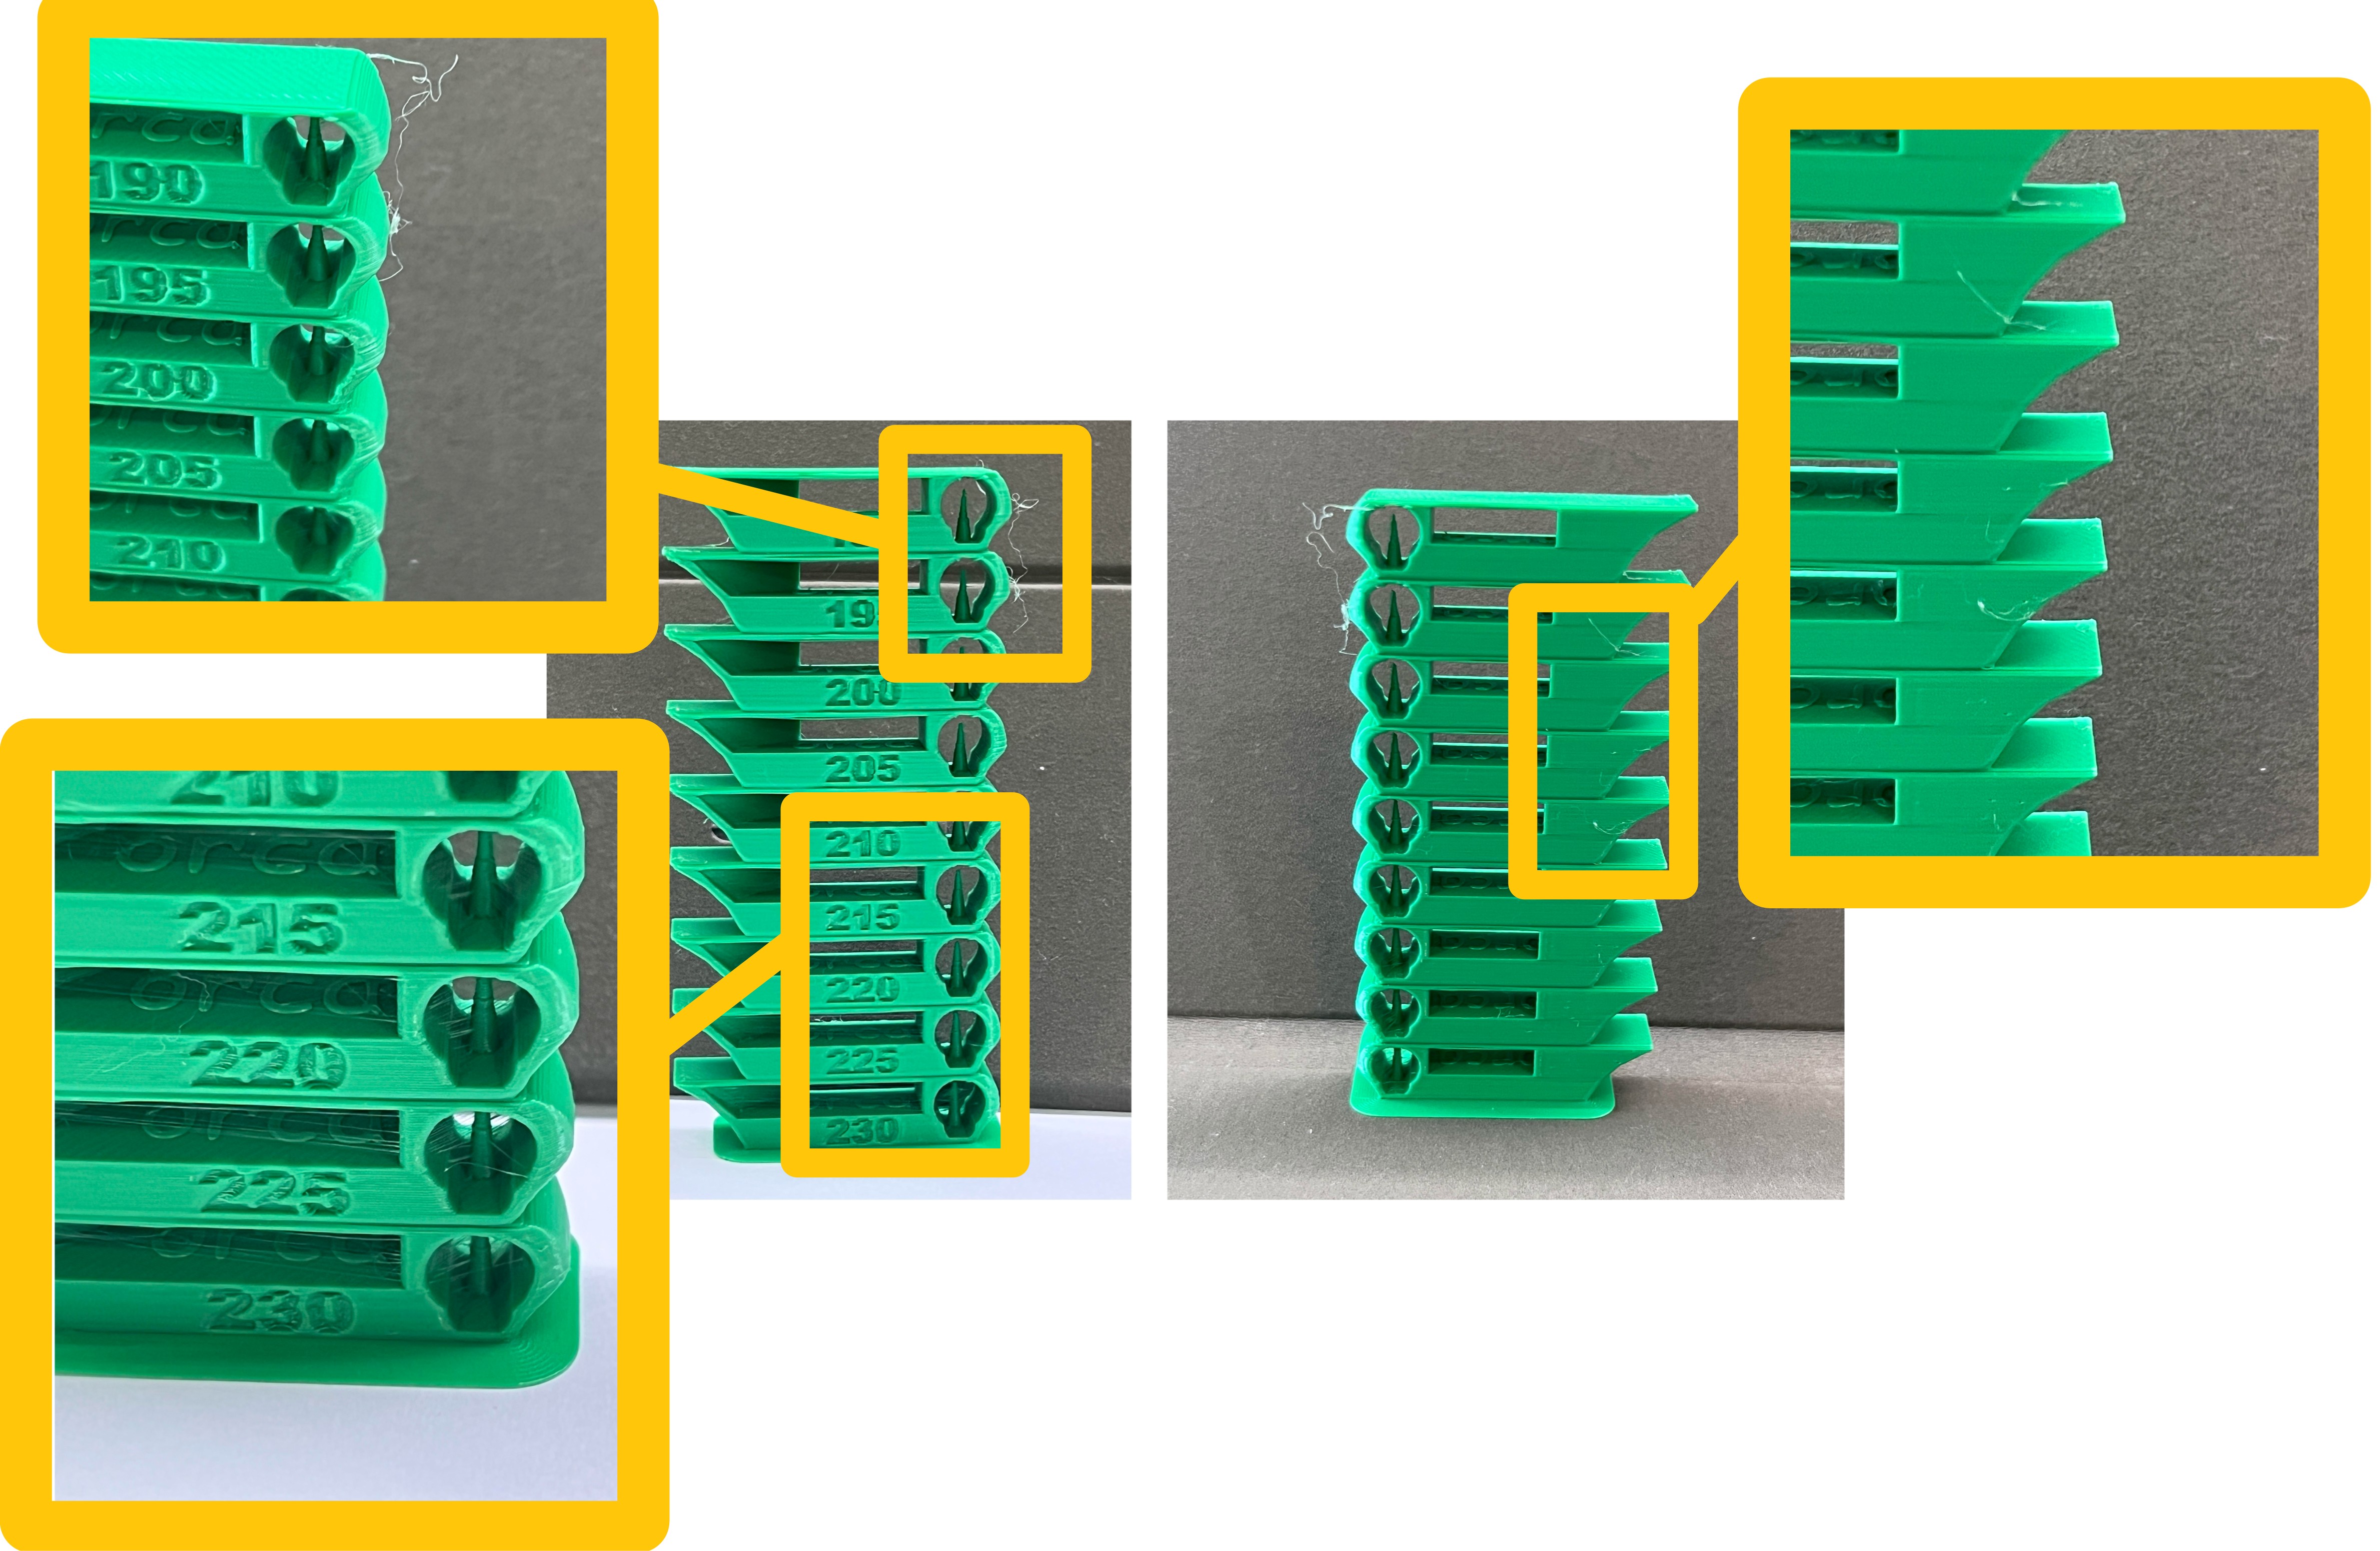
- Use your U1 to print the temperature tower model and examine each layer of the finished part. Eliminate layers with poor print quality and find the layer with the best print quality — the number marked on it is the optimal printing temperature (in °C in this example).
For example, if you think the layer marked with 200 has the best print quality, then 200°C is your optimal printing temperature.
¶ 2. Set the Optimal Printing Temperature for Your Model
-
Add your project model.
-
In the
Filamentsection of the left side list, click the...>Editnext to the specific filament.
- In the pop-up window, find
Filament>Print temperature>Nozzle.
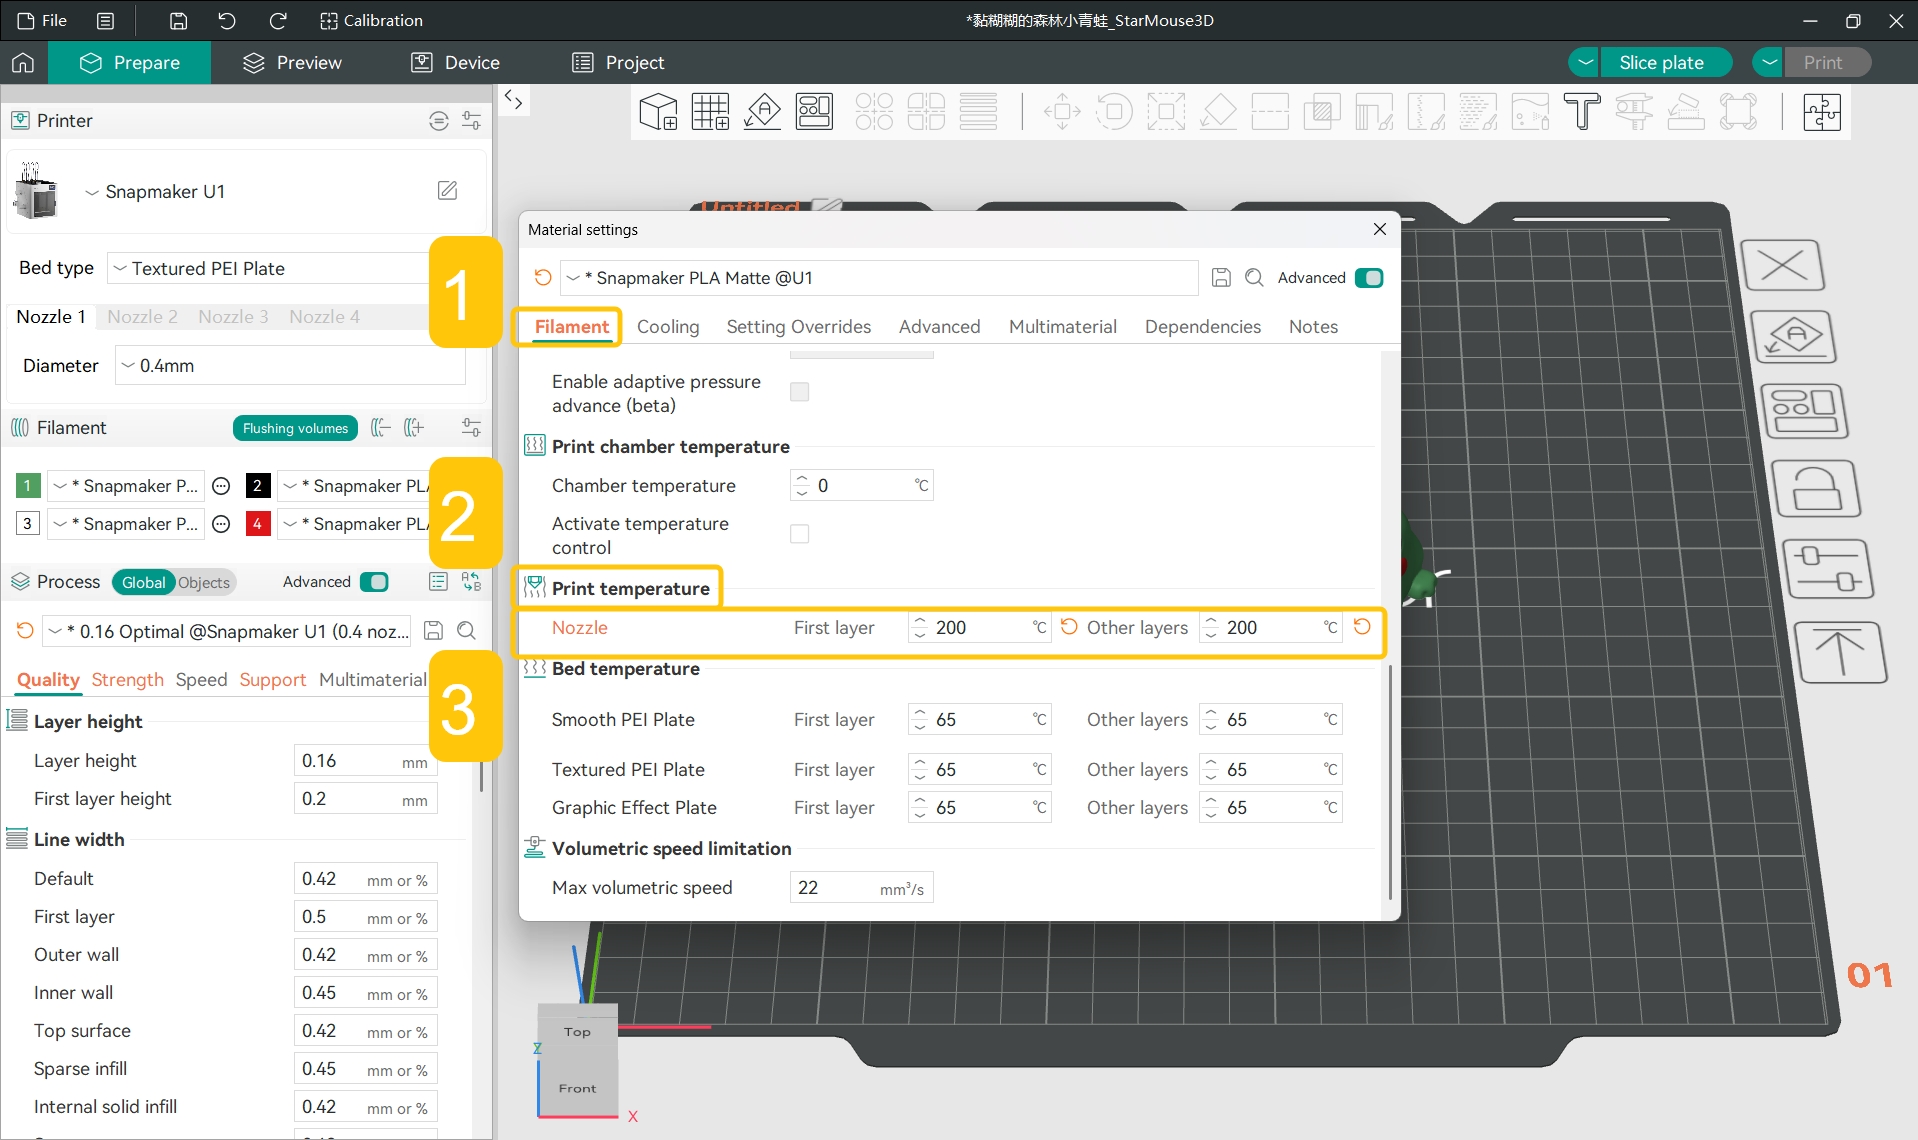
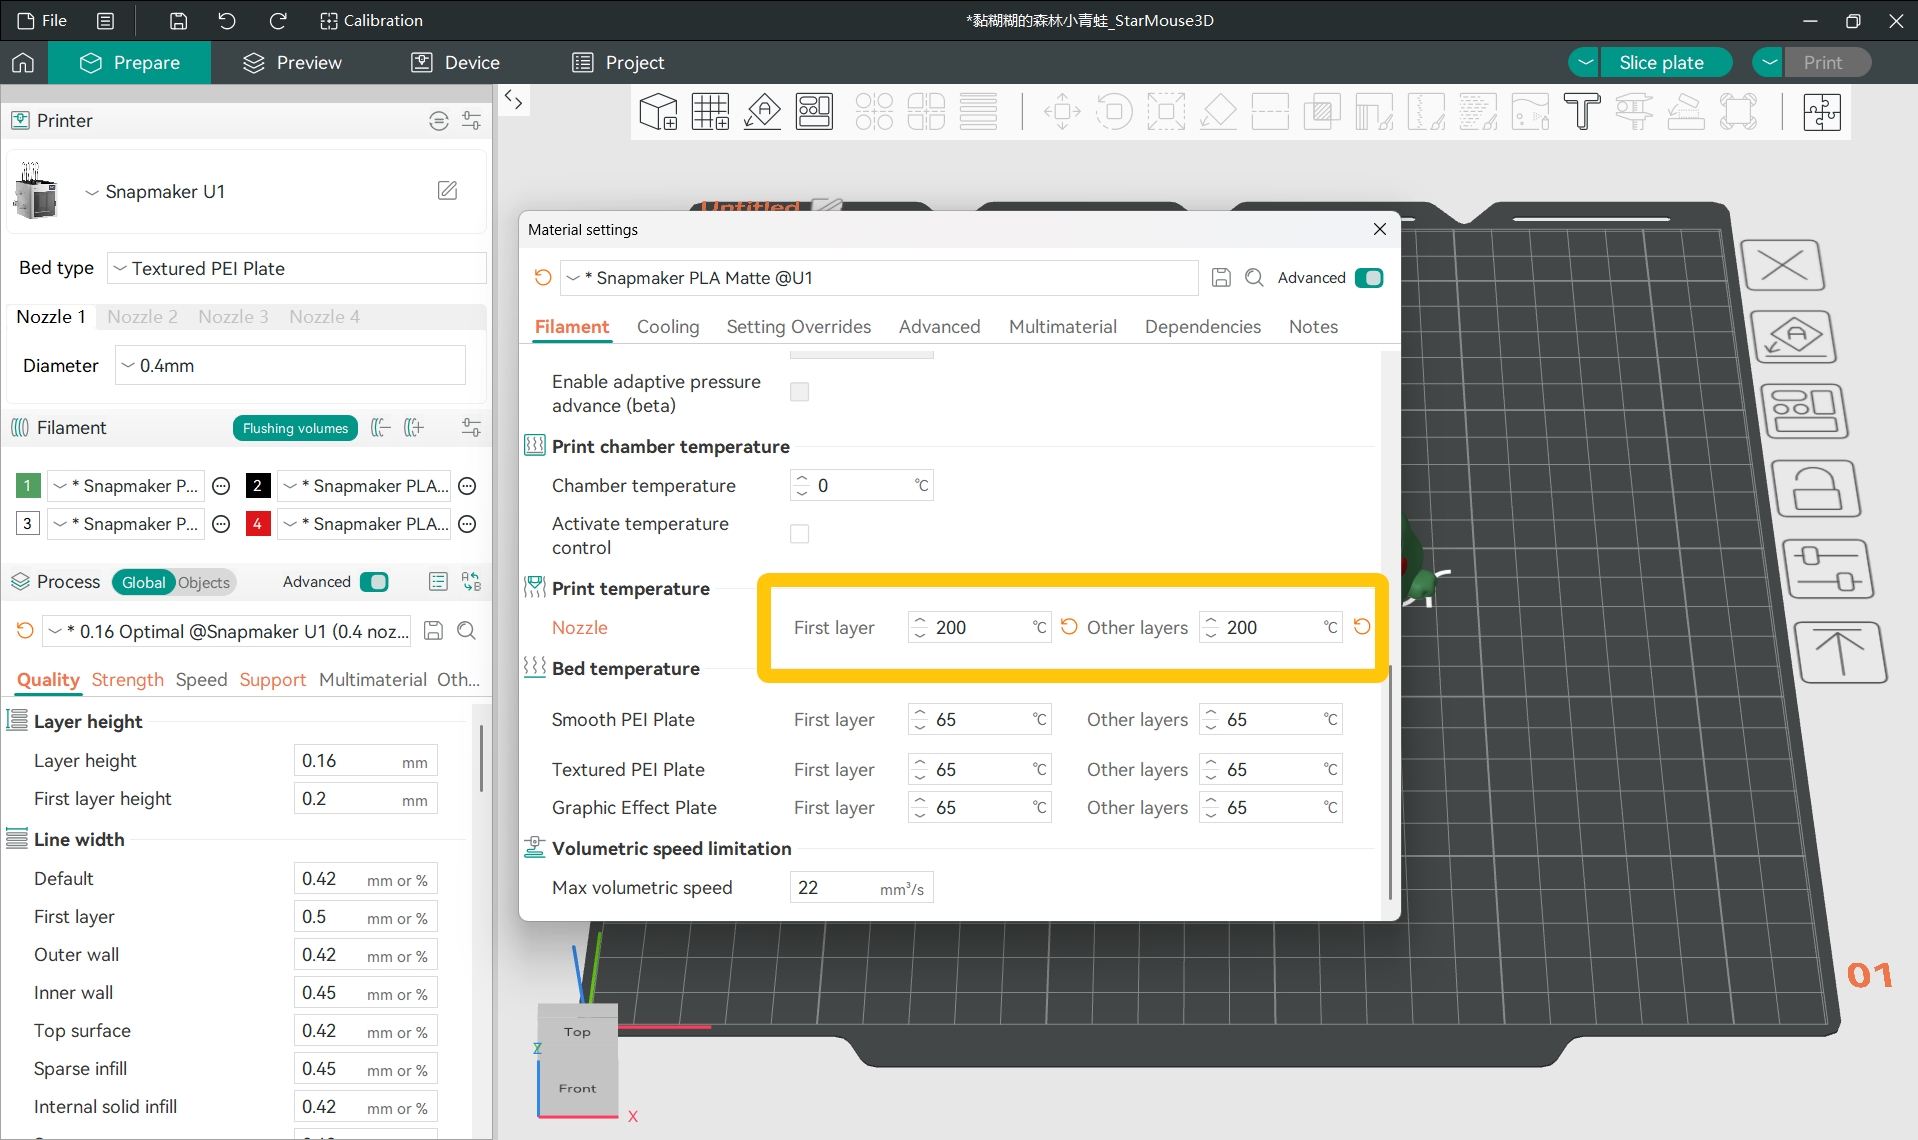
- Set the nozzle's First layer and Other layers temperatures to the optimal print temperature.
For example, based on the previous test result, set the first layer and other layers temperature to 200 (in °C in this example).
¶ Cause 5: Printing Speed Too Slow
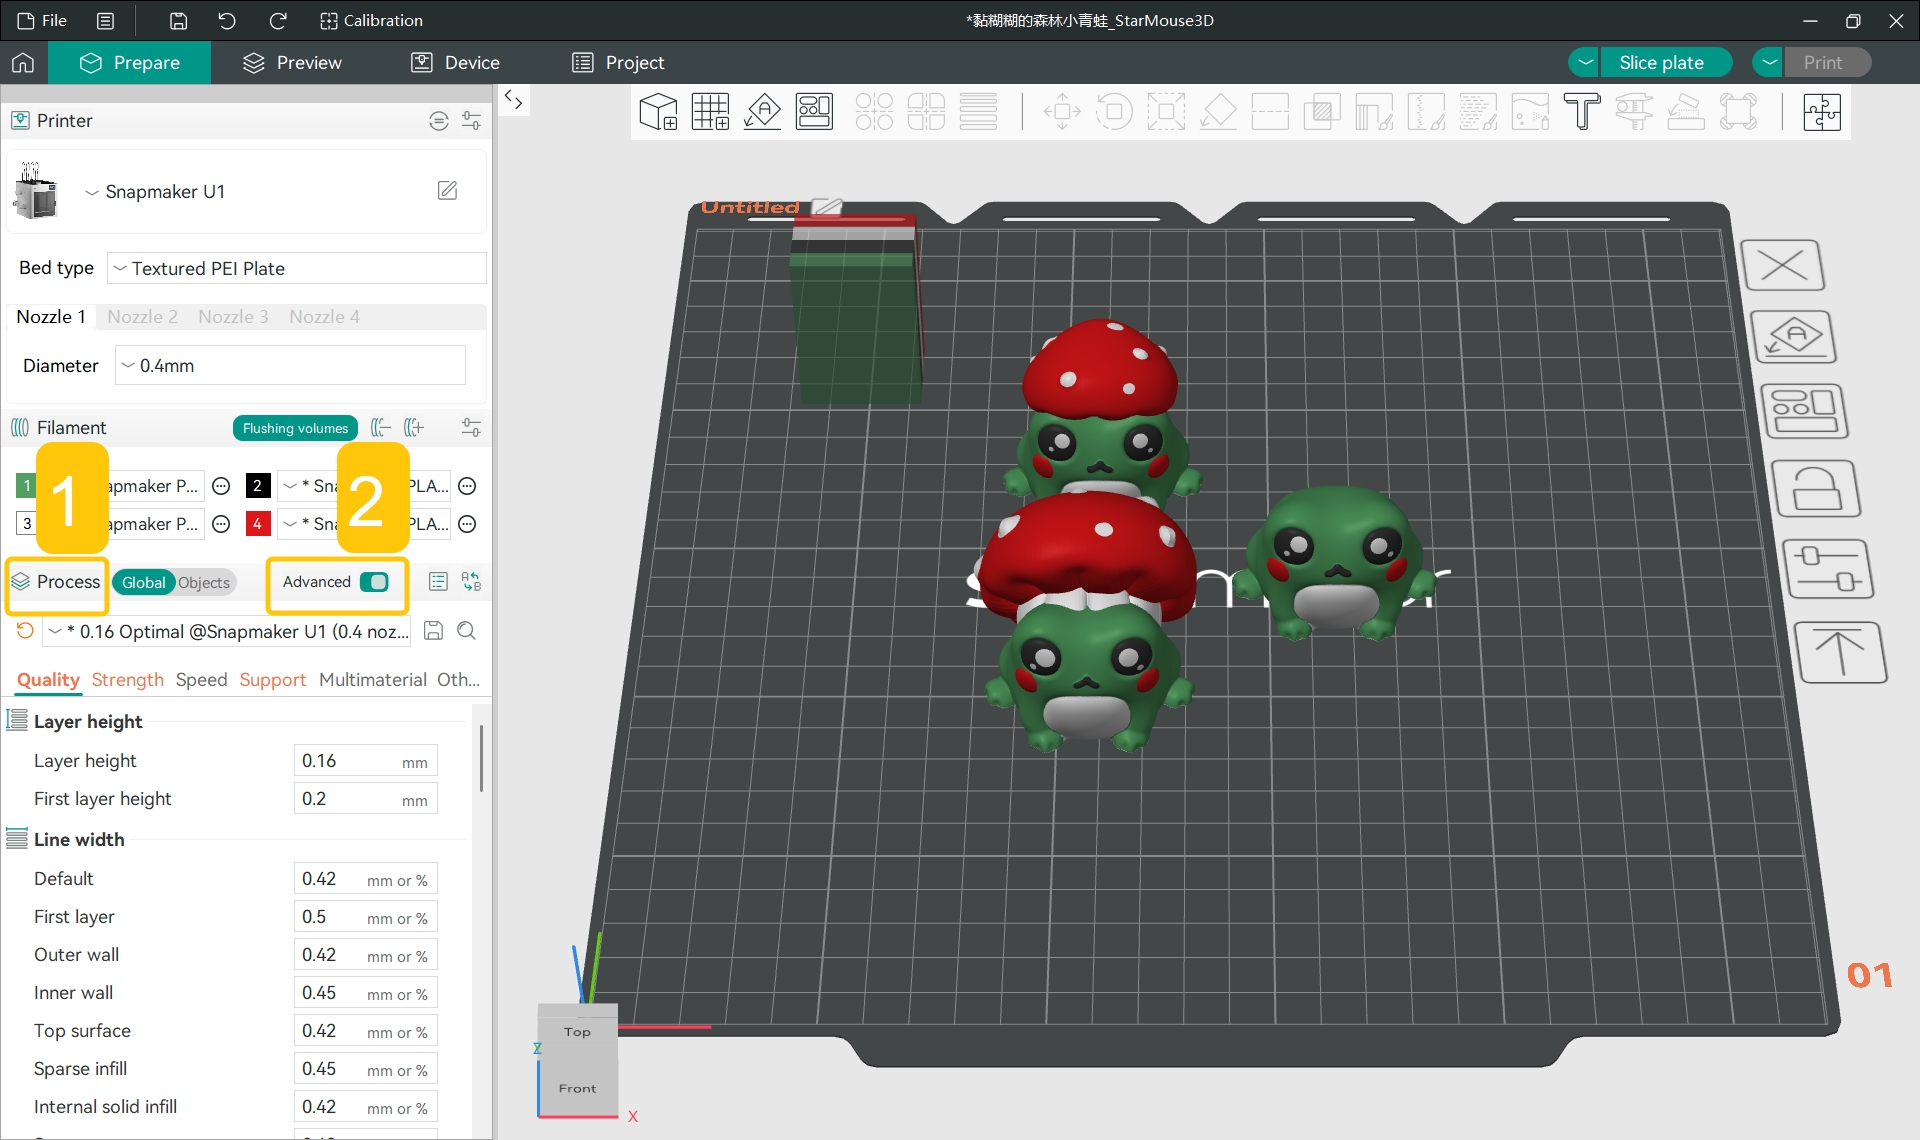
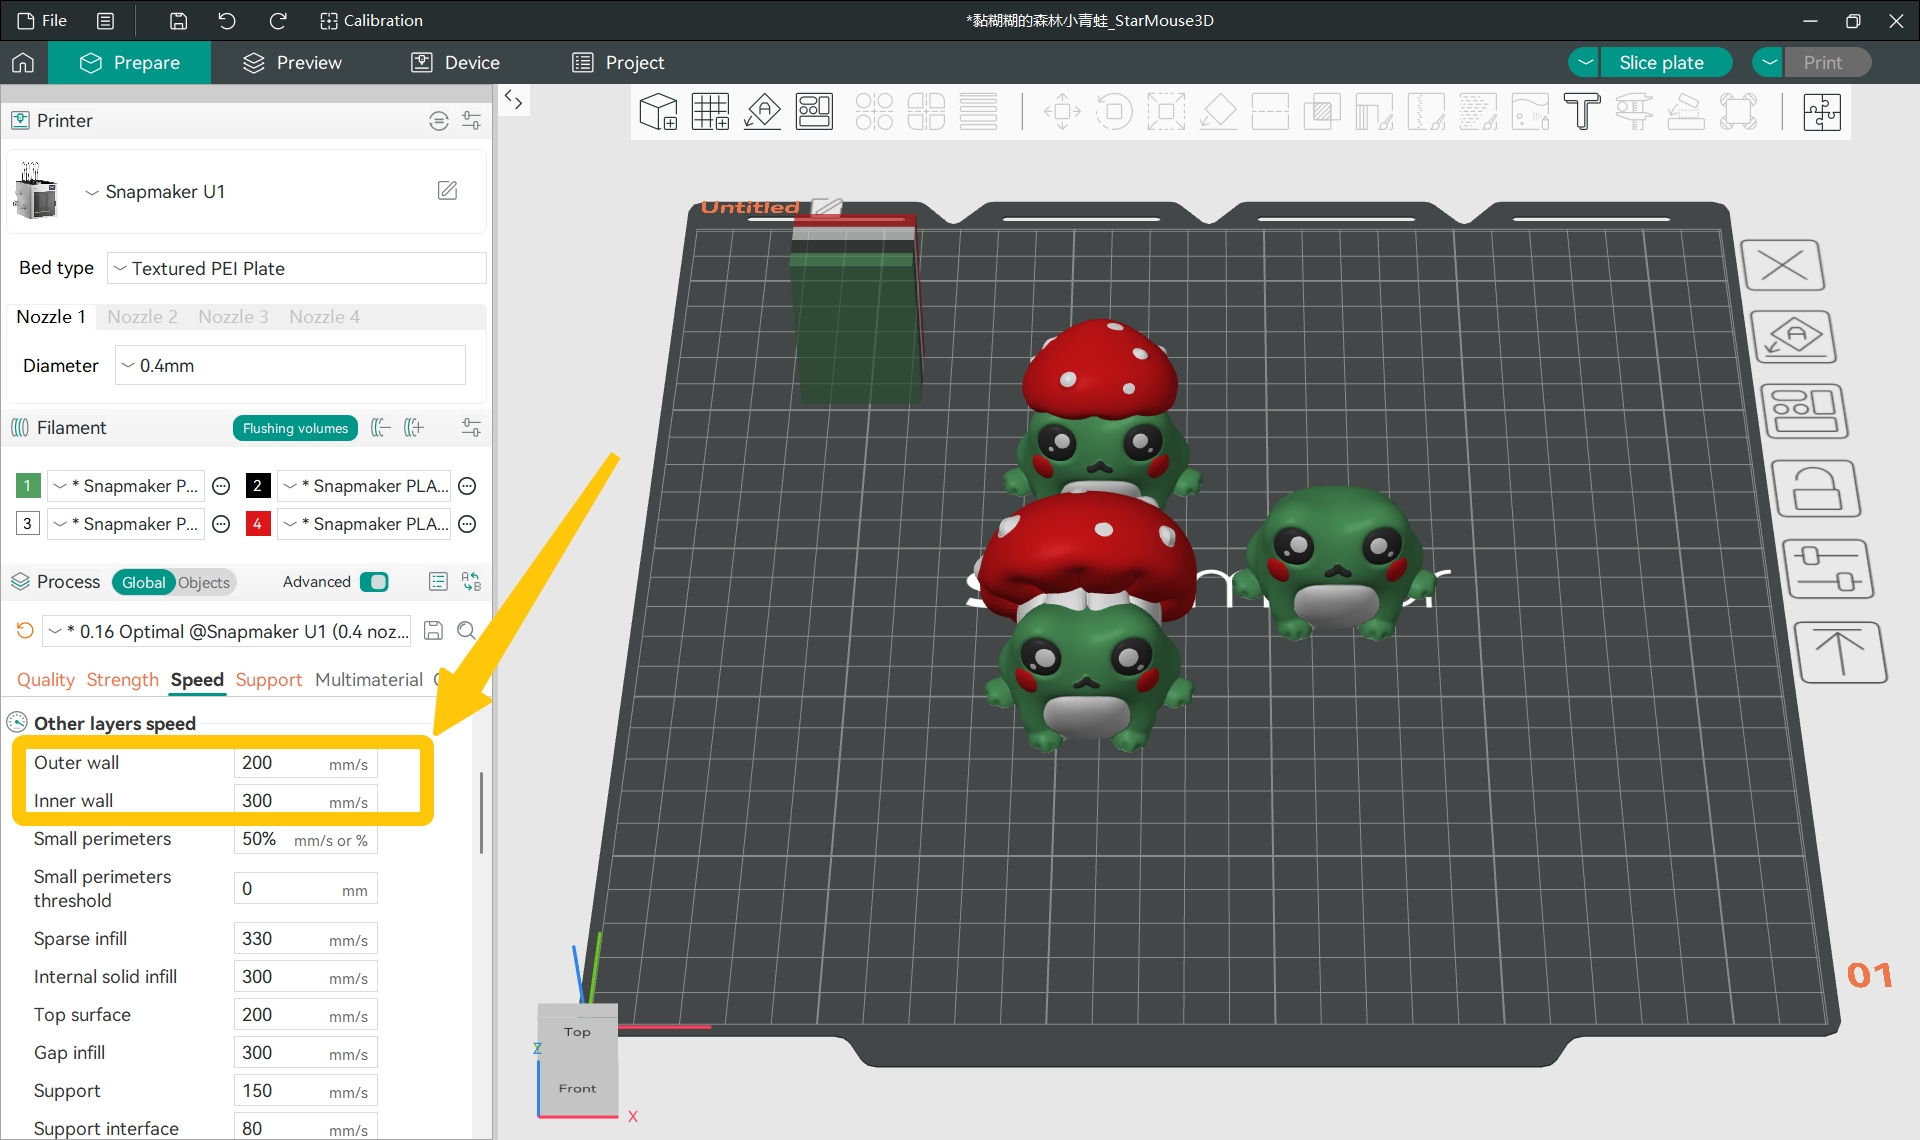
- Enable
Process>Advanced.
- Find
Process>Speed>Other layers speed.
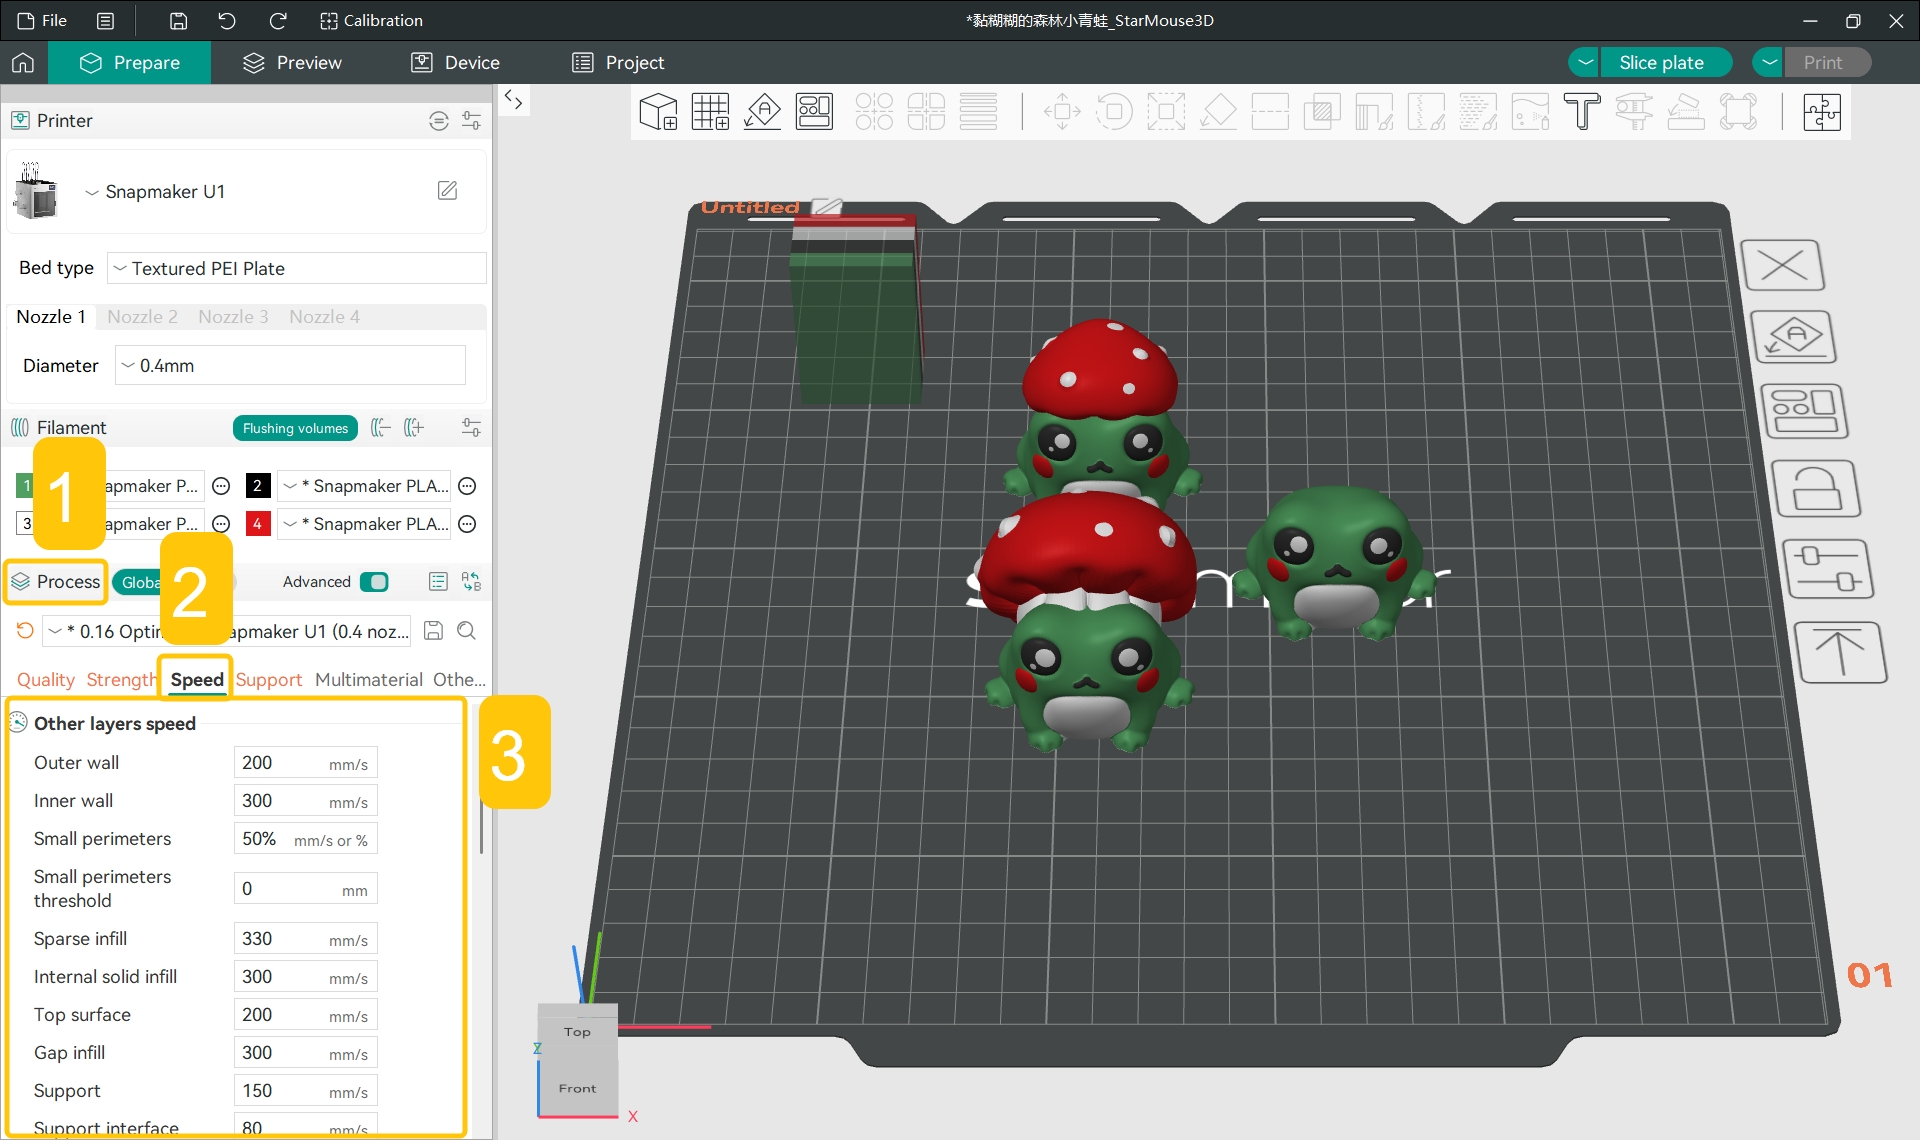
- Appropriately increase the printing speed, especially for the
Outer wallandInner wallvalues.
Outer wall speed is usually lower than inner wall speed. This produces a smoother surface and higher strength, while a higher inner wall speed reduces overall print time.
¶ Cause 6: Improper Retraction Settings
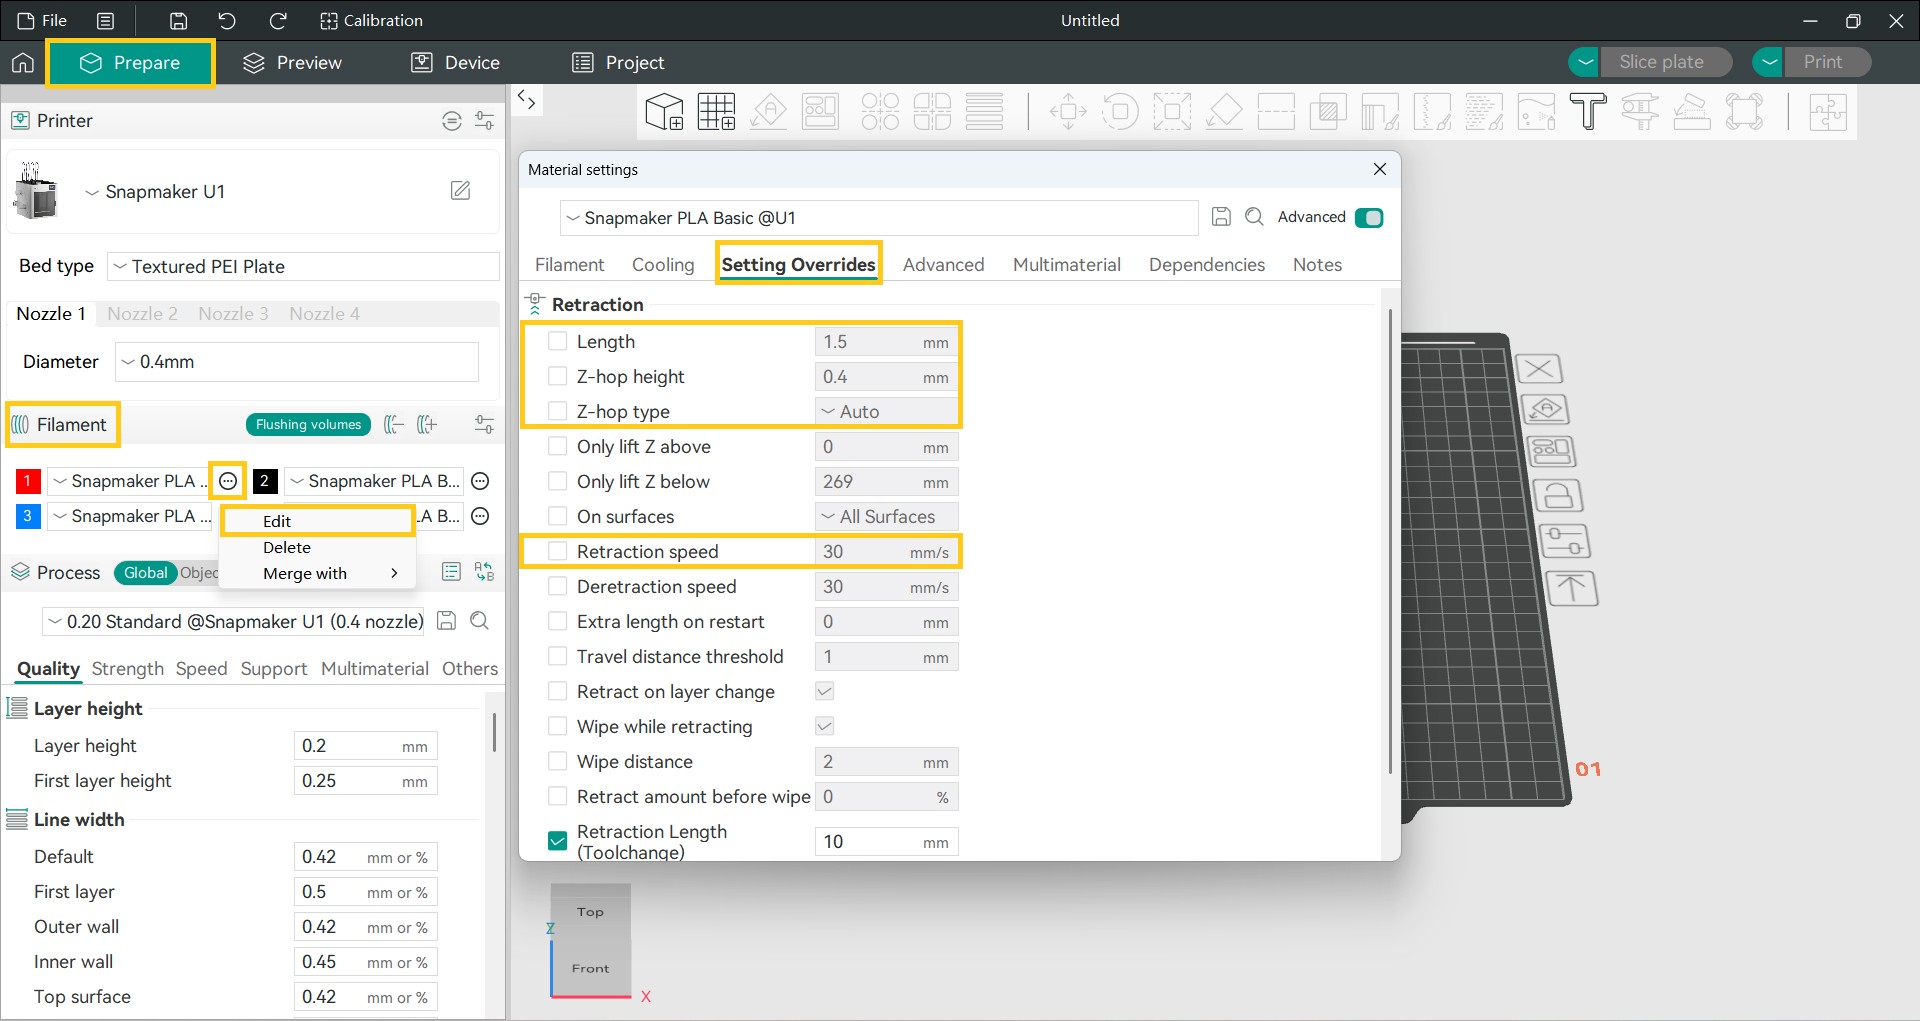
Switch to the Prepare tab > In the Filament section of the left side list, click the ... > Edit next to the specific filament > In the pop-up window, find Setting Overrides > Adjust retraction length, Z-hop height, Z-hop type, and retraction speed.
¶ ✅ Verification
If filament no longer adheres to the nozzle during printing, you have successfully identified the root cause and resolved the issue.
¶ 📚 Related Resources
¶ 💬 Reach out to Snapmaker Support
After following the troubleshooting steps, if you find it difficult to resolve your issue, kindly submit a support ticket through https://snapmaker.formcrafts.com/u1-troubleshooting-request and share your troubleshooting results with pictures or videos. Our dedicated support team will be more than willing to assist you in resolving the issue.