¶ 💡 Compatibility
This guide applies to the following machine and software. Please note when referencing:
- Recommended model: Snapmaker U1
- Software Version: Latest version of firmware and Snapmaker Orca (V2.3.3 or later)
¶ ⚠️ Important Notes
- Recommended Filaments: Filaments with higher TD values and good translucency are recommended, such as the Polymaker Panchroma PLA Full Spectrum Bundle Pack (Translucent Yellow, Translucent Cyan, Translucent Magenta, Translucent Grey). Snapmaker also plans to release official filaments optimized for color mixing printing in the future. Stay tuned for updates.
Due to factors such as filament properties, model geometry, print settings, and lighting conditions, the final print result produced with Full Spectrum (Beta) may differ from the expected appearance.
Therefore, Full Spectrum (Beta) is best suited for users who are familiar with 3D printing and slicing settings and are willing to experiment with new features, as well as creators who place a greater emphasis on color expression, gradients, and texture effects.
For print jobs that require high repeatability, accurate color reproduction, or high precision, use this feature with caution.
¶ ⏰ Full Spectrum Beta Overview
¶ 1. Introduction to Full Spectrum Beta
¶ 1.1 What Is Full Spectrum?
Full Spectrum is a feature that enables multi-color printing based on Color Mixing.
¶ 1.2 What Is Color Mixing?
Traditional multi-color printing usually changes colors by switching between filaments.
Example:
Red → Blue → Yellow
During printing, each region typically uses only a single color, resulting in clear boundaries between colors. The available colors are limited to the filament colors being used.
In contrast, color mixing printing creates new blended colors by combining and alternating filaments of different colors.
Example:
Red + Blue → Purple
Yellow + Blue → Green
As a result, you can use basic filament colors to create custom colors more freely, while also achieving:
- Smoother color transitions
- Gradient effects
- More natural color variation
¶ 1.3 Core Principle of Full Spectrum
Full Spectrum creates a visual color mixing effect by alternately stacking layers of different colors along the Z-axis.
Example:
...
Red layer
Blue layer
Red layer
Blue layer
...
To the human eye, the result appears visually similar to purple.
The smoothness of color mixing is closely related to layer height. When hardware conditions allow:
- The thinner the layers,
- The more frequently the colors alternate
the smoother the color mixing effect becomes.
Snapmaker Orca currently provides multiple features to help you set up full spectrum during slicing, enabling richer and smoother color effects.
¶ 1.4 Full Spectrum Features in Snapmaker Orca
Full Spectrum Beta is a color mixing workflow designed for Snapmaker U1 users.
This feature was initially explored by the community and has been further refined collaboratively by Snapmaker and community members. Through layer alternation, virtual mixing, and visual mixing, users can explore richer color effects using a limited set of filaments.
¶ 1.4.1 Color Mixing
Snapmaker Orca provides multiple Color Mixing modes to help you create different mixed-color effects.
- Ratio Mode: Adjust the proportions of 2 to 3 filament colors to create different intermediate colors.
- Cycle Mode: Explore color mixing effects by cyclically switching the printing sequence of filaments with different colors.
- Match Mode: Calculate the most suitable color ratio based on the target color and the available filament colors.
- Gradient Mode: Generate gradient effects between selected filament colors.
¶ 1.4.2 Subdivide Mix Layer
Snapmaker Orca provides multiple layer subdivision features for color mixing to increase color alternation frequency and achieve smoother color transitions and more vivid color effects.
- Subdivide Mix Layer
In color mixing printing, colors are created by alternately stacking layers of different colors. If the layer height is too large, visible banding, broken gradients, or uneven color transitions may occur. This is especially noticeable in gradient or detailed areas.
Therefore, Snapmaker Orca provides finer layer heights to increase color transition frequency.
This feature is intended for models where only part of a model is painted with mixed colors. After enabling it, the layer heights of these mixed-color areas are automatically subdivided during slicing.
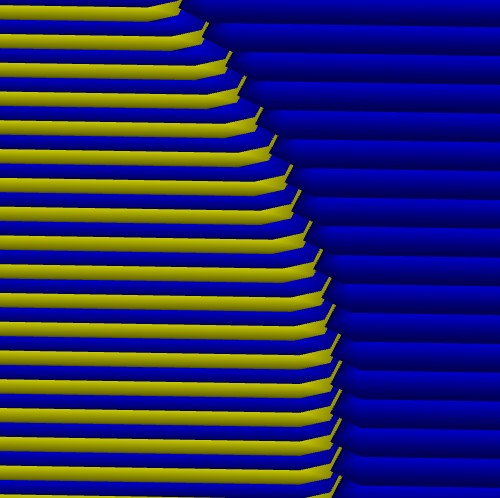
left, the painted mixed-color region uses subdivided layer heights;
right, non-mixed areas retain normal layer heights.
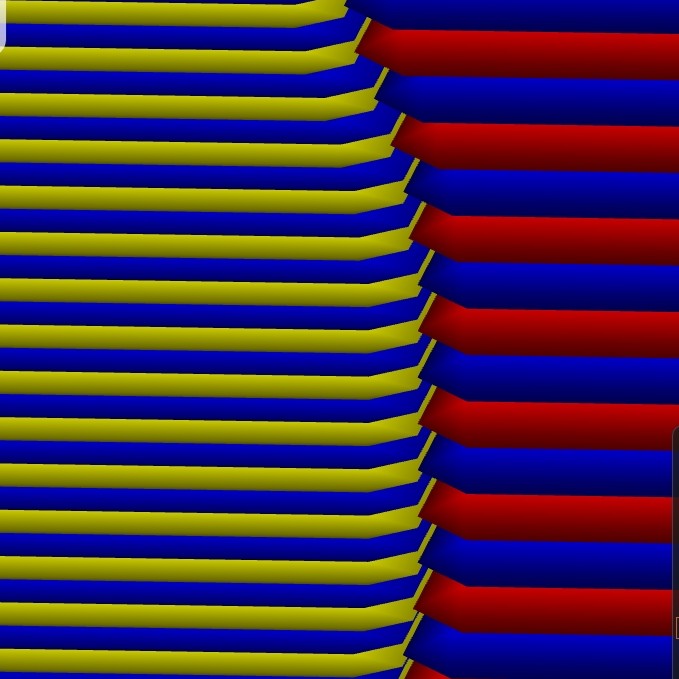
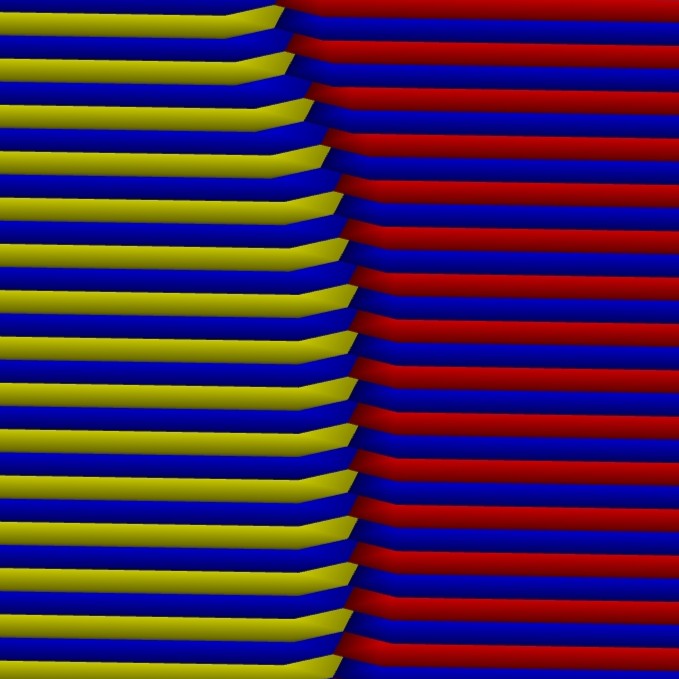
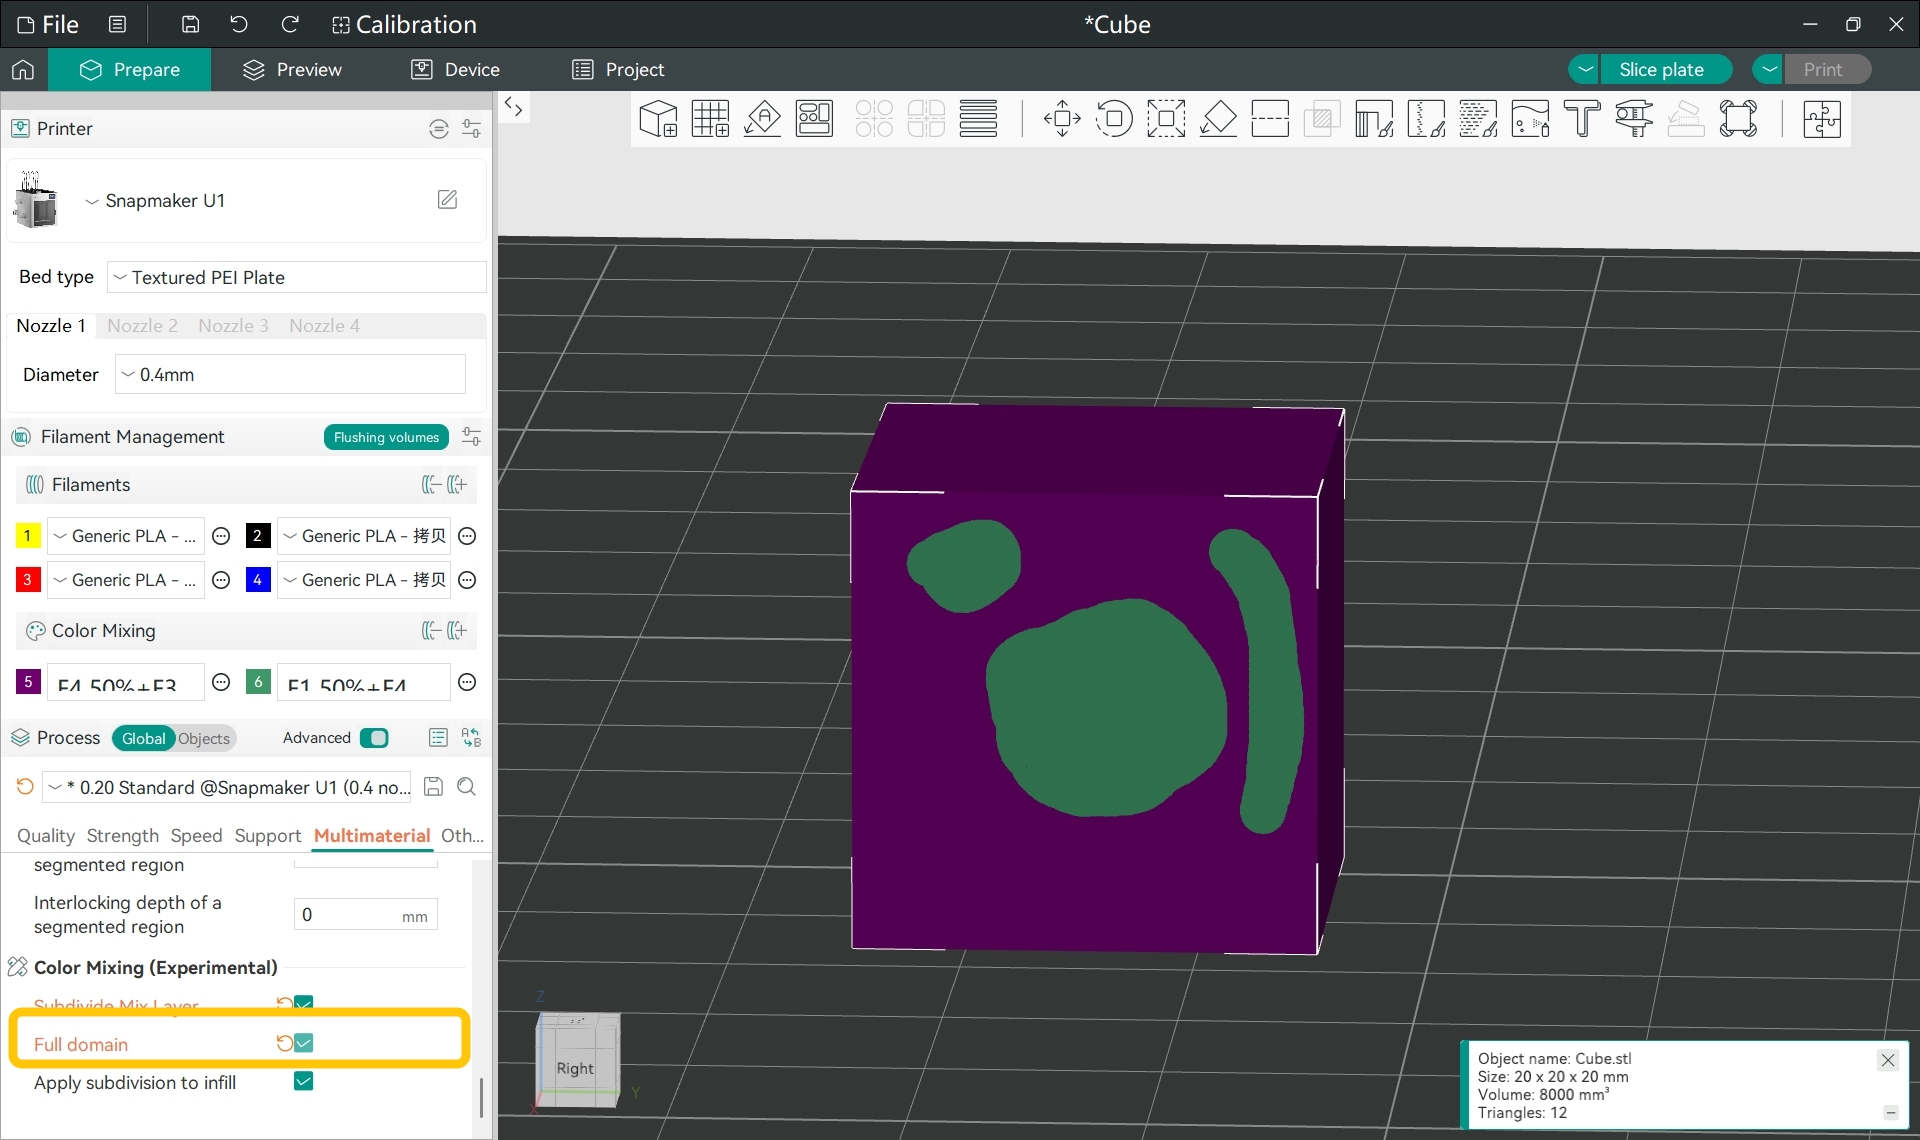
- Full domain
By default, Subdivide Mix Layer only takes effect in areas painted with mixed colors. However, in scenarios involving
Change Filament(usually used for large mixed-color regions or overall color-mixing), enabling Full domain is recommended.
This feature is mainly intended for scenarios where large areas of the model use mixed colors. After enabling it, subdivided layers are applied to the entire mixed-color region, creating smoother color transitions while reducing inconsistencies between color regions.
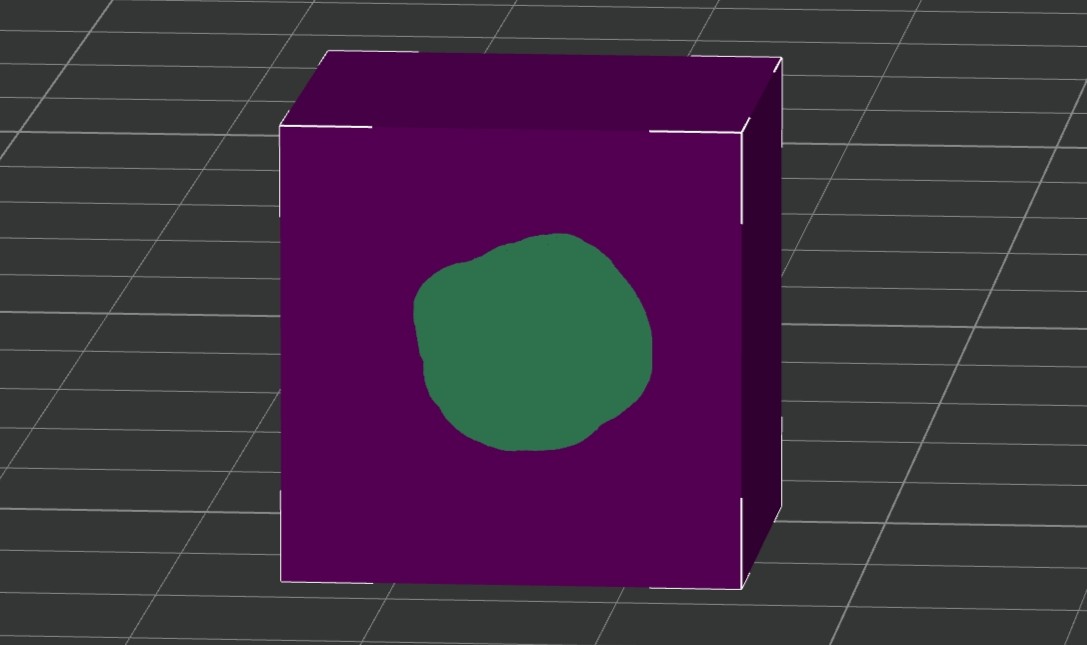
The large purple area is created by mixing red and blue.
The small green area is created by mixing yellow and blue.
- Apply Subdivision to Infill
In normal printing, infill usually has little impact on surface appearance, so larger layer heights are commonly used. However, in color mixing printing, the internal color structure can also affect the final visual effect, especially when using semi-transparent filaments. If the wall uses subdivided layers while the infill keeps normal layer heights, uneven color mixing or discontinuous gradients may occur.
After enabling this feature, the infill inside mixed-color areas will also use the same subdivided layer heights as the outer walls. This can further improve internal color mixing quality and overall color consistency.
However, enabling this feature may also increase tool changes and affect printing behavior and total print time.
¶ 🛠️ Use Full Spectrum in Snapmaker Orca
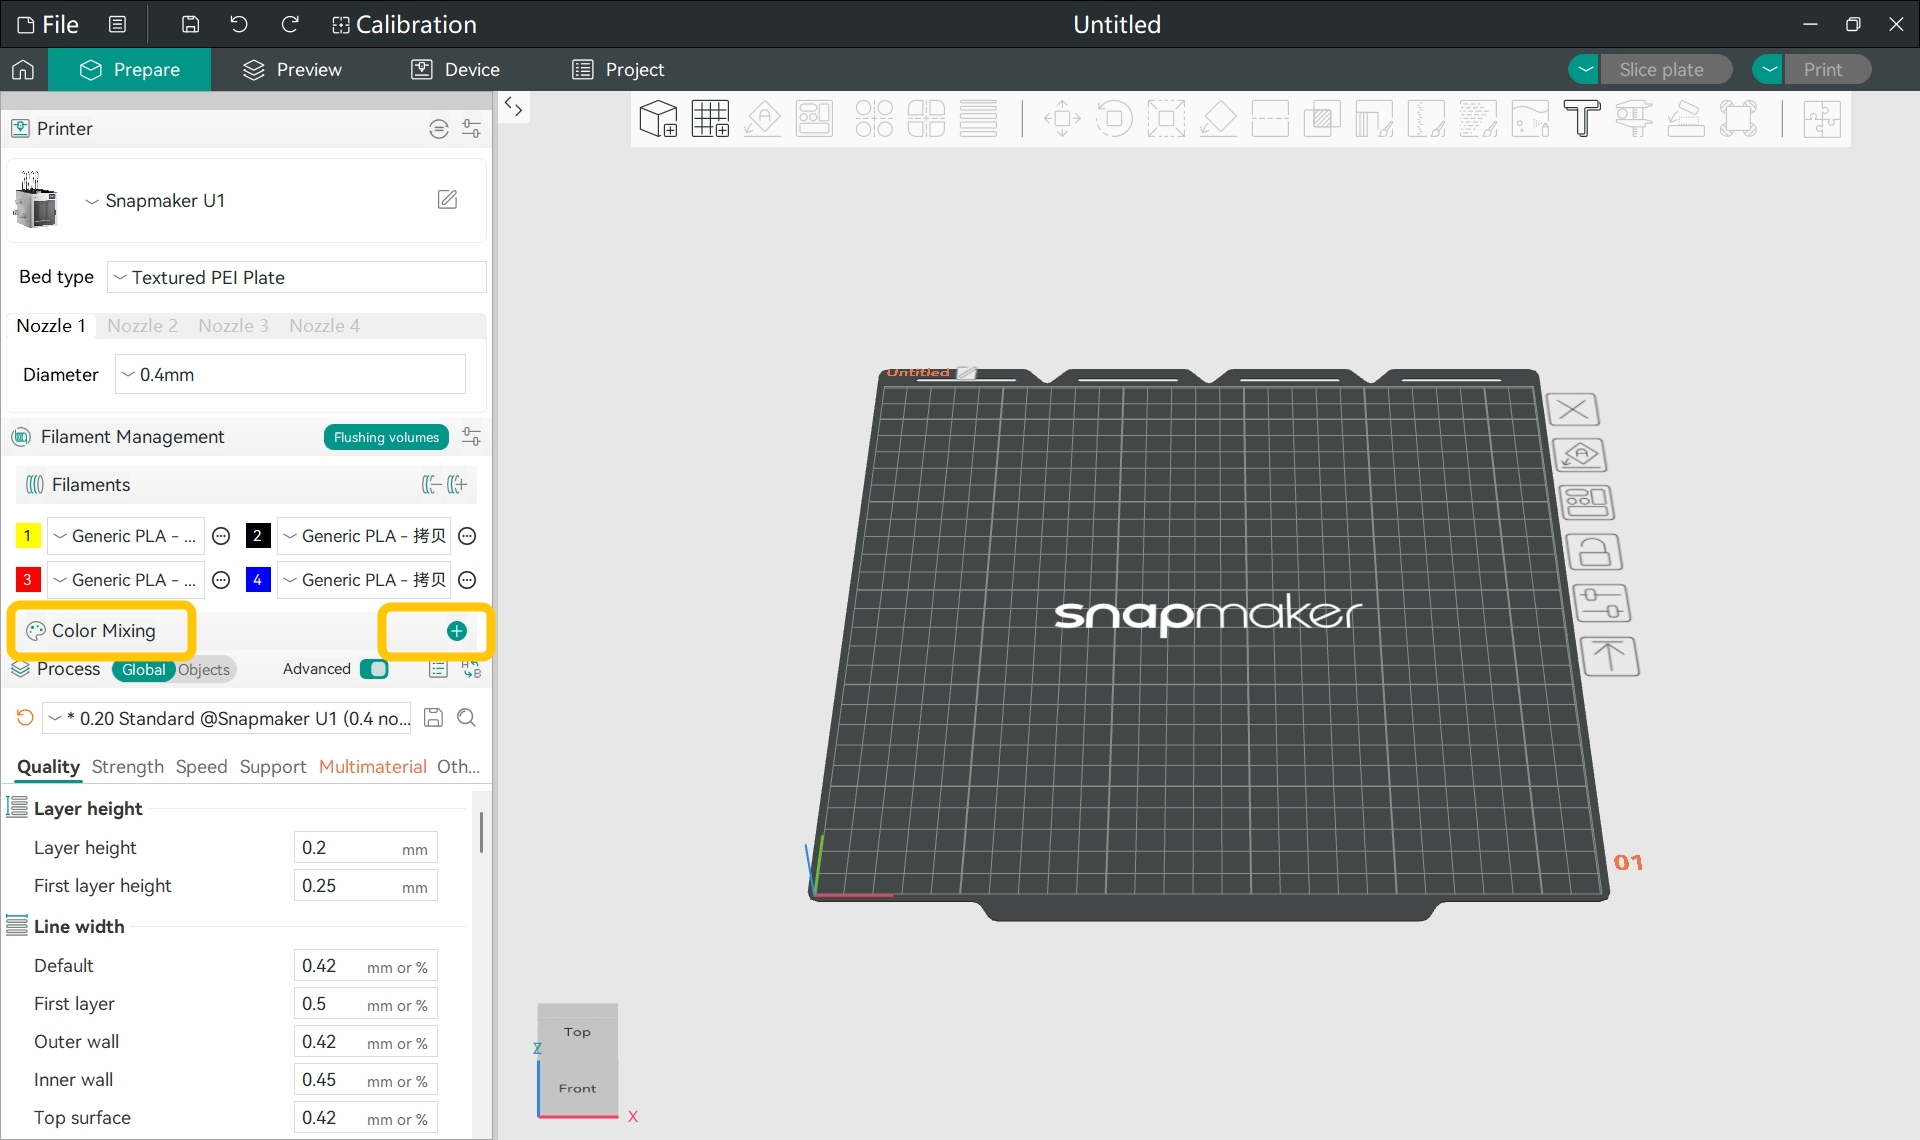
¶ 1. Access the Color Mixing Feature
- Open Snapmaker Orca.
- In the left side panel, go to
Filament Management>Filaments, click the filament name, and select the filament type and color you are using.
Based on the principle of color mixing printing through alternating stacked layers, we recommend using filaments of the same type for color mixing (e.g., PLA with PLA).
Using different types of filaments (e.g., PLA with PETG) for color mixing may result in print outcomes that differ significantly from expectations.
- In the left side panel, go to
Filament Management>Color Mixing, then click the+button on the right.
¶ 2. Color Mixing
Highly unbalanced filament ratios may result in inaccurate colors. For best results, avoid extreme filament ratios.
Snapmaker Orca may display warnings when filament ratios become overly unbalanced to help you identify potential color issues.
- In the pop-up window, select one of the following Color Mixing modes.
¶ 2.1 Ratio Mode
¶ 2.1.1 Select Base Colors
- In
Filament Selection>Filam, select the filament colors you want to mix. - Click the
+button in the upper-right corner to add more colors, or click the-button to remove added colors.
Ratio Mode supports mixing 2 to 3 base colors.
In the
Mixing Recommendationssection, Snapmaker Orca provides recommended color combinations and mixing ratios based on your currently configured filaments. You can choose them as needed.
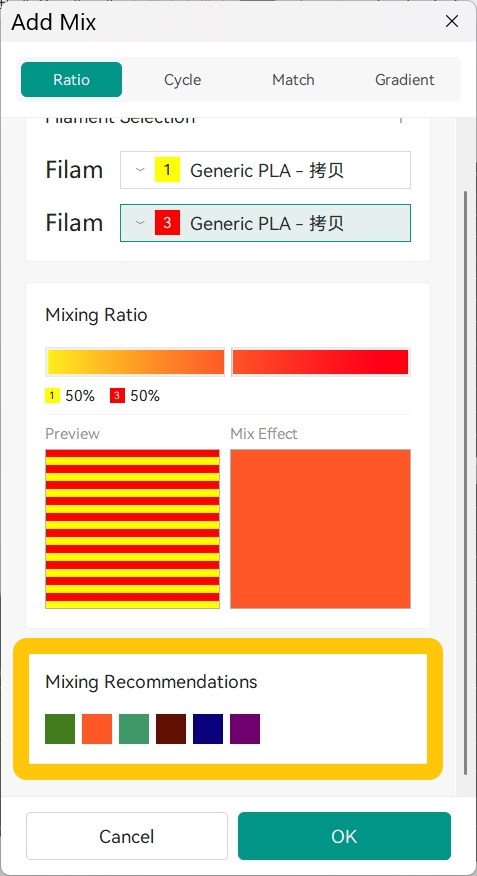
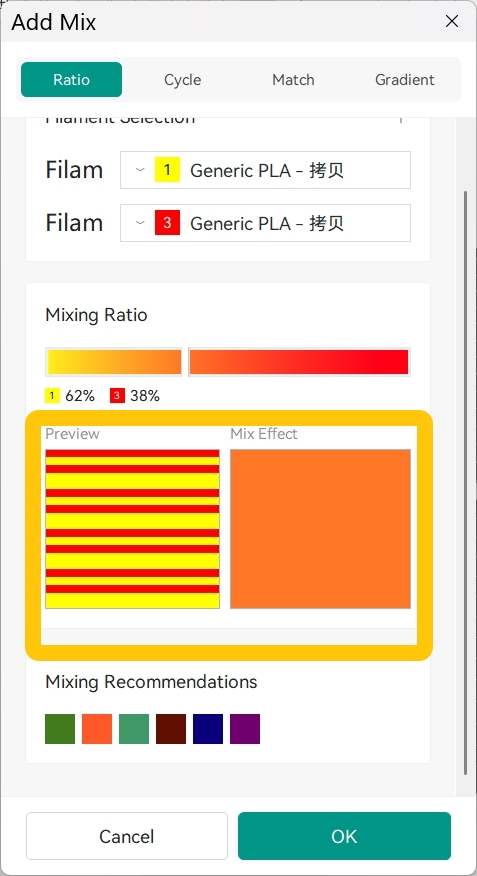
¶ 2.1.2 Set Mixing Ratios and Preview Mixed Color
- Drag the mixing ratio slider to create different mixed colors.
- In the
Previewsection, you can view how different filament layers are stacked. - In the
Mix Effectregion, you can preview the estimated mixed color.
Note: The mixing preview helps you adjust color ratios and estimate the mixing effect. Since the actual print result is affected by factors such as filament color, translucency, layer height, and other print settings, the final printed color may differ from the preview.
¶ 2.2 Cycle Mode
¶ 2.2.1 Set the Cycle Sequence
Cycle Mode alternates filaments between print layers based on your defined sequence, creating blended color effects. For example, alternating yellow and blue layers can appear visually green.
- In the
Filamentssection, you can view the index numbers and colors of the added filaments. - Enter filament index numbers in the input box and press
Enterto define the filament sequence for each print layer.
¶ 2.2.2 Preview Layer Stacking and Mixed Color
- After entering the filament sequence and pressing
Enter, you can view the stacking order of different filaments in thePreviewsection. - In the
Mix Effectregion, you can preview the estimated mixed color. - At the bottom, you can view the mixing ratio of each color.
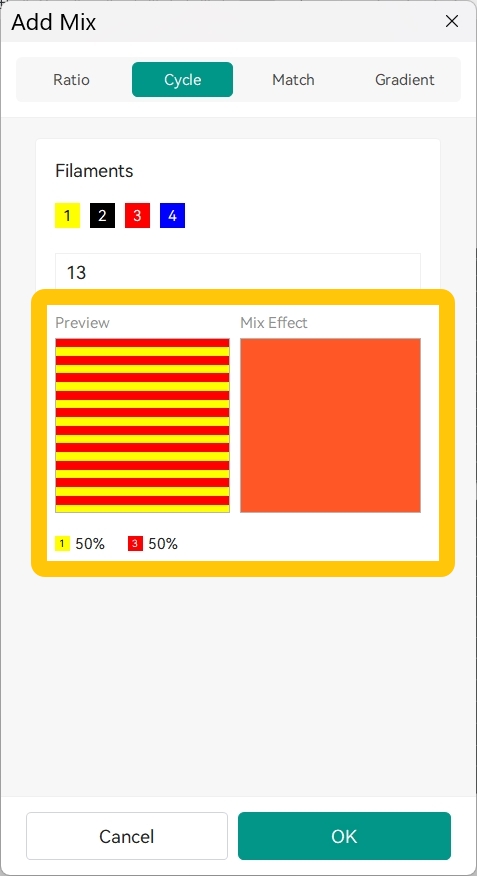
In Cycle Mode, Subdivide Mix Layer will not take effect. This preserves the defined stacking sequence and prevents layer heights from falling below the minimum supported by the nozzle.
¶ 2.3 Match Mode
Match Mode is suitable for quickly generating a color close to your target color.
¶ 2.3.1 Set the Target Color
- In the
Target Colorsection, click the color block, then selectDefine Custom Coloursin the pop-up menu to choose your target color.
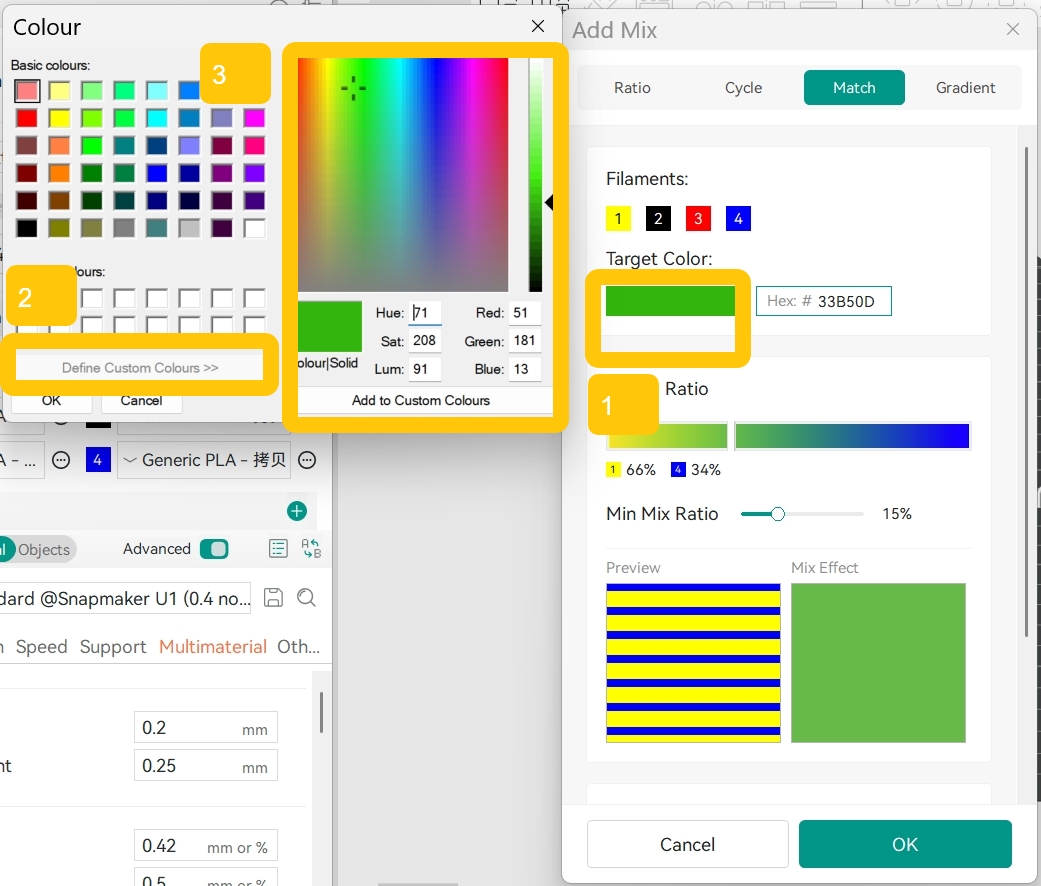
- You can also enter a Hex value next to the color block and press
Enterto specify the target color precisely.
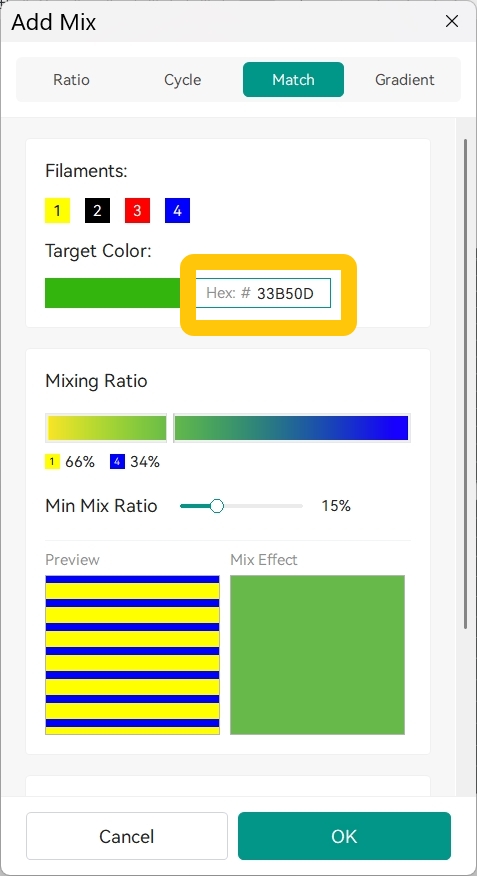
After entering a target color, the software automatically calculates the closest mixing ratio using the available filament colors.
If you are unsure about the target color, scroll down to the
Mixing Recommendationssection to view recommended target colors and mixing ratios based on your configured filaments. You can edit them further if needed.
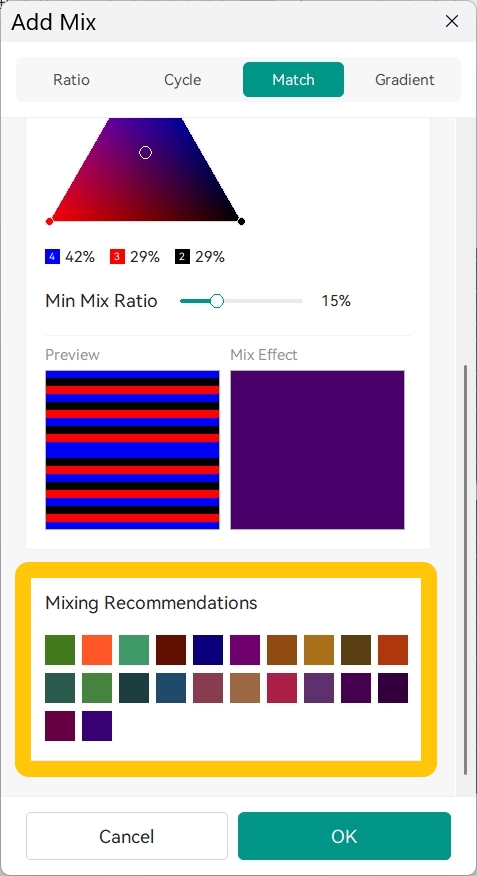
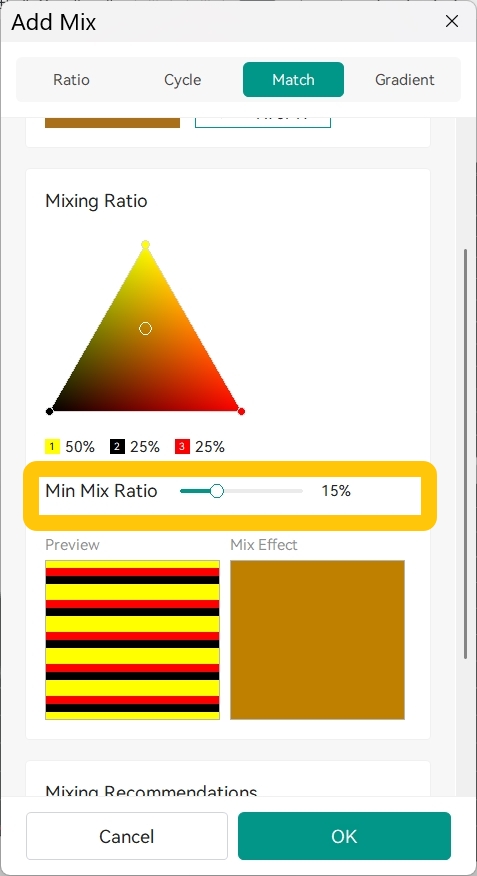
¶ 2.3.2 Adjust Mixing Ratios and Preview Mixed Color
- In the
Mixing Ratiosection, you can view the automatically generated color ratio. - You can manually adjust the slider to fine-tune the mixed color.
- In the
Previewsection, you can view the actual stacking order of different filament colors. - In the
Mix Effectregion, you can preview the estimated mixed color.
¶ 2.3.3 Set the Minimum Mixing Ratio
Imbalanced filament ratios may cause the printed color to differ from the software prediction. Setting a minimum mixing ratio helps reduce such inaccuracies and makes the print color closer to your expectations.
- Drag the
Min Mix Ratioslider to limit the minimum proportion of a single color as needed.
¶ 2.4 Gradient Mode
Gradient Mode is suitable for generating a continuous gradient effect between two colors.
¶ 2.4.1 Select Base Colors and Gradient Direction
- In
Filament Selection>Filam, select the two filament colors for the gradient.
Gradient Mode supports only two filament colors.
- Click the
Swap Filamentsbutton in the upper-right corner to reverse the gradient direction.
Example:
- Red → Blue
- Blue → Red
These produce gradients in opposite directions.
The gradient direction shown in the color block matches the gradient direction on the model:
The bottom of the color block represents the bottom of the model (near the heated bed), while the top of the color block represents the top of the model.
You can also view recommended gradient color combinations in the
Mixing Recommendationssection based on the filament colors currently loaded.
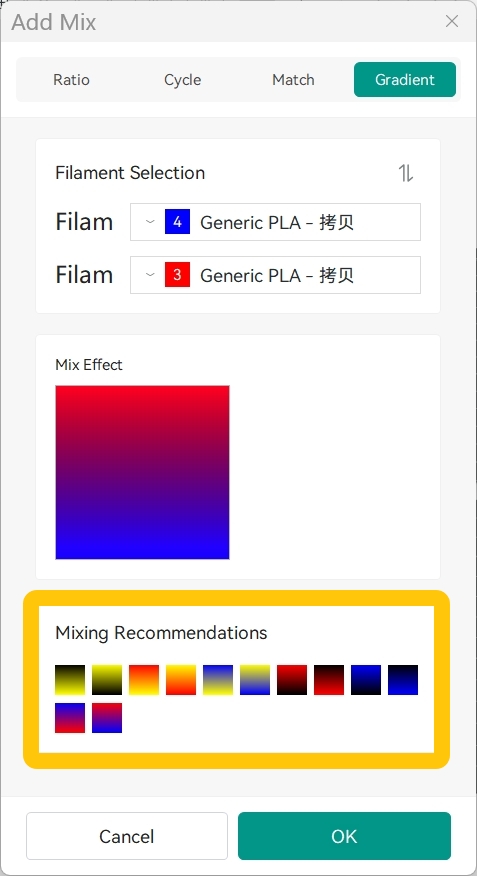
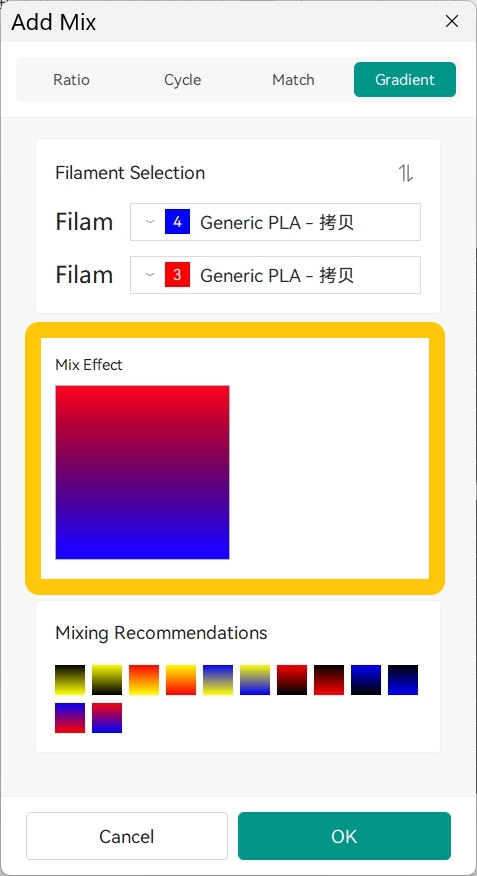
¶ 2.4.2 Preview the Gradient Effect
- You can preview the estimated gradient effect in the
Mix Effectregion.
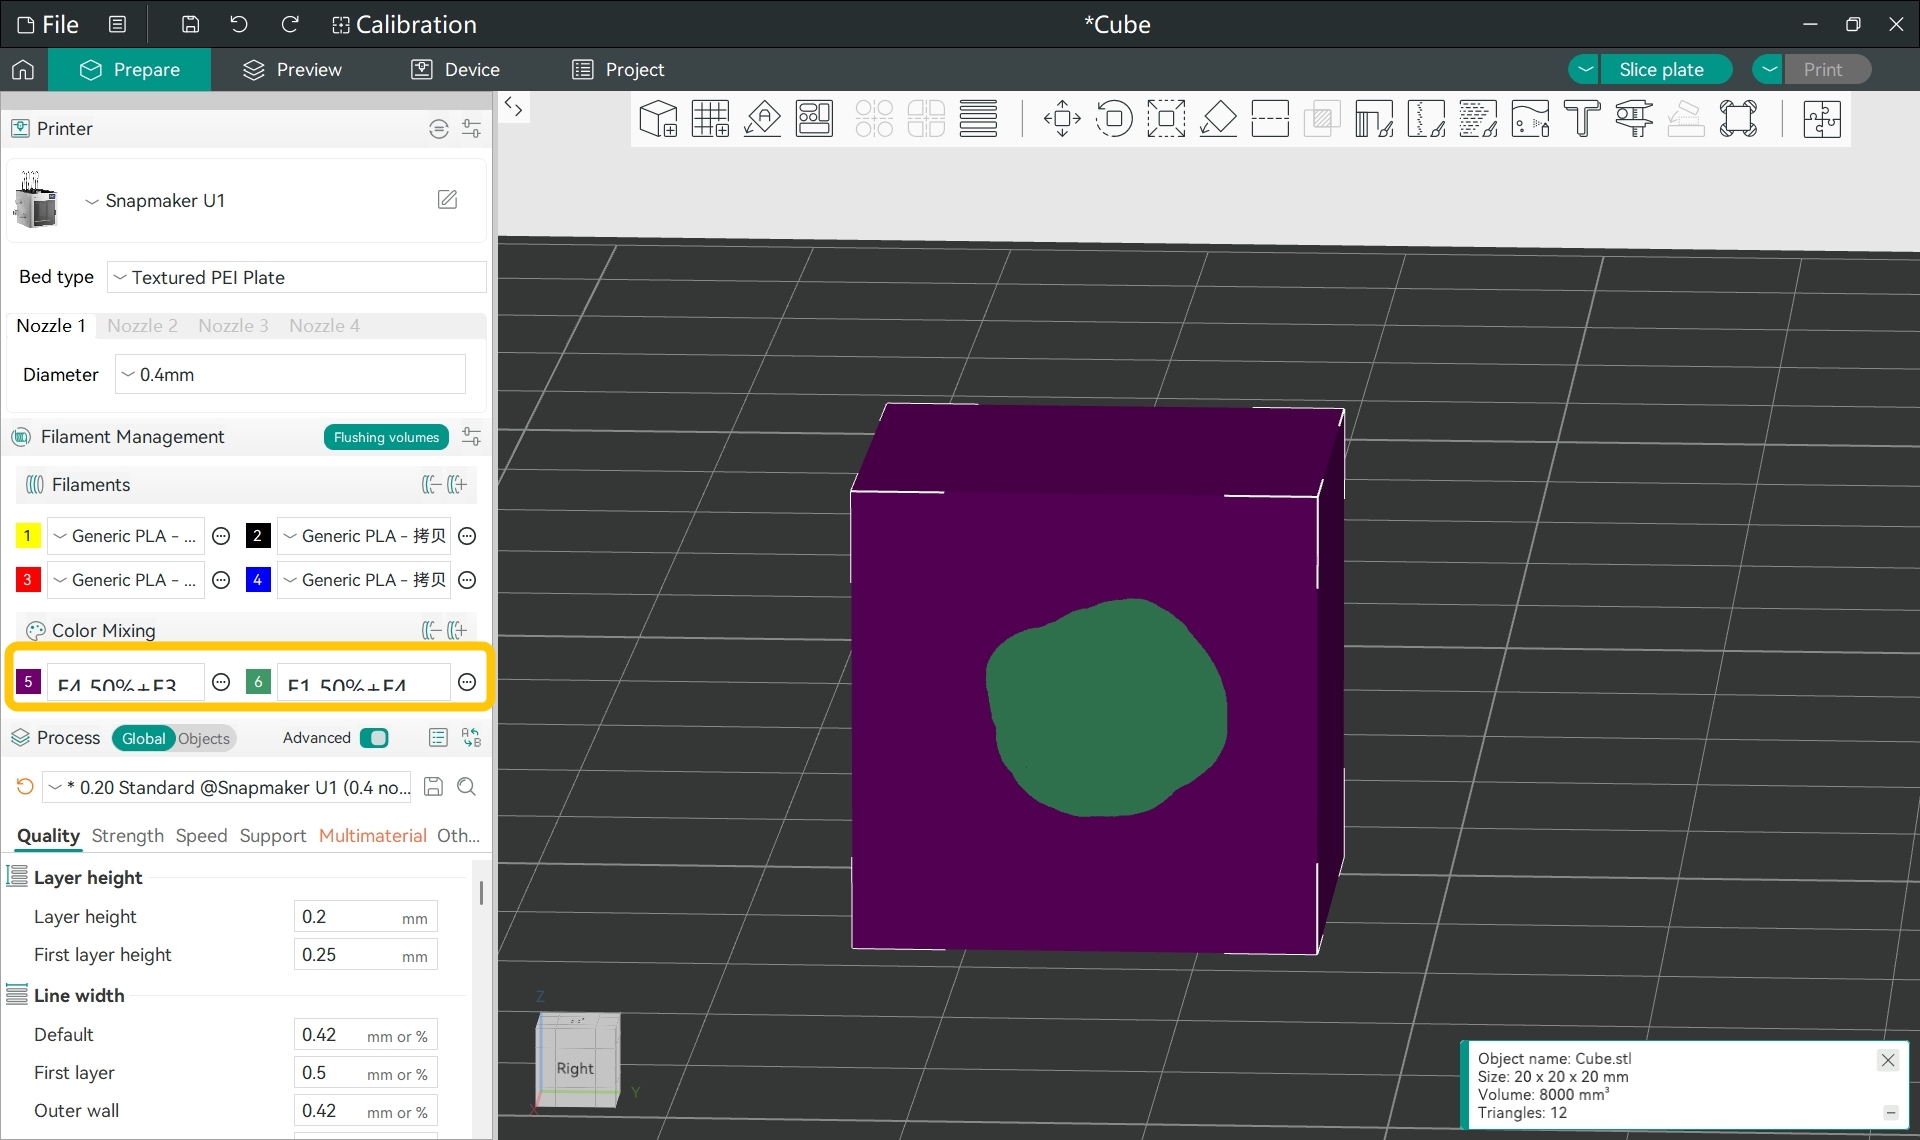
¶ 3. Save the Mixed Color
- In the selected Color Mixing mode, click
OKto save the current mixing effect. - You can view saved mixing schemes in
Filament Management>Color Mixingon the left side panel.
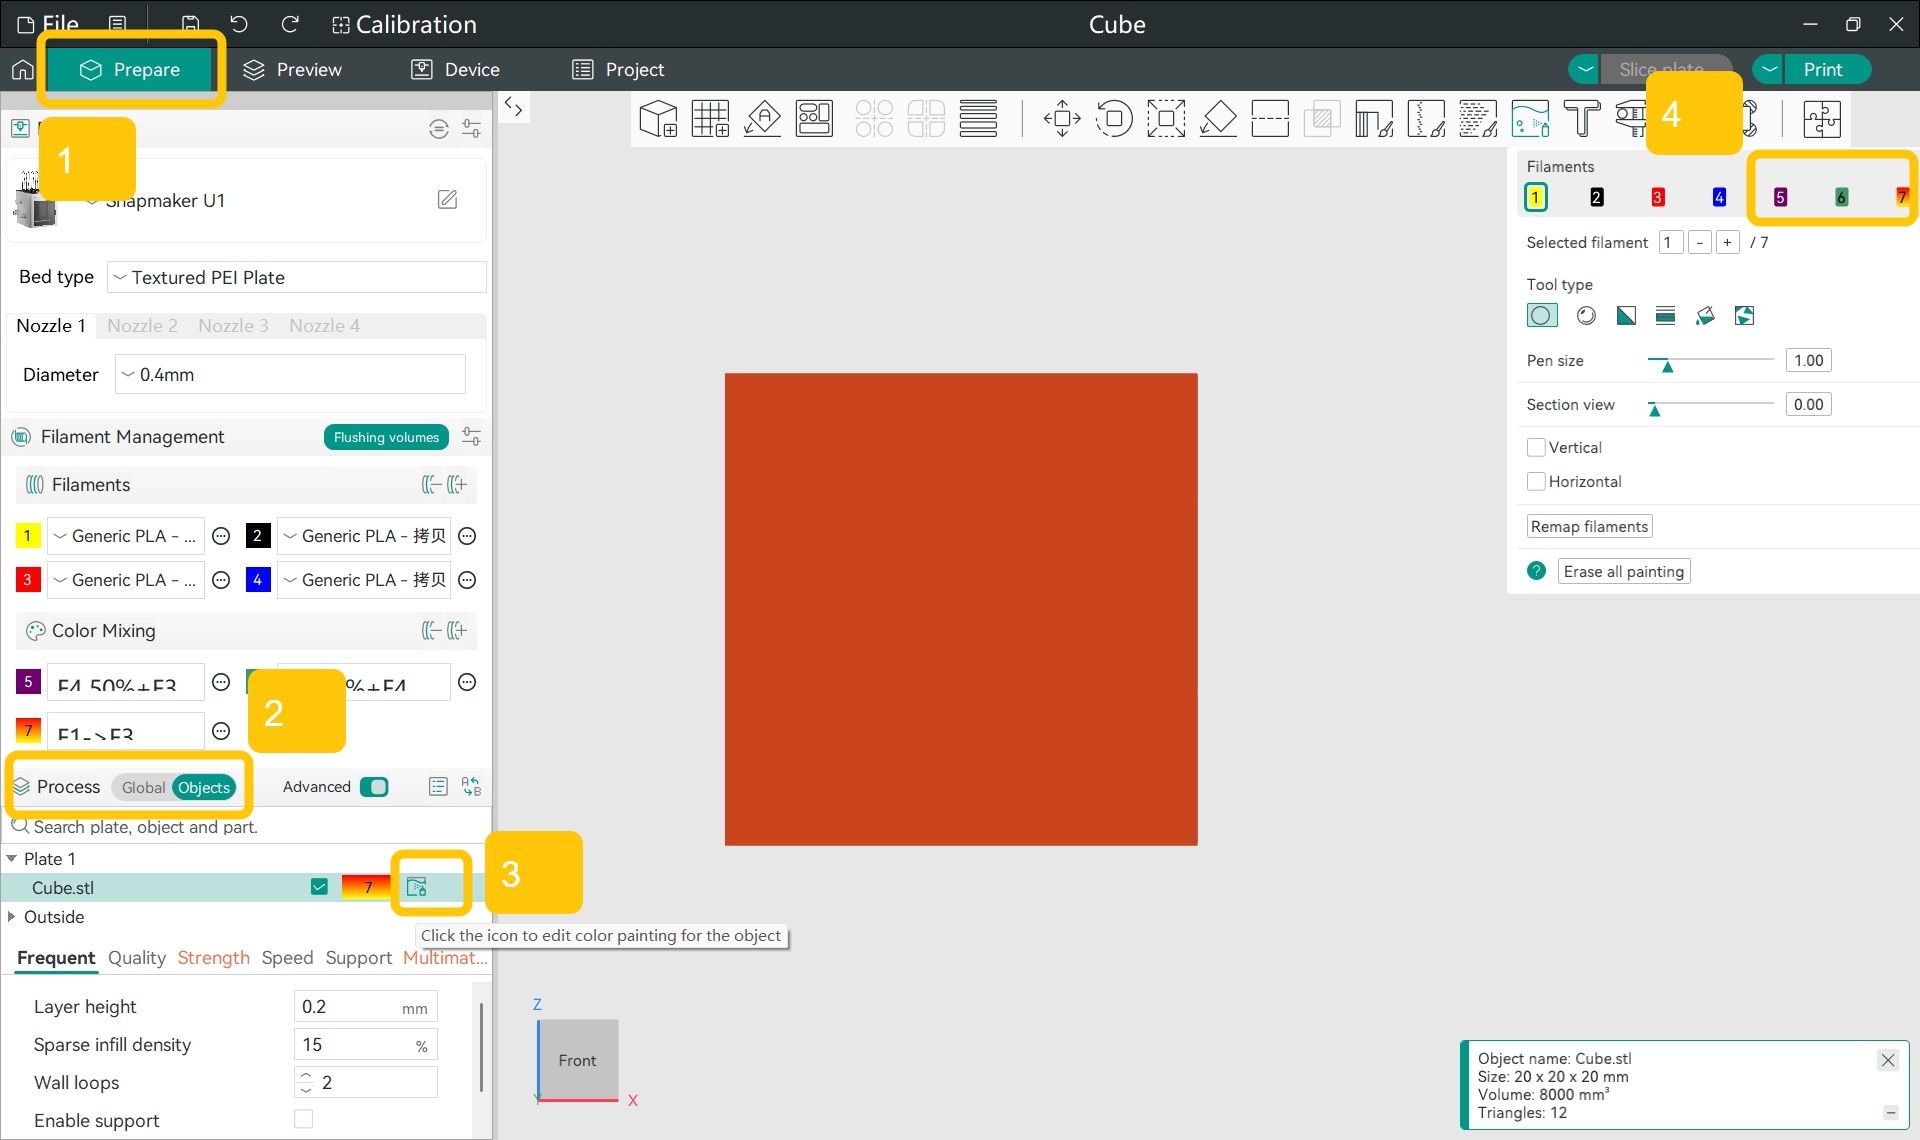
¶ 4. Paint the Model with Mixed Colors
¶ 4.1 Import Your Model
¶ 4.2 If Only Part of the Model Requires Mixed Colors
- Go to the
Preparepage. - Left-click the model, then select
Color Paintingfrom the top menu bar. - In the drop-down menu, find the
Filamentssection, select the mixed color. - Paint the desired area on the model.
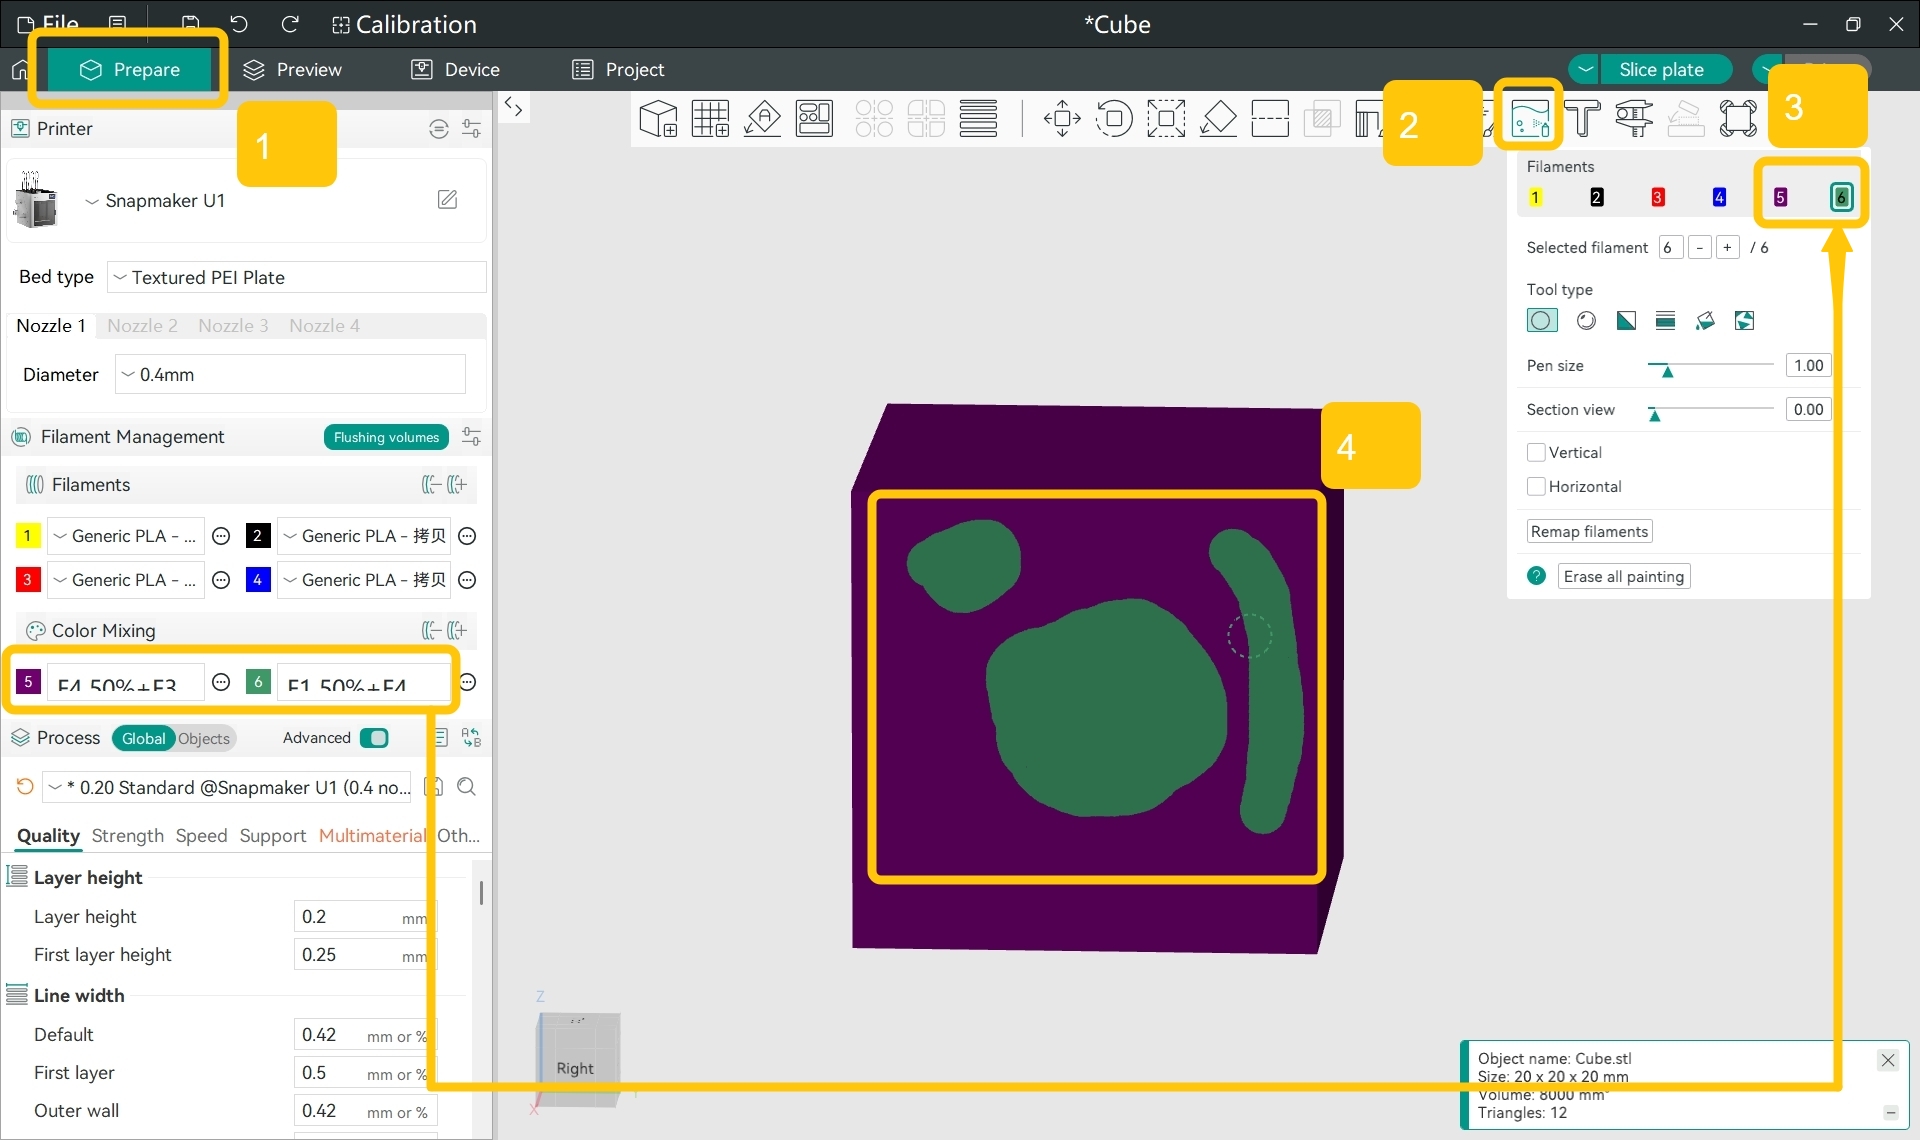
You can also paint your model using a mixed color by...
- Go to the
Preparepage and, underProcess>Objects, find the model you want to paint. - On the right of the model, click the
Color Paintingicon to open the painting menu. - In the drop-down menu, find the
Filamentssection and select the mixed color. - Paint the desired area on the model.
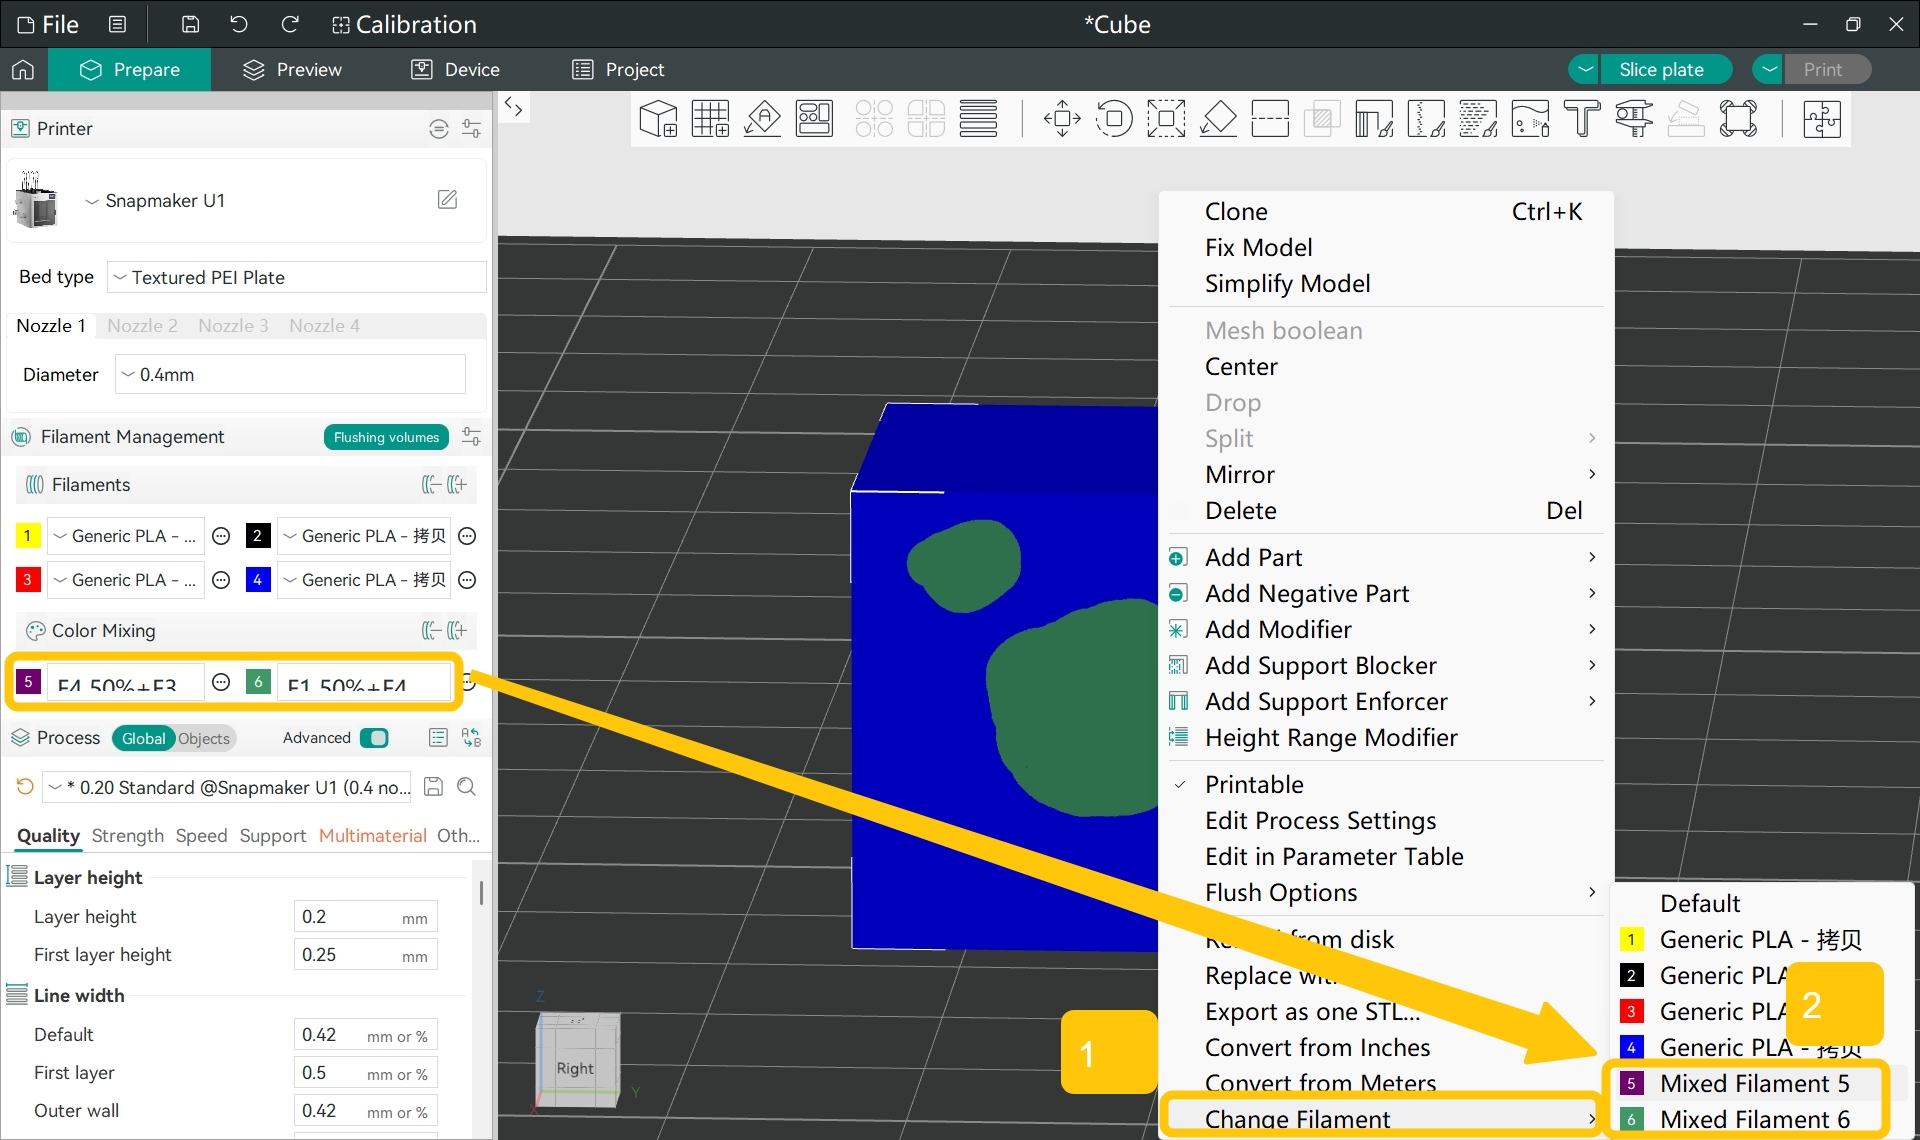
¶ 4.3 If You Want to Apply Mixed Colors to the Entire Model
- On the
Preparepage, right-click the model. - In the pop-up menu, select
Change Filament, then choose the mixed color. - The entire model (except painted regions) will switch to the mixed color.
You can also apply a mixed color to the entire model by...
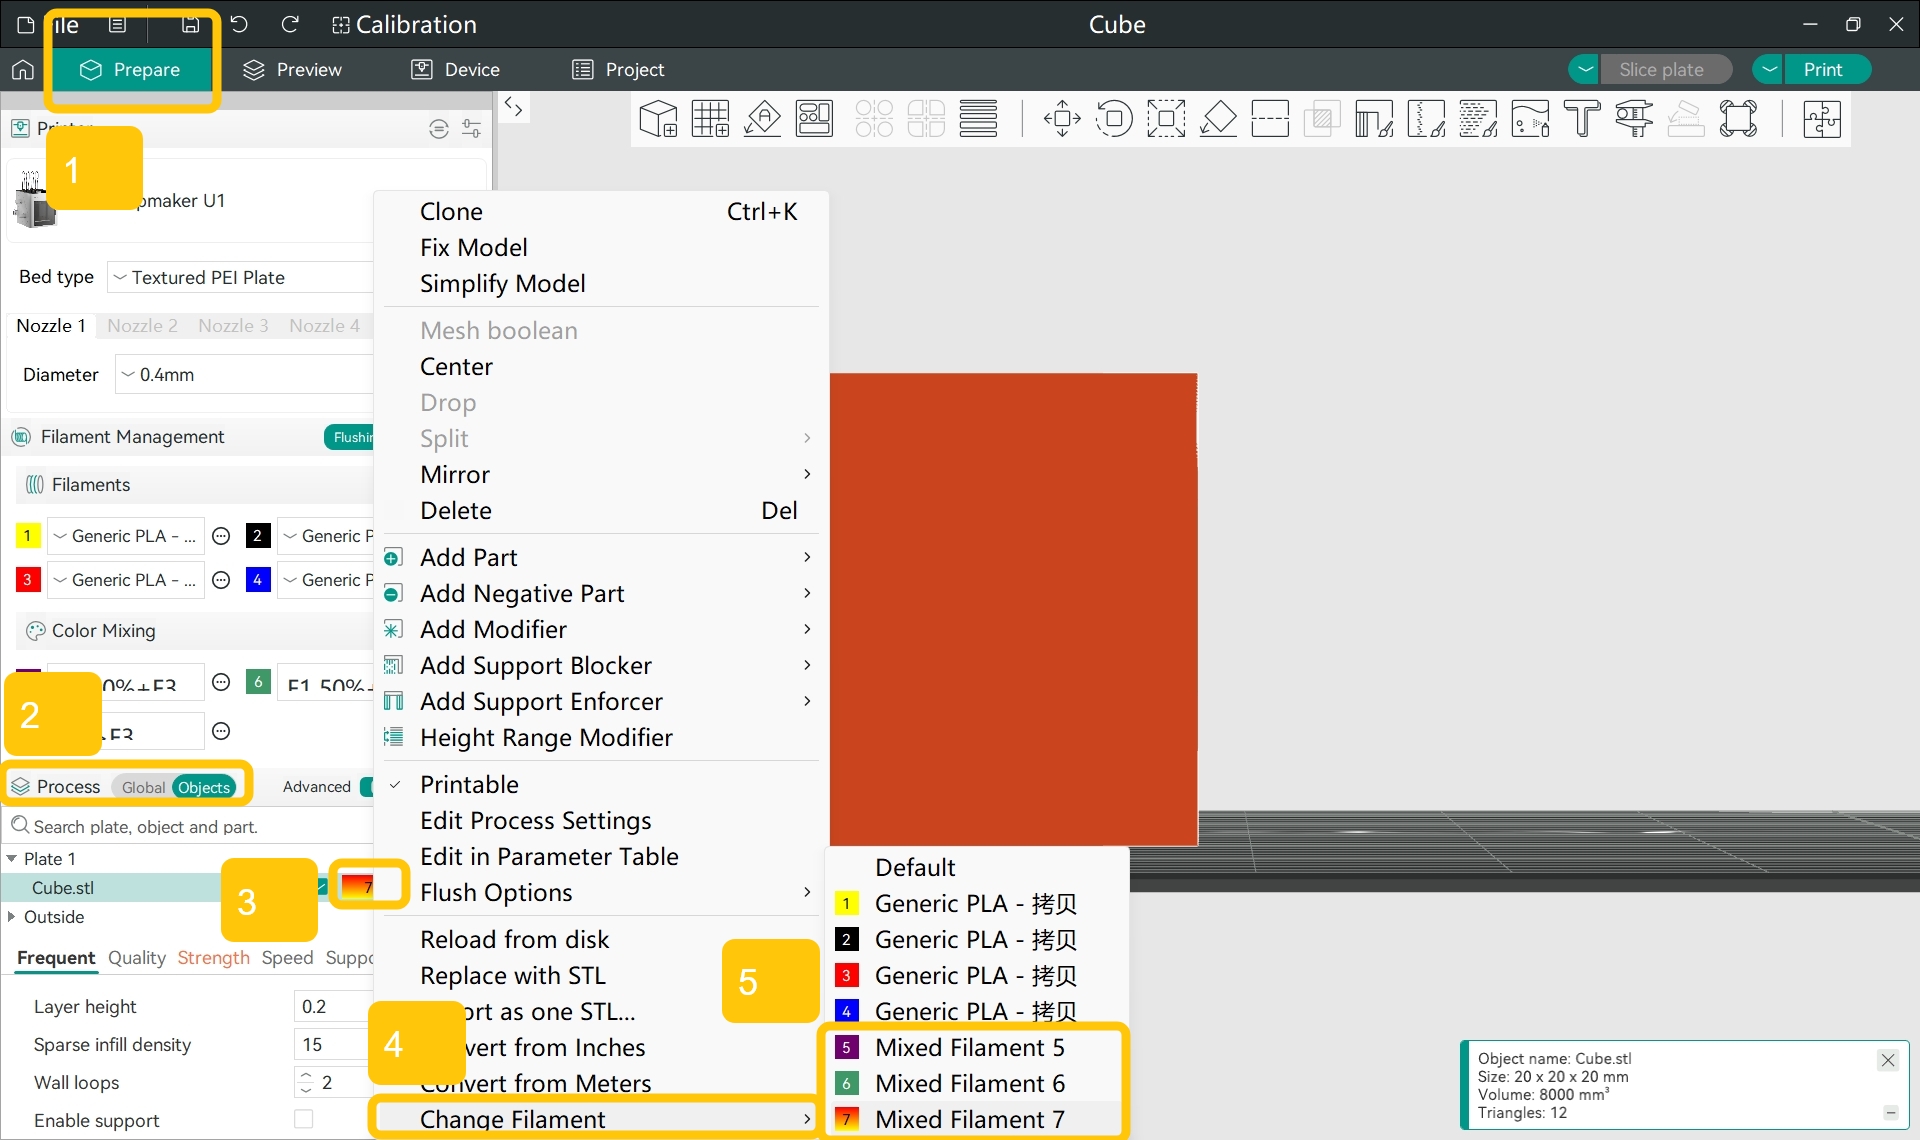
- Go to the
Preparepage and, underProcess>Objects, find the target model. - On the right of the model, right-click the color block.
- In the pop-up menu, select
Change Filament, then choose the mixed color. - The entire model (except painted regions) will switch to the mixed color.
¶ 5. Enable Subdivide Mix Layer
To achieve better color mixing results, you can enable Subdivide Mix Layer. The software will automatically apply finer layer heights to mixed-color painted areas for smoother color transitions.
In addition to enabling
Subdivide Mix Layer, you can also set a smaller layer height inProcess>Quality>Layer height. A layer height of 0.08 mm is recommended.
- In the left side panel under
Process, enableGlobalandAdvanced. - In the left side panel, go to
Process>Multimaterial>Color Mixing.
-
If you followed the steps in 4.2 and only painted mixed colors on part of the model:
- Select the checkbox next to
Subdivide Mix Layerto enable the feature and display additional Color Mixing settings.
- Select the checkbox next to
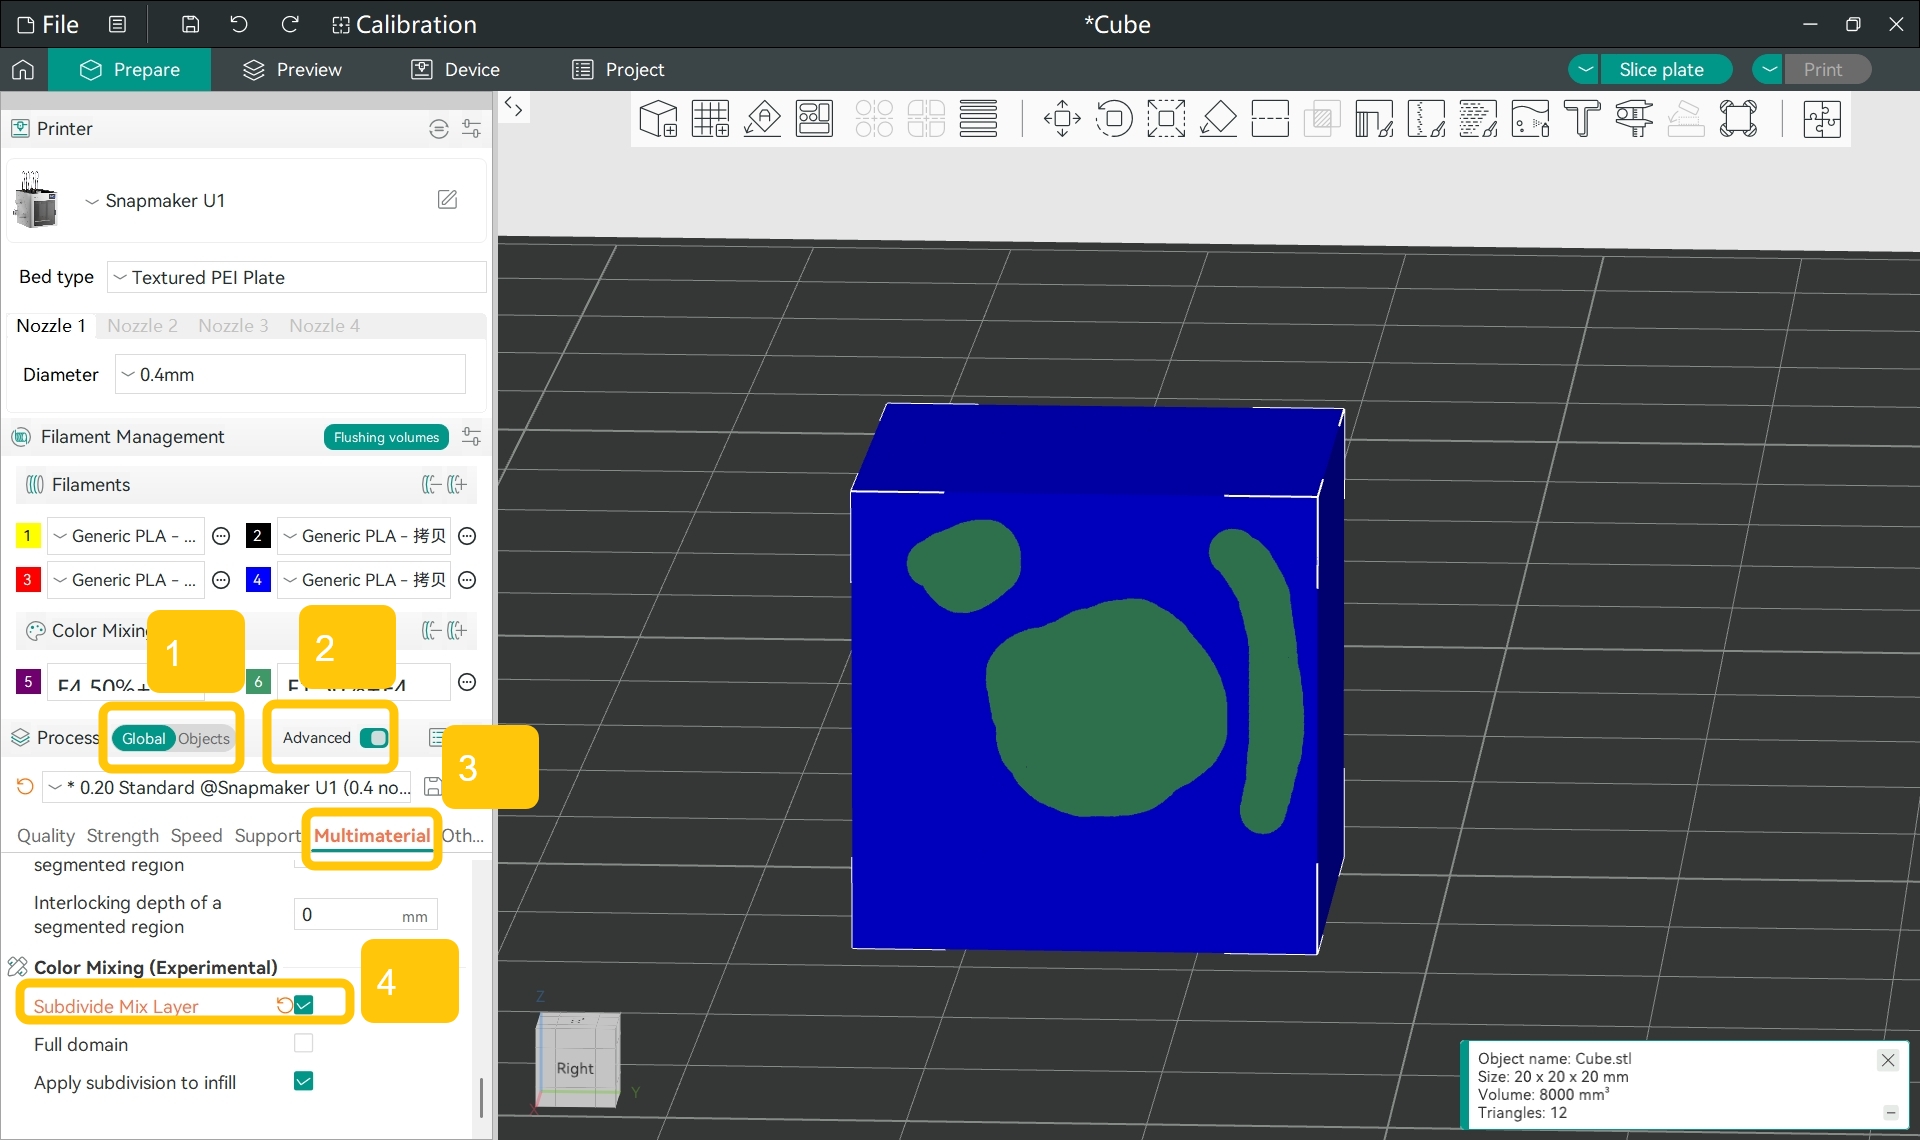
-
If you followed the steps in 4.3 and changed the entire model to use mixed colors:
- After enabling
Subdivide Mix Layer, select the checkbox next toFull domainto apply layer subdivision to all mixed-color regions.
- After enabling
- Select the checkbox next to
Apply Subdivision to Infillto apply subdivided layer heights to infill regions.

To better visualize the Gradient Mode effect, slice the model and switch to an orthographic view in the
Previewpage.
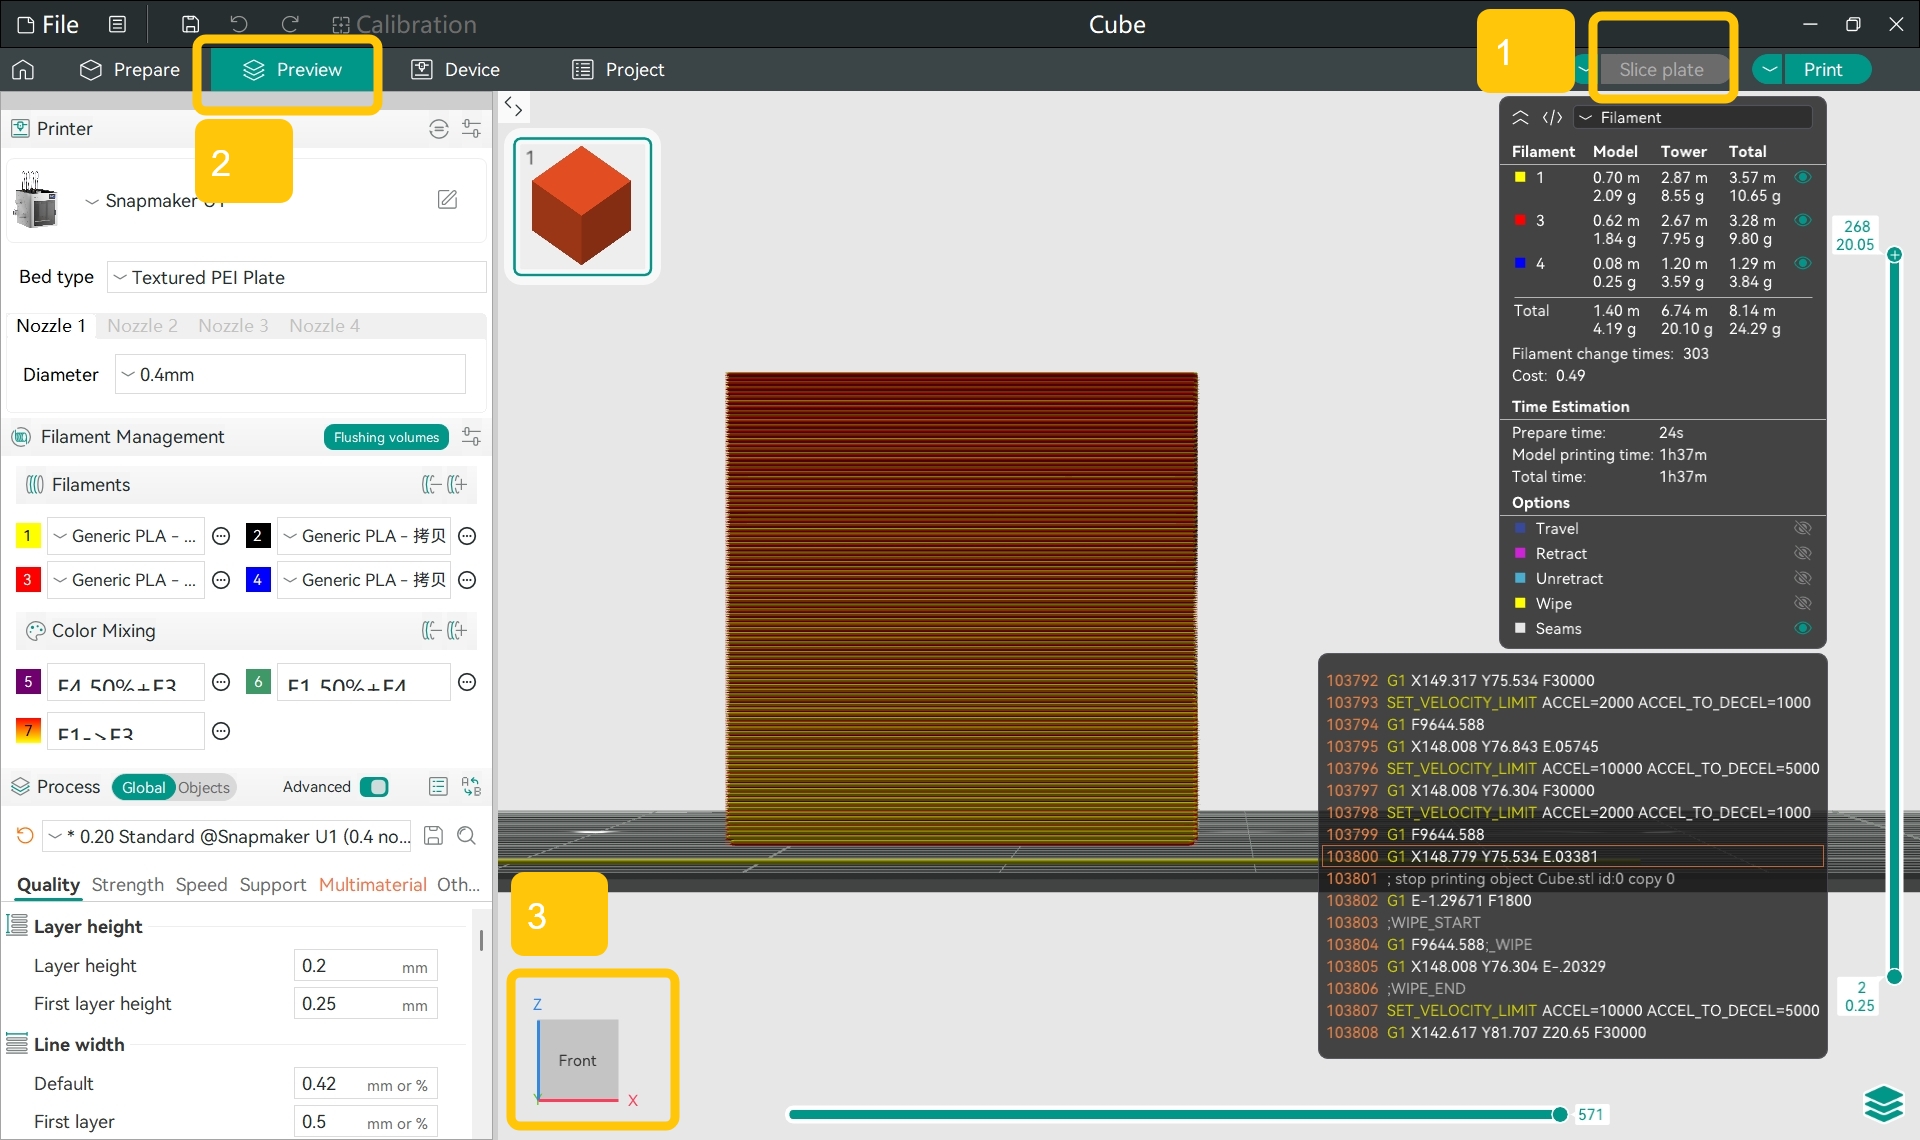
¶ 6. Slice and Print
- Refer to the Snapmaker Orca Quick Start Guide for U1 to slice the model, then upload the sliced file to your U1 for printing.