¶ 1. Software Overview
Snapmaker Orca is a slicing software based on Orca, specifically customized for Snapmaker 3D printers. In addition to the inherent functions of Orca, such as model processing and slicing, this software also supports features tailored for Snapmaker U1 3D printers, including remote monitoring, device management, and device control.
¶ 1.1 System Requirements
- Windows 10 or later.
- macOS 12.0 or later.
- Linux Ubuntu 20.02 or later / Fedora 36 or later (Linux versions need to be downloaded from Github).
- Intel® Core 2 or AMD Athlon® 64 processor; 2GHz or faster processor.
- System supporting OpenGL 2.0.
- 8GB RAM recommended (minimum 4GB), 2.0GB or more available hard disk space.
¶ 1.2 Download and Installation
Download Link: https://www.snapmaker.com/snapmaker-orca
Follow the instructions for installation.
¶ 1.3 First Startup Guide
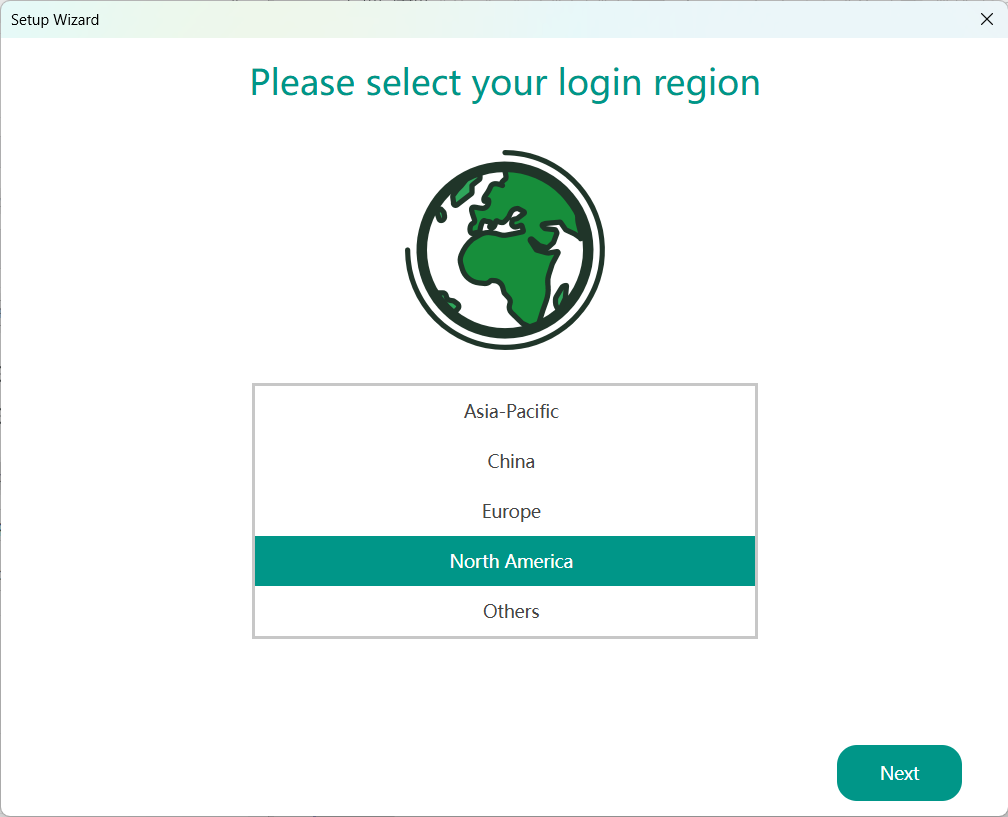
- Select Login Region.
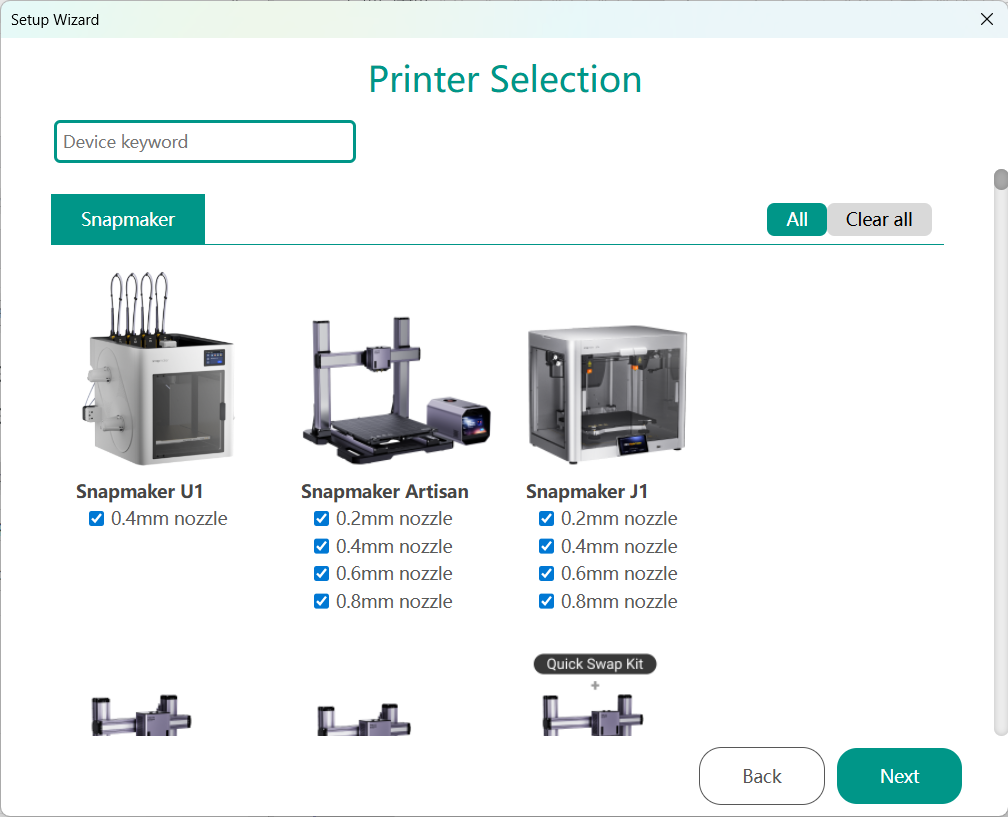
- Select Printer
The default model is Snapmaker U1. You can customize the printer and nozzle to be used (these options can be adjusted later in the slicer menu bar).
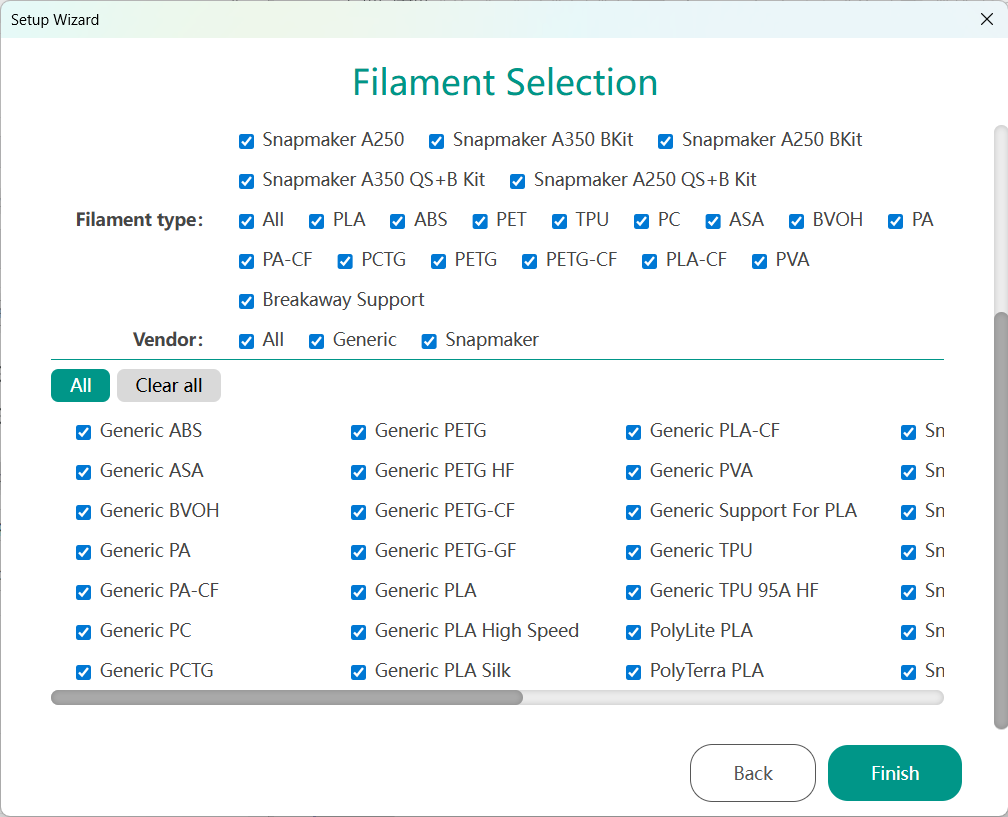
- Select Filament
Select the filaments you want to list in the material preset list.

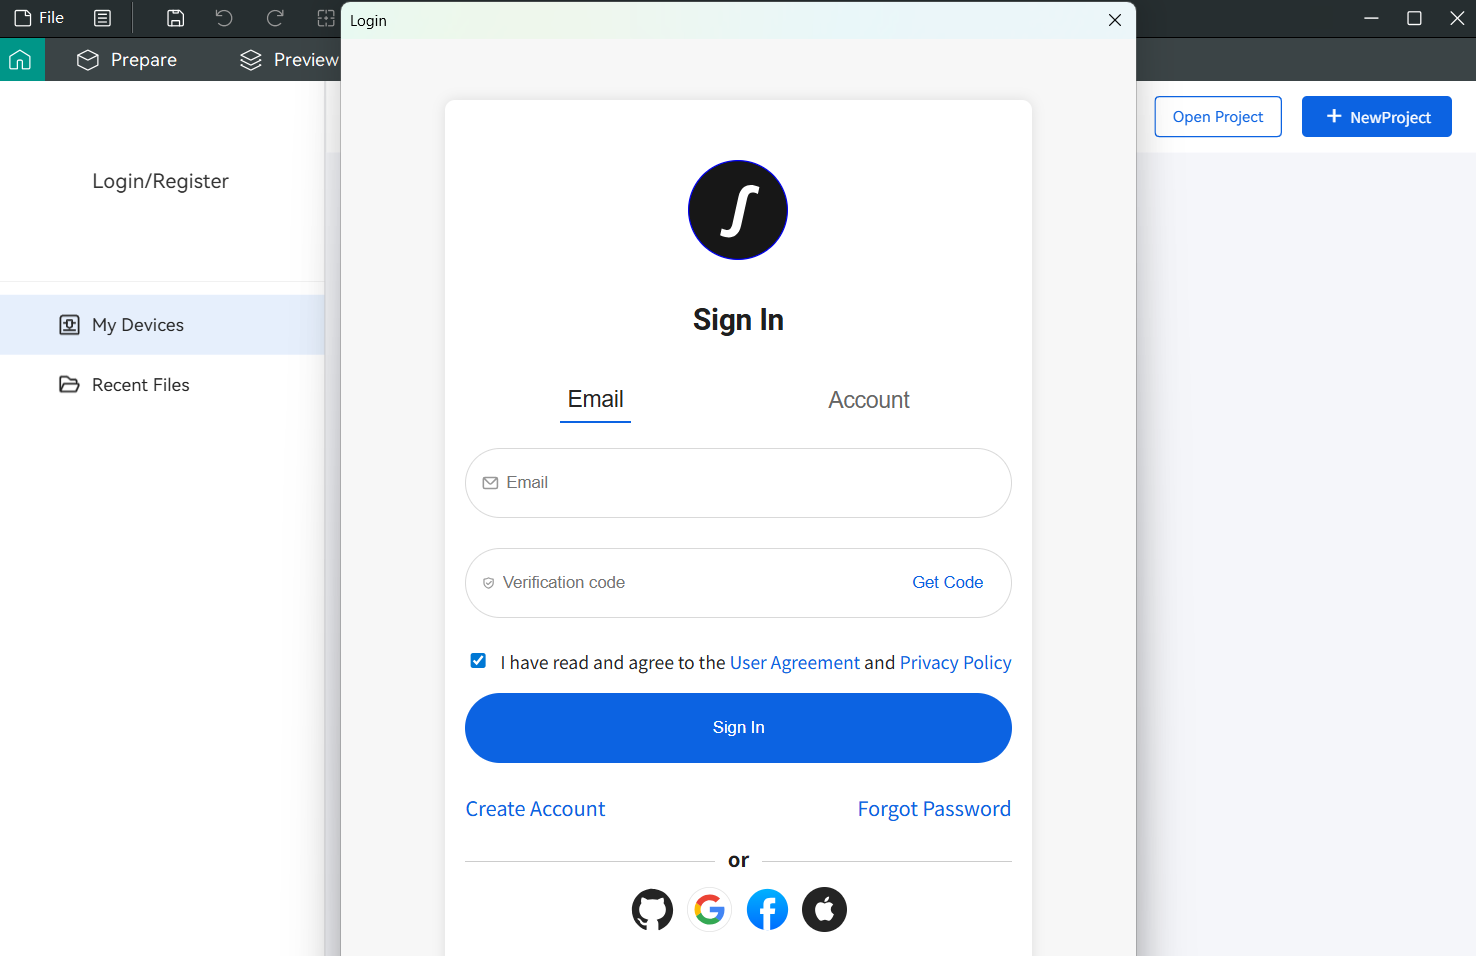
¶ 1.4 Software Login
Snapmaker Orca supports login via email + verification code, and email + password. If using the software for the first time, you need to register with your email and set a password for subsequent logins. Additionally, you must agree to the User Agreement and Privacy Policy to register successfully.
¶ 1.5 Binding Printer
You need to bind Snapmaker Orca with your printer to view device status, control remotely, and initiate tasks. You can bind the printer via Snapmaker Orca or the Snapmaker App.
- Bind via Snapmaker Orca
-
Cloud Mode
- Bind via PIN code.
- Bind by searching for nearby devices.
-
LAN Mode
The printer operates in LAN mode, suitable for scenarios requiring data isolation or without an external network.- Bind via IP address.
- Bind by searching for nearby devices.
- Bind via Snapmaker App
- Cloud Mode
- Bind by scanning QR code.
- Bind by searching for nearby devices.
- LAN Mode
- Bind by searching for nearby devices.
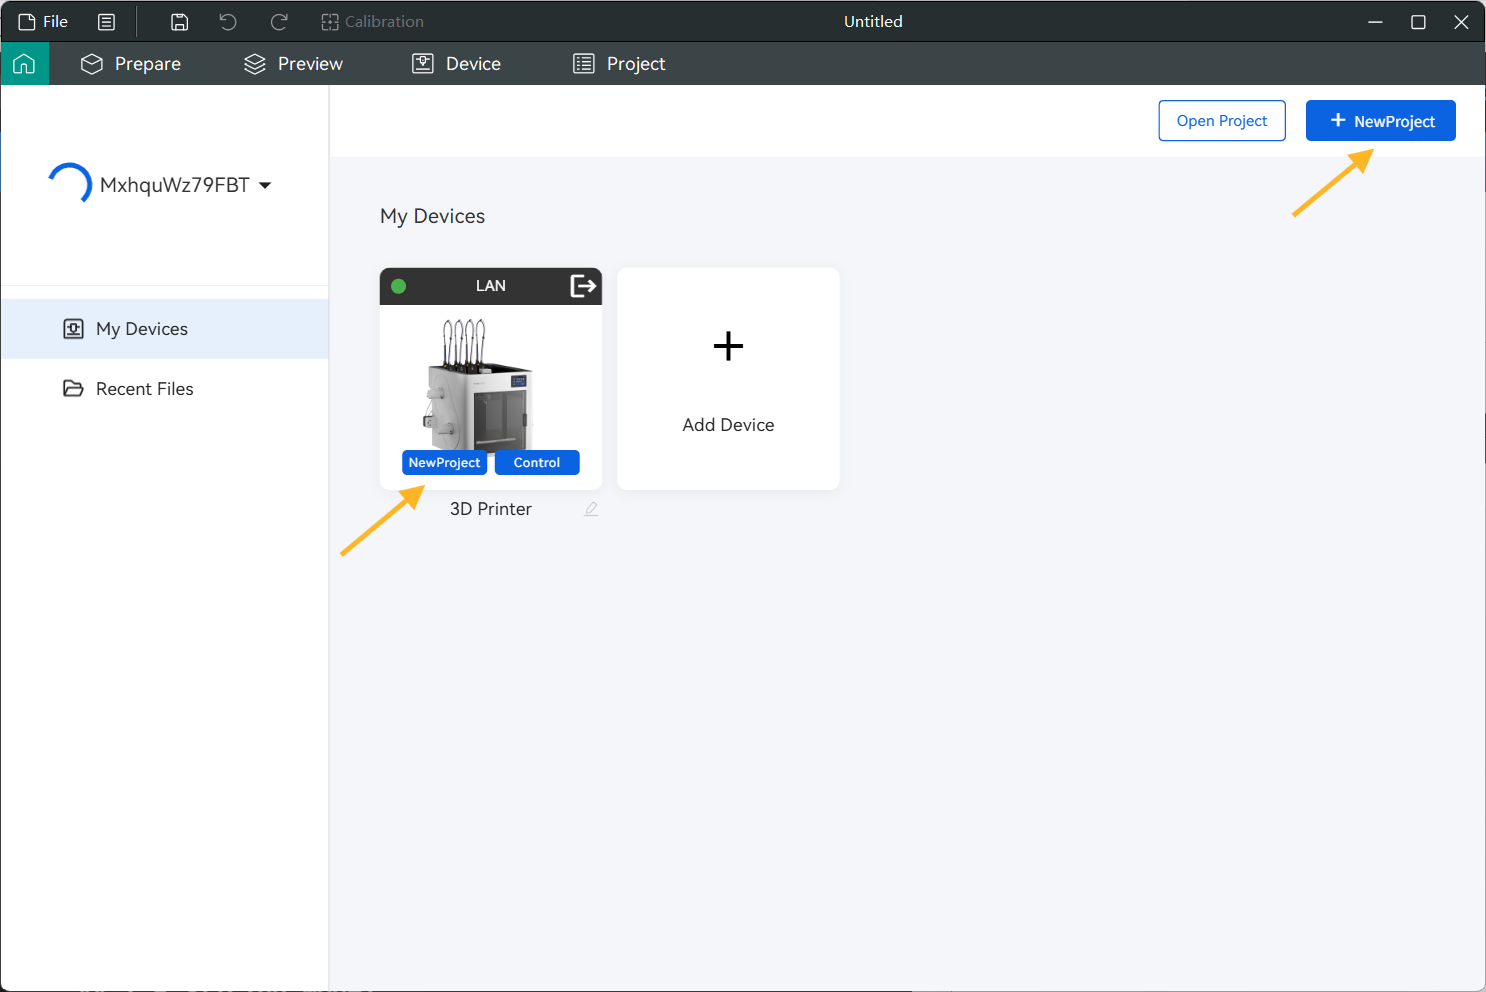
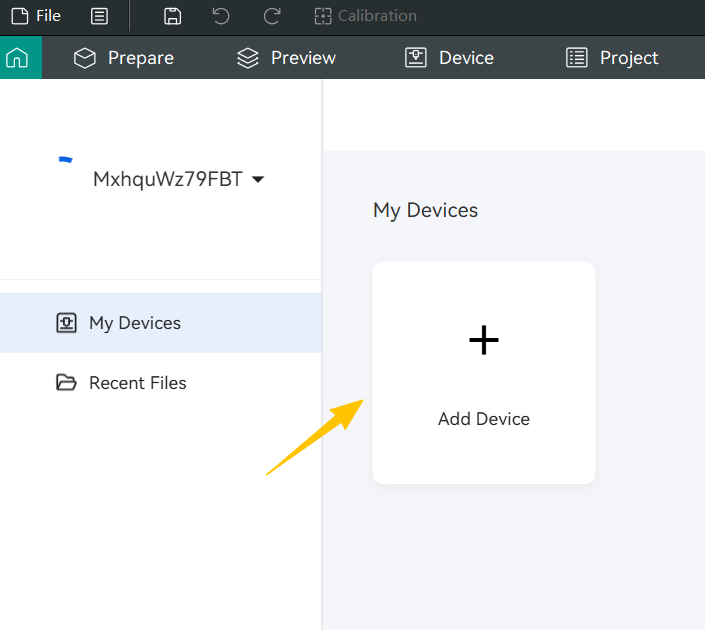
¶ 1.6 Creating Project
Create a new project on the home page using one of the two methods shown in the image below.
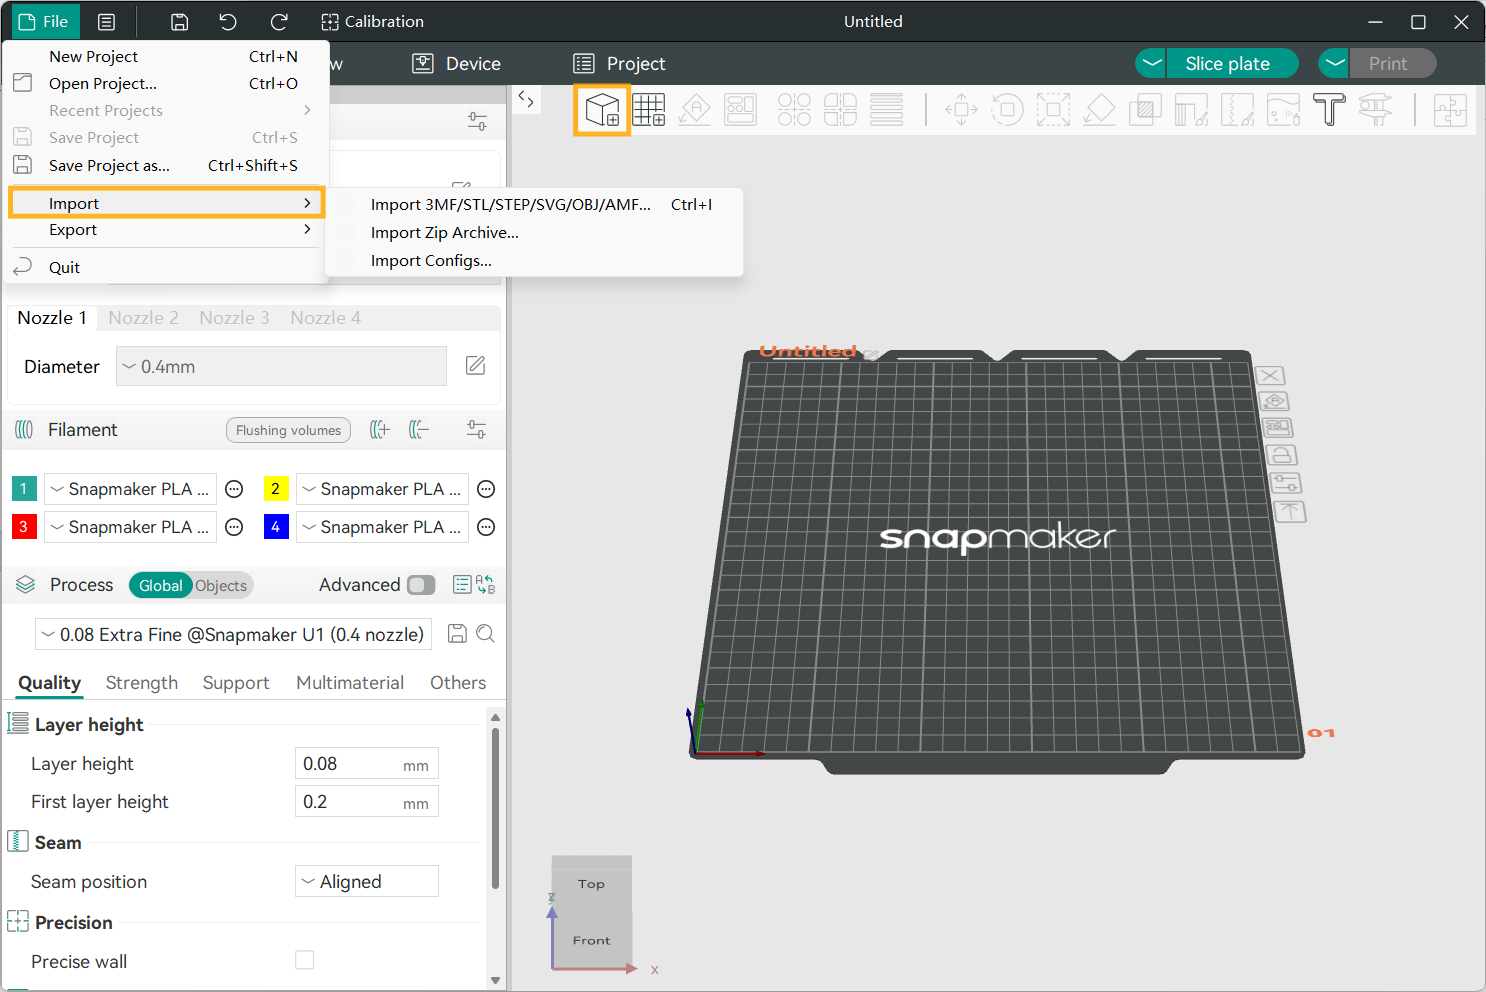
¶ 1.7 Adding Model
- Method 1: Top Menu Bar > File > Import.
- Method 2: Click the first icon in the top toolbar to add a model.
- Method 3: Drag and drop the model file into Snapmaker Orca to import.
Supported file formats include: .3mf, .stl, .stp, .step, .amf, .obj.
¶ 1.8 Print Parameter Configuration
- Select Printer: Choose the target model and nozzle size from the list.
- Filament Settings: Select the target filament type from the list.
- Process Settings: Configure process parameters in the list, such as quality, strength, speed, etc.
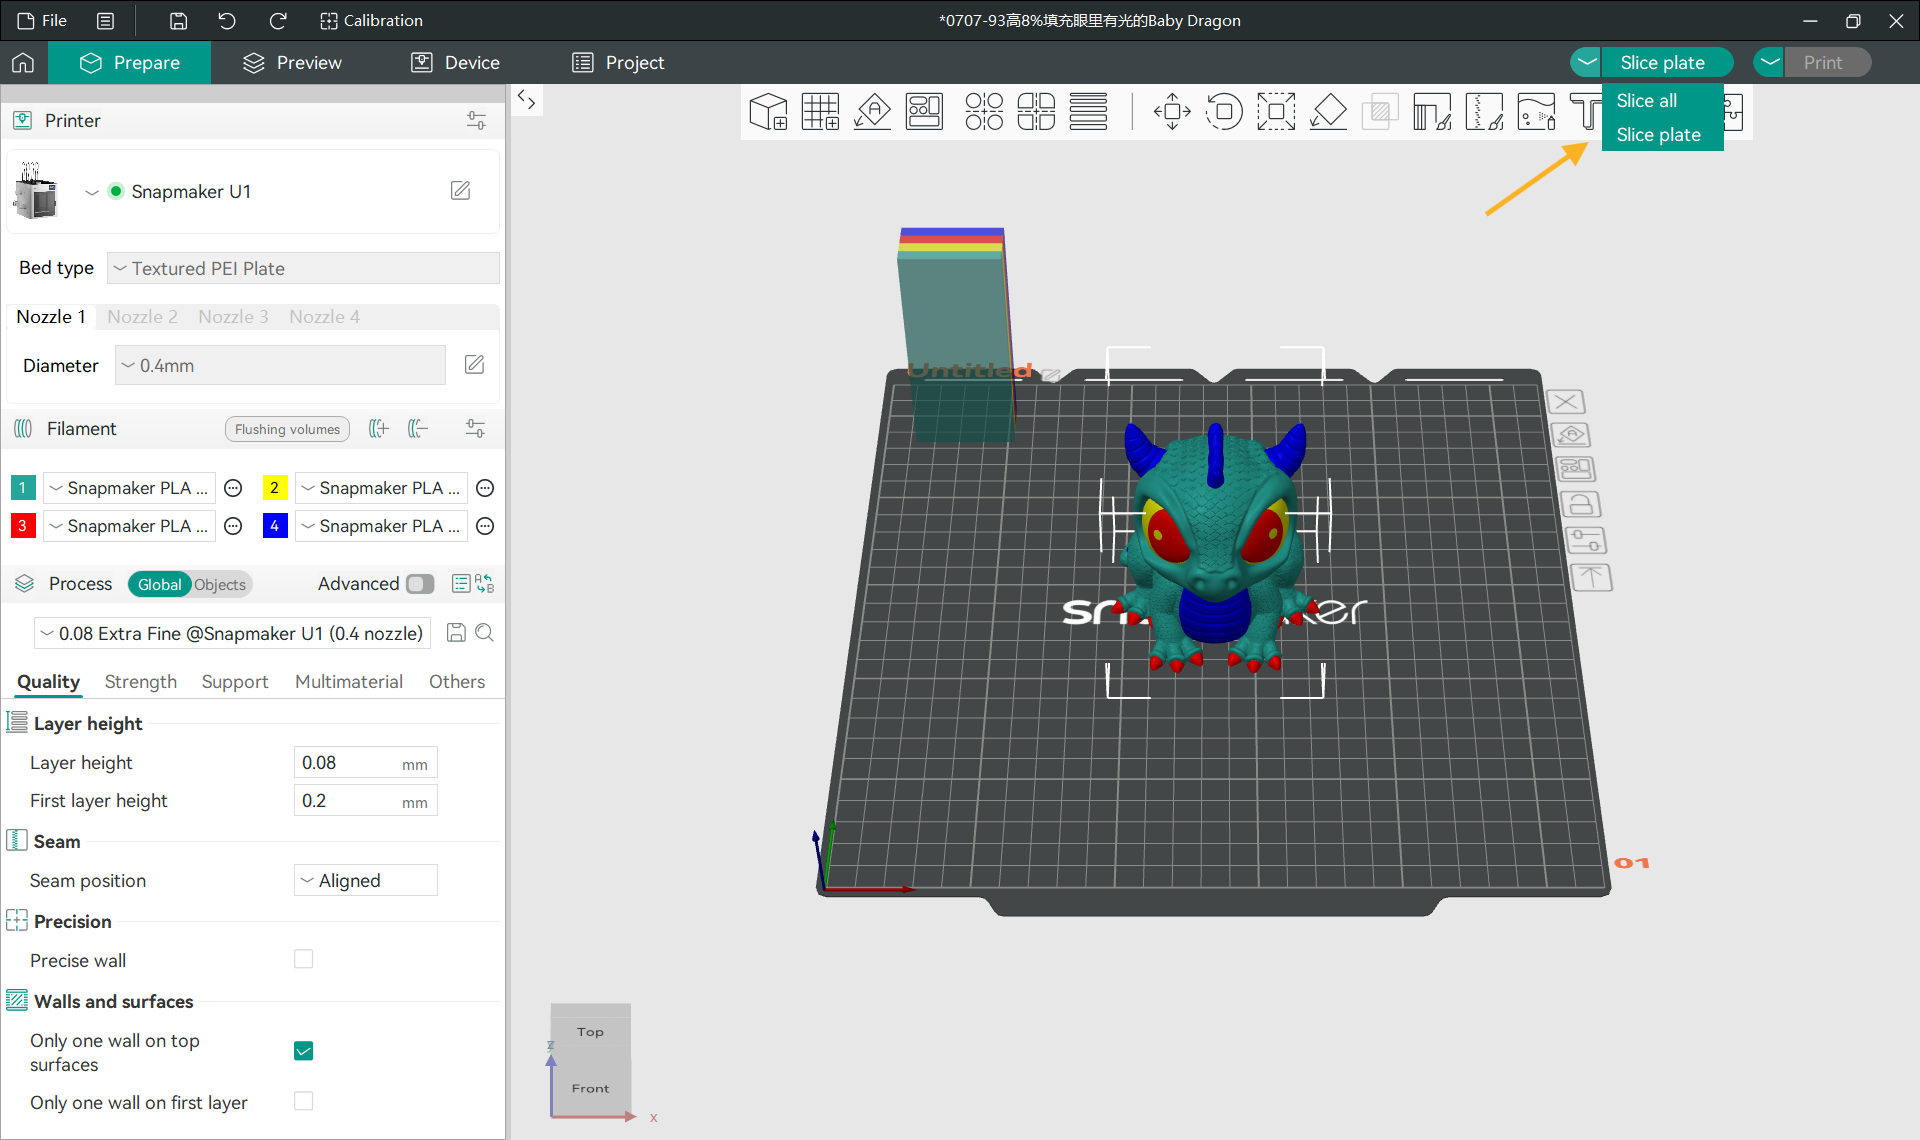
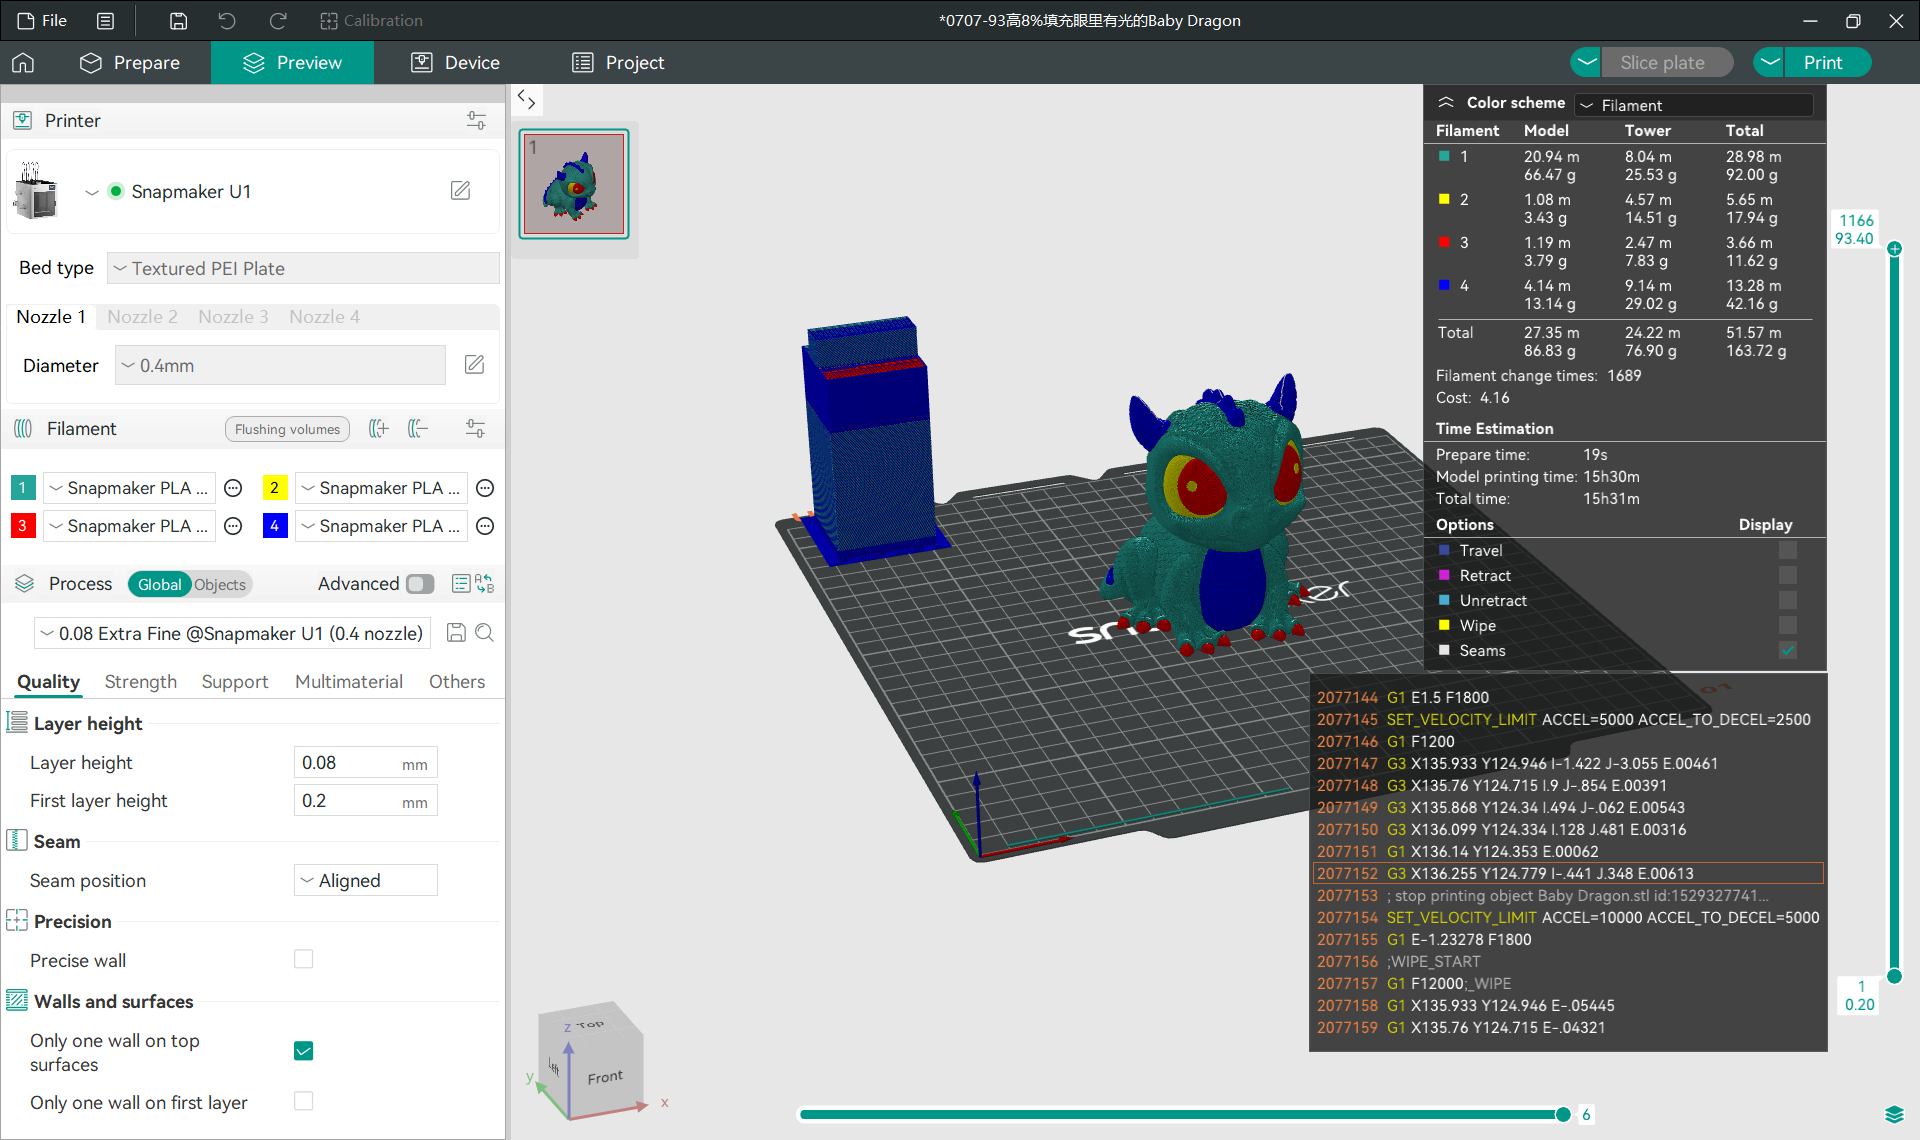
¶ 1.9 Slicing Model
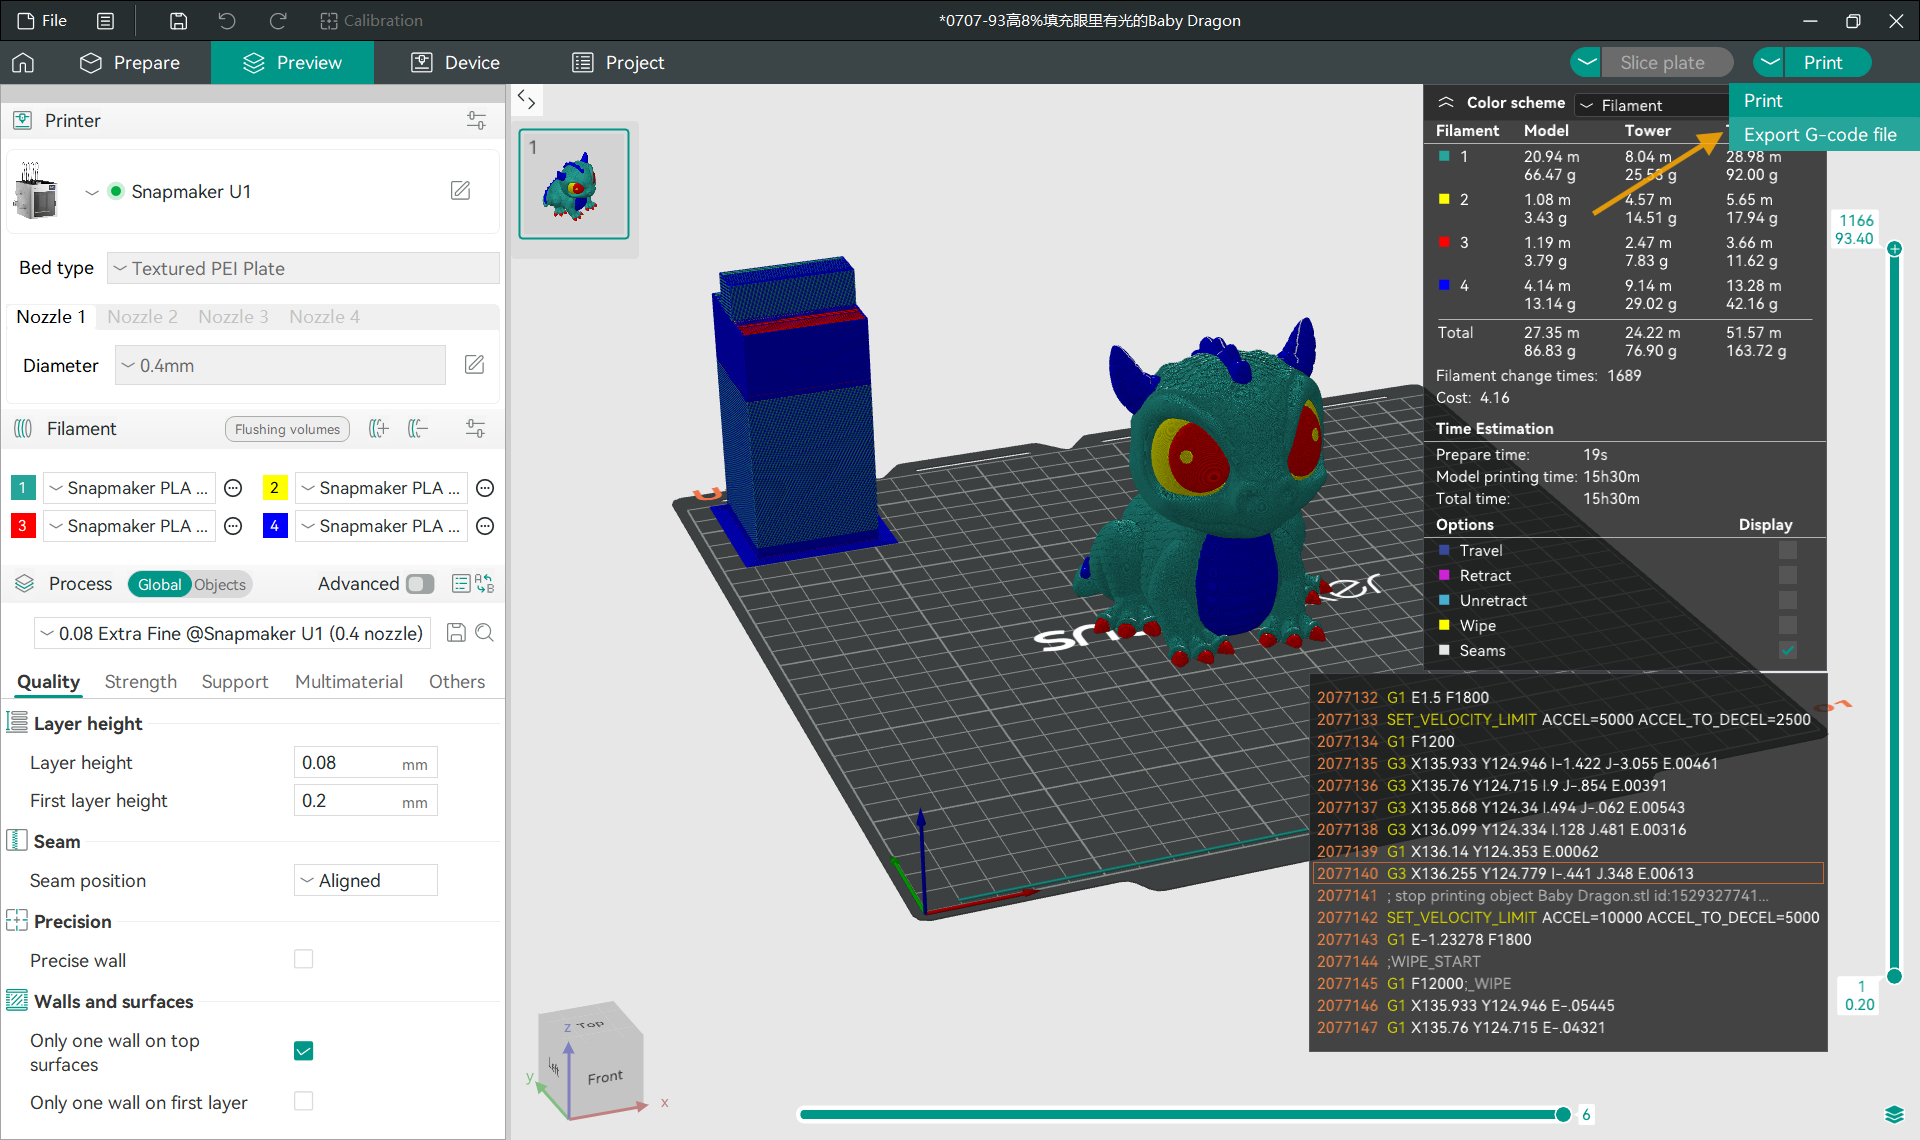
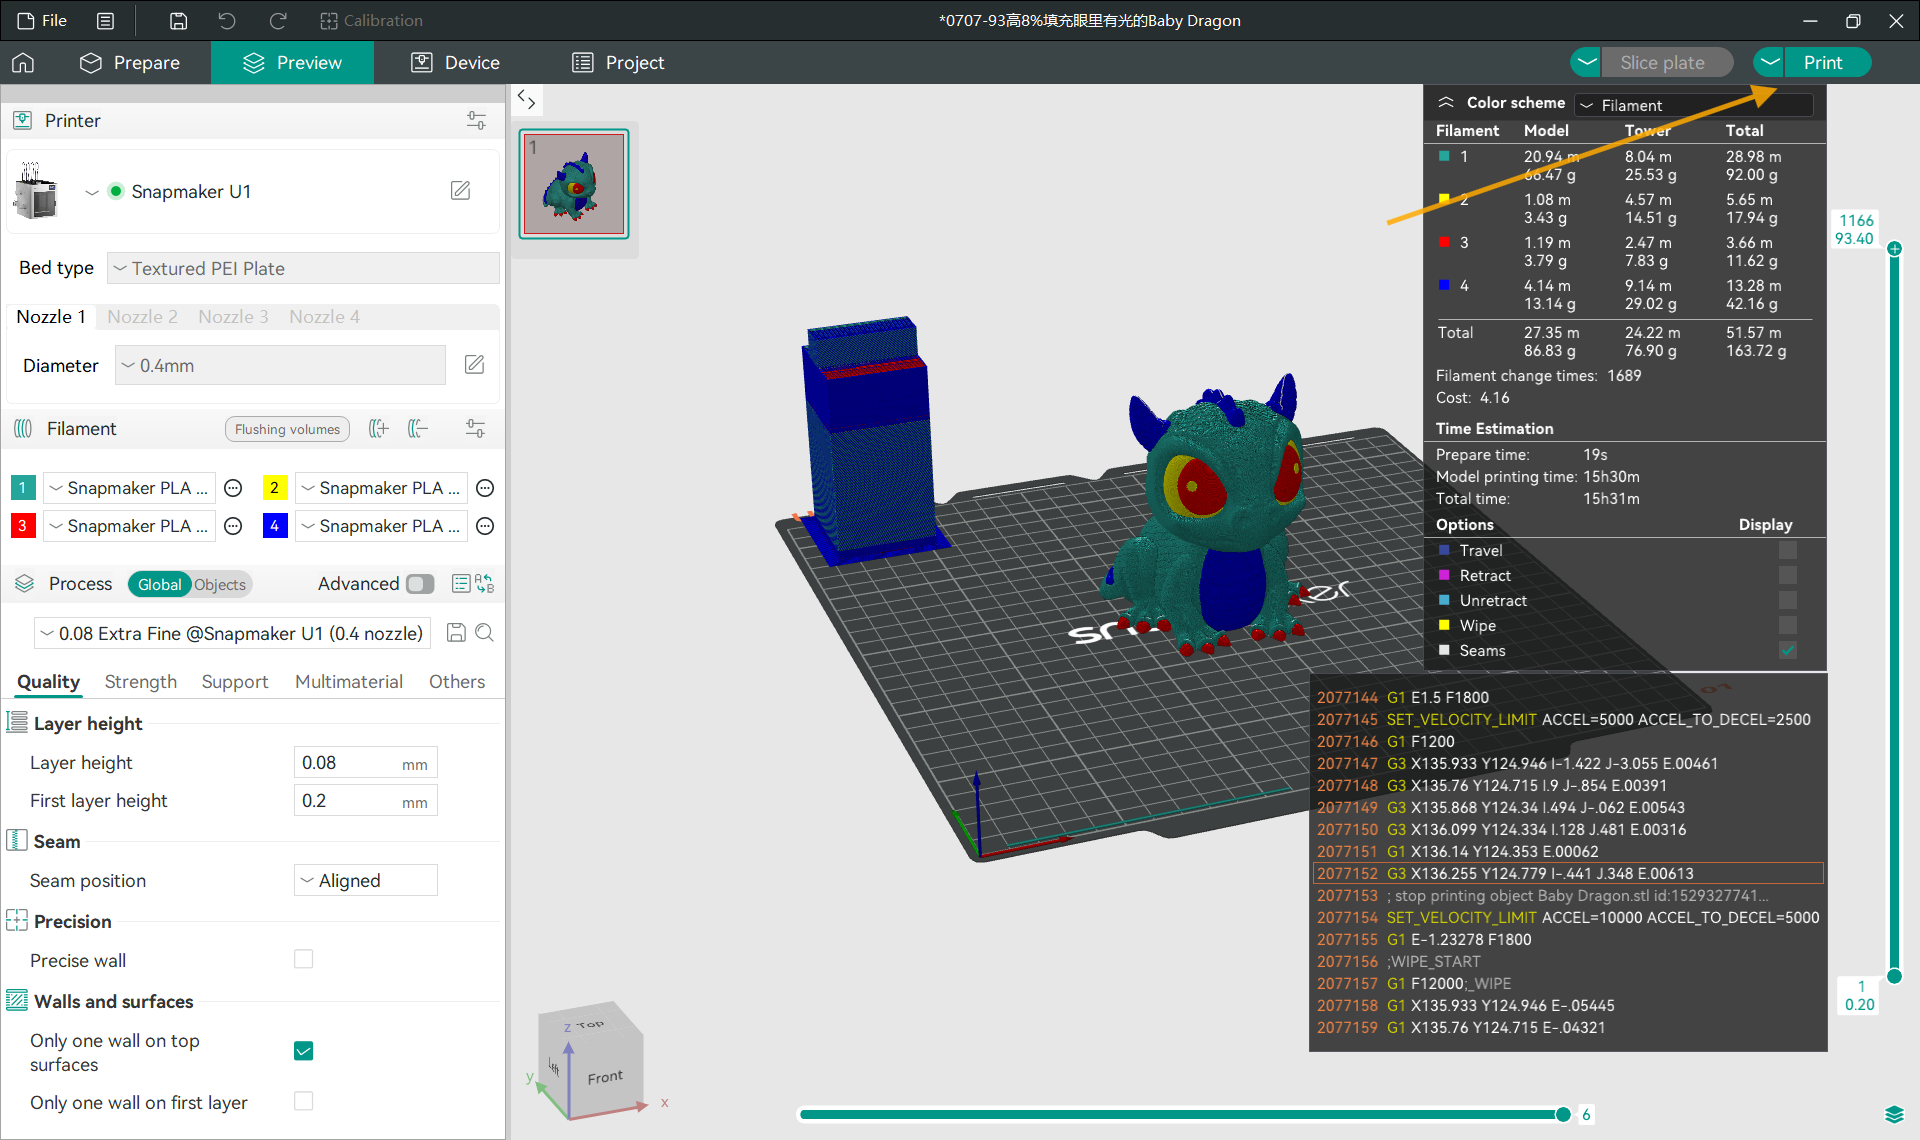
After completing the print parameter settings, click the Slice Plate button in the upper right corner of the software (if the model file contains multiple plates, you can click Slice All). After slicing is complete, the software view area will display the G-code file model, and the upper right area will show information such as material usage, color scheme, and estimated print time.
¶ 1.10 Sending Print Job
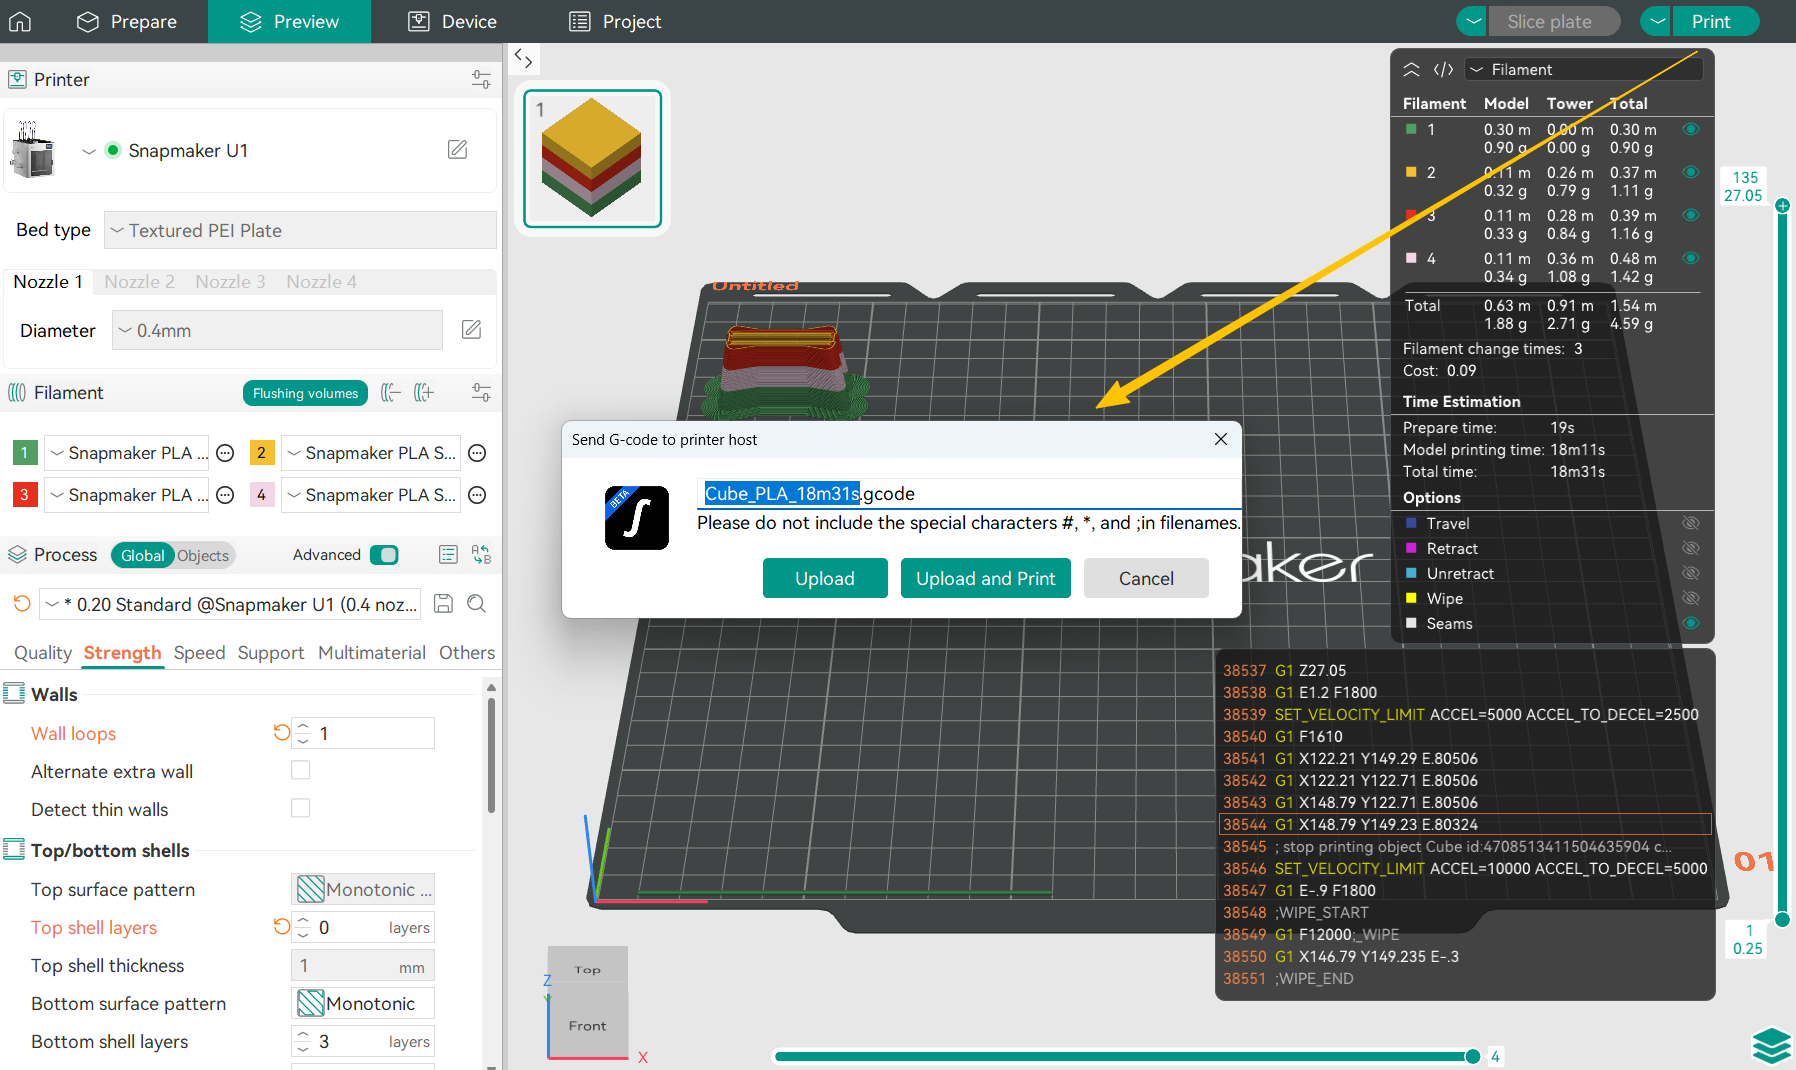
Click the Print button in the upper right corner of the software to open the print job sending pop-up window.
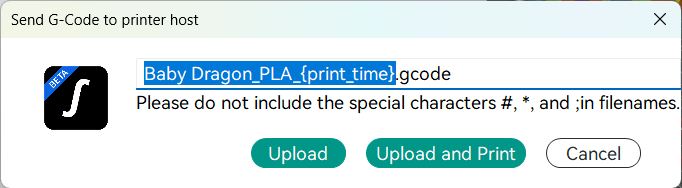
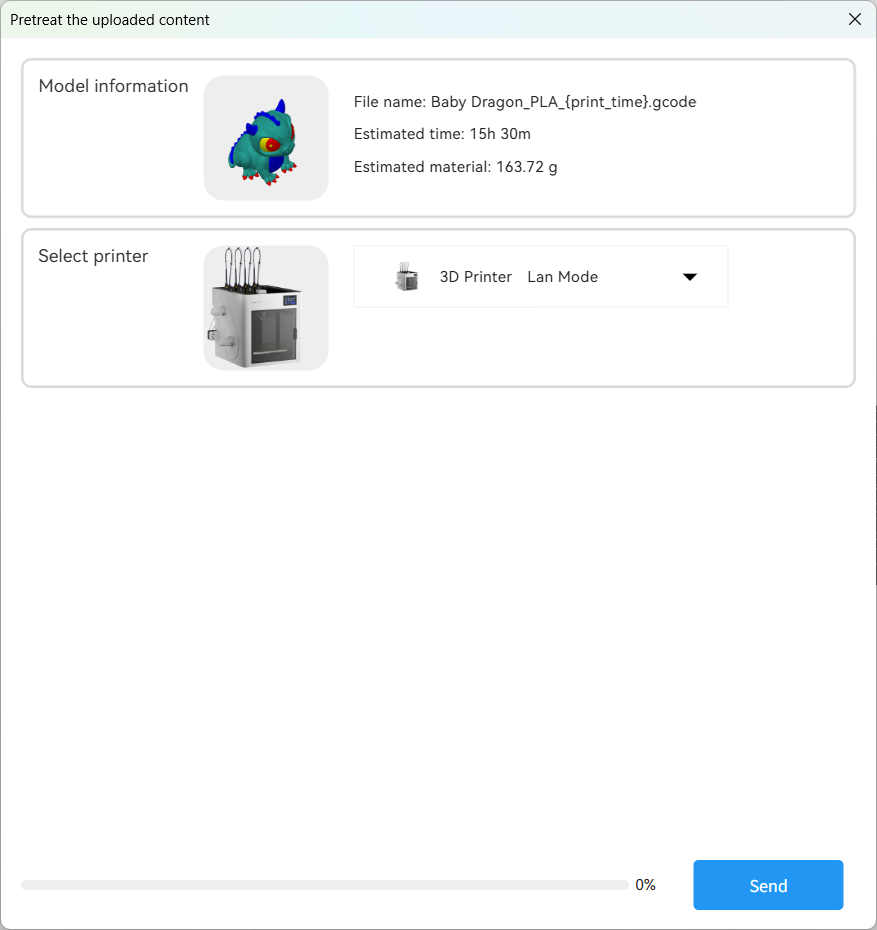
- Upload: Upload the G-code file to the printer. An upload pre-processing window will pop up before uploading; click Send to start uploading.
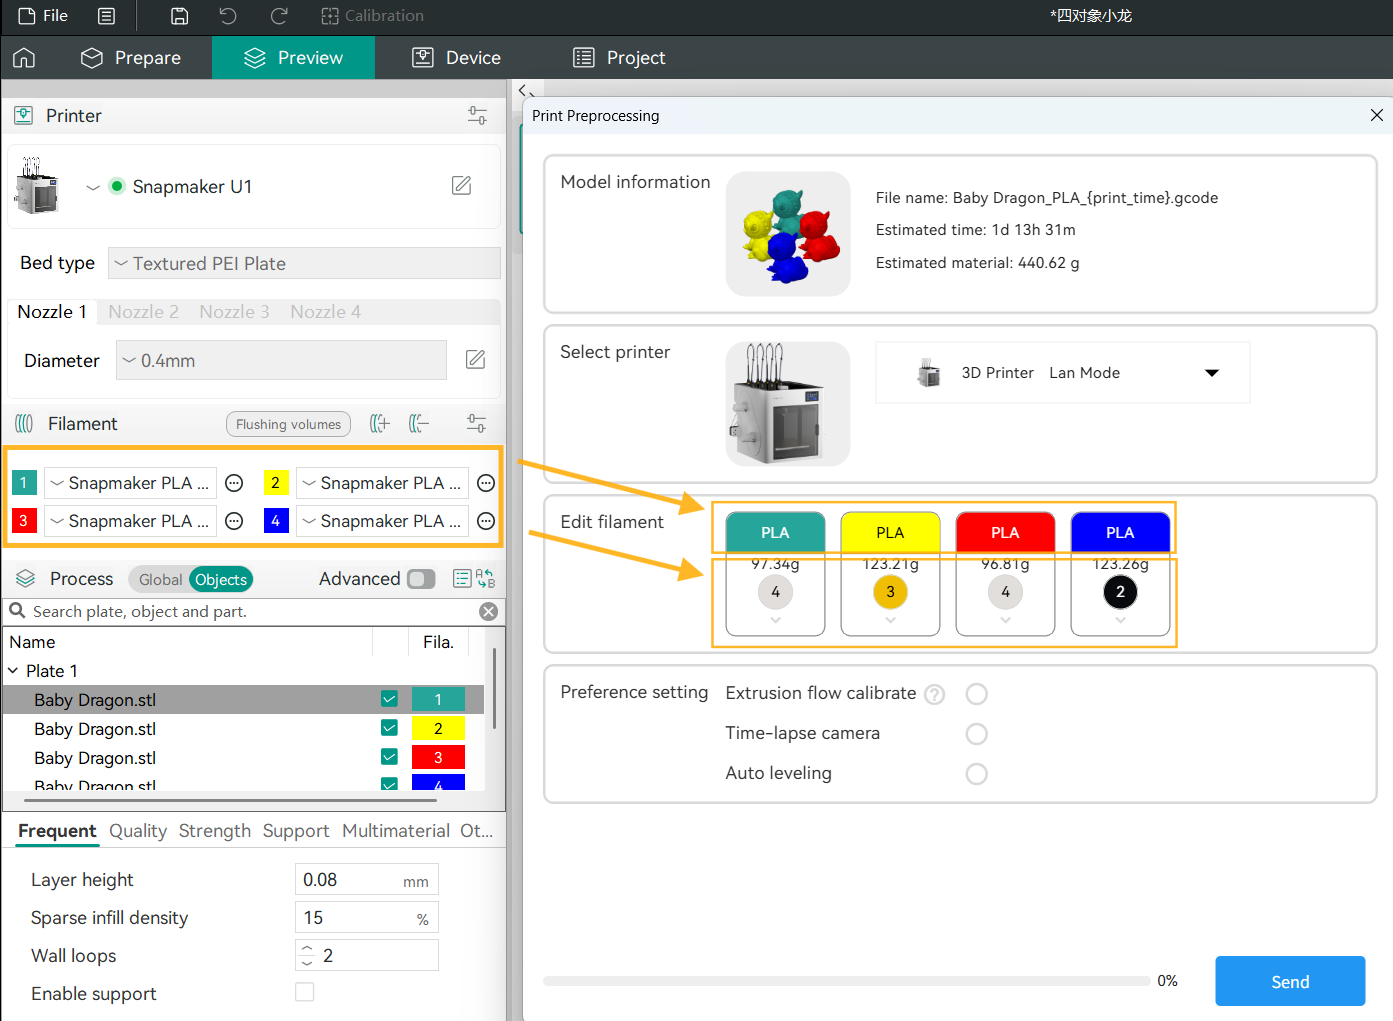
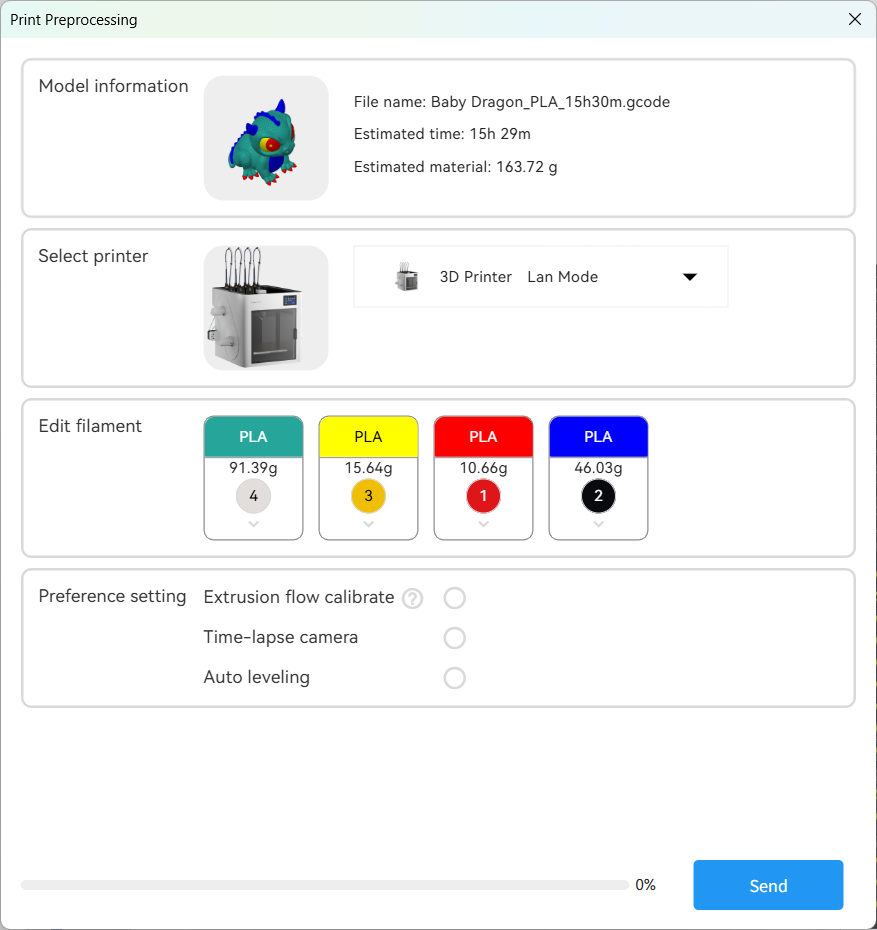
- Upload and Print: Upload the G-code file to the printer and initiate the print job. Clicking Upload and Print opens a print pre-processing pop-up. After selecting the printer, editing filament, and completing preference settings, click Send to start printing.
Click the Export G-code File button to save the G-code file locally. You can then import the file to the printer via SD card and start printing.
¶ 1.11 Device Control
Click the Device button to monitor printing in real-time or control remotely.
¶ 2. Device Connection
¶ 2.1 Cloud Mode
How to bind the printer using Cloud Mode.
¶ 2.1.1 Feature Introduction
The printer and computer are not required to be on the same local area network. As long as the necessary network interfaces and protocols are interconnected, the printer can be connected via Cloud Mode.
- Supports binding via PIN code.
- Supports binding by searching for nearby devices.
- Supports binding via APP QR code scan.
¶ 2.1.2 Preparations
- Configuring Network
Configure the printer network.
Configure the software network.
- Configuring Protocol
| Application | Port | Protocol Type | Mode |
|---|---|---|---|
| HTTP/HTTPS API | 80 / 443 / 8080 | TCP | Cloud / LAN Mode |
| MQTT | 1884 | TCP | LAN Mode |
| MQTTS | 8883 | TCP | Cloud / LAN Mode |
| Bonjour | 5353 | UDP | Cloud / LAN Mode |
¶ 2.1.3 Procedure
- Turn on the printer.
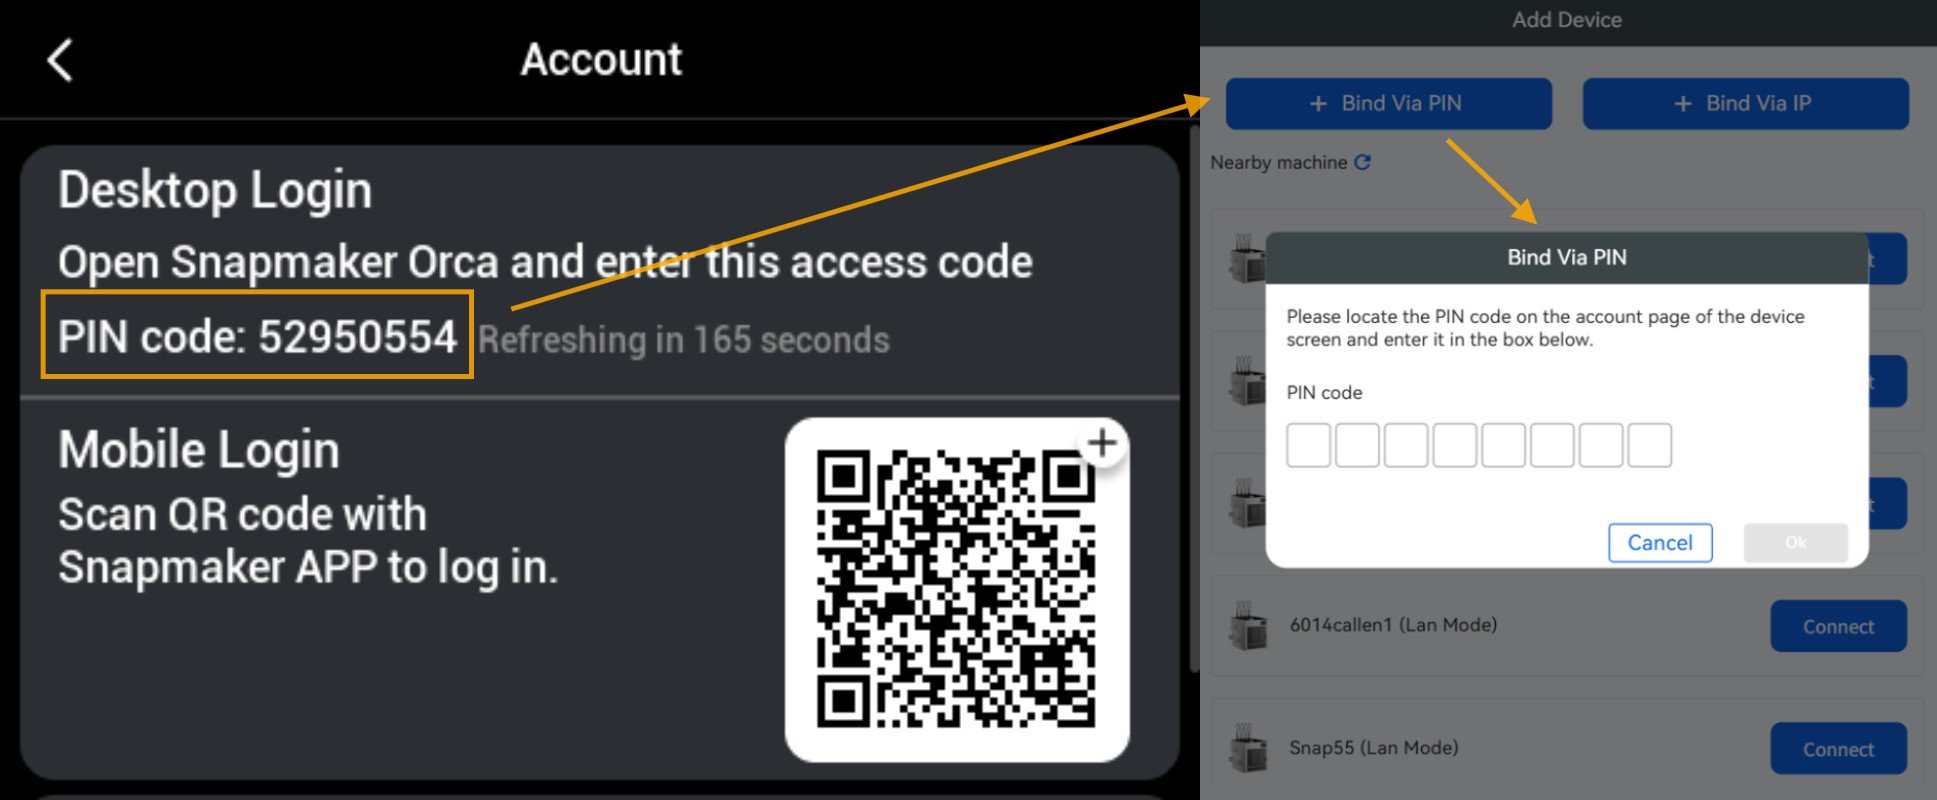
- Select Settings > Account.
- Ensure the device's region information matches the software's region information.
- Wait for the PIN code to refresh and complete the binding before the countdown ends (180s).
If in a dim or bright environment, you can tap the touchscreen to zoom in on the QR code before scanning.
- Open the Snapmaker Orca software and log in to your personal account.
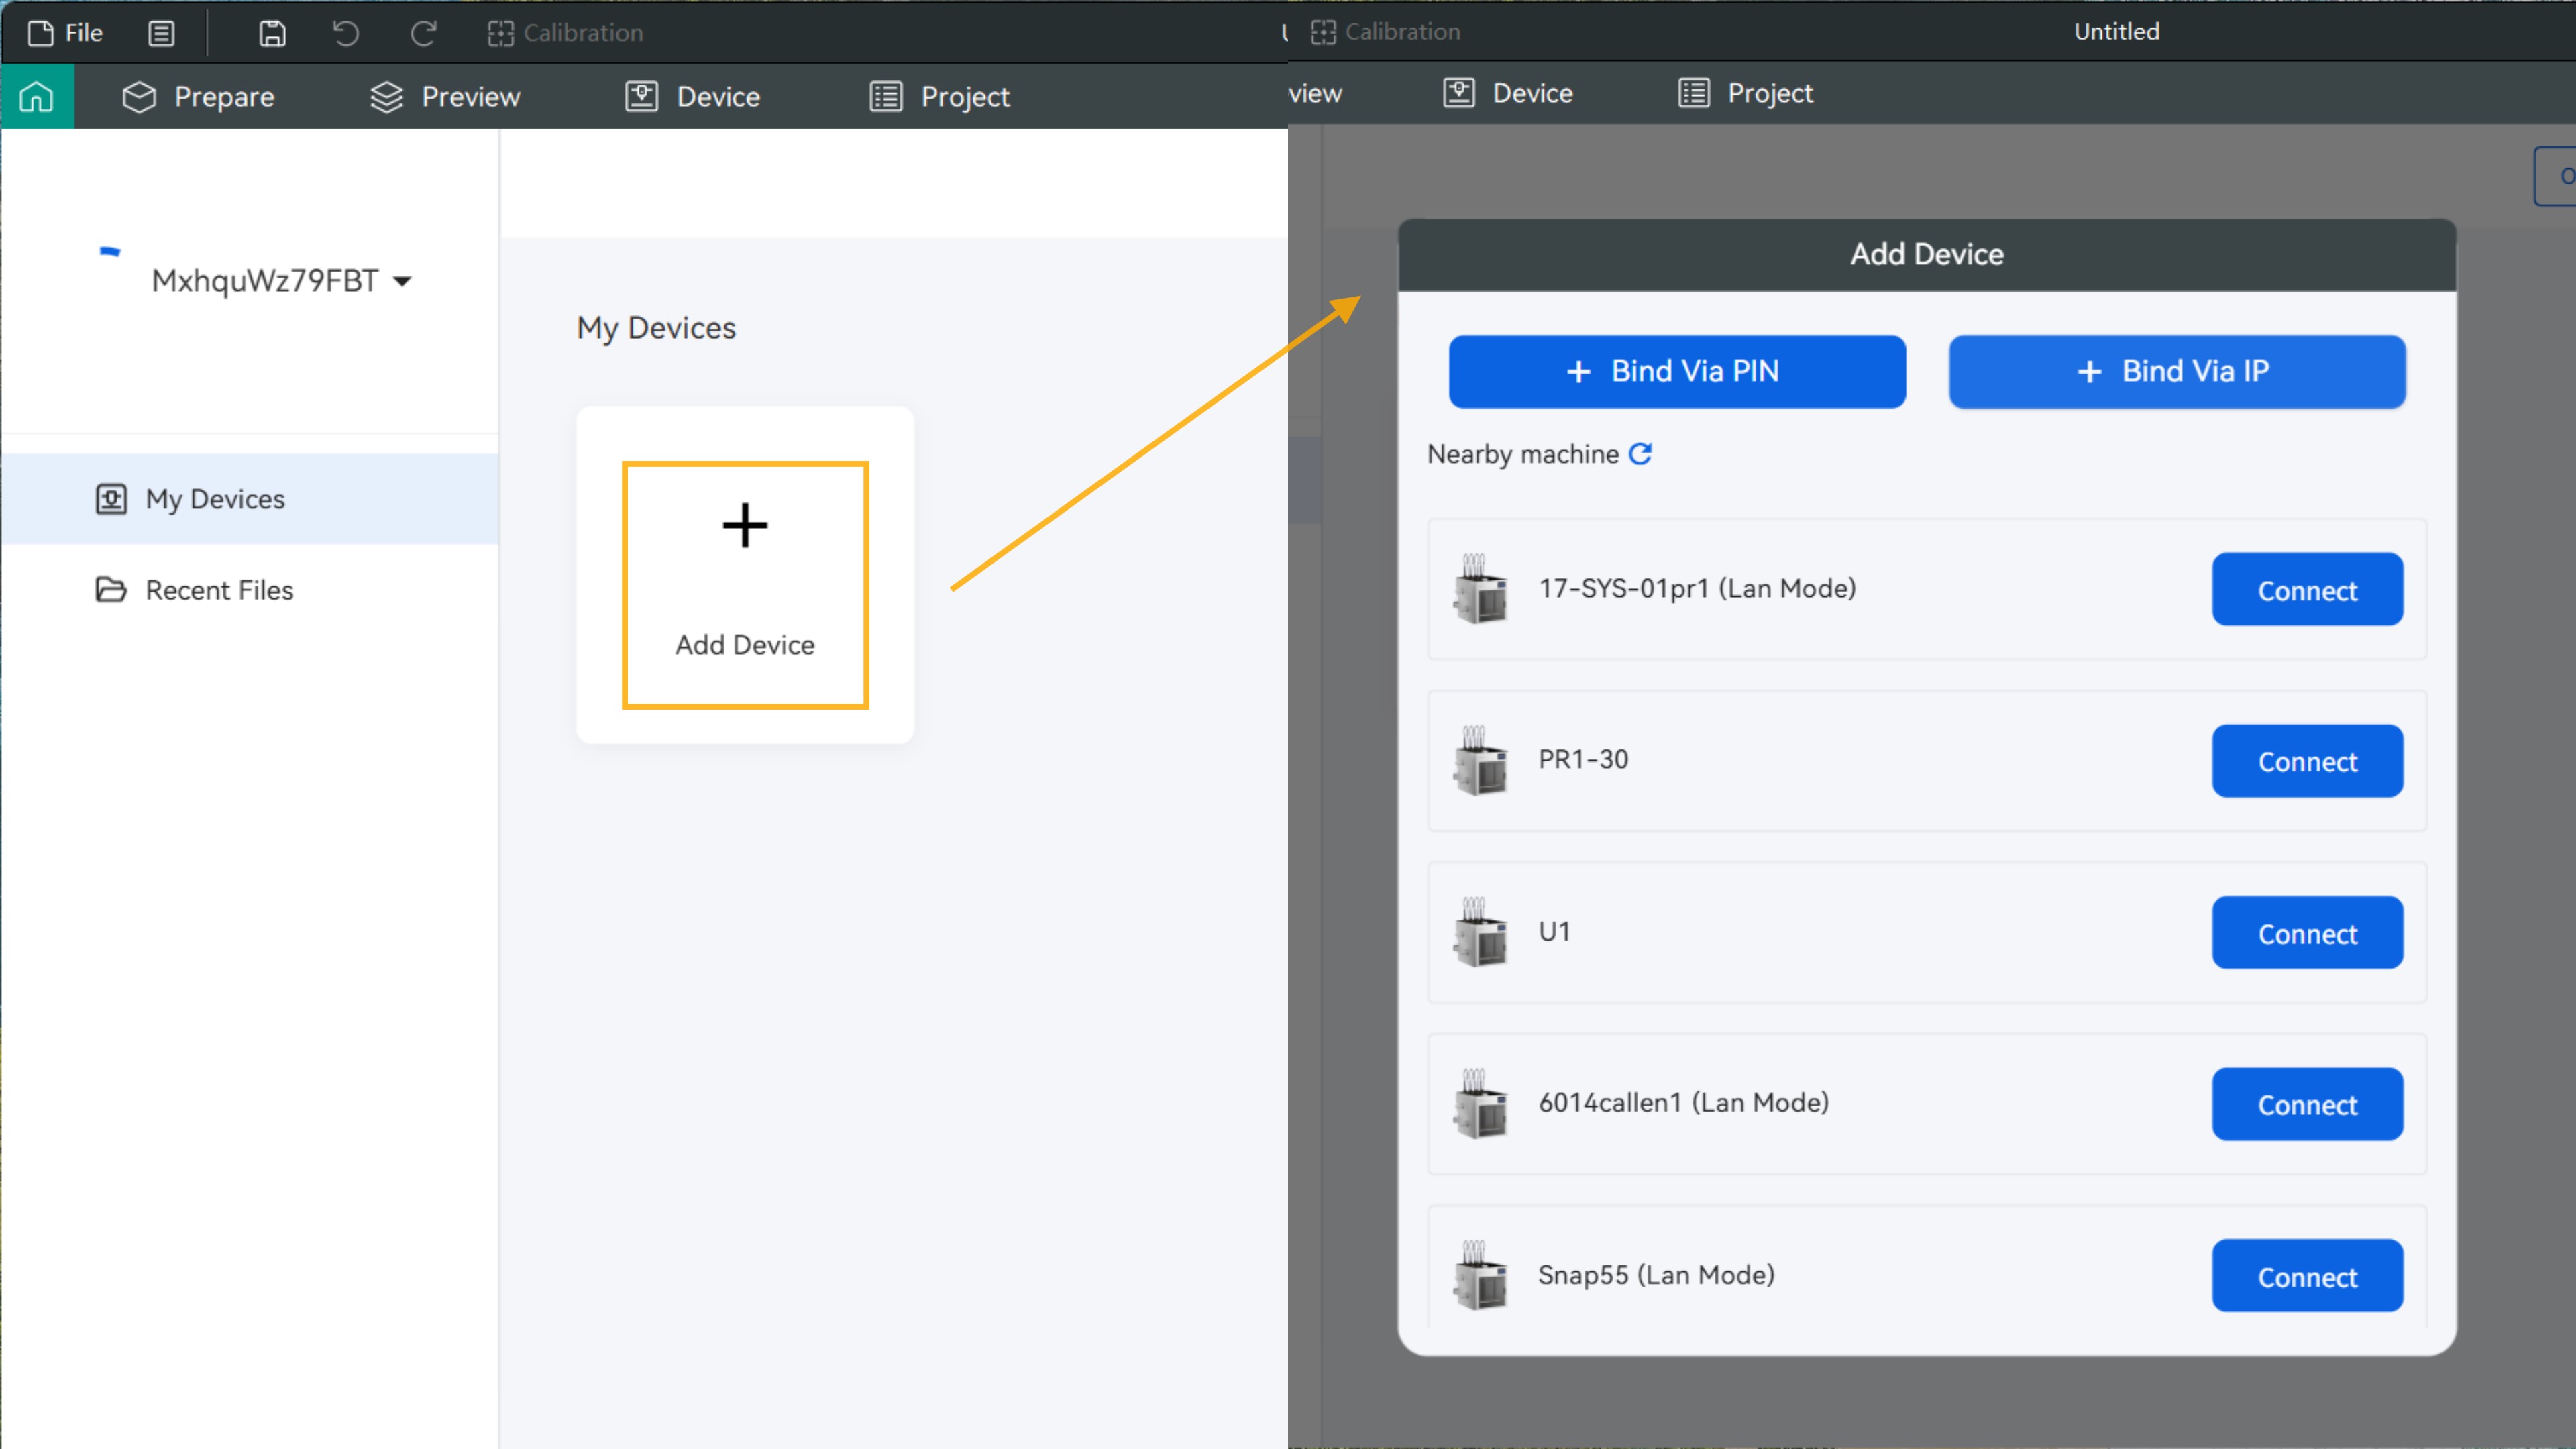
- On the Home page or Devices page, click Add Device.
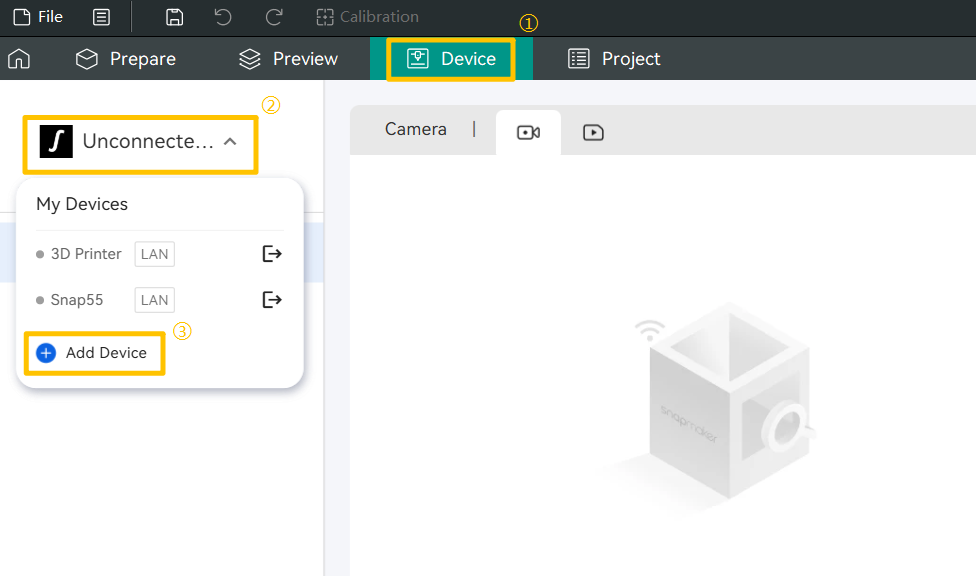
- Use either method to bind:
a. Select PIN Code Binding. If the PIN code is correct, binding will succeed automatically.
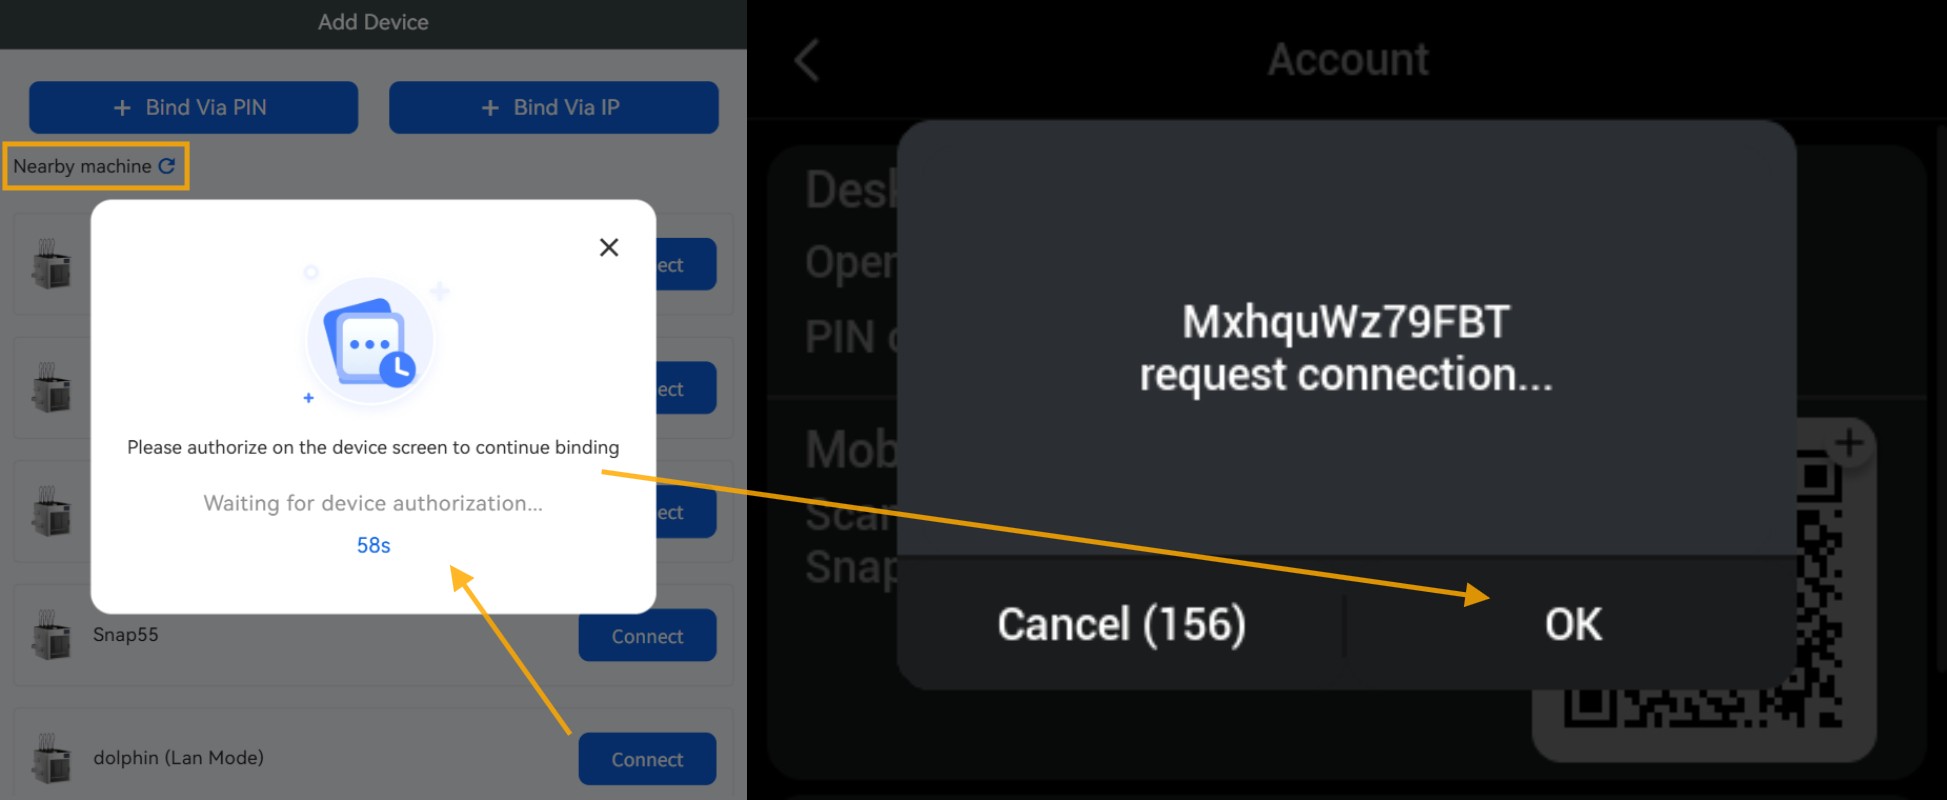
b. Select Search Device to bind. Authorization is required on the printer's touchscreen; binding succeeds after authorization is granted.
¶ 2.2 LAN Mode
Without connecting to any cloud network, the printer operates within a local area network environment and establishes communication with Snapmaker Orca to enable functions like sending files, managing print jobs, and video monitoring.
LAN mode is particularly suitable for printing highly confidential models where data privacy and usage security are paramount.
¶ 2.2.1 Feature Introduction
- Supports binding via IP address.
- Supports binding by searching for nearby devices.
¶ 2.2.2 Preparations
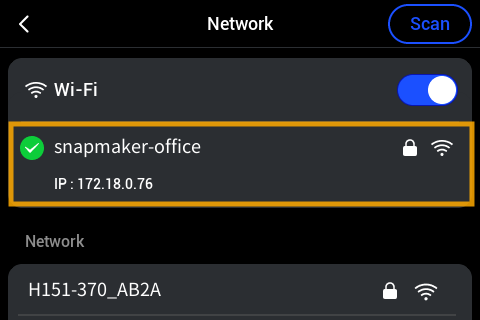
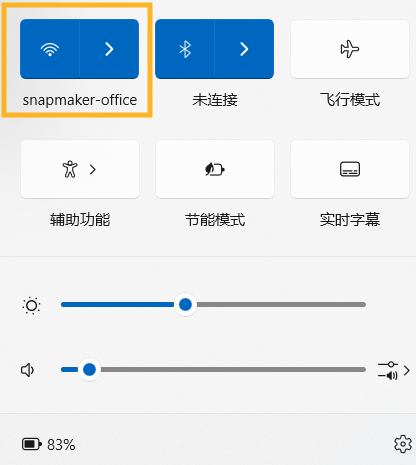
- Configuring Network
Ensure the printer and software are on the same network.
Configure the printer network.
Configure the software network.
¶ 2.2.3 Procedure
- Enable LAN Mode on the printer. Path: Settings > LAN Mode > Enable LAN Mode.
- Use either method to bind:
a. Bind via IP Address. If the IP address is correct, confirm on the printer's touchscreen to bind successfully.
b. Bind by searching for nearby devices. After initiating the bind request, confirm authorization on the printer's touchscreen to bind successfully.
¶ 3. Device Remote Control
Supports comprehensive remote control and video monitoring of the printer over the network (WAN/LAN).
¶ 3.1 Preparations
- Log in to your account (required before binding the printer, except for LAN Mode).
- Bind the printer (refer to Chapter 2 "Device Connection" for binding instructions).
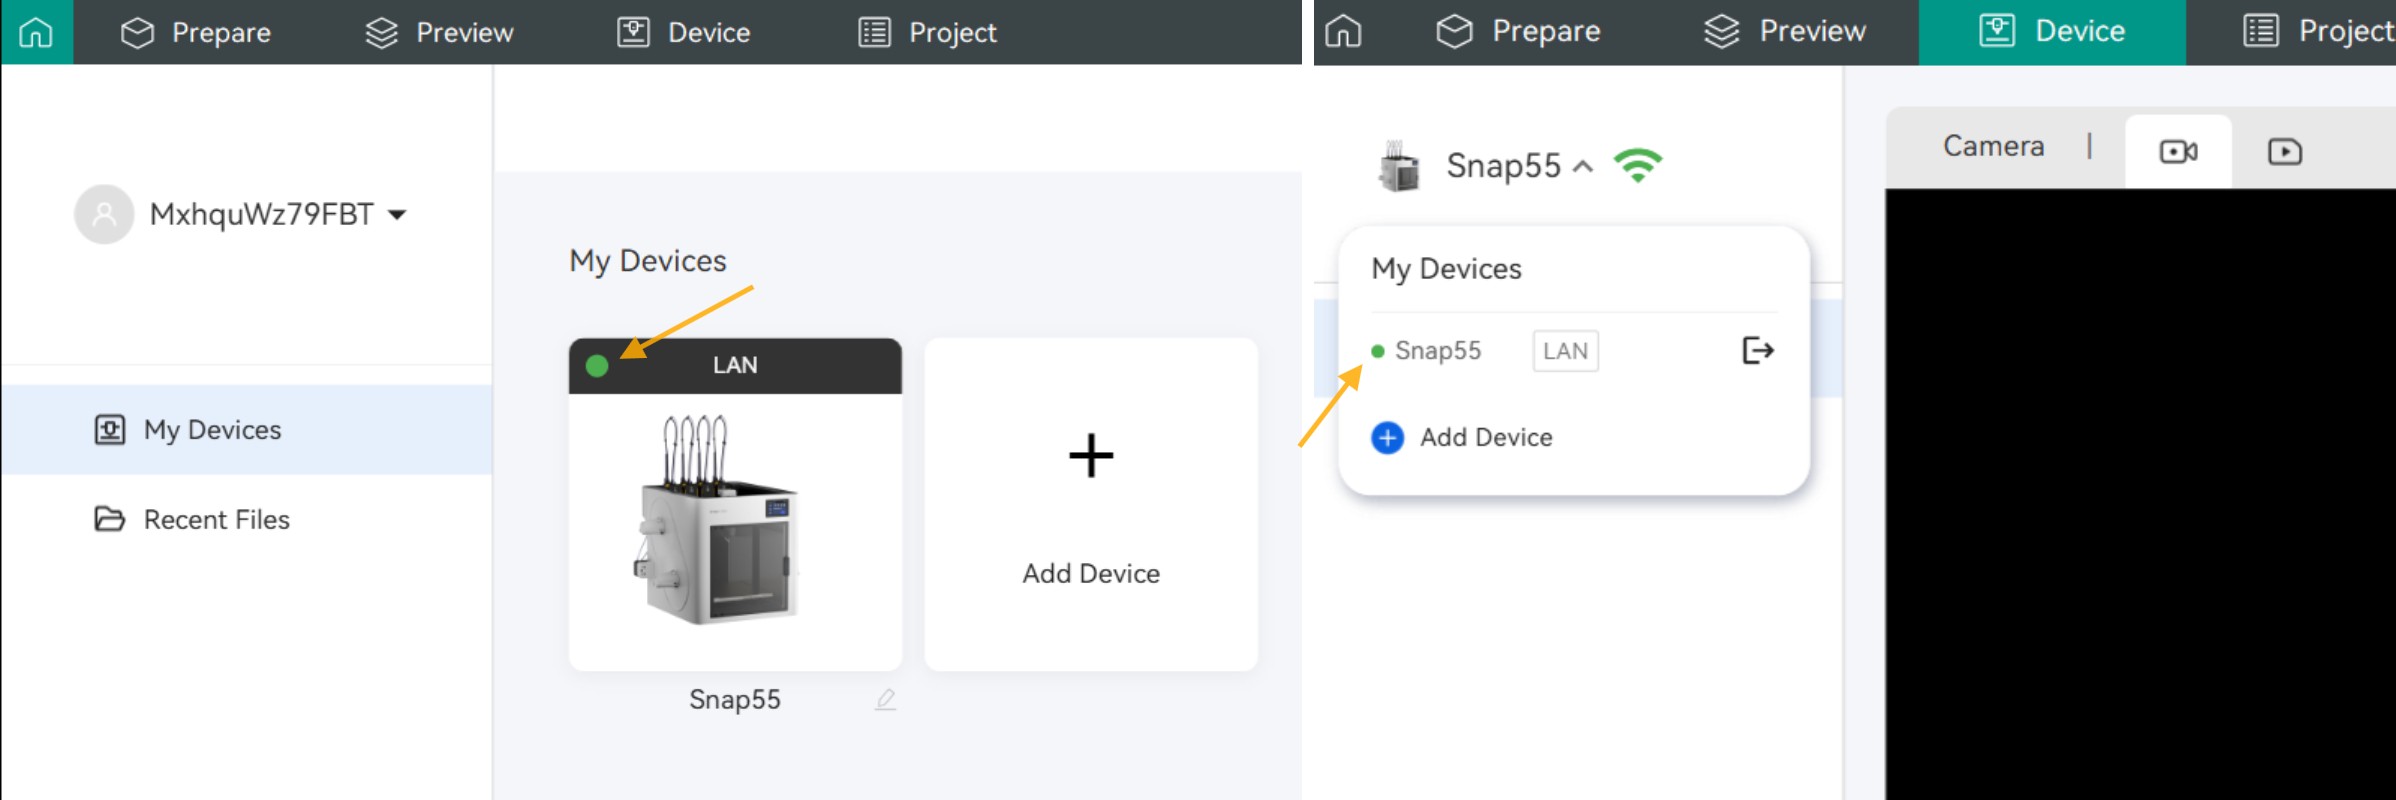
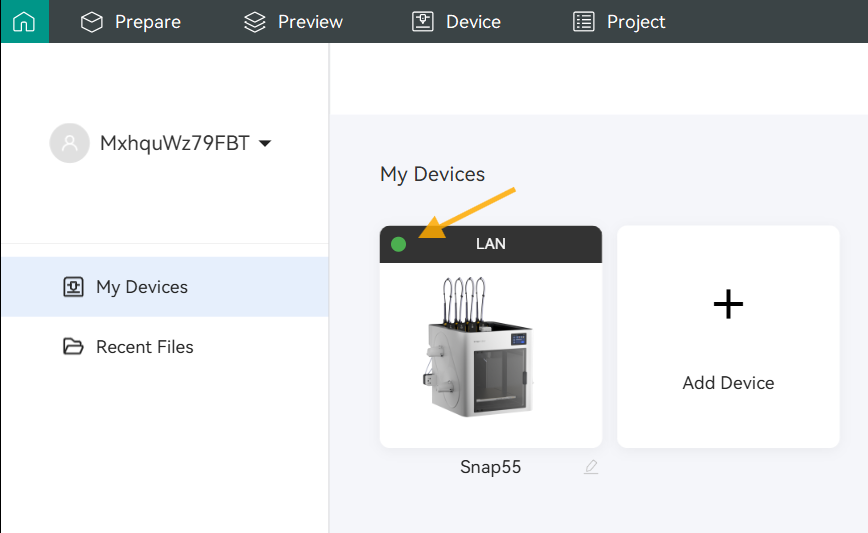
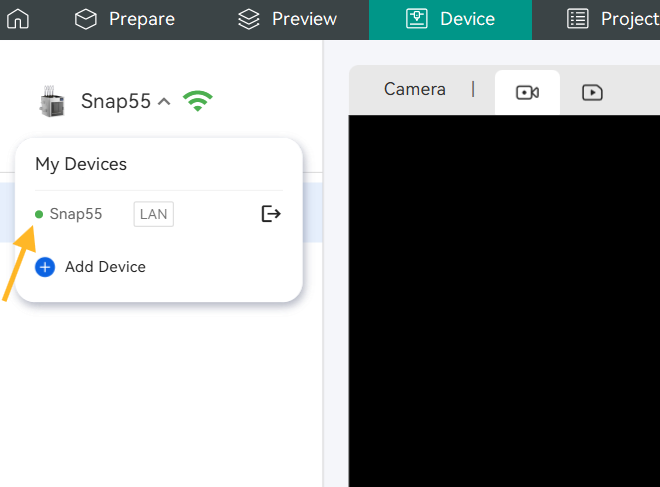
- Check the device communication status on the Home page or Device page to ensure the device remains connected.
A green indicator signifies normal communication; a gray indicator signifies disconnected communication.
¶ 3.2 Feature Introduction
¶ 3.2.1 Starting a Print Remotely
After slicing the model, you can send the sliced file from the software to the bound printer and initiate printing.
- Complete model slicing and click Print.
- Click the Upload and Print button in the pop-up window.
- On the print pre-processing page, select the bound printer, choose the loaded filament, configure preferences as needed, then click Send.
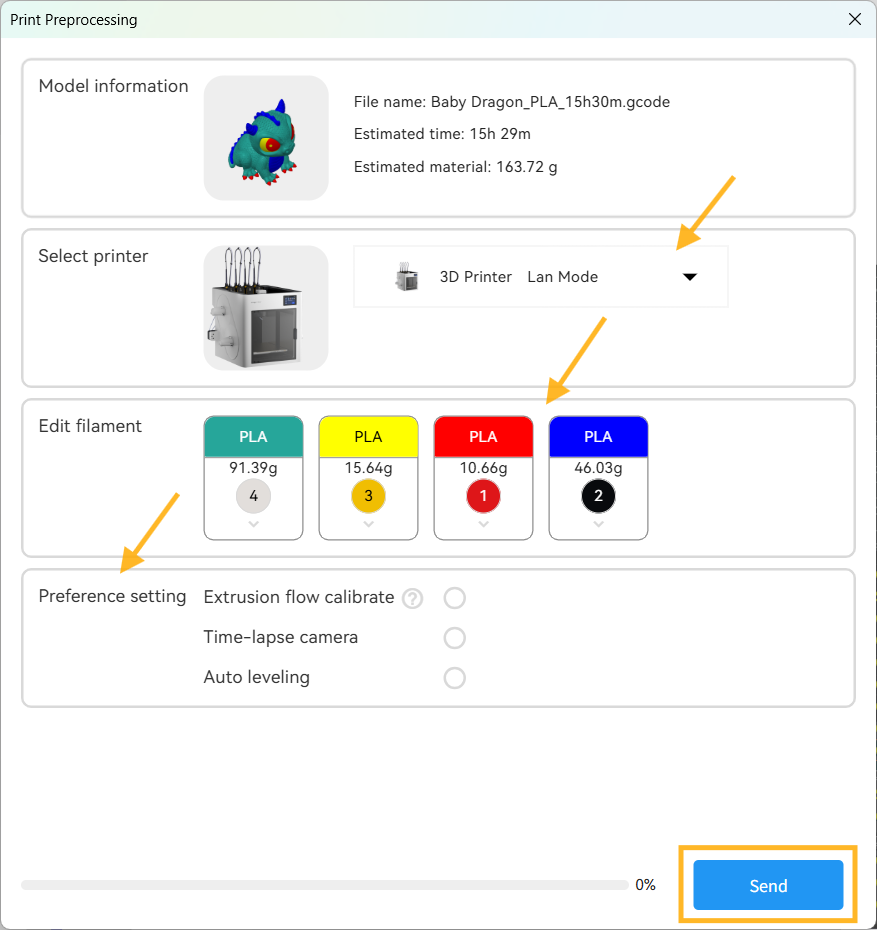
- After sending is complete, you can view the print job progress.
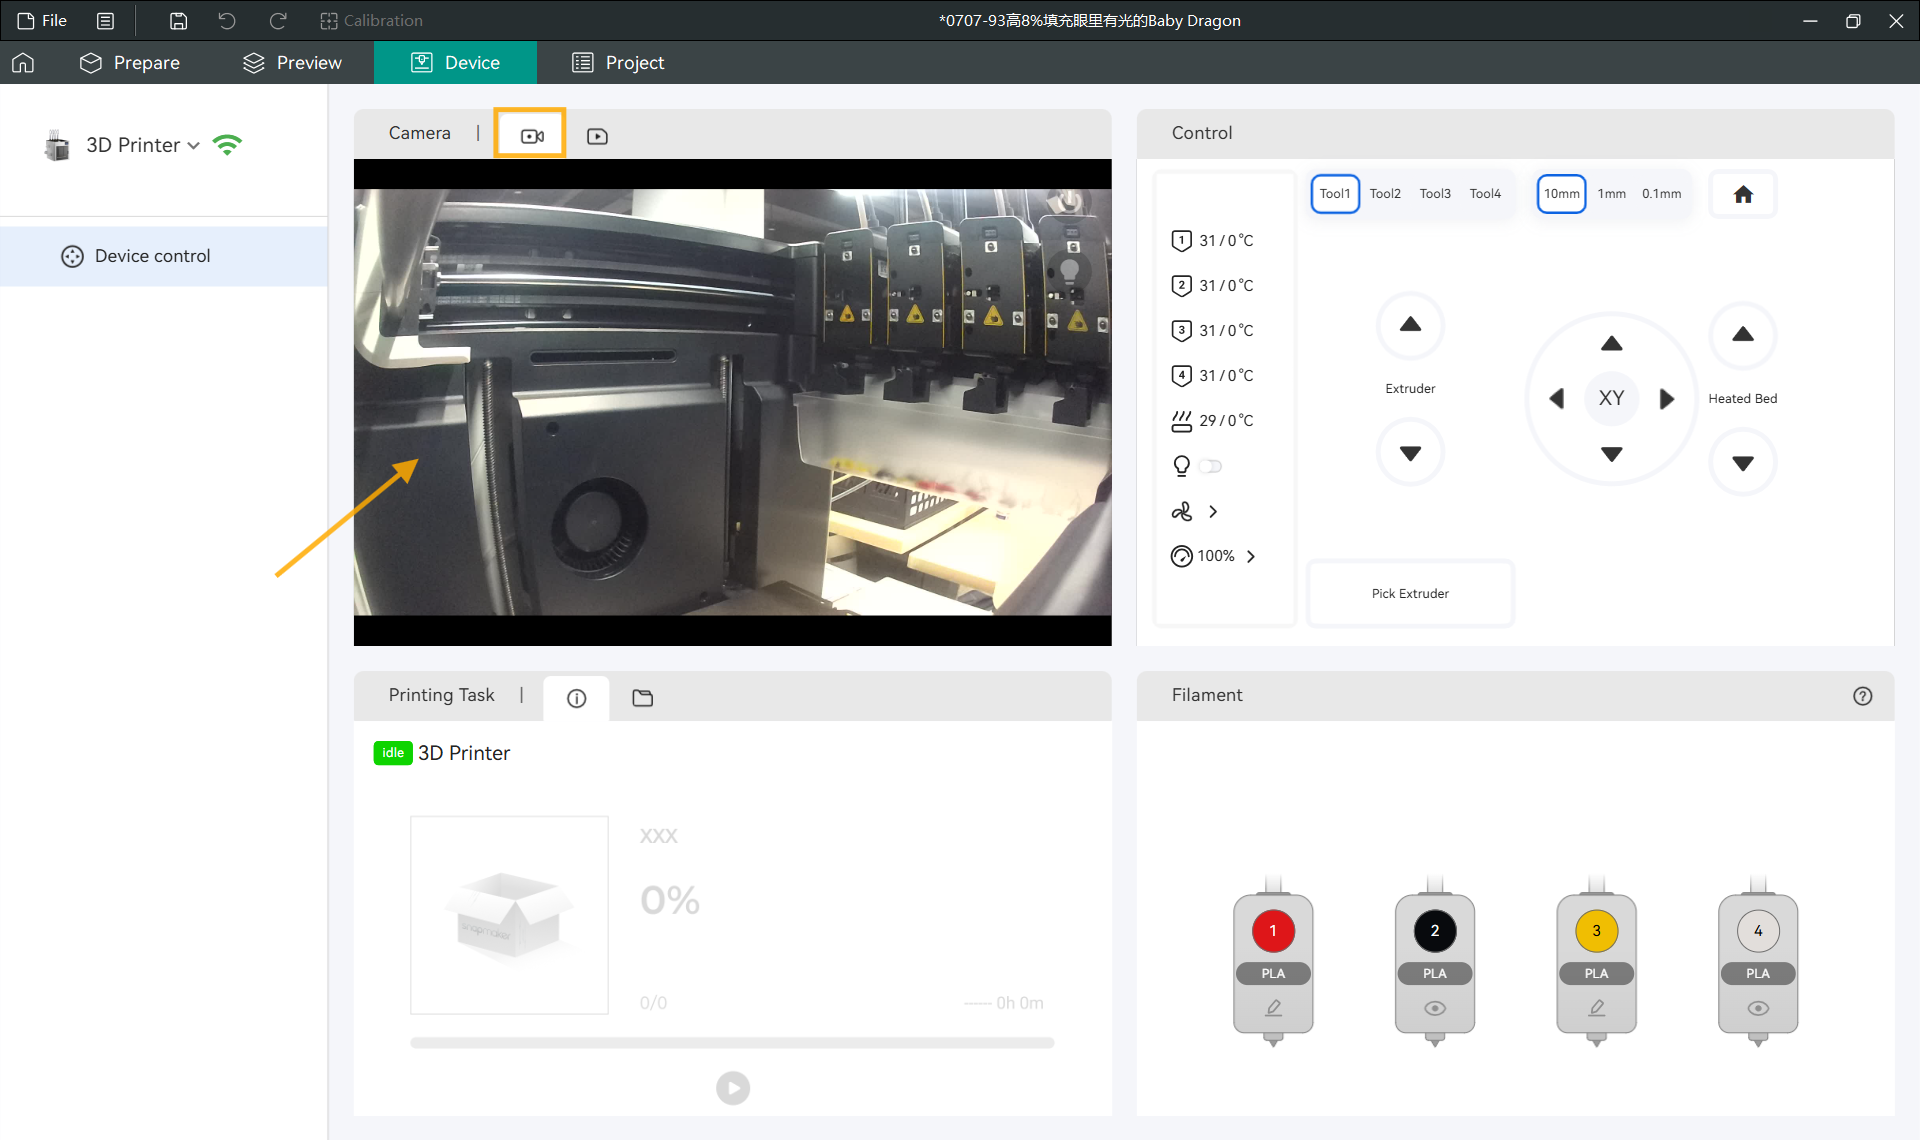
¶ 3.2.2 Monitoring Print View
Click the Camera button to open the camera view.
The view cannot be displayed if the printer is off or the network is disconnected.
¶ 3.2.3 Controlling Print Job
While a print job is in progress, you can view print progress, remaining time, etc., in the print job window.
You can remotely pause or cancel the print by clicking the Pause or Stop buttons.
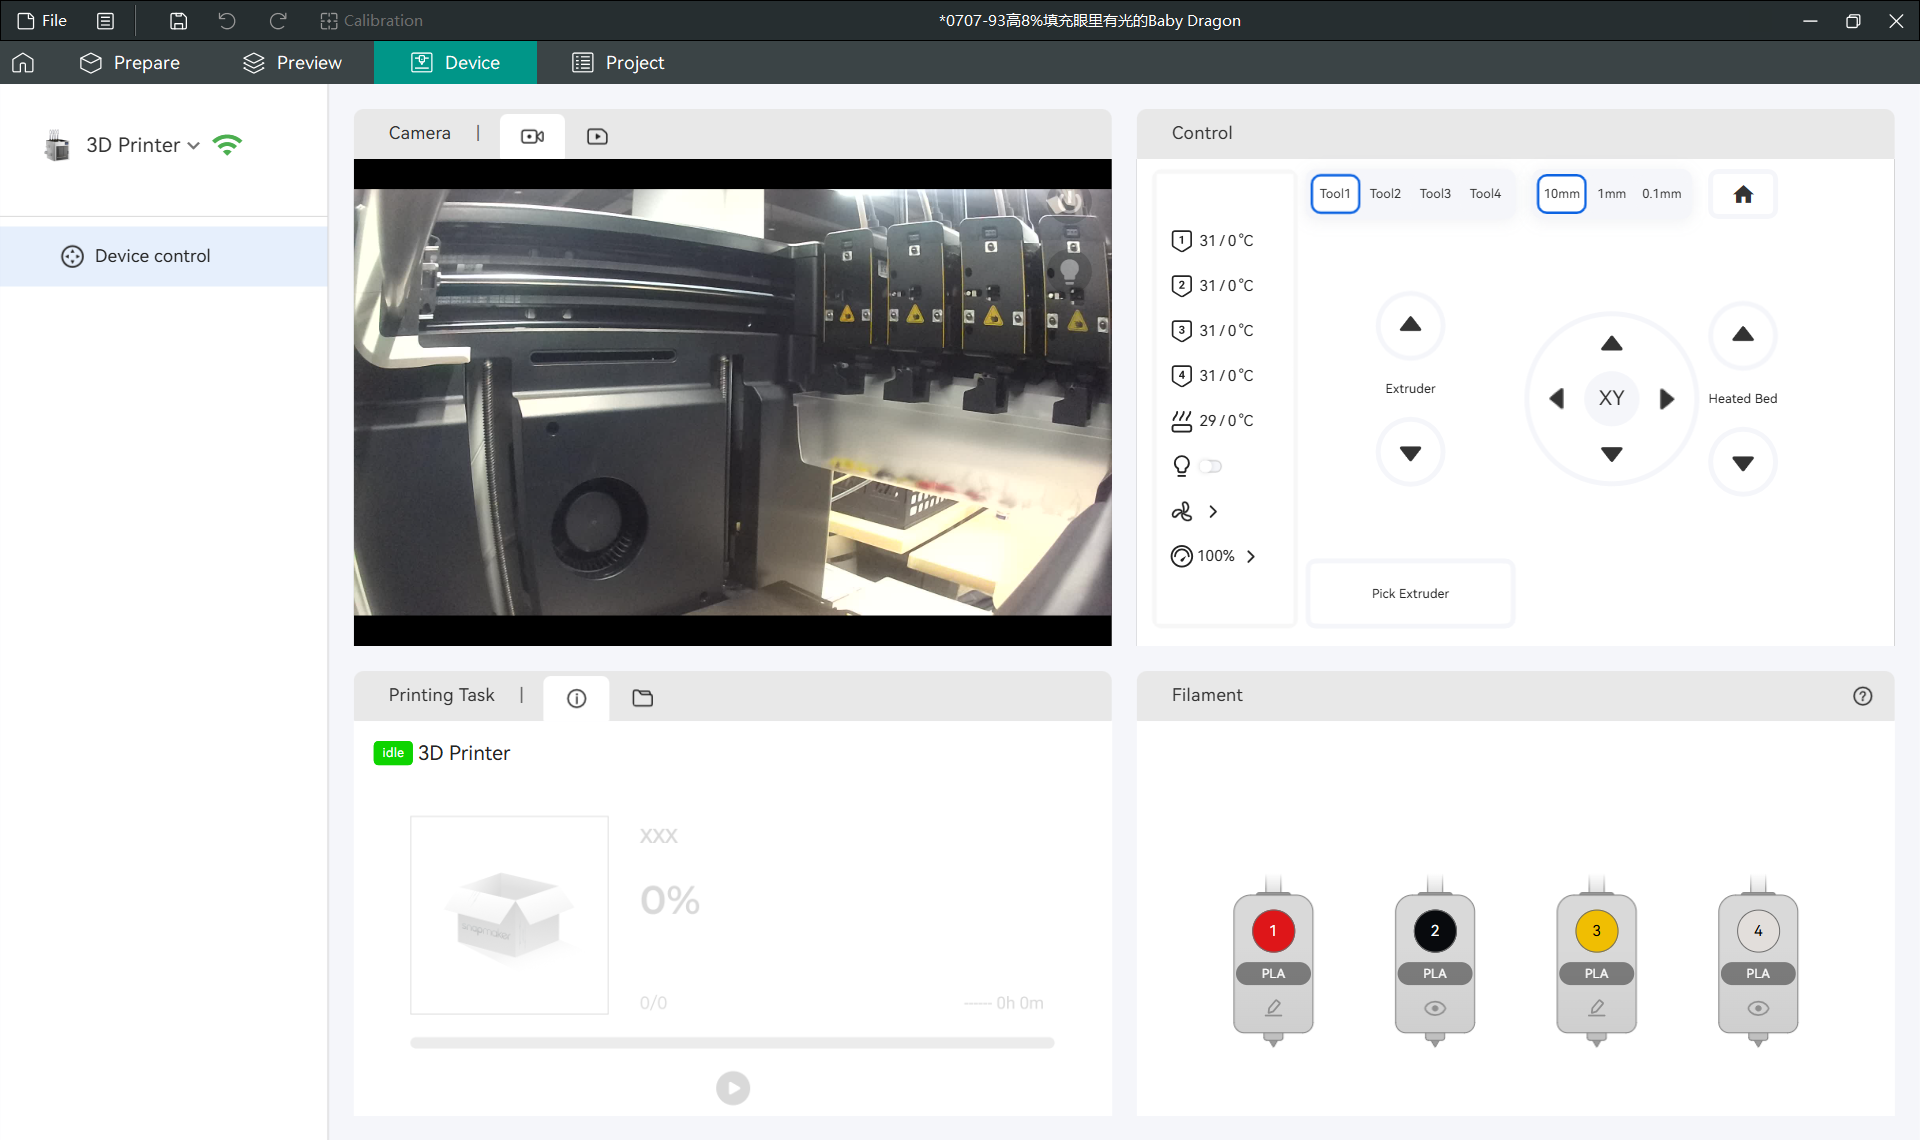
¶ 3.2.4 Controlling Printer
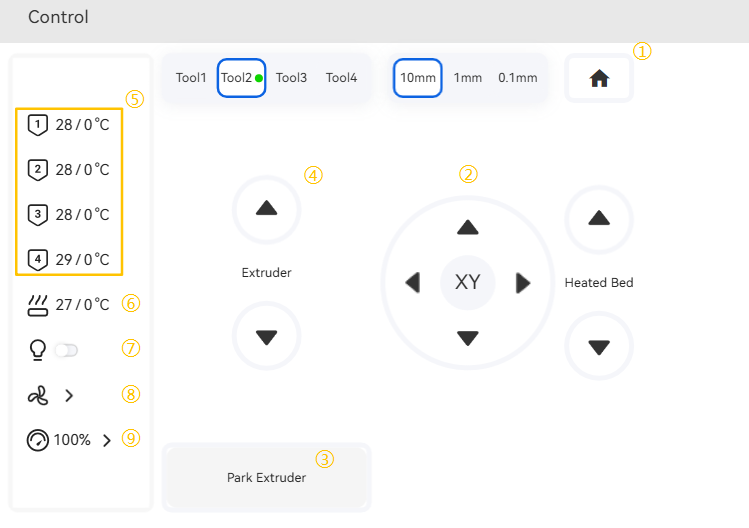
You can remotely control the printer from the Control panel on the Device page:
① Return to Home position.
② Move X/Y/Z axis.
③ Attach/Detach toolheads.
④ Extrude/Retract filament.
⑤ Set nozzle temperature.
⑥ Set heated bed temperature.
⑦ LED light on/off.
⑧ Control fan speed.
⑨ Set print speed (only allowed during a print job).
¶ 3.2.5 Setting Filament
Supports remote viewing of official filaments (with built-in RFID chip) and editing third-party filaments.
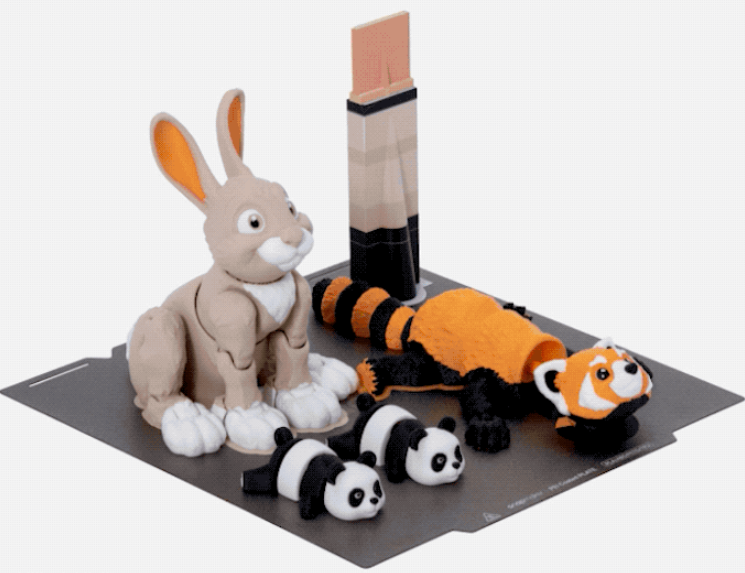
¶ 4. Multi-color Printing Guide
One of the most prominent capabilities of the Snapmaker U1 3D printer is its support for fast printing of independent multi-color models. Supporting multi-color printing is one of the core functions of Snapmaker Orca. After importing the model, creating a colorful model requires only a few steps.
Step 1: Add filaments according to your desired colors.
Step 2: Paint the model.
Step 3: Slice and print.
¶ 4.1 Managing Filaments
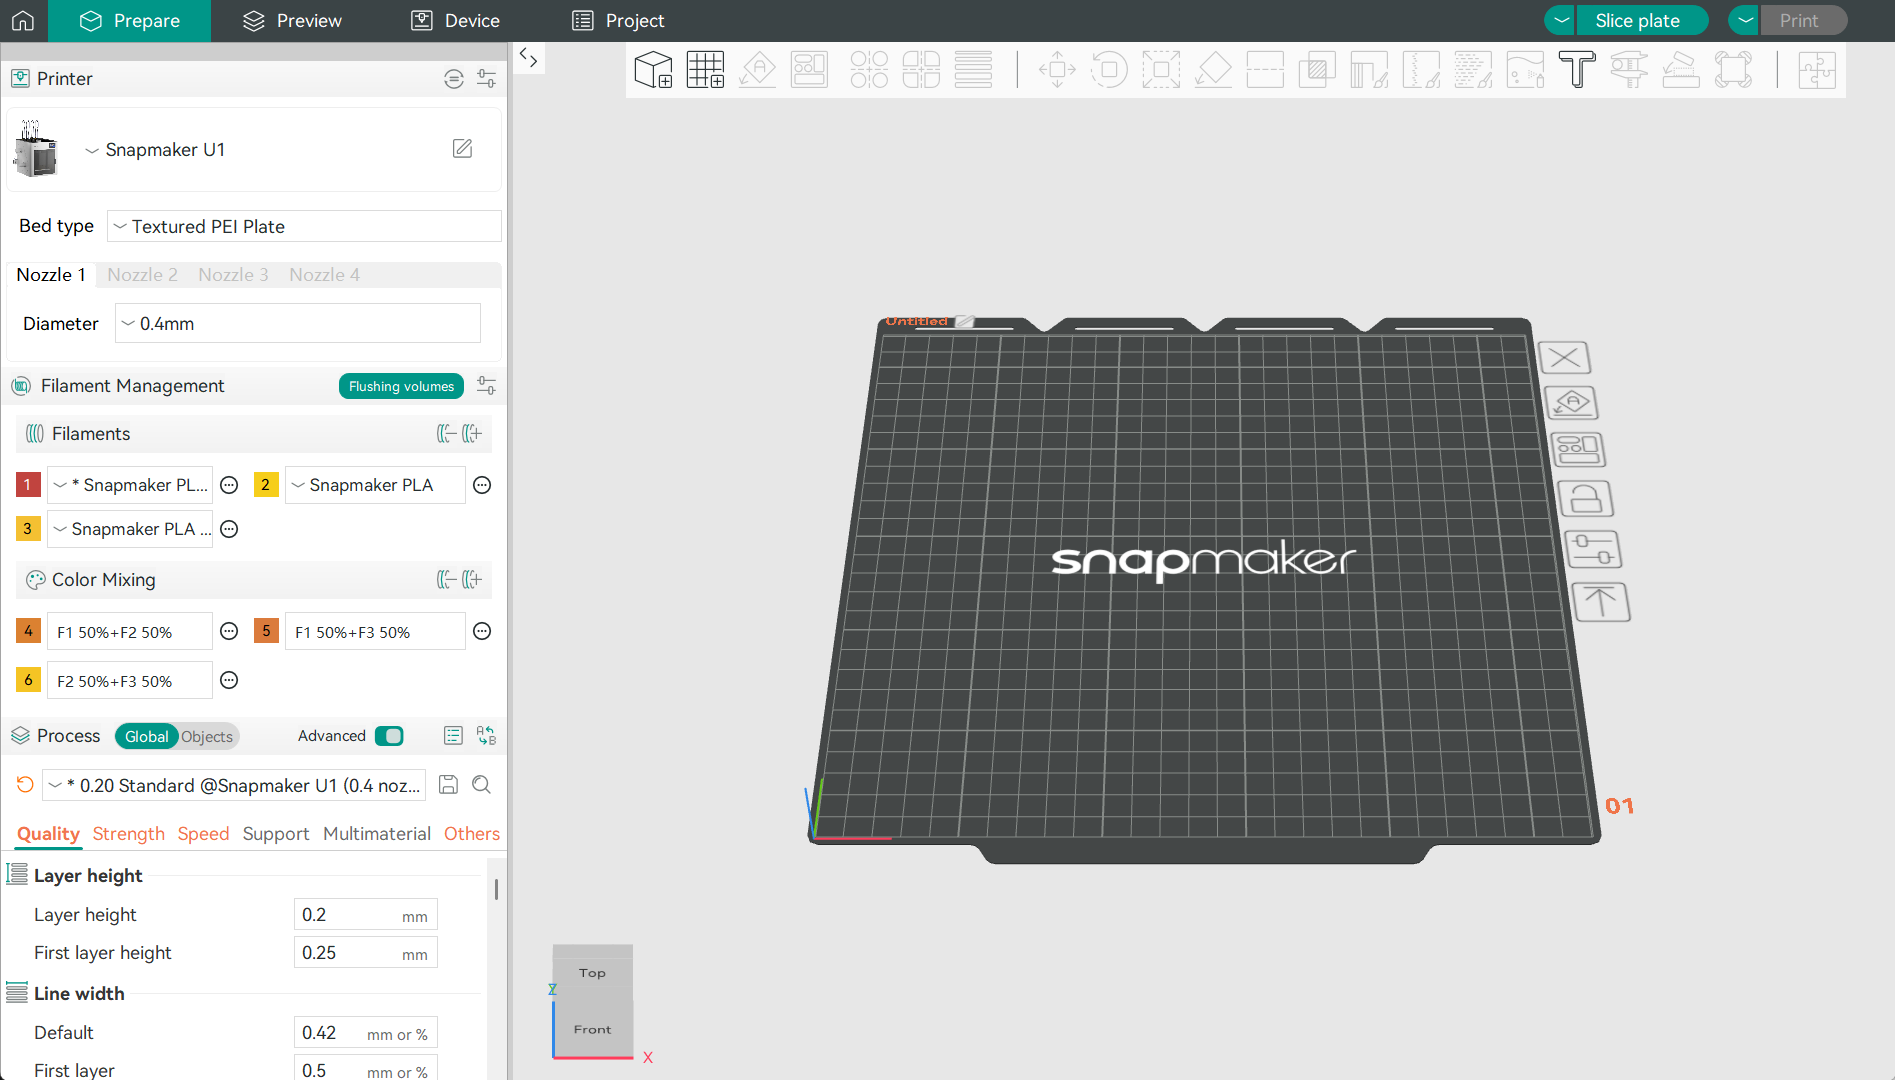
In the left filament panel, you can manage filaments:
- Add/Remove Filament
Click the + button to add a new filament to the project.
Newly added filaments will be appended to the filament list.
Click - to remove the last filament. - Sync Filament
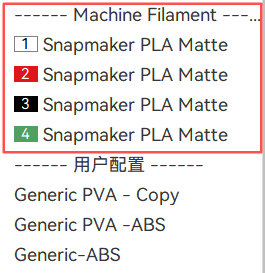
After a filament is loaded into the printer bound to Snapmaker Orca and its information is edited on the touchscreen, it can be automatically mapped to the filament list.
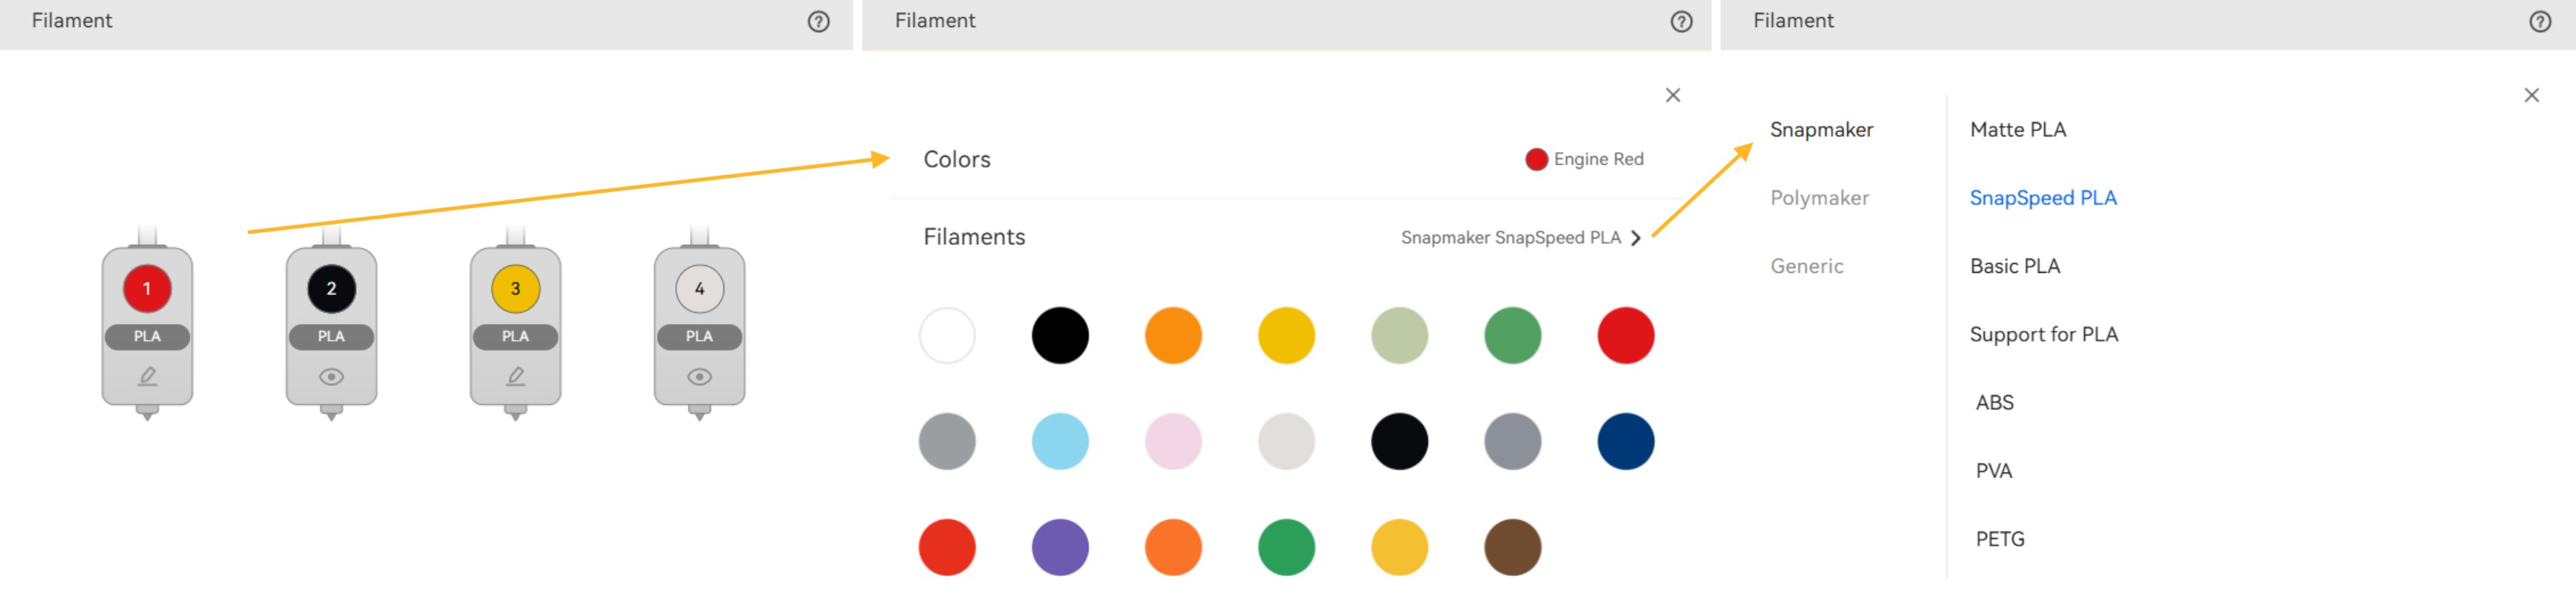
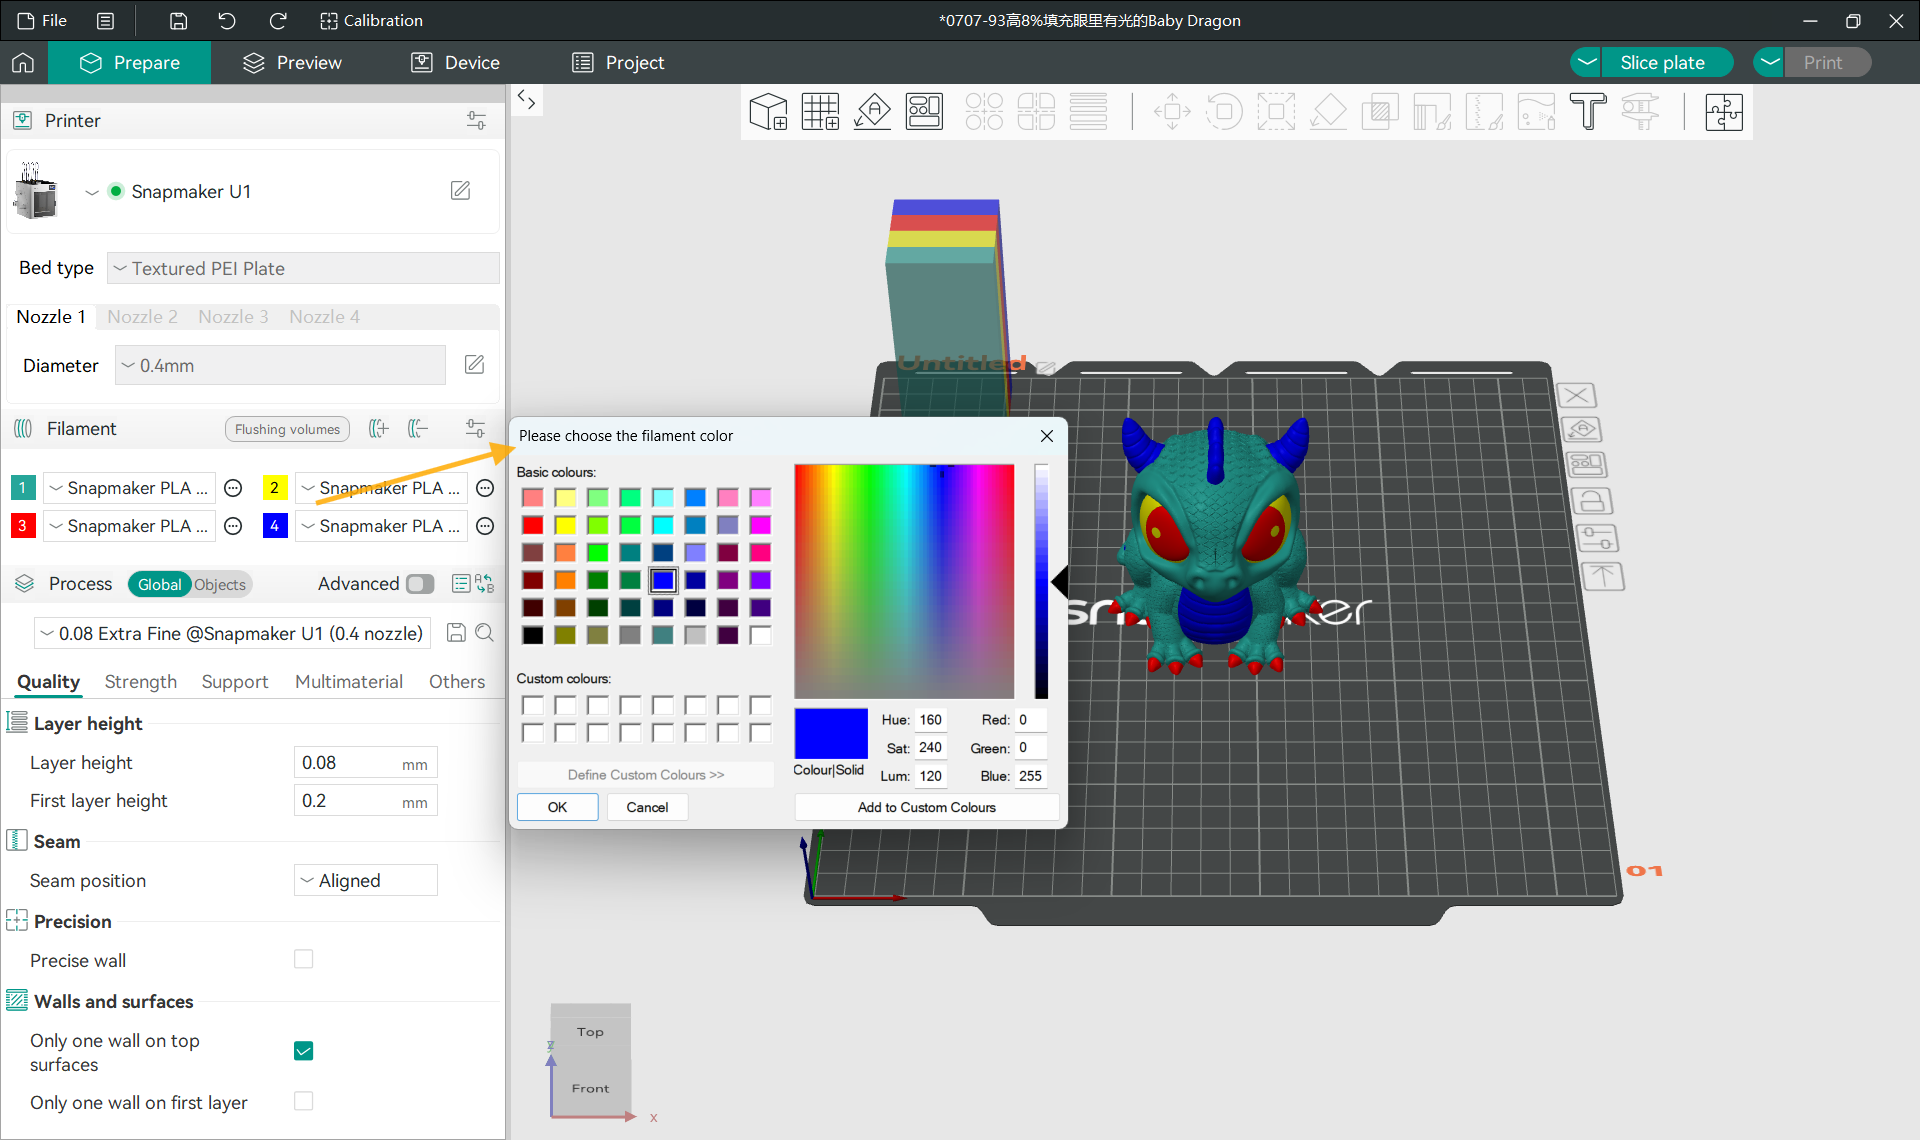
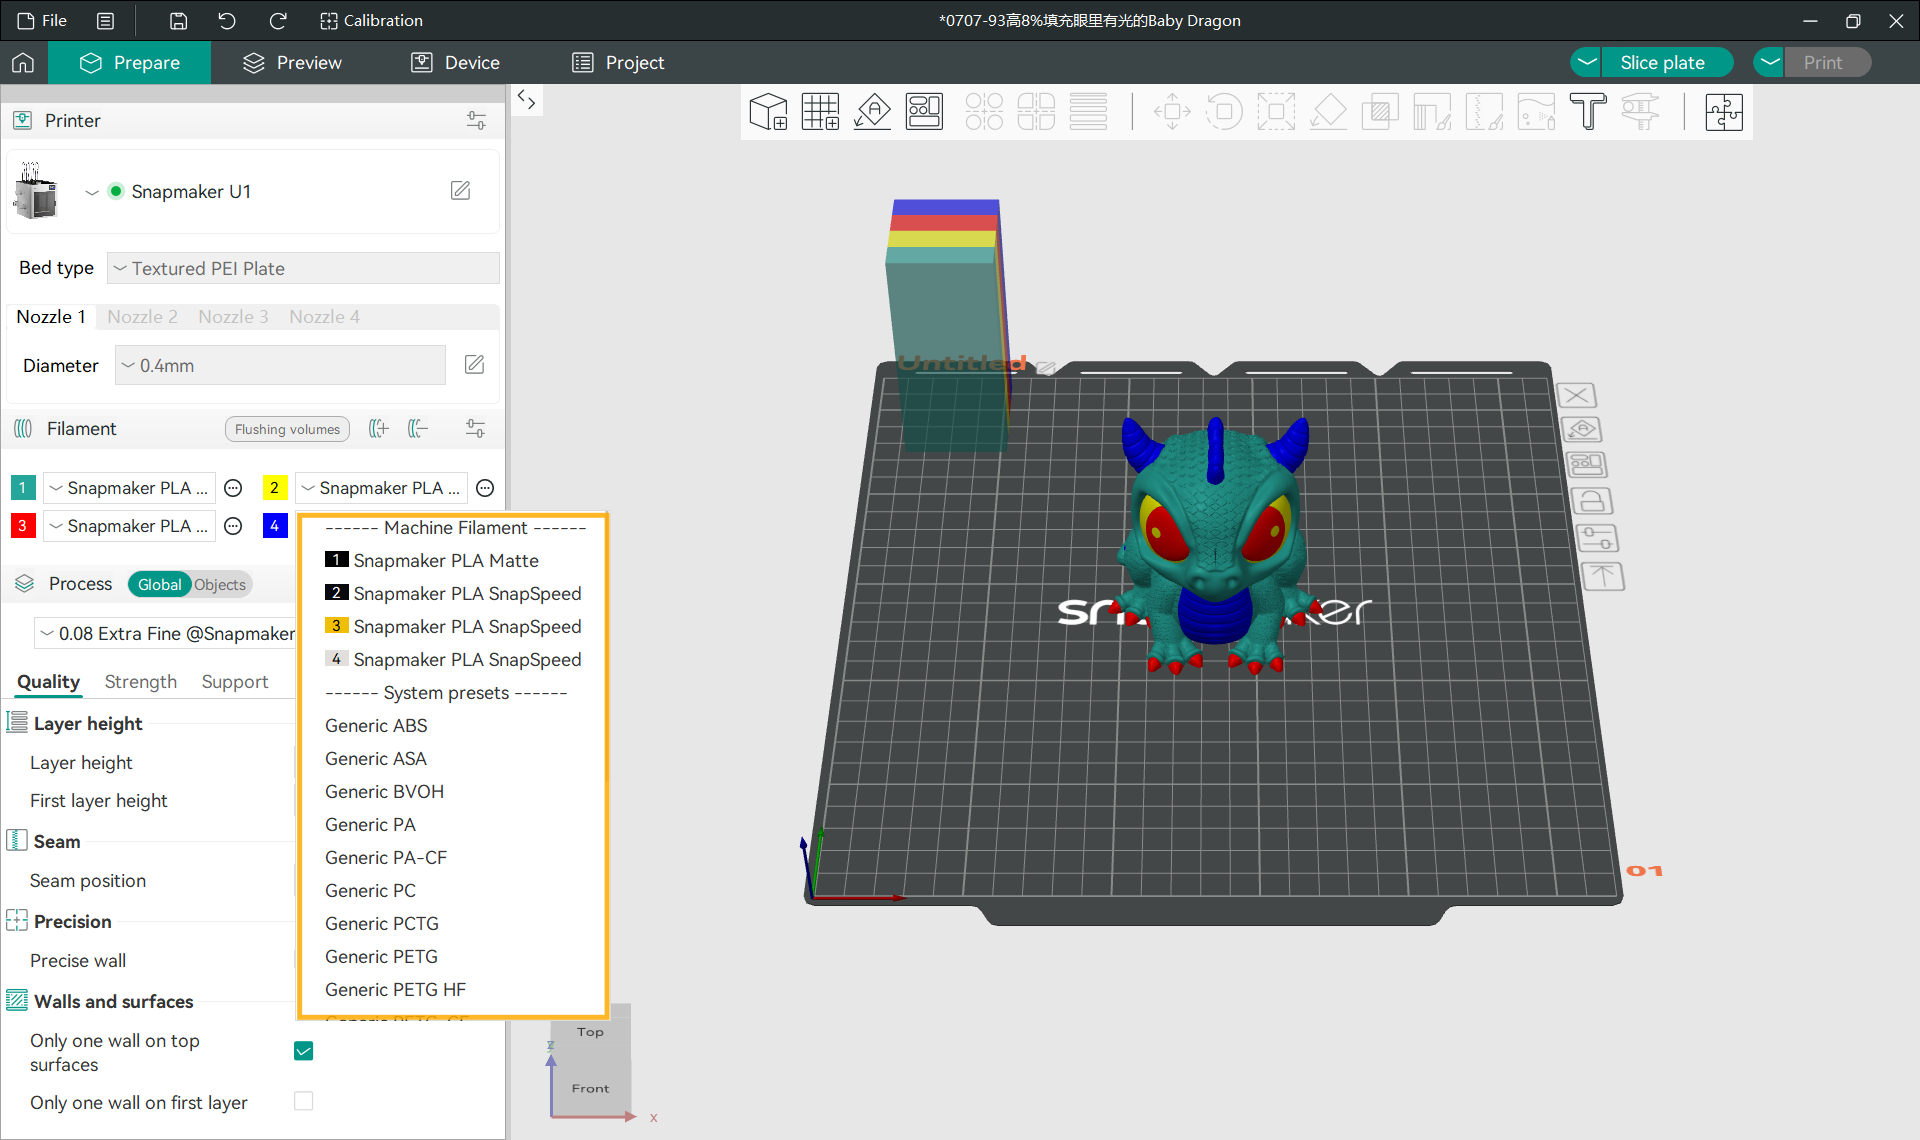
- Set Filament Color and Type
Modify filament color.
Select filament type. You can choose mapped (loaded) filaments from the printer, or user-configured or system-configured filaments.
¶ 4.2 Painting Model
- Assign Filament to Model
Method 1: Select the filament for the part in the Object List on the left sidebar.
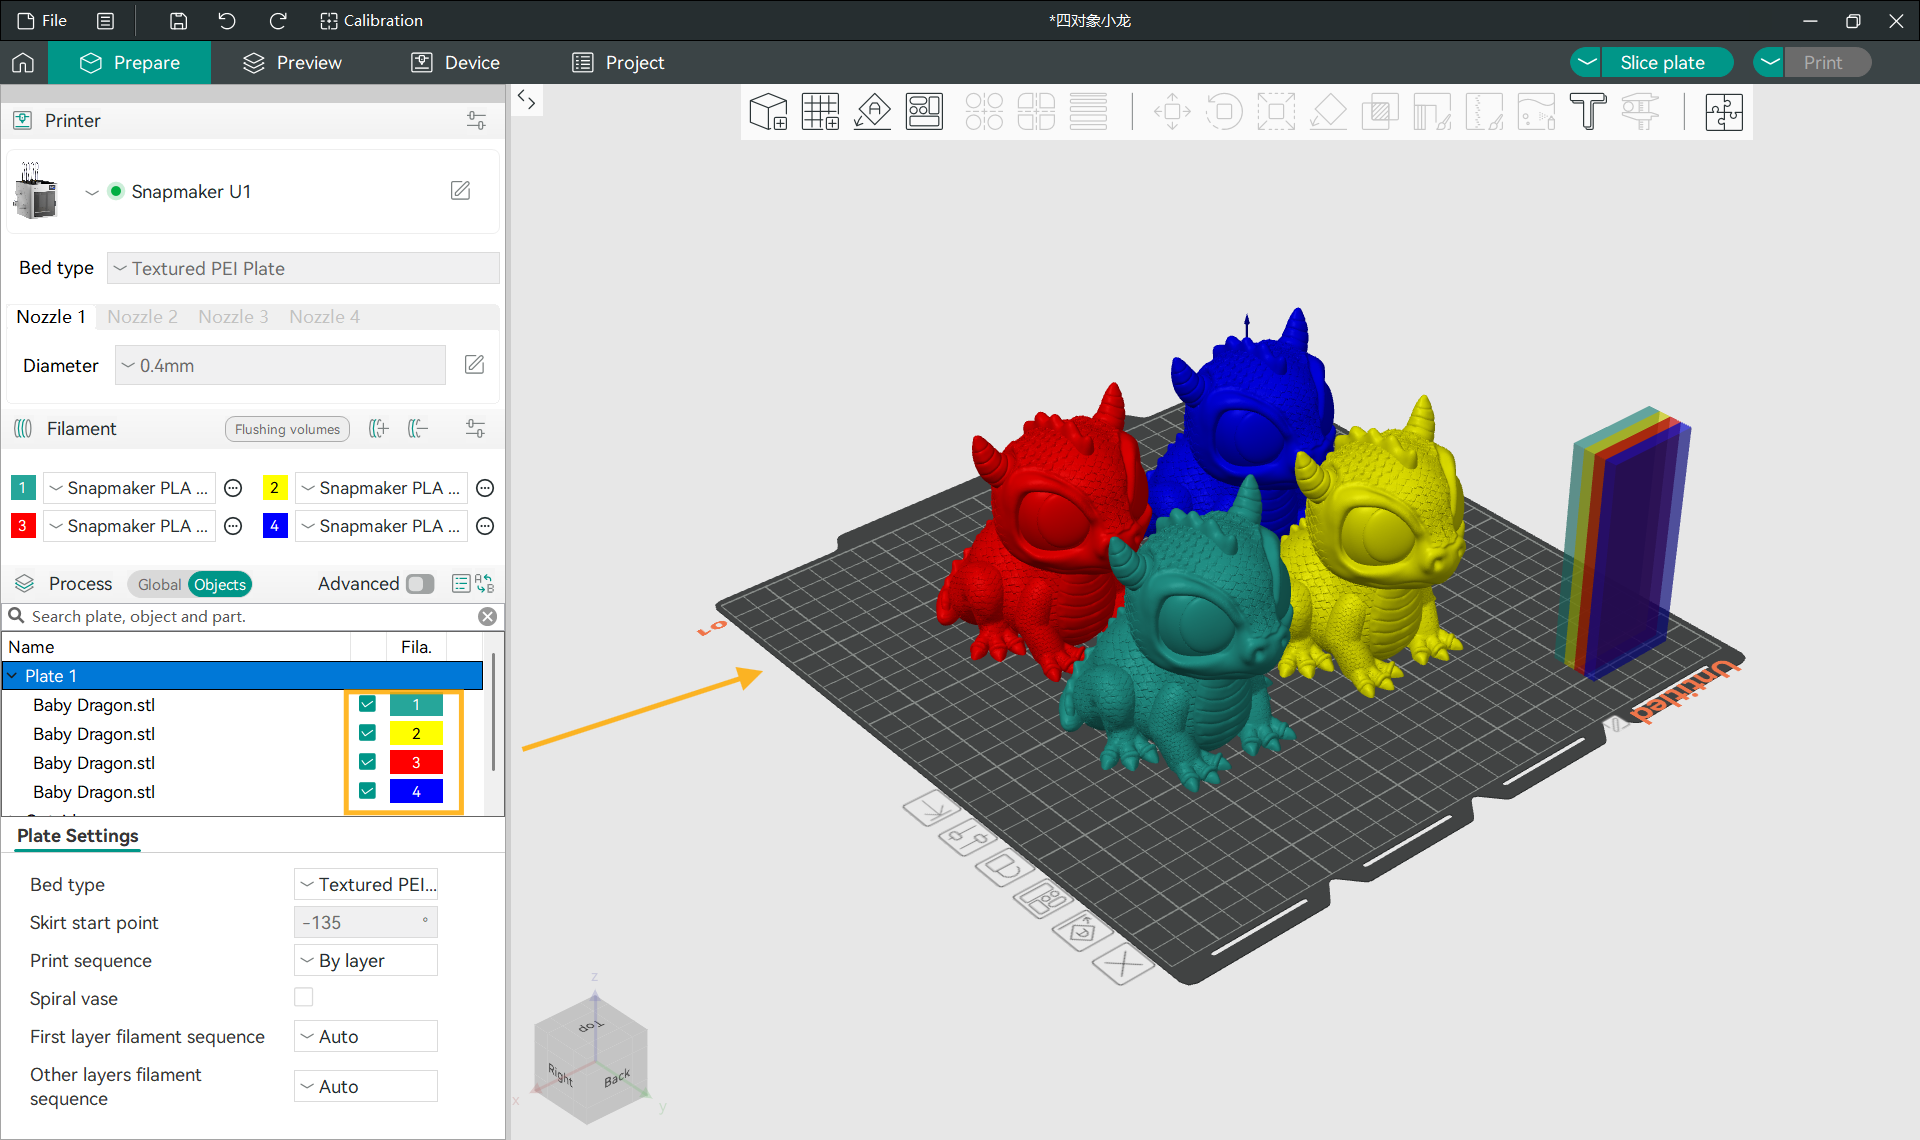
Method 2: Right-click the target part and select the filament from the menu.

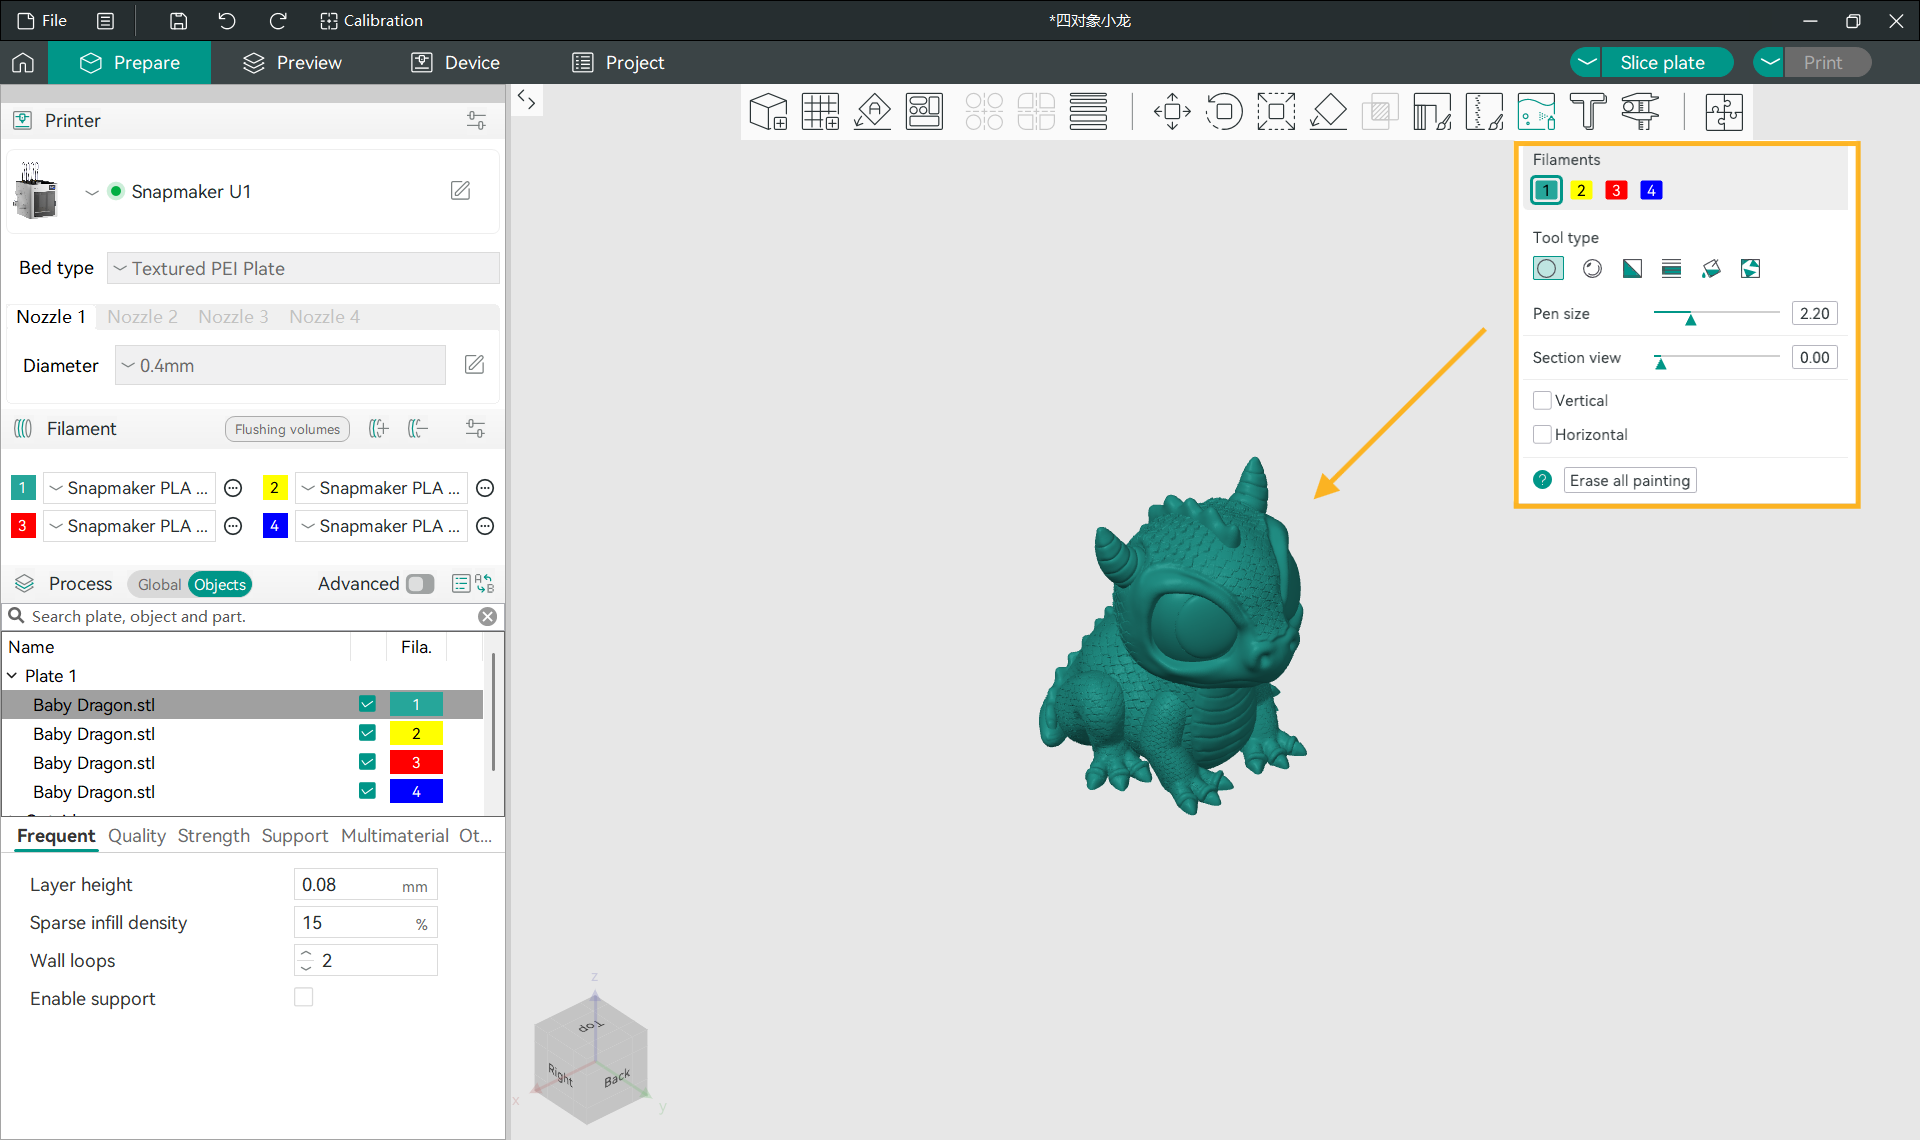
- Painting
Snapmaker Orca features powerful painting tools, supporting the following painting modes: Circle/Sphere/Triangle/Height Range/Fill/Gap Fill.
For details, refer to: Orca Slicer: Color Painting
¶ 4.3 Managing Device Filaments
- Setting Device Filament
Supports remote viewing of official filaments (with built-in RFID chip) and editing third-party filaments.
- Filament Mapping
The upper part of the Edit Filament section shows the source color and type configured in the current model. The lower part shows the color and type of the indexed, matched filament loaded in the printer.
The printer automatically matches the preset filament with the loaded filament of the same type and the closest color. You can also modify it to your desired color.