In this article, we aim to introduce the basic workflow for multi-process CNC machining in Luban.
You can also use Fusion 360 to generate G-code file for multi-process 3-axis CNC machining, please refer to Using Artisan/2.0 with Fusion 360 for multi-process 3-axis CNC machining.
¶ 01 Tools & Accessories Required
To illustrate how to use Artisan/2.0 with Luban (hereinafter Luban) for multi-process 3-axis CNC machining, we will walk you through a simple project (carving "SNAPMAKER" on a piece of beech), which will include three processes: creating a pocket, carving the text and cut down the contour. During this process, you will need the tools and materials listed below.
- Beech ×1(the height of the beech used in the following example is 10mm)
- 14mm open end wrench ×1
- 17mm open end wrench ×1
- 3.175mm flat end mill ×1
- Carving V-bit ×1

¶ 02 Procedures
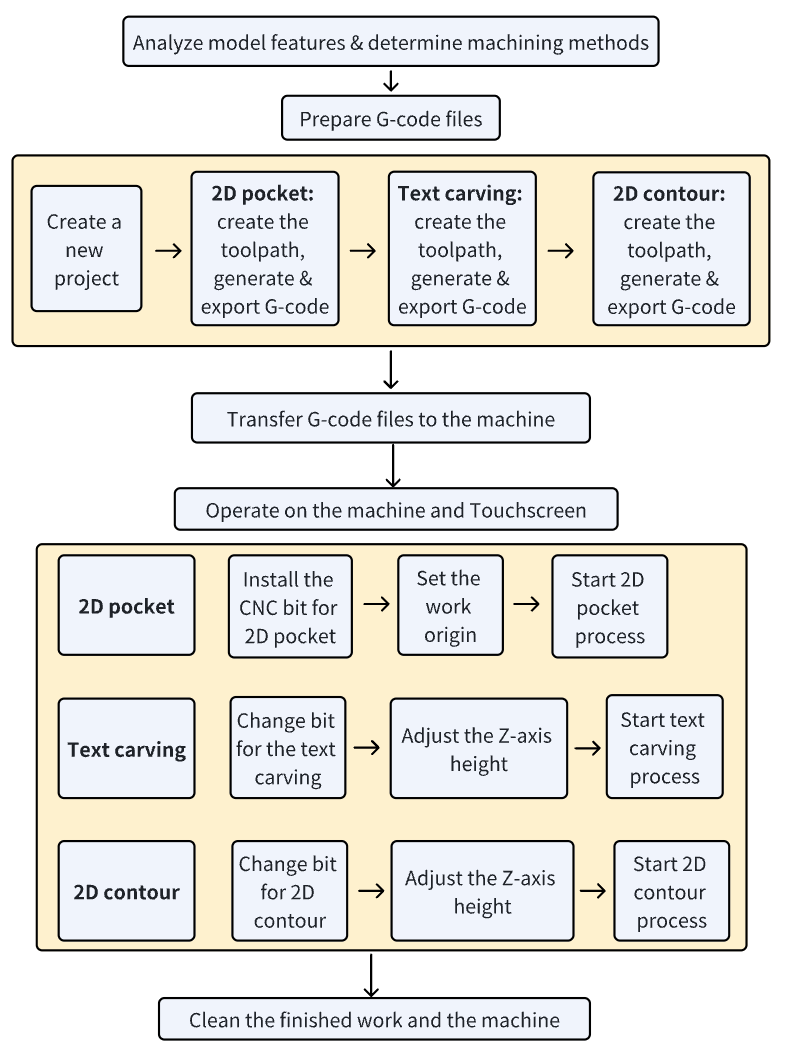
The following flowchart outlines the procedures to use Artisan/2.0 with Luban for multi-process 3-axis CNC machining.
¶ 2.1 Analyze model features & determine machining methods
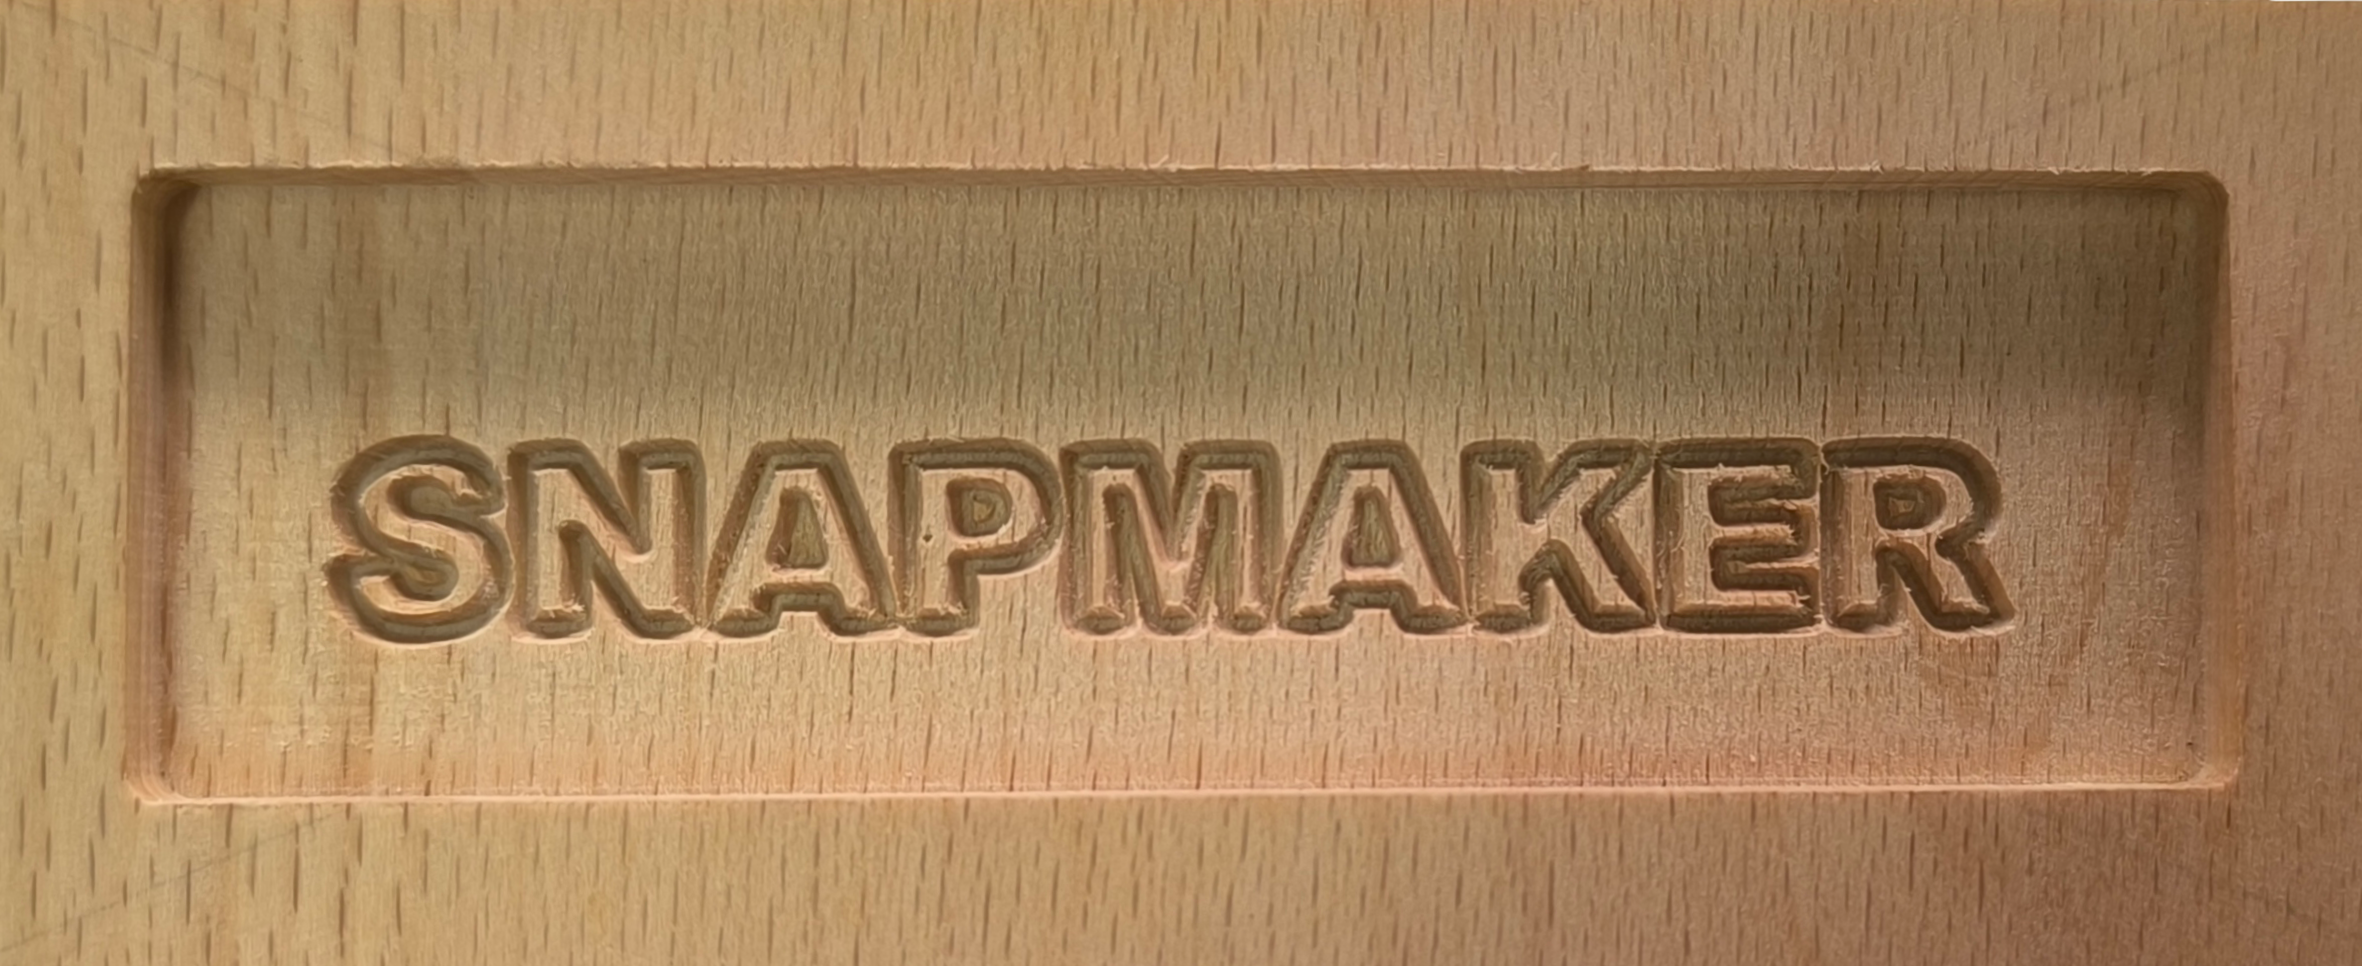
To achieve this effect, we need:
- Adopt the 2D contour method to create a pocket on the material.
The bit we will use in this step is a 3.175mm flat end mill.
- Carve text on the surface of the pocket.
The bit we will use in this step is a Carving V-bit.
- To cut the part from the material, we need to adopt a 2D contour method at the end.
The bit we will use in this step is also a 3.175mm flat end mill.
¶ 2.2 Prepare G-code files
¶ Create a new project
Select the correct machine and toolhead in Settings > Preferences > Machine Settings.
- Launch Luban, click CNC > 3-axis to enter 3-axis G-code Generator.

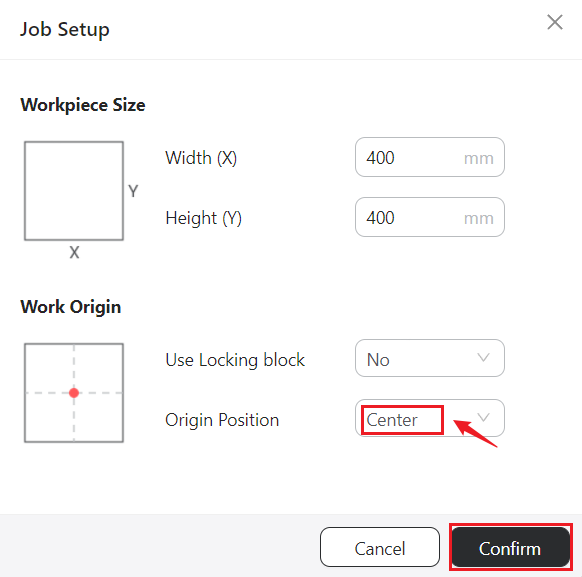
- Select Center as the Origin Position, then click Confirm.
¶ 2D pocket process
¶ Create the toolpath
- Click rectangle tool, drag to draw a rectangle.
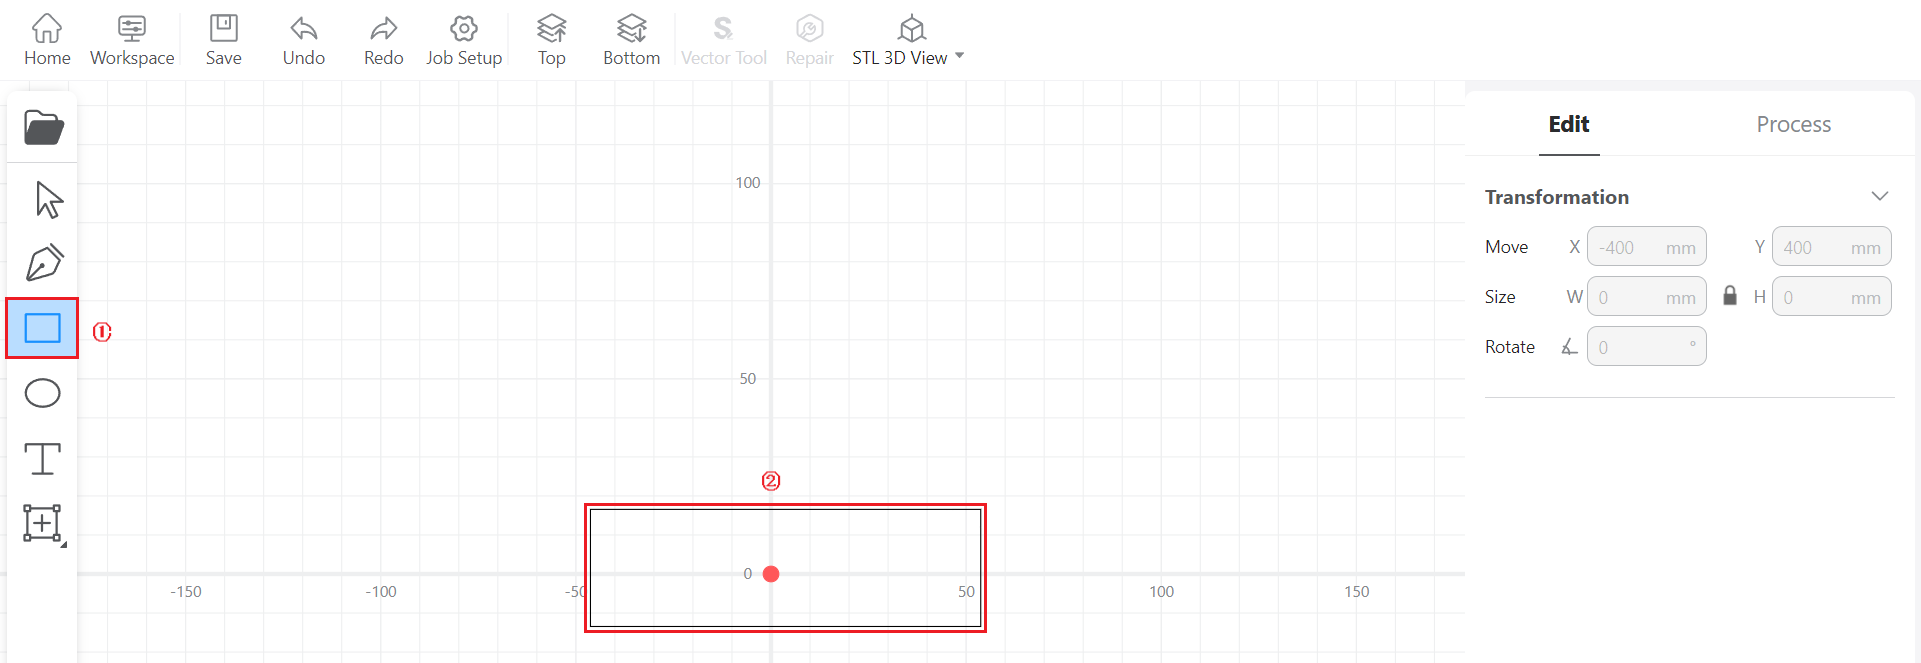
- Click select tool, select the rectangle, then set the Width and Height to 100mm and 30mm, respectively.
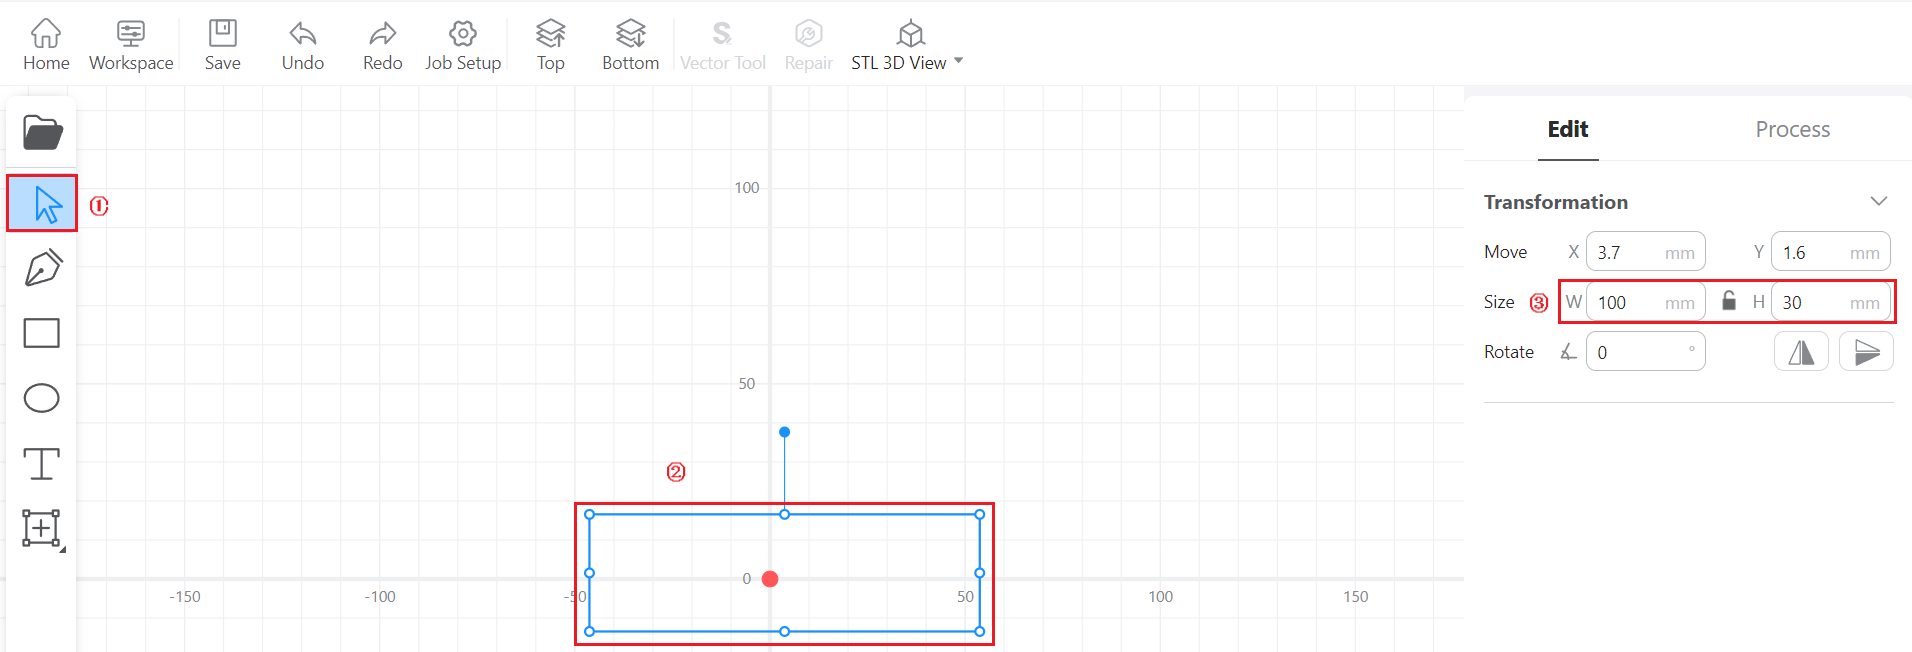
You can click the lock button to lock and unlock the width-height ratio.
-
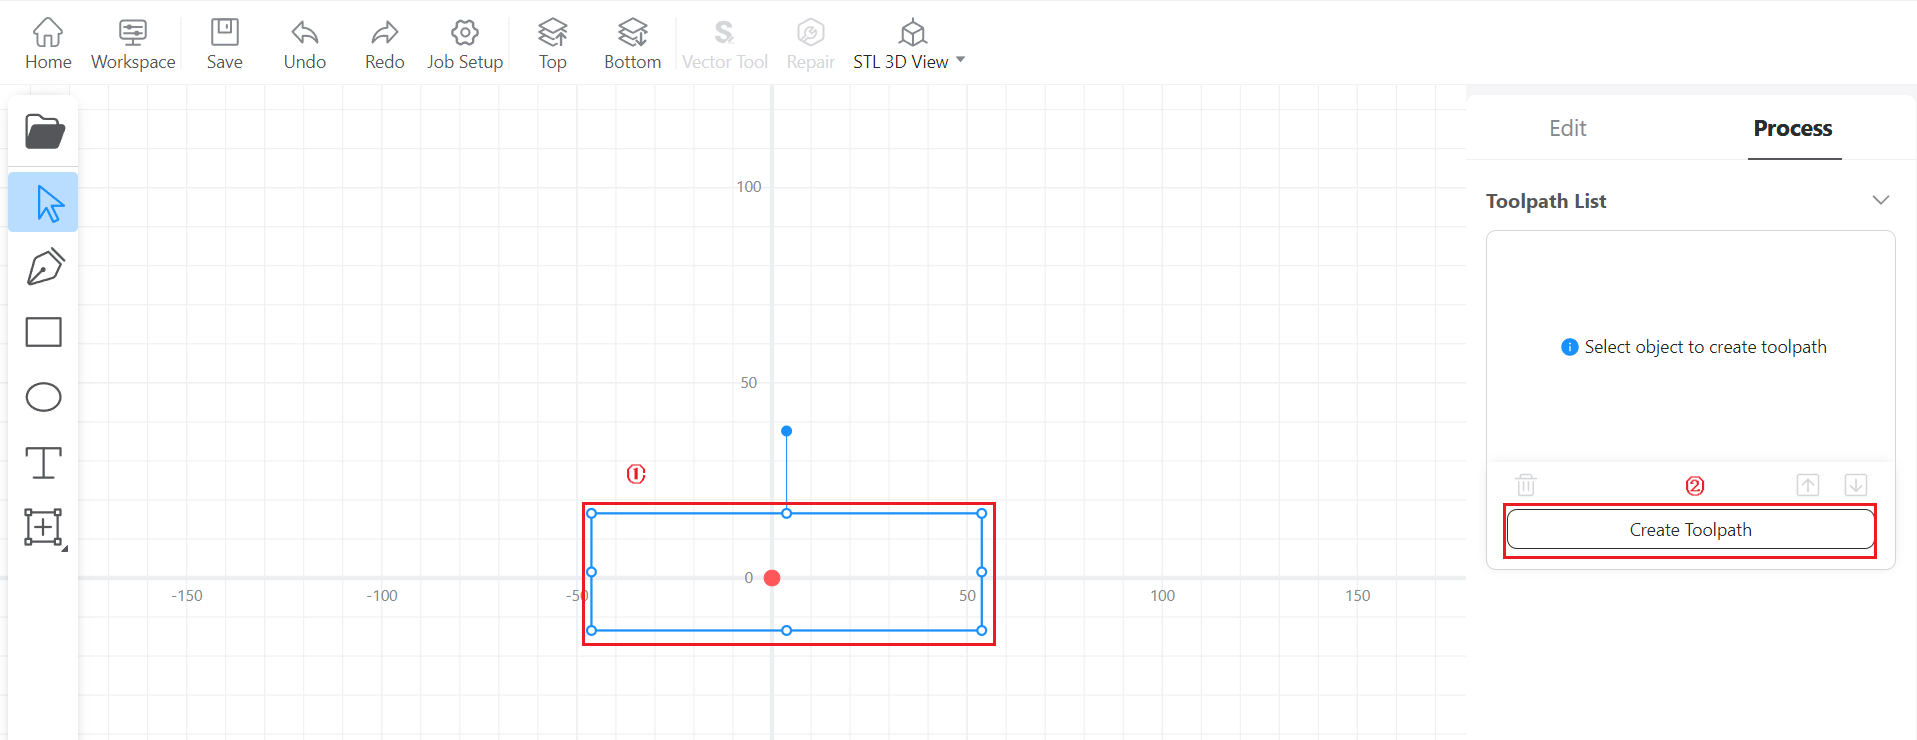
Click either Next to switch to Process Panel.
-
Select the rectangle and click Create Toolpath.
- Set Fill as Method, set Target Depth to 5mm, select Flat End Mill 3.175 as the Tool and set Step down to 1mm. Click Save when finished.
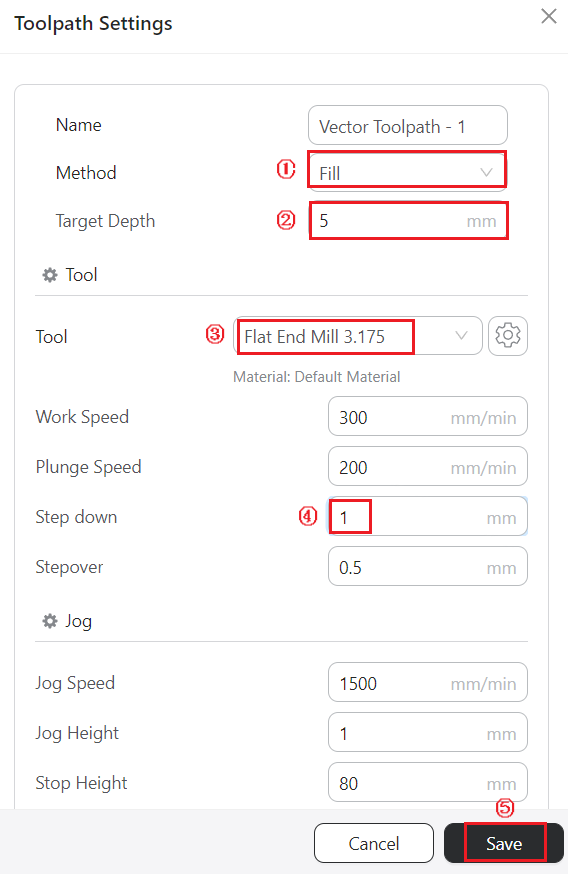
For parameters like work speed, you can also refer to our officially recommended parameters for 200W CNC Module.
¶ Generate and export G-code
-
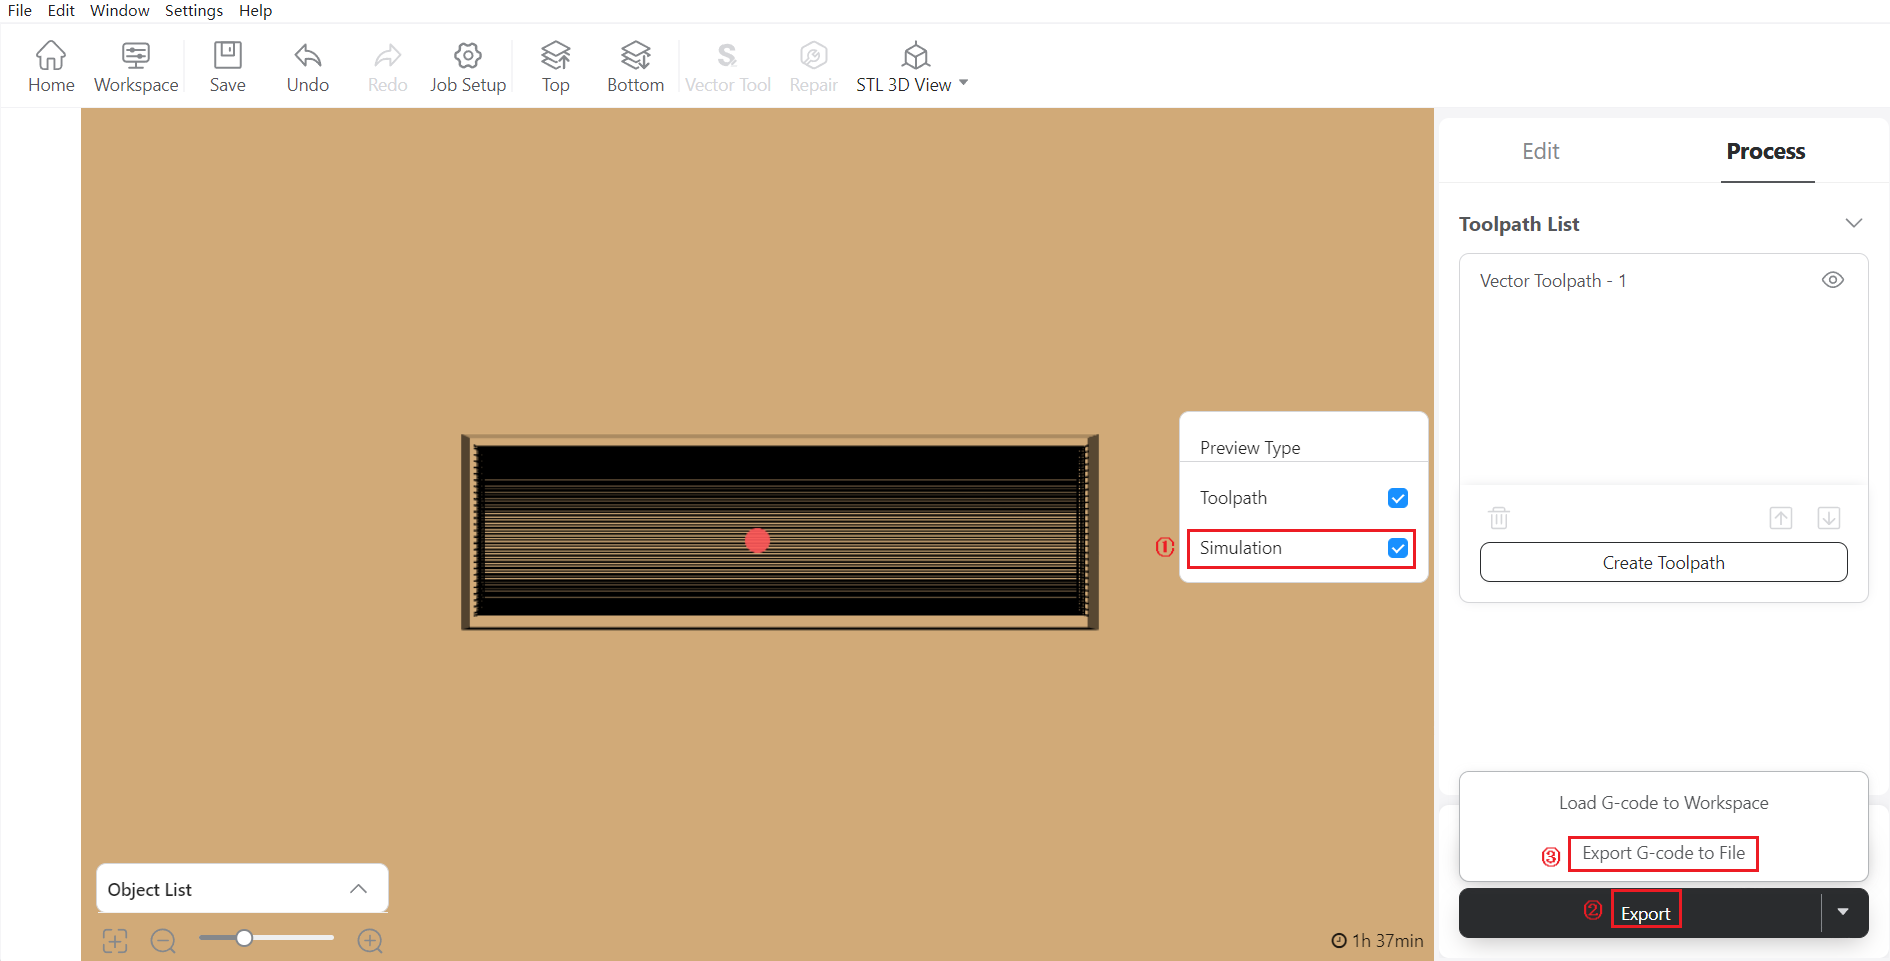
Click Generate G-code and Preview.
-
Tick Simulation to check if the toolpath goes as expected. If so, click Export > Export G-code to File.
¶ Text carving process
¶ Create the toolpath
- Click Edit to go back to the Edit Panel.
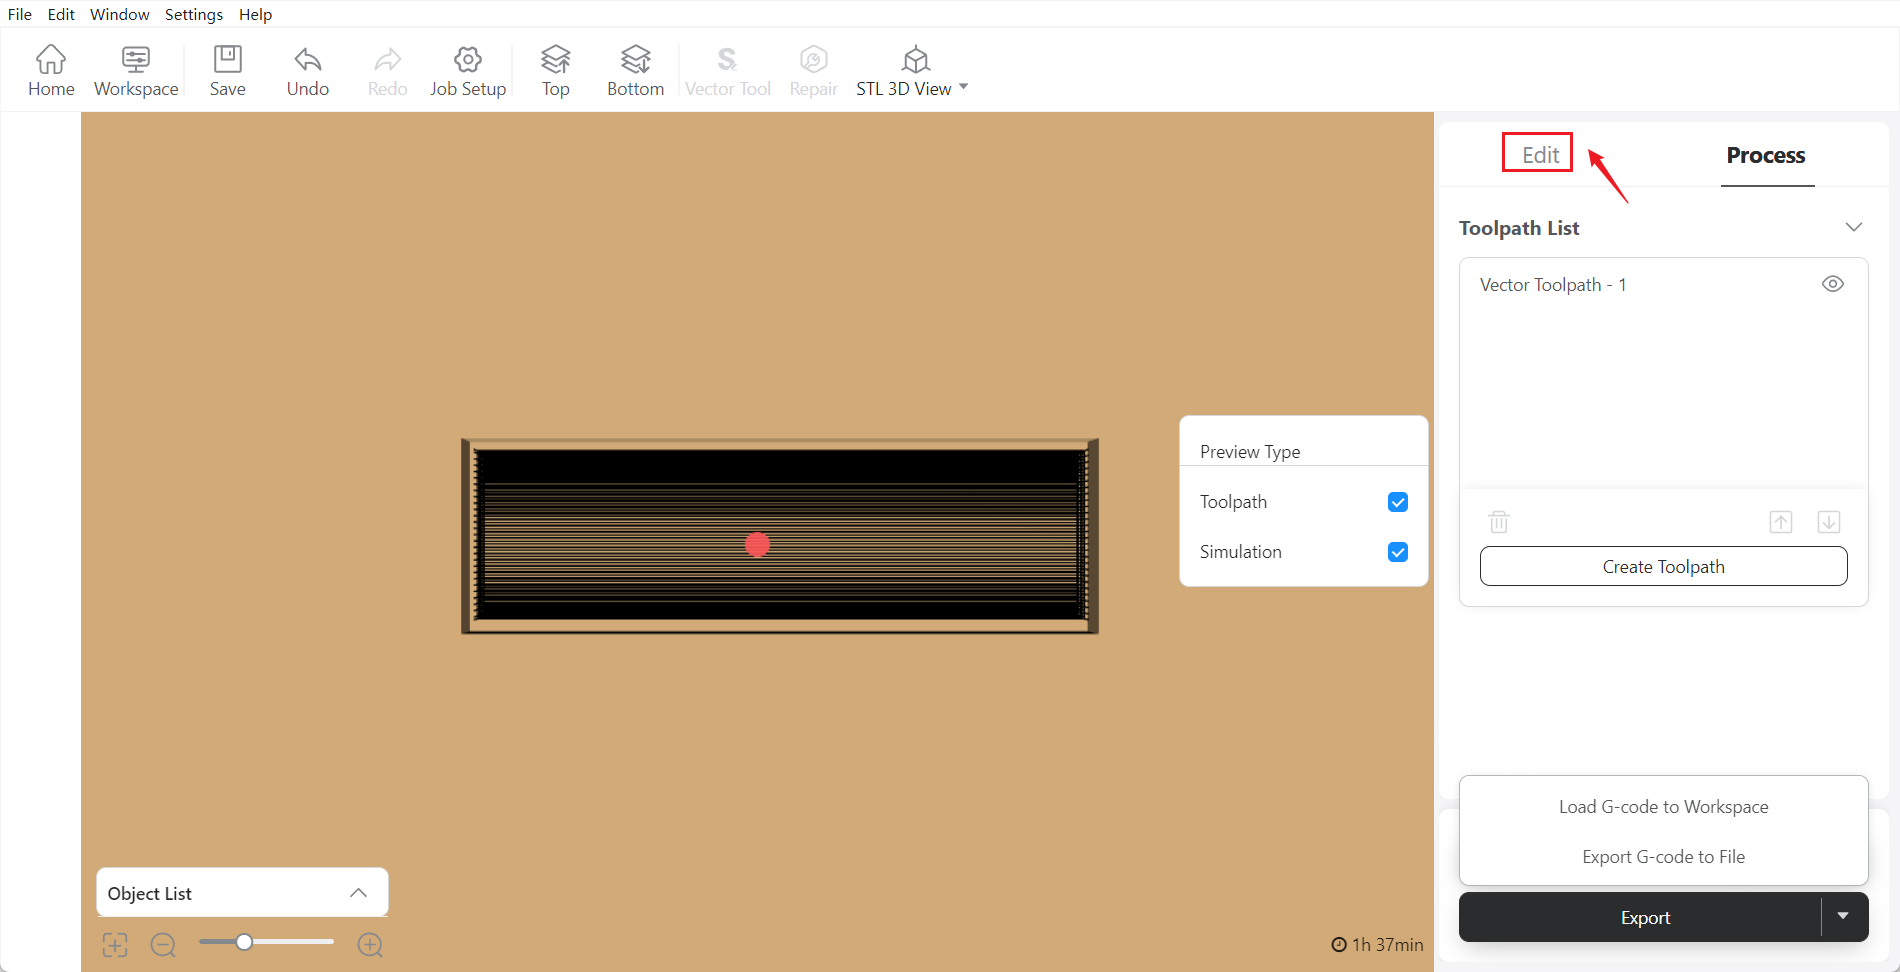
- Click the text tool, "Snapmaker" will automatically pop up.
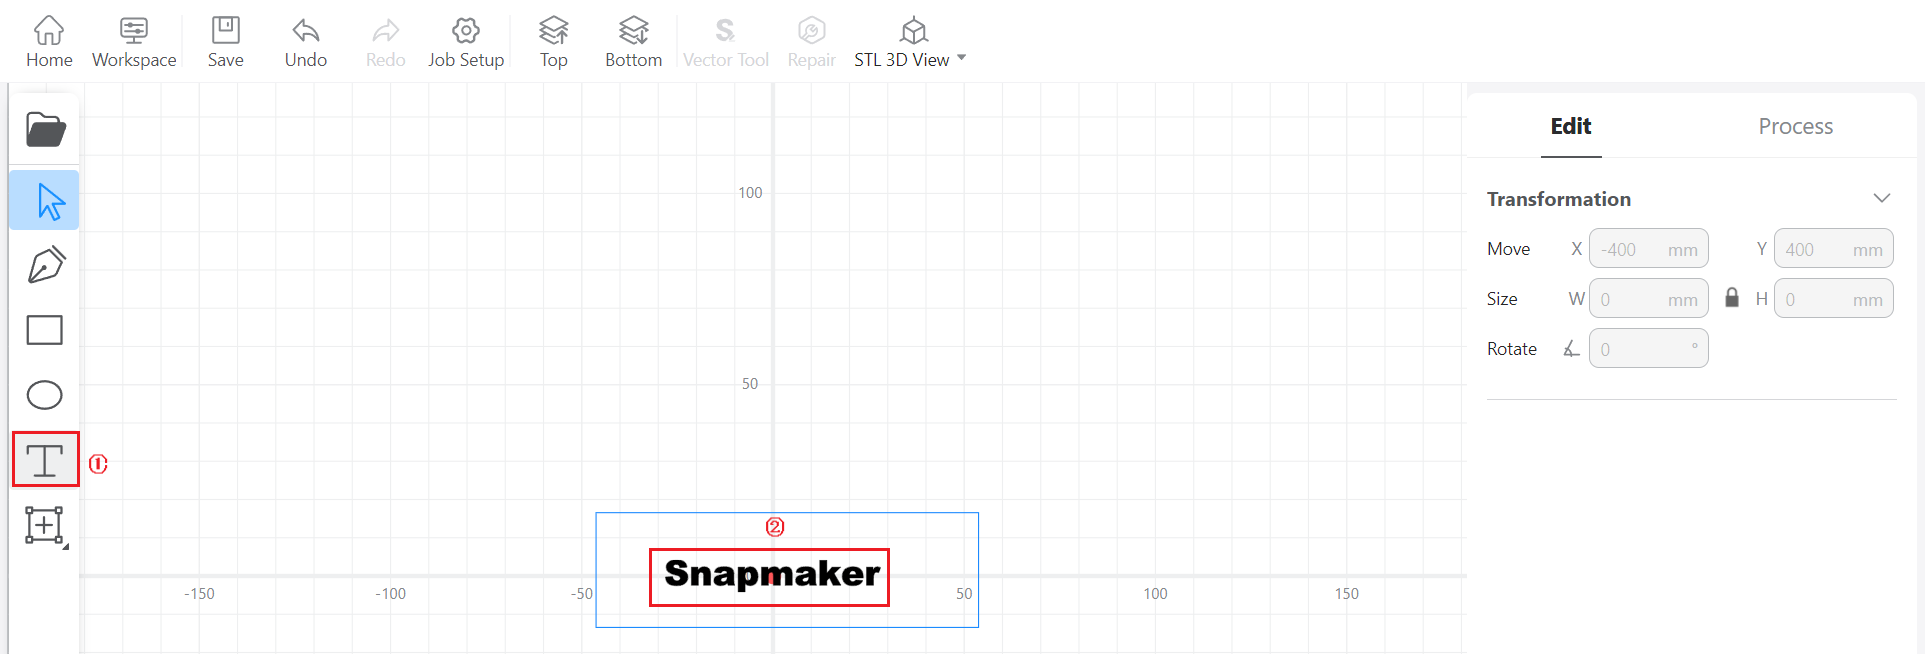
- Click select tool, select the text, then you can edit the text content as you want.
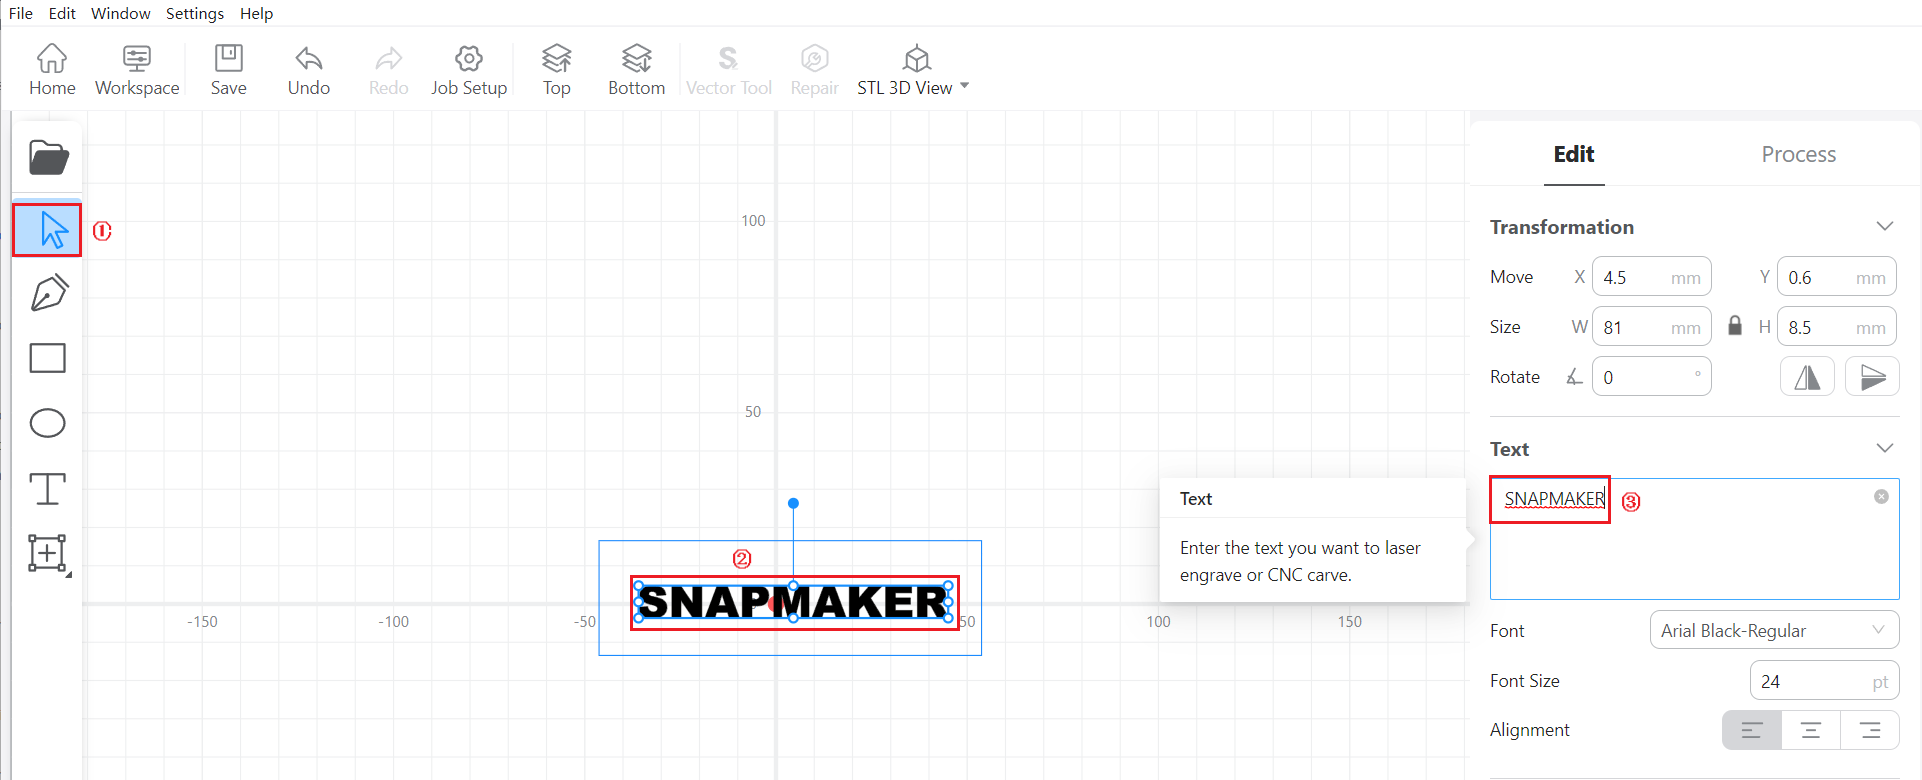
- Set the Width and Height of the text to 90mm and 10mm, respectively.
You can click the lock button to lock and unlock the width-height ratio.
-
Click either Next to switch to Process Panel.
-
Select the text and click Create Toolpath.
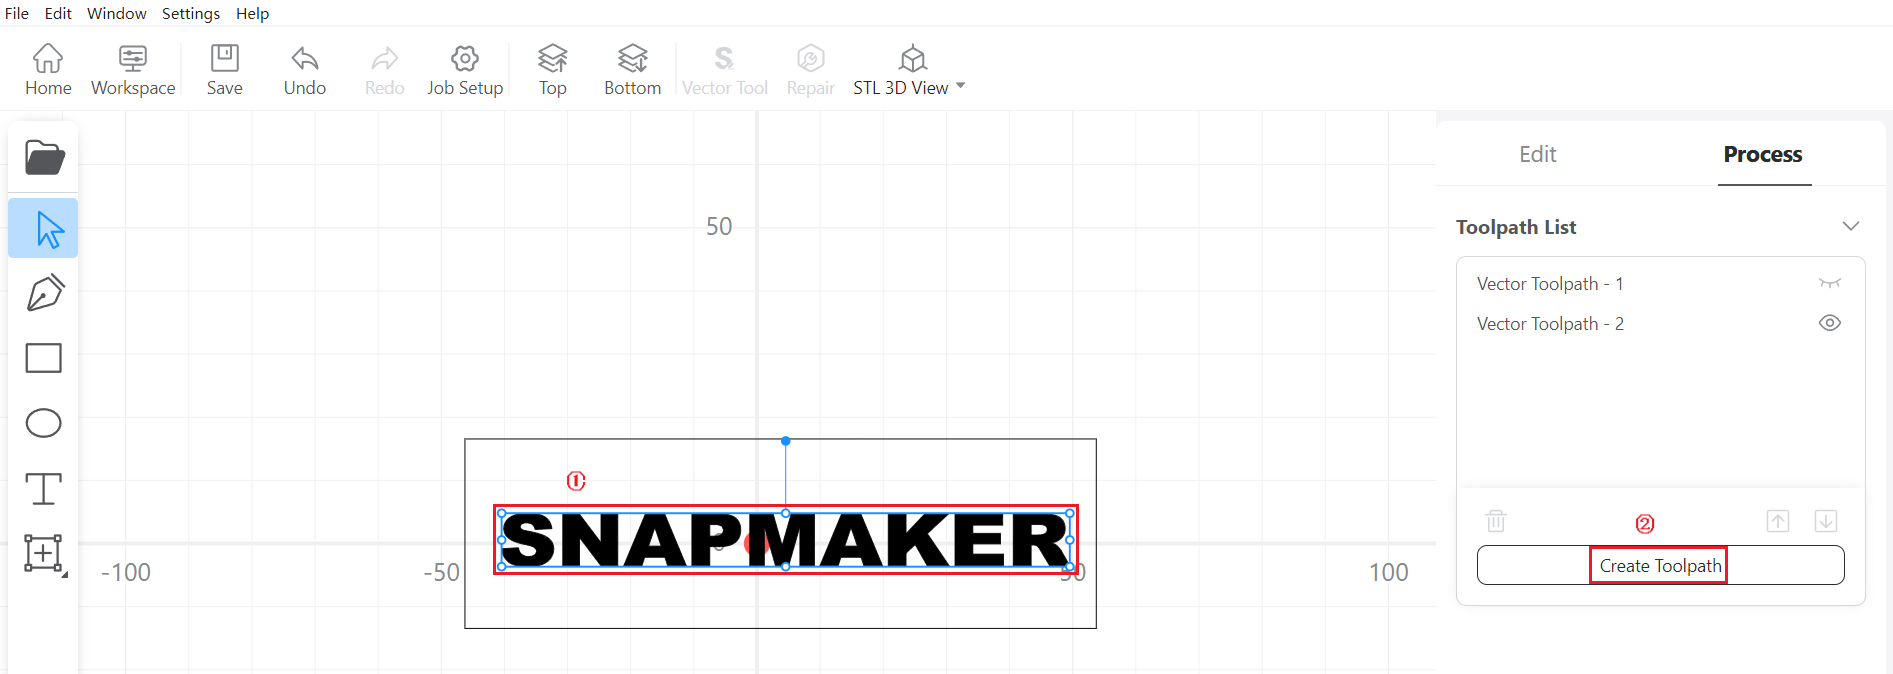
- Set On the Path as Method, set Target Depth to 3mm, and select Carving V-bit as the Tool. Click Save when finished.
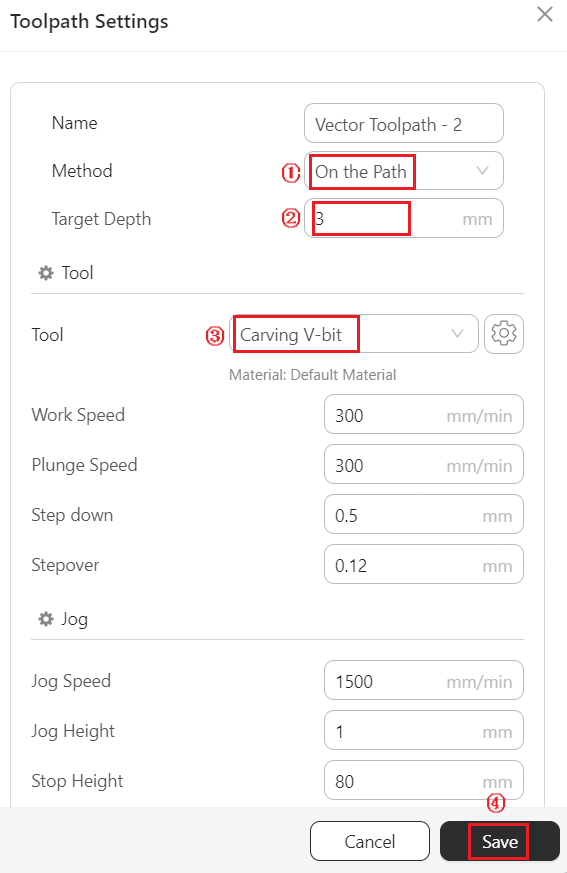
For parameters like work speed, you can also refer to our officially recommended parameters for 200W CNC Module.
¶ Generate and export G-code
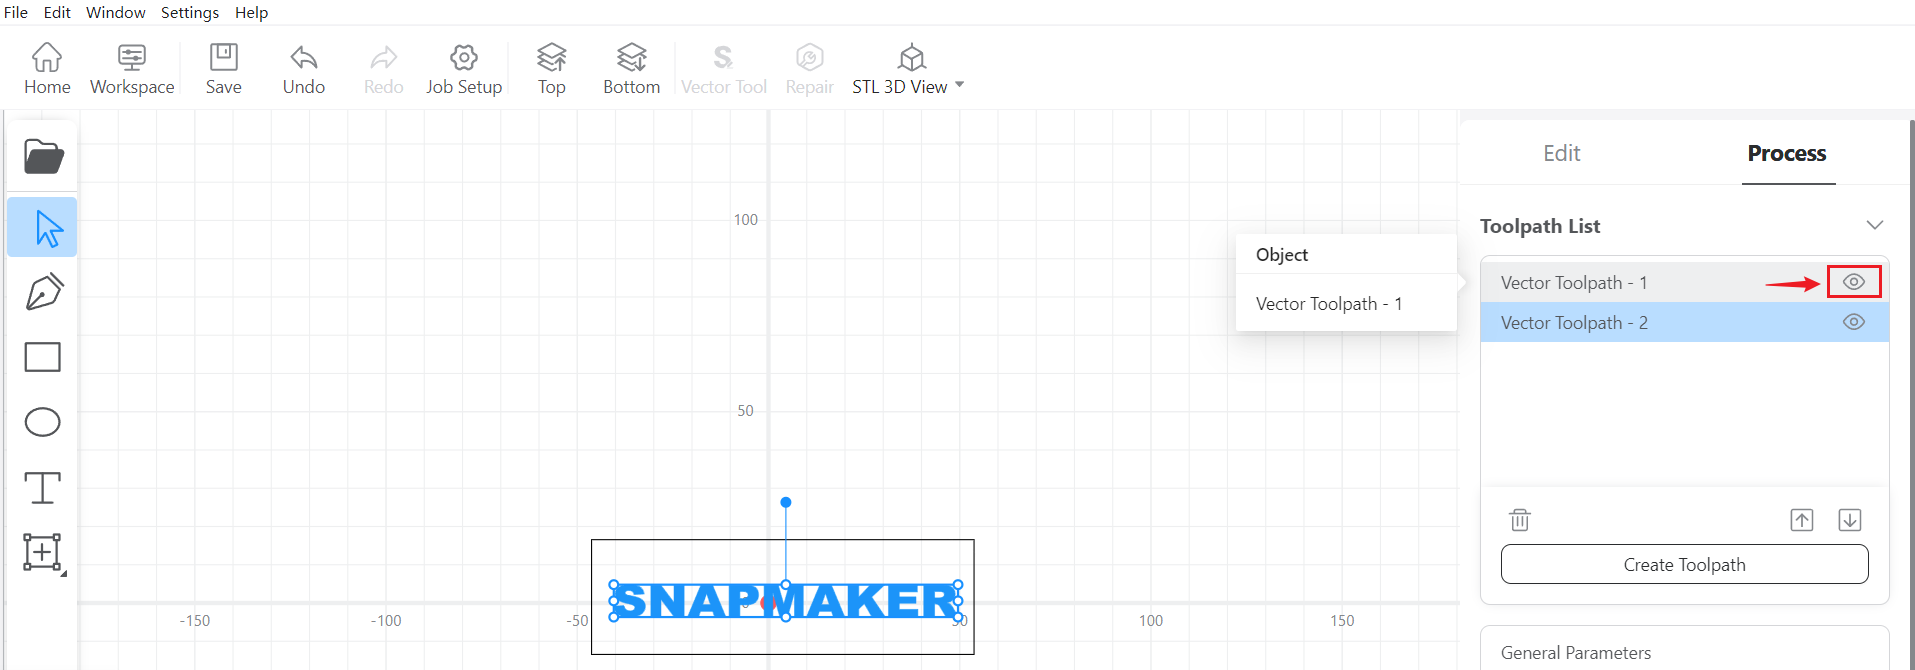
- Click the view button to hide the toolpath for the 2D pocket.
-
Click Generate G-code and Preview.
-
Tick Simulation to see if Luban only generates the toolpath for the text. If so, click Export > Export G-code to File.
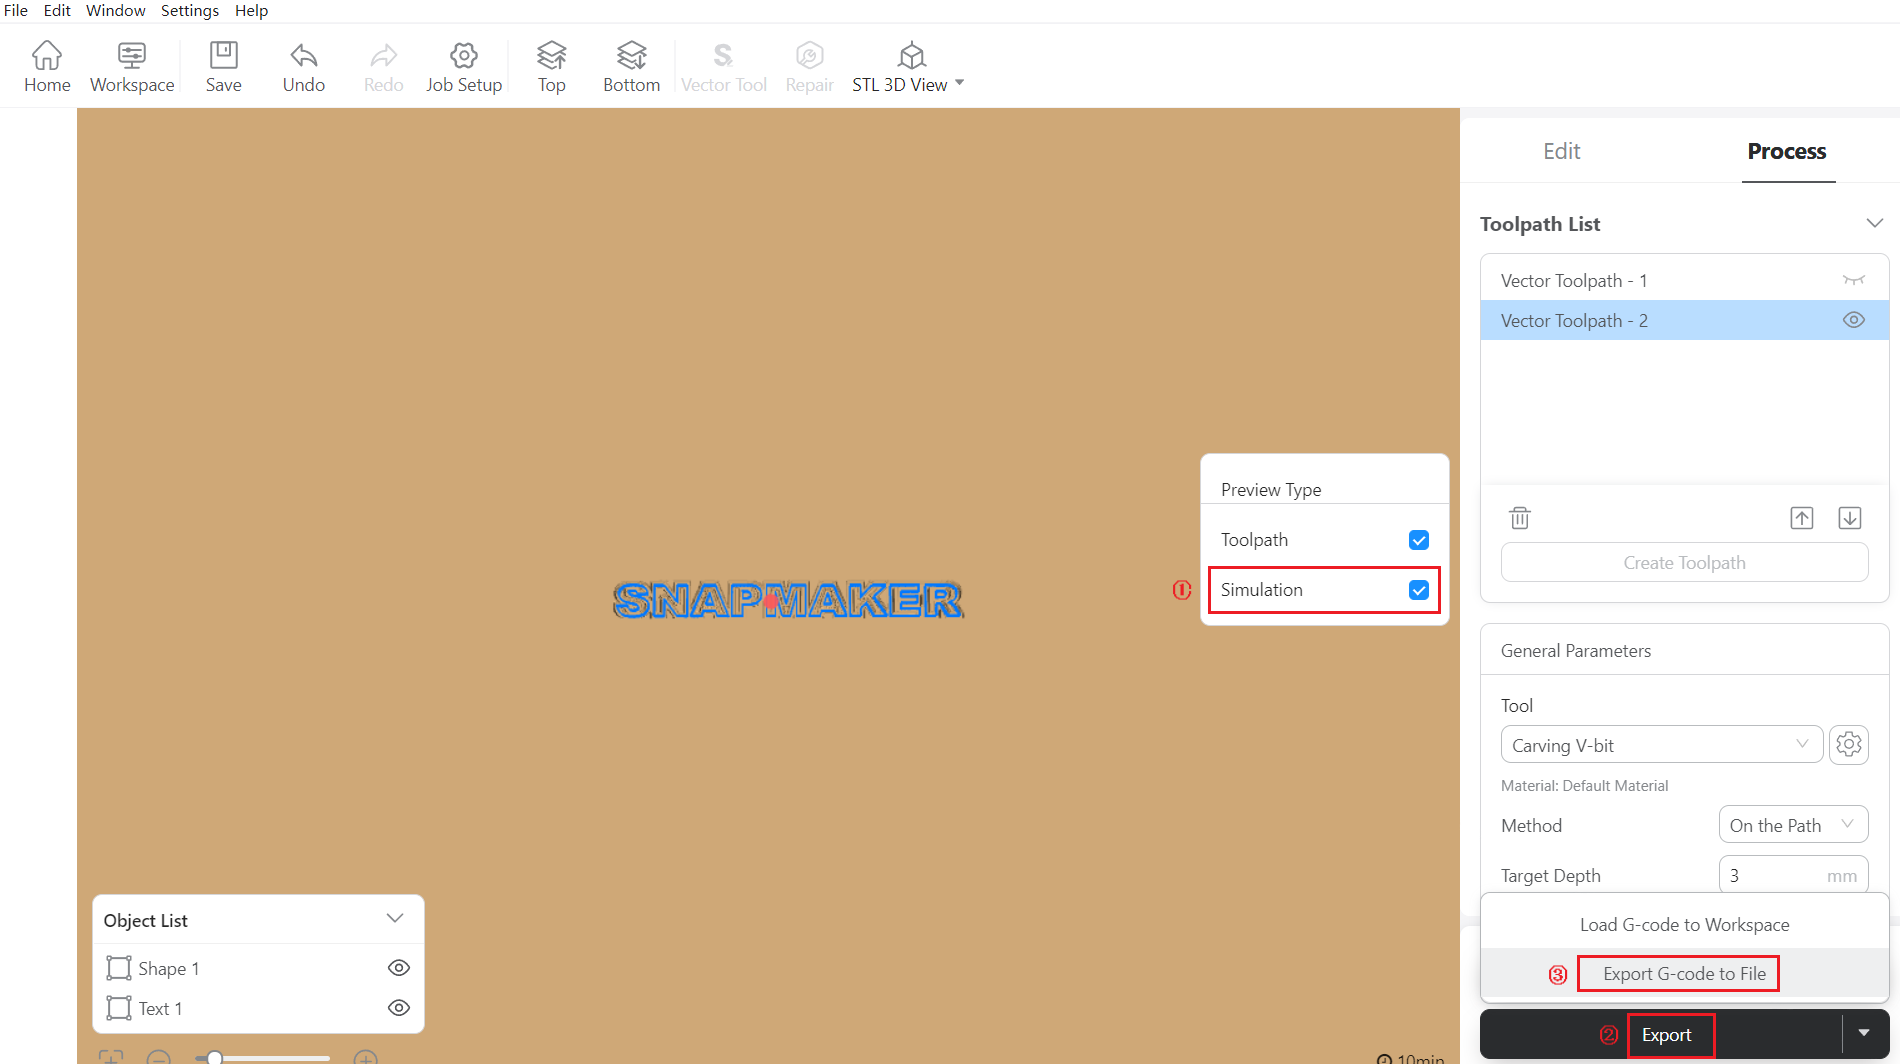
Make sure that the toolpath of 2D pocket is not generated in this step, otherwise the machine will perform both processes later on.
¶ 2D contour process
¶ Create the toolpath
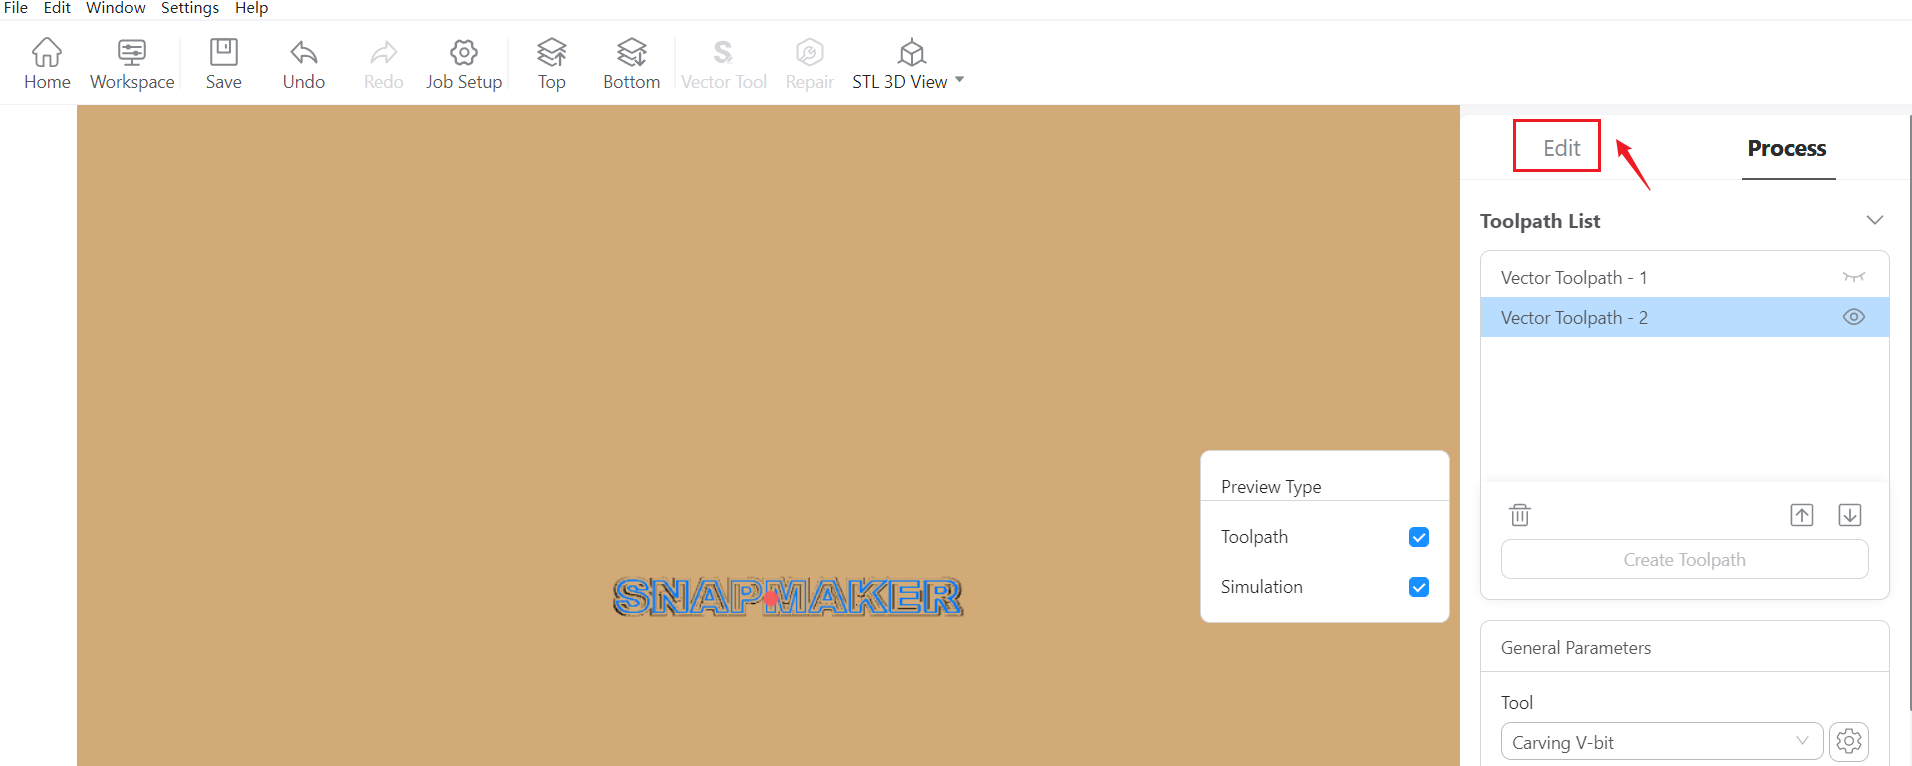
- Click Edit to go back to Edit Panel.
- Click the rectangle tool, drag to draw a rectangle.
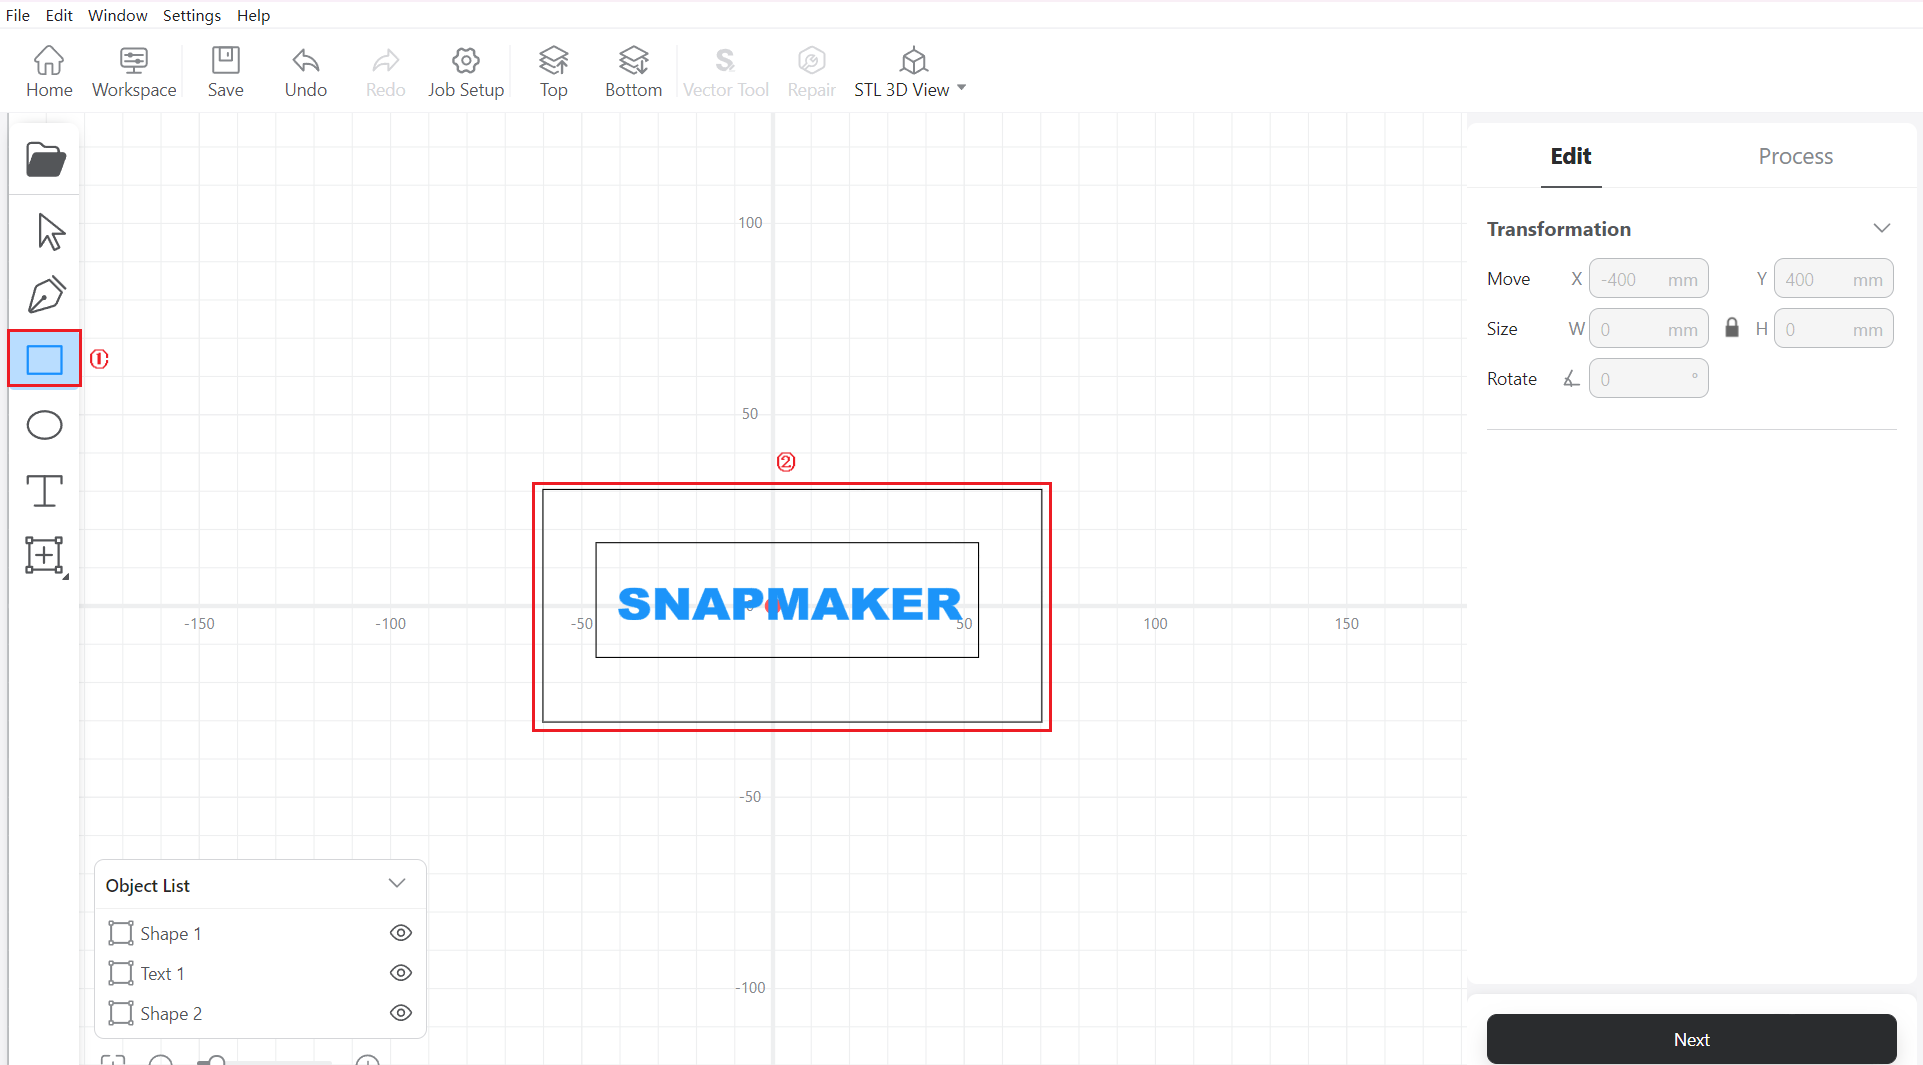
- Set the Width and Height of the rectangle to 120mm and 50mm, respectively.
You can click the lock button to lock and unlock the width-height ratio.
-
Click either Next to switch to Process Panel.
-
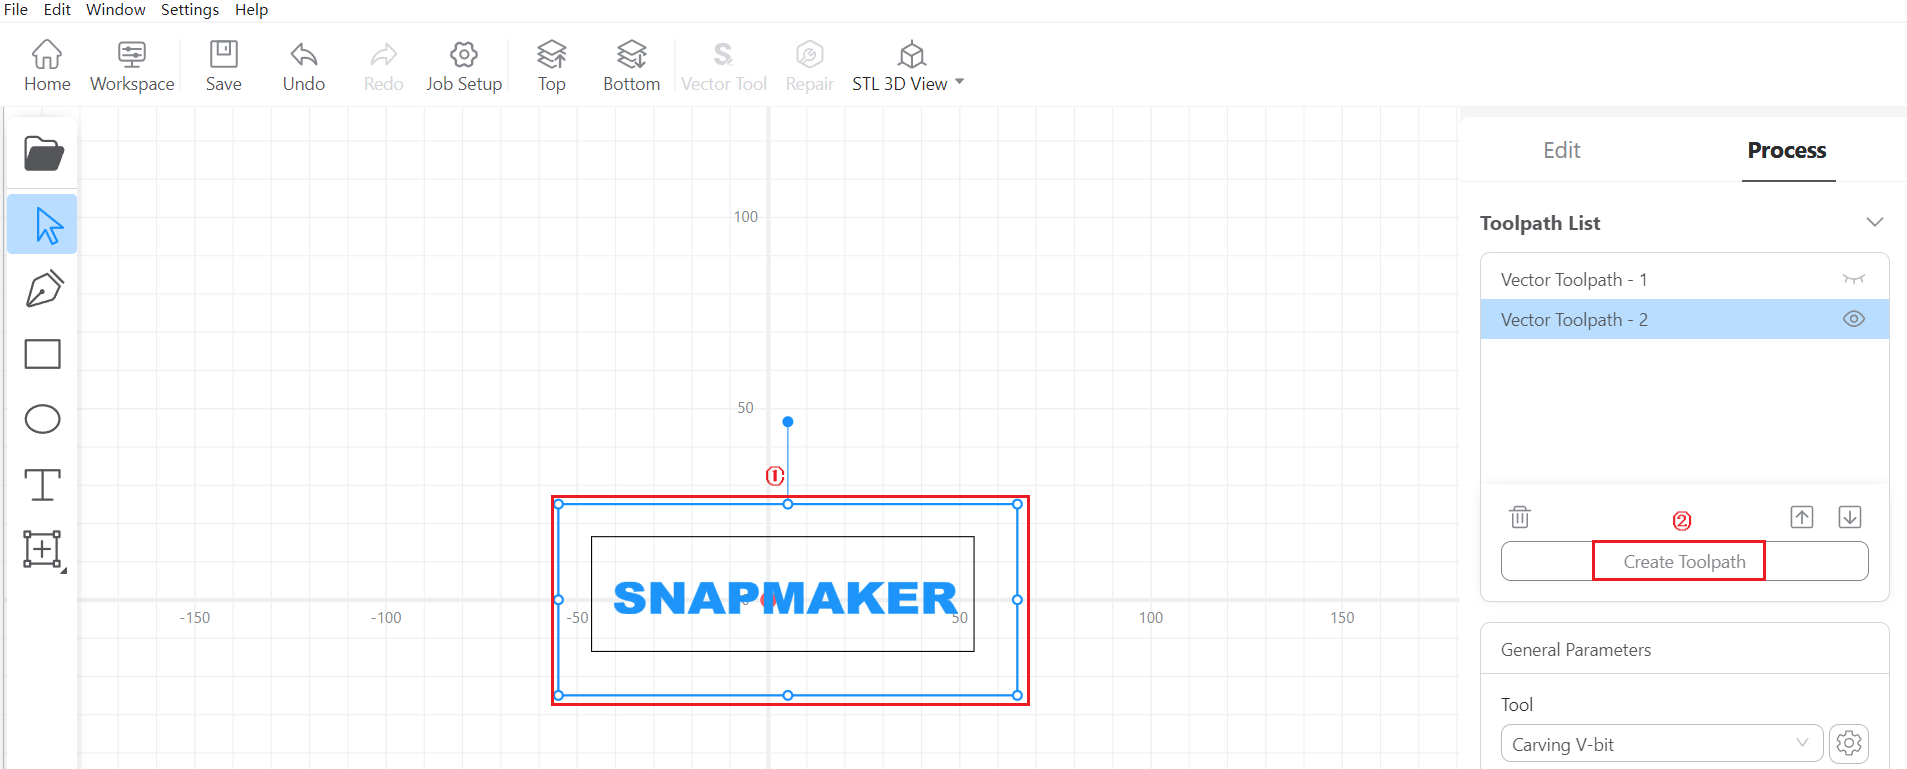
Select the rectangle and click Create Toolpath.
- Set Outline as Method, set Target Depth to 10mm, and select Flat End Mill 3.175 as the Tool and set Step down to 1mm.
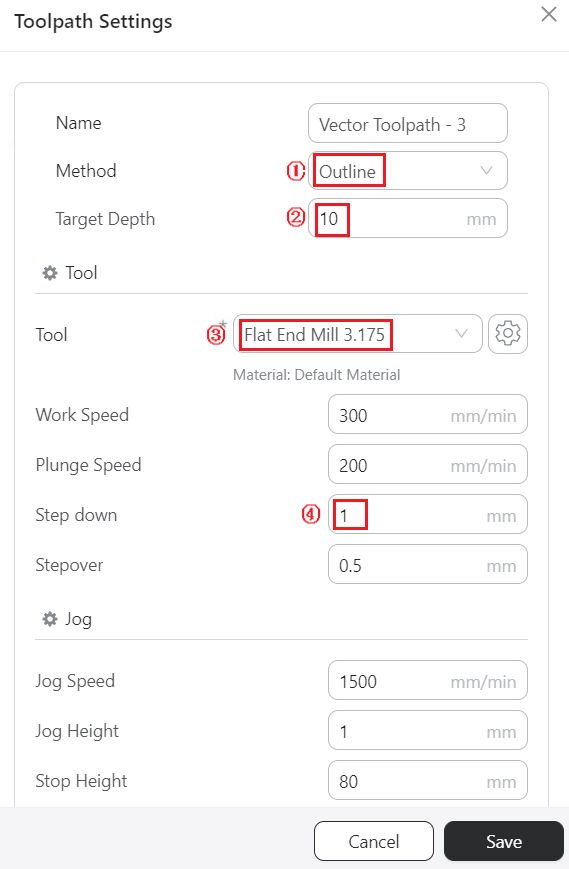
For parameters like work speed, you can also refer to our officially recommended parameters for 200W CNC Module.
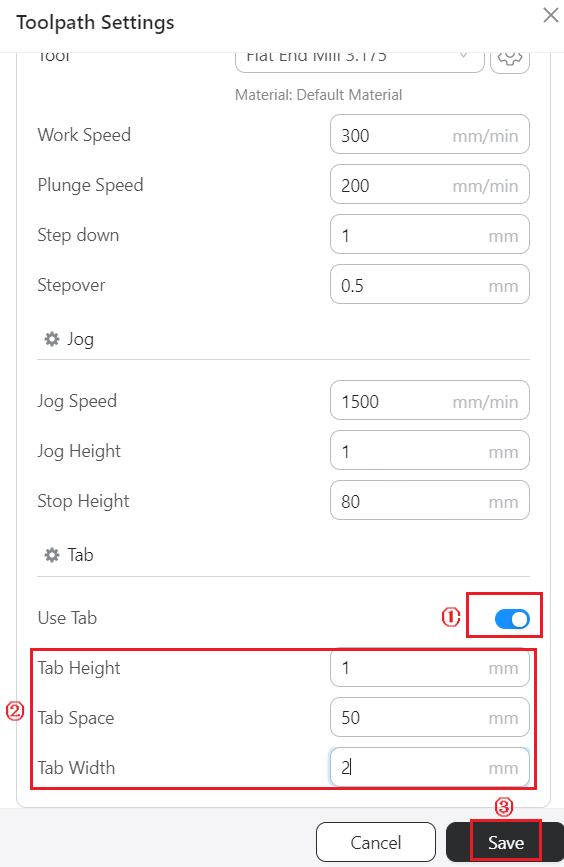
- Slide down and tick Use Tab, then set several tabs according to your preference. Click Save when finished.
¶ Generate and export G-code
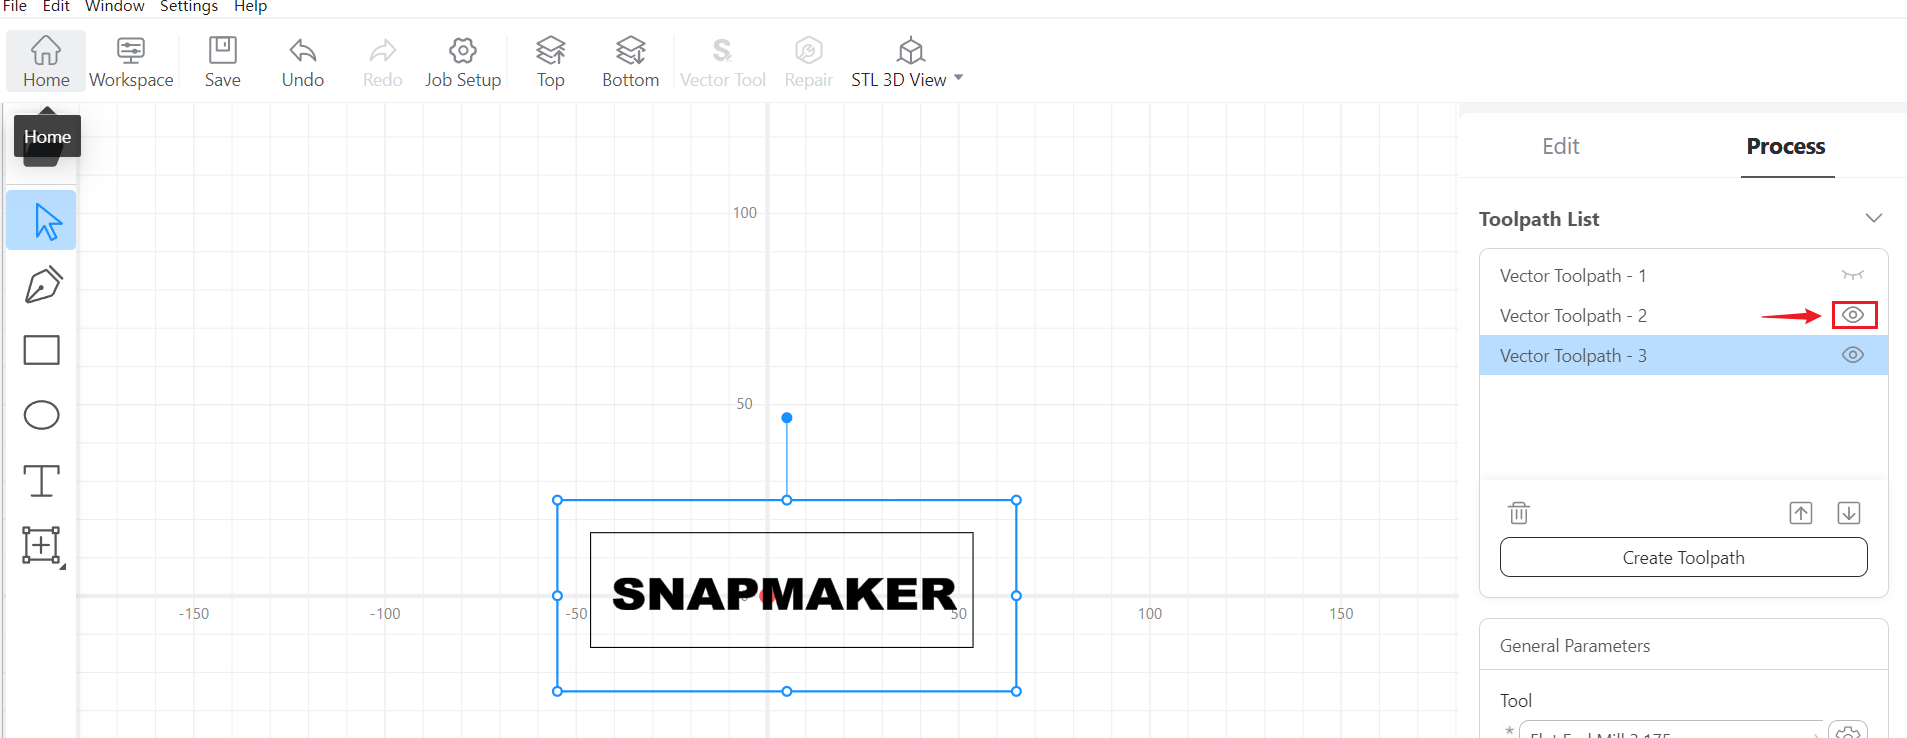
- Click the view button to hide the toolpath for the text.
-
Click Generate G-code and Preview.
-
Tick Simulation to see if Luban only generates the toolpath for 2D contour. If so, click Export > Export G-code to File.
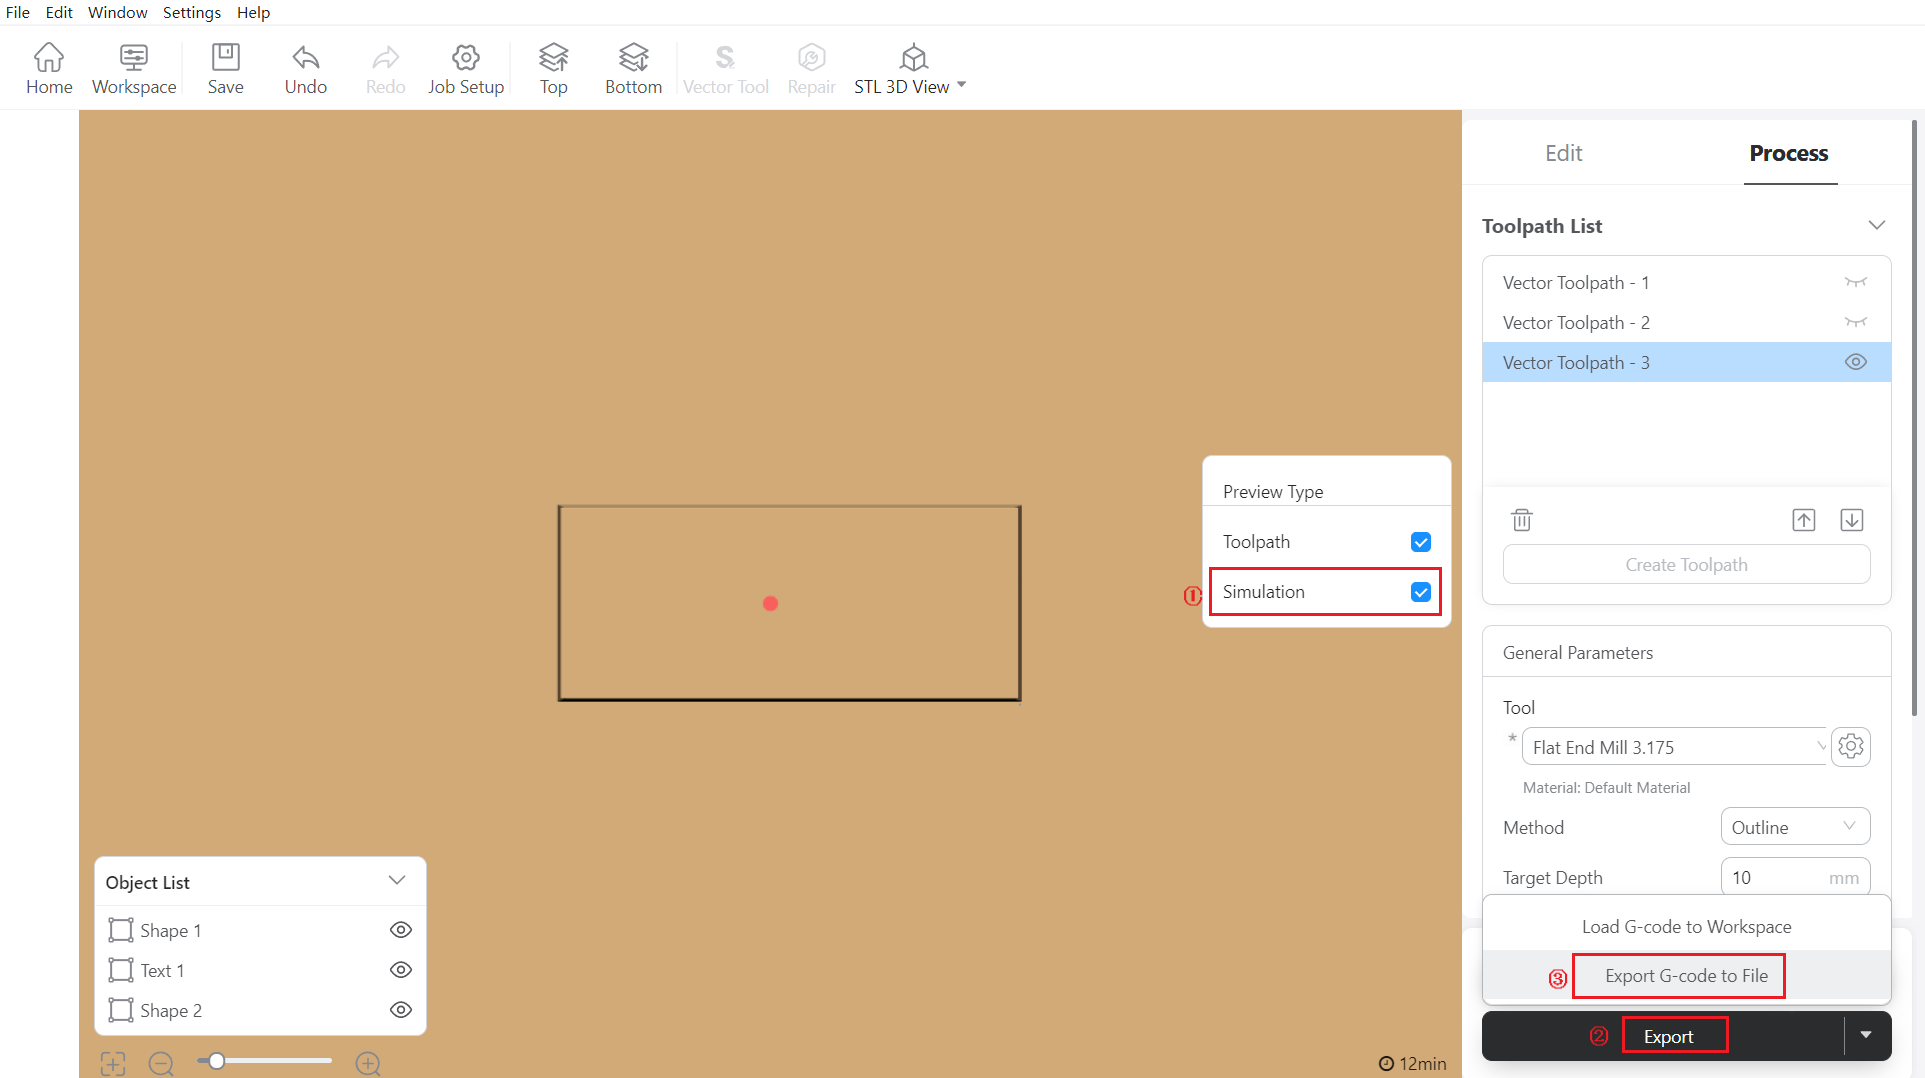
Make sure that the toolpath of 2D pocket and the toolpath of the text carving are not generated in this step, otherwise the machine will perform all the three processes later on.
¶ 2.3 Transfer G-code files to the machine
- Copy the exported .cnc G-code file to USB flash drive.
- Insert USB flash drive into the Integrated Controller.
- On Touchscreen, tap Start > Files > Local, you will find your .cnc G-code file.
- Copy the exported .cnc G-code file to USB flash drive.
- Insert USB flash drive into the Controller.
- On Touchscreen, tap Files > USB, you will find your .cnc G-code file.
¶ 2.4 Operate on the machine and Touchscreen
¶ 2D pocket process
¶ Install the CNC bit
Please read the instructions below to install 3.175mm flat end mill onto your 200W CNC Module.
¶ Set the work origin
Make sure that you have clamped the material correctly before setting the work origin. Again, make sure that the height of the material is no smaller than the model radius (which is 10mm in this case), otherwise your CNC Carving and Cutting platform will get cut and damaged.
Open the G-code file for the roughing process, tap Next. Then read the instructions below to set the work origin on Touchscreen.
Make sure that you have clamped the material correctly before setting the work origin. Again, make sure that the height of the material is no smaller than the model radius (which is 10mm in this case), otherwise your CNC Carving and Cutting platform will get cut and damaged.
On Touchscreen, open the G-code file, and refer to section 5.6 Set the Work Origin and Start Carving to set the work origin.
¶ Start 2D pocket process
Tap Start Job on Touchscreen to start the 2D pocket process.
Ensure that you place the Integrated Controller within easy reach. In case of an emergency, press the emergency stop button on top of the Integrated Controller to stop the job immediately. After you have handled the emergency, rotate the emergency stop button clockwise to release it.
It is not recommended to turn on the exhaust fan of the Enclosure during a CNC process, or the dust and wood chips generated will attach to the inner surfaces of the Enclosure and the exhaust fan.
¶ Text carving process
¶ Change the CNC bit
Please read the instructions below to change the CNC bit into Carving V-bit, which will be used for carving the text.
¶ Adjust the Z-axis height
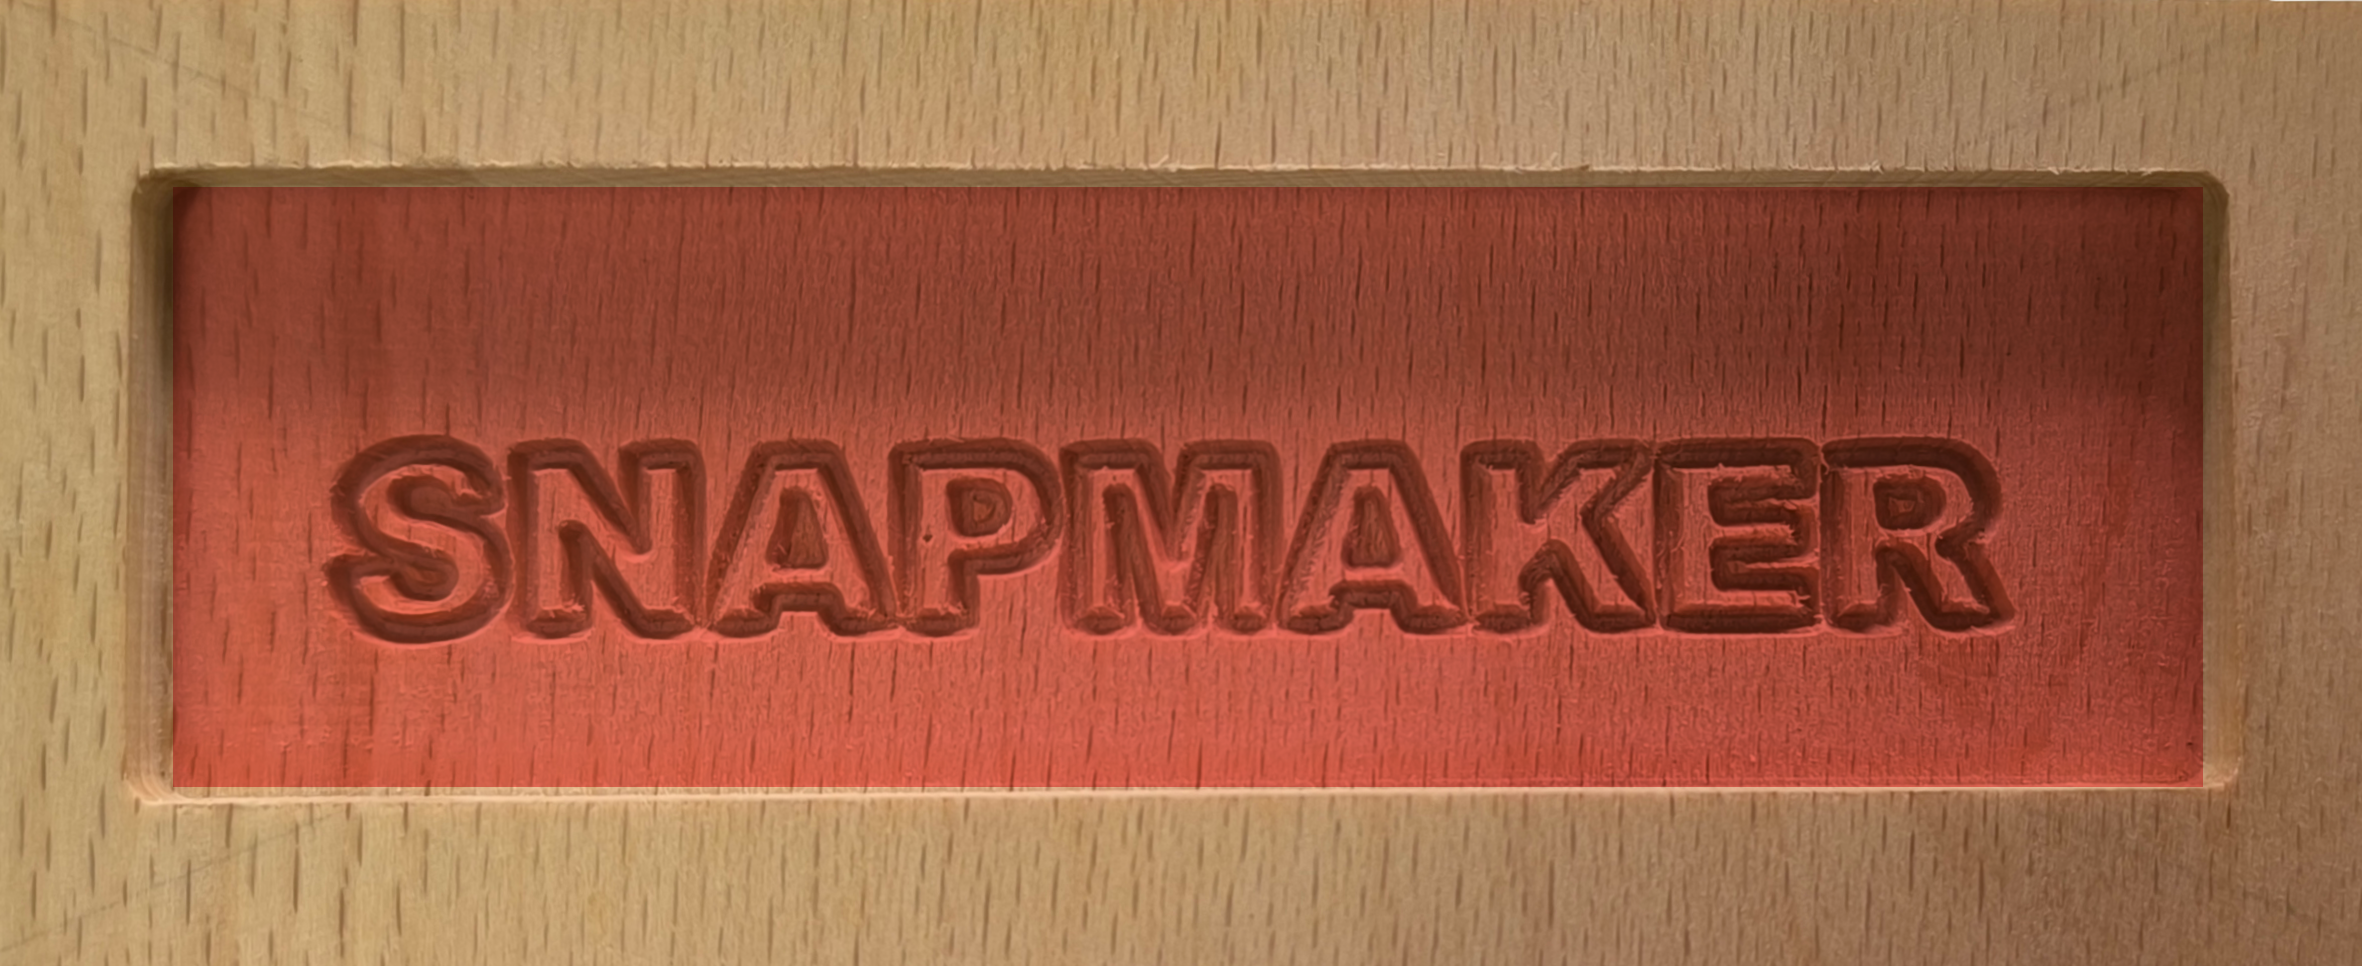
Since the text will be carved on the 2D pocket surface, we need to adjust the Z-axis origin to this height after changing the bit.
Please reset the height of Z-axis to the surface of the highlighted area.
¶ Start Text carving process
Tap Start Job on Touchscreen to start the text carving process.
Ensure that you place the Integrated Controller within easy reach. In case of an emergency, press the emergency stop button on top of the Integrated Controller to stop the job immediately. After you have handled the emergency, rotate the emergency stop button clockwise to release it.
It is not recommended to turn on the exhaust fan of the Enclosure during a CNC process, or the dust and wood chips generated will attach to the inner surfaces of the Enclosure and the exhaust fan.
¶ 2D contour process
¶ Change the CNC bit
Please read the instructions below to change the CNC bit into 3.175mm flat end mill, which will be used for 2D contour process.
¶ Adjust the Z-axis height
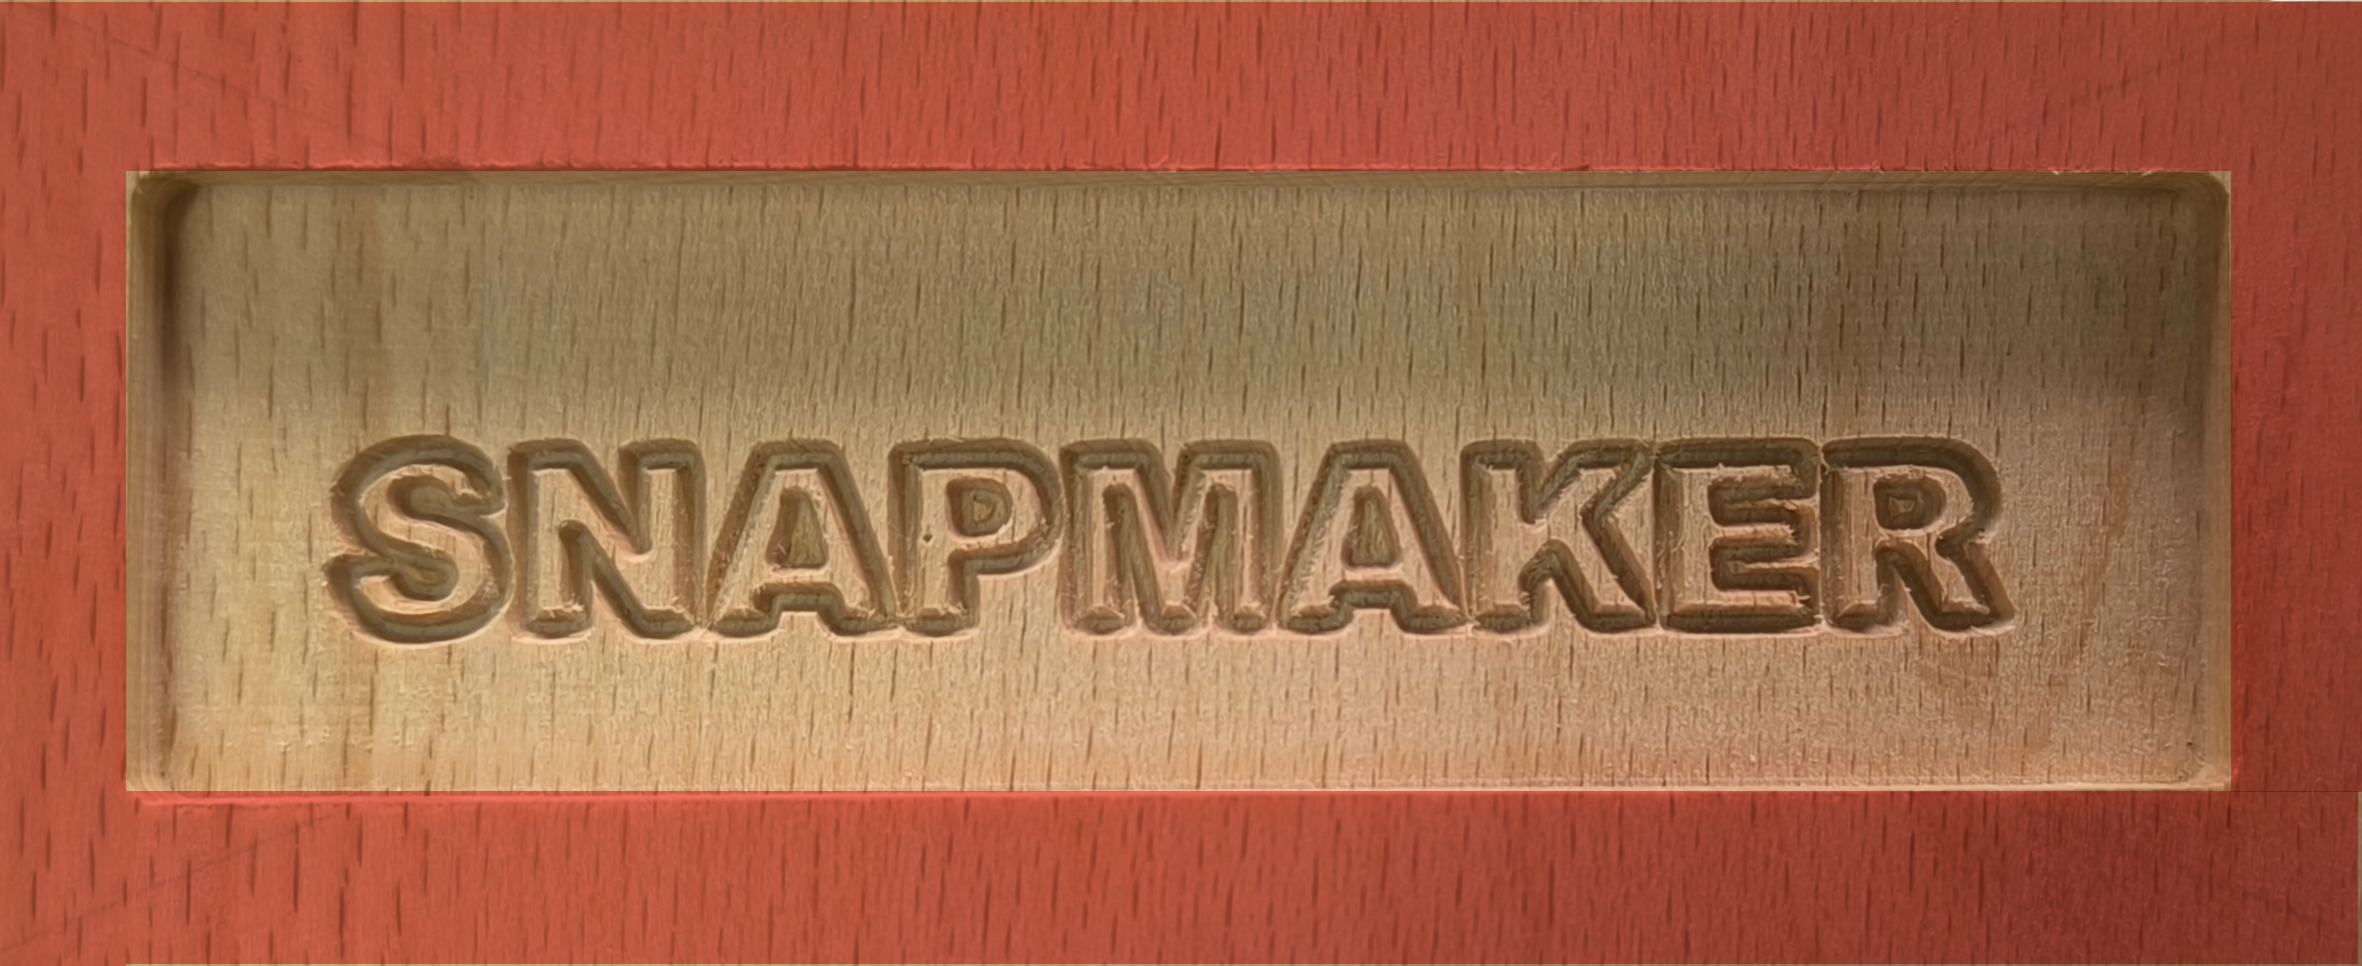
In this step, we will perform a 2D contour whose size is sightly bigger than 2D pocket to create embedded effects. In such case, the Z-axis origin should be set back to the top surface of the material.
Please reset the height of Z-axis to the surface of the highlighted area.
¶ Start 2D contour process
Tap Start Job on Touchscreen to start the 2D contour process.
Ensure that you place the Integrated Controller within easy reach. In case of an emergency, press the emergency stop button on top of the Integrated Controller to stop the job immediately. After you have handled the emergency, rotate the emergency stop button clockwise to release it.
It is not recommended to turn on the exhaust fan of the Enclosure during a CNC process, or the dust and wood chips generated will attach to the inner surfaces of the Enclosure and the exhaust fan.
¶ 2.5 Clean the finished work and the machine
Gently remove the tabs around it, you will get a plate with the text "SNAPMAKER" carved on it.