¶ 💡 Compatibility
This guide applies to the following machine. Please note when referencing:
- Machine model: U1
¶ ⏰ When to Use This Guide
When printing with the U1, if the model surface shows any of the following issues, refer to this guide for troubleshooting:
- Popping / Pockmarks: The edges of the holes often appear curled outward or burst open. During printing, you may hear crackling or popping sounds from the nozzle—similar to tiny bubbles rupturing as the filament is extruded.
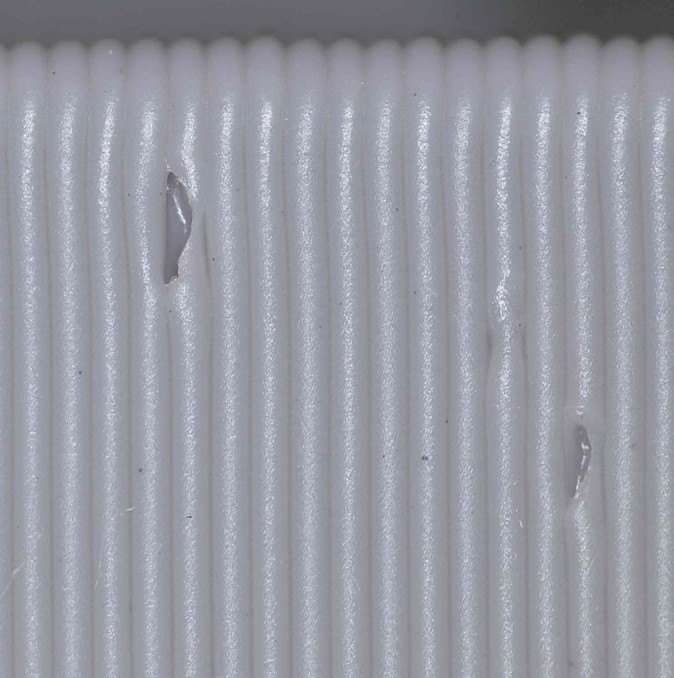
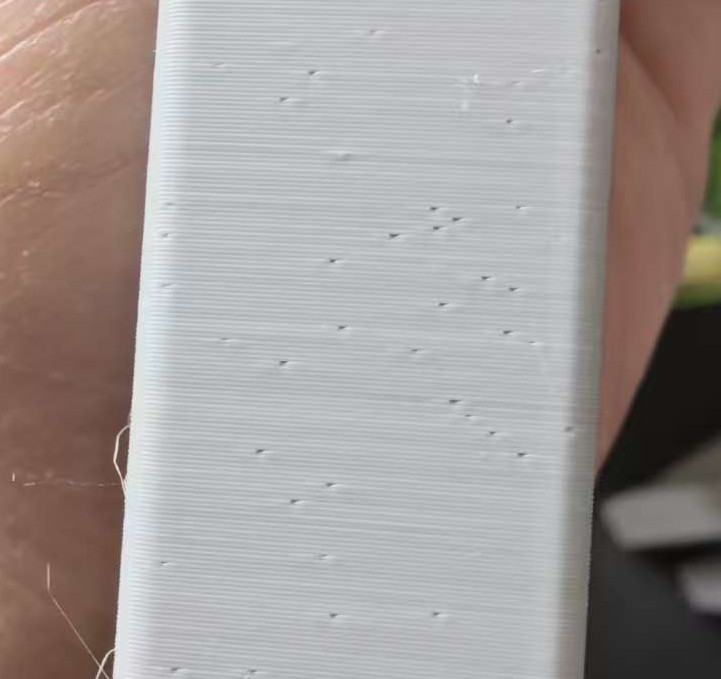
- Random Pitting: Small depressions scattered across the outer walls with no clear pattern. These pits are typically very fine, measuring about 0.1–0.3 mm in diameter.
¶ 📋 Quick Info Card
- Difficulty: ⭐⭐☆☆☆ (Easy)
- Estimated Time: 20 minutes
¶ 🔁 Troubleshooting Flowchart
¶ 🔍 Quick Diagnosis
Which situation are you experiencing?
- Wet filament → Go to Scenario 1
- Improper retraction settings → Go to Scenario 2
¶ 🛠️ Troubleshooting Steps
¶ Scenario 1: Wet Filament
Surface pits and popping-related pockmarks on 3D prints are typically caused by moisture in the filament vaporizing inside the nozzle. Once moisture-laden filament enters the hotend, it is rapidly heated from room temperature to 200 °C or higher within seconds. The liquid water trapped in the plastic matrix instantly turns into vapor, expanding to roughly 1,600 times its original volume. However, inside the high-pressure melting chamber of the nozzle, the vapor cannot expand freely and instead forms high-pressure microbubbles that mix into the molten plastic. At the moment of extrusion, the bubbles enter a normal-pressure environment, rapidly expand, and burst. This micro-level "explosion" directly disrupts or displaces the surrounding molten plastic, leaving voids along the printing path. If the bubble burst occurs on the outer wall of the model, it creates visible pits; if the bubble is larger, it may also be accompanied by distinct popping or crackling sounds.
¶ 1. Check whether the filament has absorbed moisture
Not all materials behave the same way after moisture exposure. We’ve compiled a moisture-sensitivity overview for different materials to help you quickly identify the issue based on each material’s characteristics.
| Material Type | Moisture Absorption Rate | Time to Saturation | Typical Symptoms After Moisture Exposure | Surface Pitting Characteristics |
|---|---|---|---|---|
| PLA / PLA+ | Low to moderate | 1–2 weeks | Increased brittleness, more stringing, reduced layer adhesion. | Fine sandy or fuzzy surface texture; occasional faint crackling sounds. |
| PETG | Moderate | 3–5 days | Severe stringing or even clumping; transparent filament becomes cloudy. | Frequent popping sounds; noticeable pits and unmelted spots on the surface; internal infill filled with bubbles. |
| TPU / TPE | High | 12–24 hours | Surface whitening, significant steam generation, uneven extrusion. | Rough, foam-like surface with dense micro-pores resembling pinholes. |
| ABS / ASA | Moderate | 1 week | Excessive oozing, layer cracking, matte surface finish. | Intermittent pores accompanied by an increase in burnt-plastic odor. |
| Nylon (PA) | Extremely high | < 6 hours | Violent steam release; print failure is highly likely. | Large holes; sponge-like structure that completely loses strength. |
| PVA / BVOH | Extremely high | < 1 hour | Softens and cannot be fed; may even dissolve inside the PTFE tube. | Foam-like structure that prevents the model from forming at all. |
¶ 2. Dry the filament using SnapDryer
If you determine that the filament has absorbed moisture, refer to U1 Video Guide: How to Use the SnapDryer with the Snapmaker U1. The table below summarizes recommended drying methods for common filament types:
| Material Type | Recommended Drying Temperature (°C) | Recommended Drying Time | Notes |
|---|---|---|---|
| PLA / PLA+ | 45–50°C | 4–6 hours | Do not exceed 55°C, or the PLA may soften and deform, leading to feeding issues. |
| PETG | 60–65°C | 4–6 hours | PETG is relatively heat-resistant; low-temperature drying is ineffective and must reach at least 60°C. |
| TPU (95A) | 50–55°C | 6–8 hours | Moisture diffuses slowly inside TPU, requiring extended low-temperature drying. Excessive heat may cause the filament to stick. |
| ABS / ASA | 80–85°C | 4–6 hours | Requires a dryer capable of maintaining higher temperatures. |
| Nylon (PA) | 70–80°C | 12+ hours | Nylon is difficult to dry. A professional hot-air dryer is recommended, and the filament should remain in a dry box during printing. |
| PC | 120°C | 6–8 hours | Most household filament dryers cannot reach this temperature; industrial-grade equipment is required. |
¶ Scenario 2: Improper Retraction Settings
During retraction, the extruder gears rotate in reverse, pulling the filament upward from the nozzle and creating a momentary negative-pressure (vacuum) zone inside the melt chamber near the nozzle tip. If the retraction distance is too long or the retraction speed is too high, the molten plastic is pulled back aggressively. This can allow outside air to be “drawn” into the chamber through the nozzle opening, filling the vacuum created by the retraction. When the toolhead moves to the next location and extrusion resumes, the trapped air is expelled before the molten plastic, forming tiny bubbles that adhere to the model’s outer wall. These bubbles eventually burst, leaving behind small pits.
¶ 1. Shorten the retraction distance
Retraction distance is one of the key parameters affecting surface pitting. Excessive retraction can create excessive negative pressure inside the melt chamber, making it easier for air to enter through the nozzle. It may also pull molten plastic back into the cooler zone, leading to clogs and unstable extrusion.
- Direct Drive: Recommended range is 0.5–1.5 mm. Do not exceed 2 mm, as this may draw molten plastic into the cold end, causing blockages and severe bubbling.
- Tuning strategy: Reduce the retraction distance in 0.5 mm increments until slight stringing appears, then increase it slightly.
Minor stringing can be removed with a heat gun, whereas surface pits caused by excessive retraction cannot be repaired. Prioritize surface quality whenever possible.
¶ 2. Reduce the retraction speed
Excessively high retraction speeds (typically > 60 mm/s) can cause the melt to separate inside the nozzle or create a cavitation effect, introducing vacuum bubbles. When extrusion resumes, these bubbles rupture instantly, appearing as pockmarks or pits on the surface.
- We recommend lowering the retraction speed to 25–45 mm/s. A slower speed helps maintain melt integrity, reduces the risk of air entrapment, and improves extrusion stability.
¶ ✅ Verification
After using properly dried filament and adjusting the retraction settings, print a test model. If the intermittent popping or crackling sounds no longer occur during printing, and the finished surface shows no obvious or continuous pits, pockmarks, or similar defects, the issue has been successfully resolved.
¶ 📚 Related Resources
¶ 💬 Reach out to Snapmaker Support
After following the troubleshooting steps, if you find it difficult to resolve your issue, kindly submit a support ticket through https://snapmaker.formcrafts.com/u1-troubleshooting-request and share your troubleshooting results with pictures or videos. Our dedicated support team will be more than willing to assist you in resolving the issue.