To ensure that your Snapmaker J1 is in top condition, follow the guidelines in this chapter to maintain the printer regularly to achieve desired printing results.
¶ Update the Firmware
Why
To ensure that your Snapmaker J1 is in top working condition, keep the firmware up to date.
When
At least once every three months.
How
You can update via Wi-Fi or USB flash drive.
Wi-Fi
Turn on the printer > Connect the printer to Wi-Fi > Tap Settings > Firmware Update > Download > Update > Complete.
USB Flash Drive
Download the firmware from the Snapmaker website > Insert the USB flash drive into the printer > Turn on the printer > Tap the blank area on the home screen of the touchscreen > Tap USB > Tap the firmware file to update.
¶ Clean the Nozzle
Why
During the calibration process, some extruded filaments may adhere to the nozzle surface and make the nozzle surface black. If it is not cleaned in time, it may affect the calibration results.
During the 3D printing process, some of the extruded filament may stick to the nozzle surface. After the nozzle cools, these filament residues will solidify on its surface. If not cleaned in time, they may cause nozzle jams or leave dark marks on your next print.
When
At each calibration and before each print.
During calibration, the nozzle shall rebound quickly after touching the calibration point on the heated bed surface. If the nozzle does not rebound quickly, clean the nozzle and recalibrate.
How
-
Prepare the cleaning tool: wire brush (provided, in tool box).
-
Turn on the printer, then on the touchscreen, tap Control > Extruder and heat the extruder to be cleaned to 200°C.
-
After the nozzle is heated, scrape off the filament residue from the nozzle surface with the wire brush. Try to avoid scraping the end of the nozzle with the wire brush to avoid wearing the nozzle.
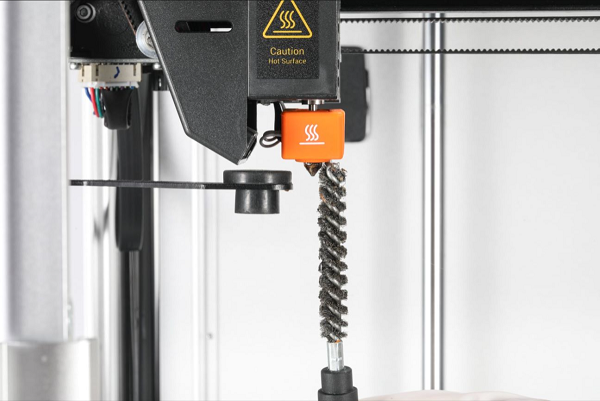
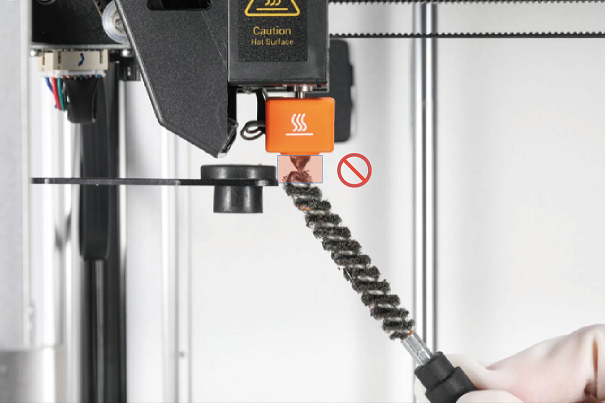
Be careful of the hot nozzle surface! It is recommended to wear insulated gloves when operating.
¶ Clean the Glass Plate
¶ Remove the Filament Residues
Why
If you use 3D printing filaments with strong stickiness, or the nozzle is too close to the glass plate when printing, some filaments may still adhere to the surface of the glass plate after removing the print. If it is not cleaned up in time, it may affect the effect of the next printing. As the residue continues to pile up, the glass plate will also become more difficult to clean.
When
At least once a month, or when you notice filament residues on the surface of the glass plate.
How
-
Prepare the cleaning tool: the palette knife (provided, in tool box).
-
Use the palette knife to gently scrape off the filament residues on the glass plate. The angle between the palette knife and the glass plate should be less than 30°to avoid damaging the PEI coating on the surface of the glass plate.
-
Scrape until there is no filament residue on the glass plate surface.
If it is difficult to remove the residue, you can tap Control > Heated Bed on the touchscreen, heat the heated bed to 50℃ and then try to scrape it. It is recommended to wear insulated gloves when operating.
¶ Remove the Glue
Why
Before printing, applying a proper amount of glue on the glass plate can improve the adhesion effect of the first layer. However, after printing, if the residual glue on the surface of the plate is not cleaned in time, the effect of the next printing may be affected.
When
At least once a month, or after each time you apply glue to the glass plate.
How
-
Prepare cleaning tools: the wiping cloth (provided, in tool box) and clean water.
-
Turn off the printer and unplug the power cable from the electrical outlet.
-
Dip an appropriate amount of water with the wiping cloth to wipe off the residual glue on the glass plate until there is no visible residue on the surface of the plate.
If it is difficult to remove the glue, you can tap Control > Heated Bed on the touchscreen, heat the heated bed to 50℃ and then try to scrape it off. It is recommended to wear insulated gloves when operating.
¶ Remove the Grease and Dust
Why
Our hands or other body parts might leave a small amount of natural oil and dust on the plate surface when touching the glass build plate. Besides, the dust in the air will also adhere to the plate. If not removed in time, the first layer adhesion of the print might be weakened.
When
At least once a month, or when you find that the adhesion of the first layer is not good.
How
-
Prepare the cleaning tool: the wiping cloth (provided, in tool box).
-
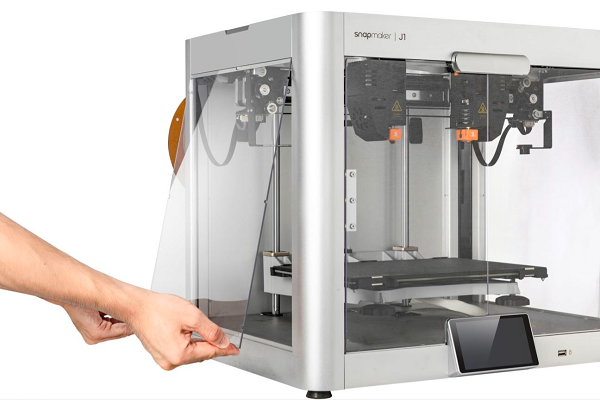
Remove the glass plate out of the printer.
Before removing the glass plate, make sure that the glass plate has been cooled to room temperature.
- Wash the glass plate with clean water and clean the surface of the glass plate with wiping cloth until the surface of the plate is free of visible grease, dust or other impurities. When finished, rinse the glass plate again with clean water.
If it is difficult to remove it with clean water, you can use alcohol instead. After cleaning, wash the glass plate again with clean water.
-
Install the glass plate to the printer.
-
On the touchscreen, tap Control > Heated Bed, slide to set the heating temperature to 60℃, and tap Heat to dry the glass plate.
¶ Clean the Heated Bed
Why
Foreign objects such as filament debris on the heated bed may cause the calibration to fail.
When
At least once a month.
How
-
Prepare the cleaning tool: the wiping cloth (provided, in tool box).
-
Turn off the printer and unplug the power cable from the electrical outlet.
-
Remove the glass plate and place it in a safe place.
-
Gently wipe the heated bed with the wiping cloth until there is no visible foreign objects on the heated bed.
-
Install the glass plate to the printer.
¶ Clean the Extruder Gears
Why
When extruding the filament, the gears need to rub and engage the filament, which will produce waste in the process. With the accumulation of waste filaments, the friction between filament and gears decreases, and the extrusion efficiency will also decrease, or even cannot be extruded. In addition, accumulated waste filaments may fall into the nozzle and jam it. Therefore, you need to clean the gears inside the extruder regularly.
When
At least once a month.
How
-
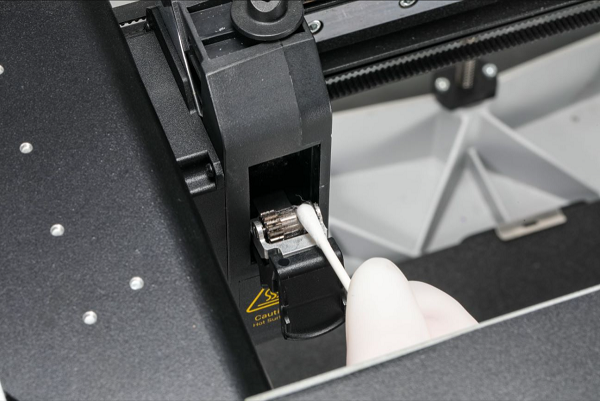
Prepare the cleaning tool: a cotton swab.
-
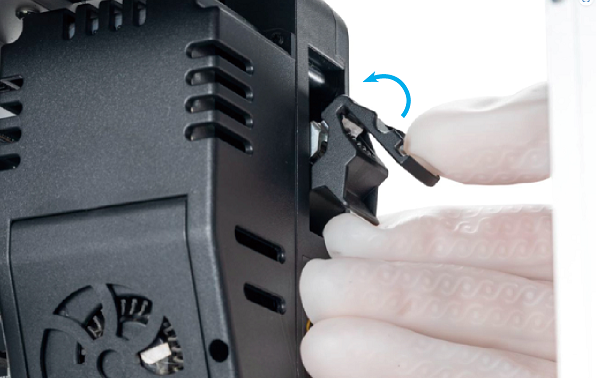
Press down on the idler latch on the front of the printhead to open it.

- Use a cotton swab to remove the waste filaments from the idler gear until there is no visible residue.
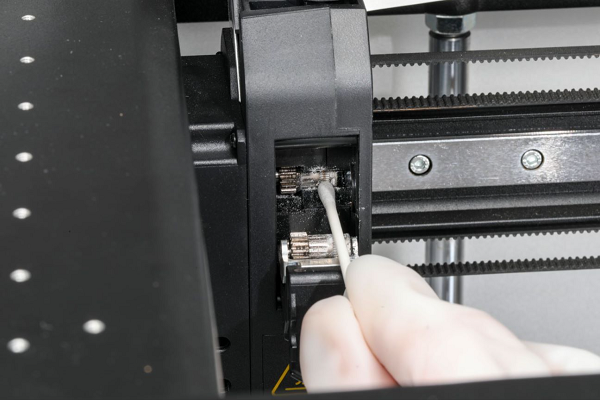
- Remove the waste filaments from the drive gear with a cotton swab until there is no visible residue, and then close the idler latch.
¶ Clean the Base Panel
Why
During daily use of the printer, some filament debris or small parts will collect on the base panel. If not cleaned promptly, accumulated debris from the filaments may prevent the printer from operating properly.
When
At least once a month.
How
-
On the touchscreen, tap Control > Jog Mode, then tap the
 button in the Z direction to lift the heated bed.
 -
Clean the base panel with a wiping cloth to remove any visible foreign objects. Pay special attention to the area near the Z-axis lead screw, where the accumulation of foreign objects may prevent the heated bed from moving properly.
Do not place sundries on the base panel, otherwise the heated bed will not home to the correct position.
¶ Adjust the Tension of the Belts
Why
Belts are an important part of the printer transmission system. If the belt is too loose, printhead movement may not be accurate, which can cause print inaccuracies; If it is too tight, it may affect the lifespan of the belt itself.
When
At least once every three months, or when you:
- Find that the printing effect is not good, such as the failure of the first layer to adhere to the glass plate, and the layer shifting when printing with dual filaments, etc.
- Belt makes abnormal noise during printing.
- After transporting the printer over a long distance.
How
¶ X Axis
-
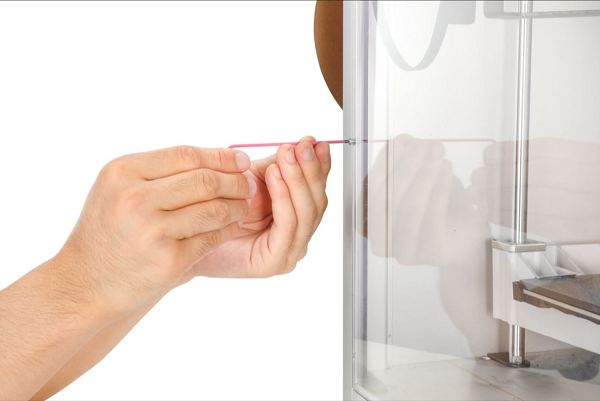
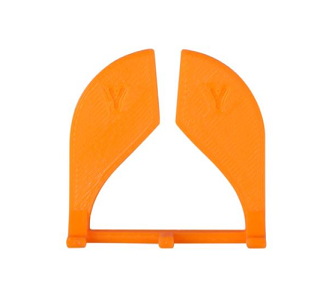
Prepare a 5.5mm wrench and a pink hex key (both provided, in tool box).
-
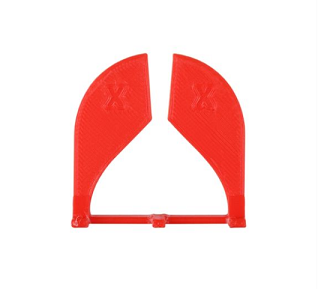
For firmware V2.2.2 and above, obtain the G-code in the Local folder of the screen and print the X-axis belt tension gauge using PLA filaments.
-
On the touchscreen, tap Control > Motor, and tap to turn off the motor.
-
Turn off the printer and unplug the power cable from the electrical outlet.
-
Manually move the left extruder to the leftmost side and the right extruder to the rightmost side.

- Remove the left and right side panels with an hex key (H2.0).

When using an hex key, you can hold the longer end first to loosen the screw, and then switch to the shorter end to unscrew the screw quickly.
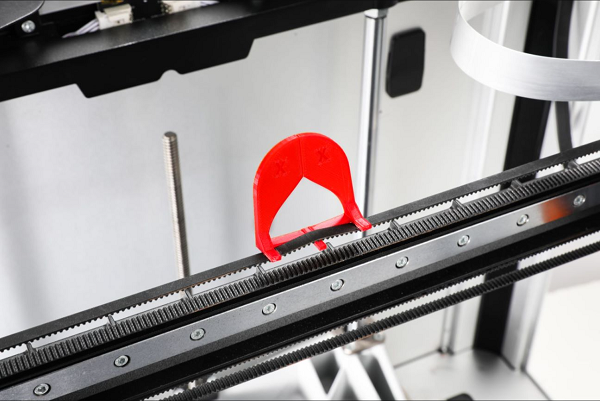
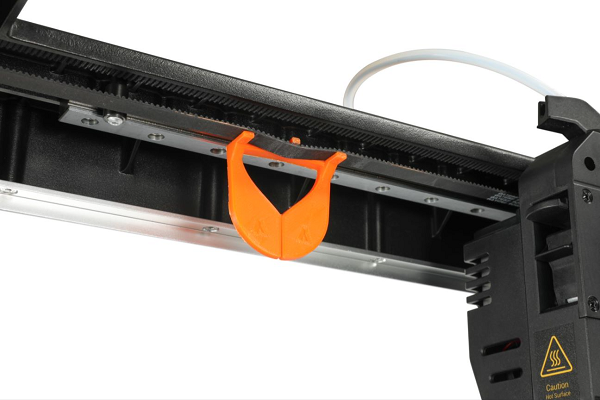
- Clip the X-axis belt tension gauge onto the X-axis belt as illustrated.
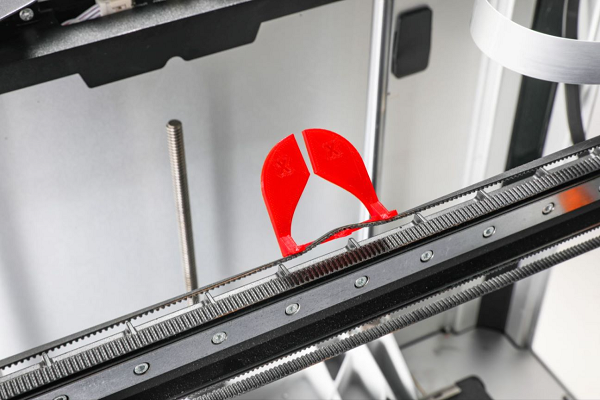
- Use a 5.5mm wrench to adjust the hexagon screws at the left and right ends of the X-axis linear rail respectively until the two sides of the X-axis belt tension gauge are closed and there is no obvious gap.
- Reinstall the left and right side panels with an hex key (H2.0).
¶ Y Axes
- For firmware V2.2.2 and above, obtain the G-code in the Local folder of the screen and print the Y-axis belt tension gauge using PLA filaments.
-
On the touchscreen, tap Control > Motor, and tap to turn off the motor.
-
Turn off the printer and unplug the power cable from the electrical outlet.
-
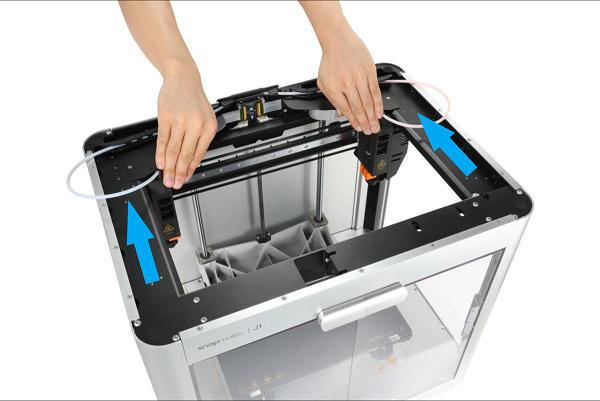
Manually move the left extruder to the leftmost side and the right extruder to the rightmost side, and then move the X-axis linear rail to the innermost side.
- Remove the left and right side panels with an hex key (H2.0).
When using an hex key, you can hold the longer end first to loosen the screw, and then switch to the shorter end to unscrew the screw quickly.
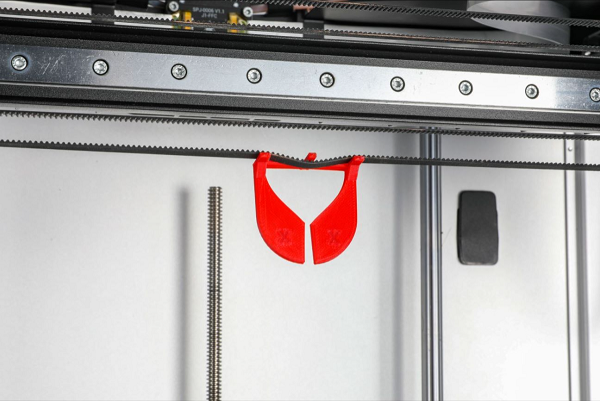
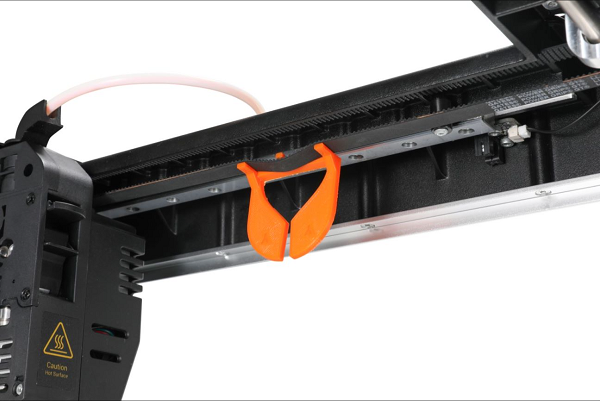
- Clip the Y-axis belt tension gauge onto the Y-axis belt as illustrated.
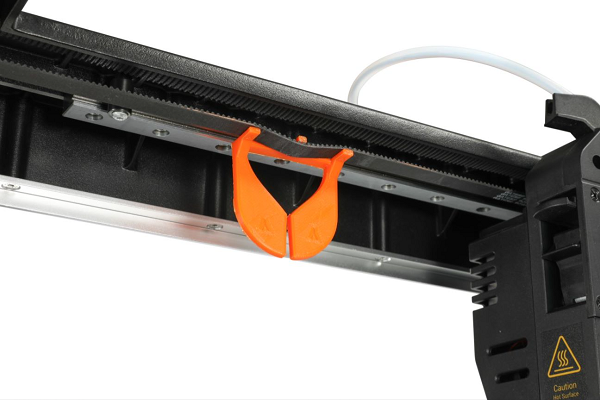
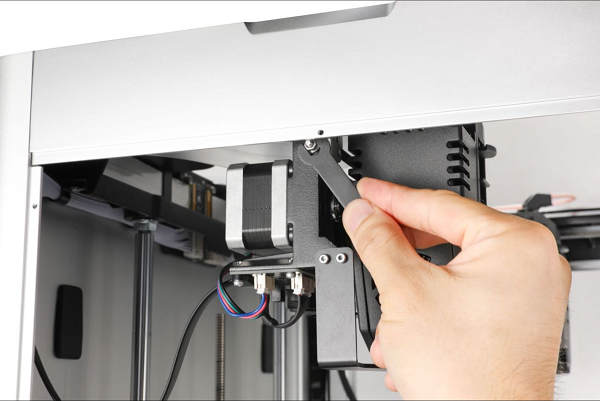
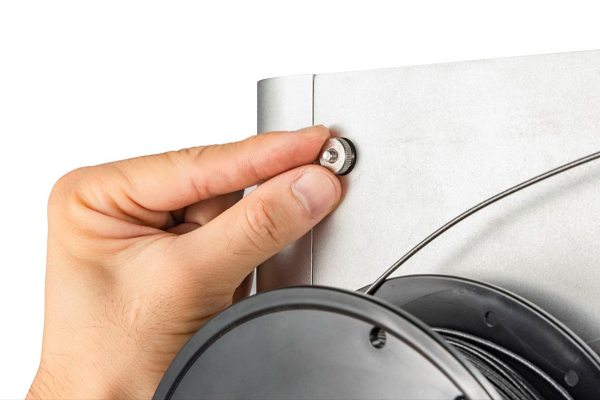
- Manually twist the screw in the upper left corner on the back of the printer until the two sides of the Y-axis belt tension gauge are closed and there is no obvious gap.
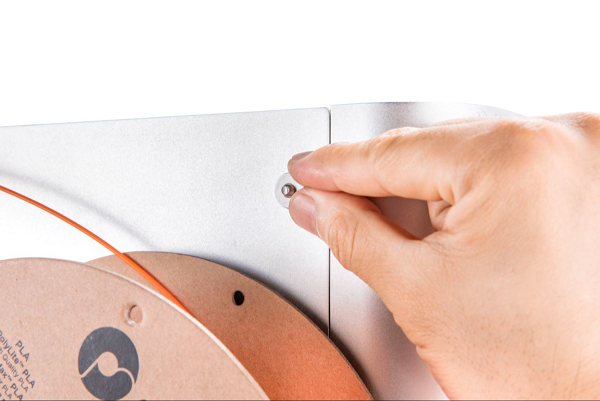
- Remove the Y-axis belt tension gauge and clip it onto the right Y-axis belt in the same way.
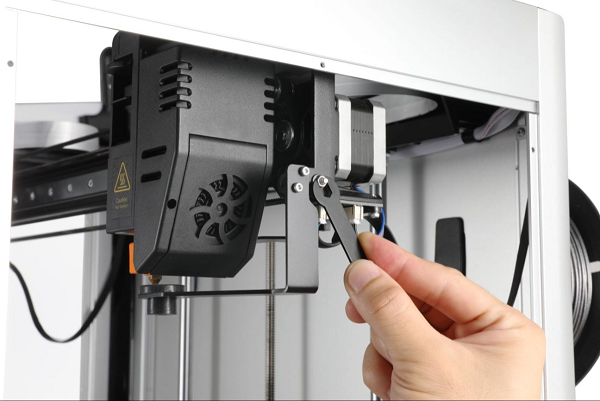
- Manually twist the screw in the upper right corner on the back of the printer until the two sides of the Y-axis belt tension gauge are closed and there is no obvious gap.
- Reinstall the left and right side panels with an hex key (H2.0).
¶ Lubricate the Axes
Why
To ensure smooth movement of the extruders and the heated bed, the X, Y linear rails and the Z-axis lead screw need to be lubricated regularly, otherwise the printing results may be affected.
When
Once every three months, or when the lubricating grease color turns black brown.
How
¶ Preparations
- Prepare lubricating grease and tools:
- White lithium grease;
- Brush;
- Wiping cloth (provided, in tool box).
-
On the touchscreen, tap Control > Motor, and tap to turn off the motor so that you can move the extruders freely by hands.
-
Turn off the printer and unplug the power cable from the electrical outlet.
¶ X, Y Linear Rails
-
Wipe all the original grease from the X, Y linear rails.
-
Dip a proper amount of new grease with the brush and apply it to the grooves on the upper and lower sides of the X-axis linear rail and the front of the guide rail.
-
Manually move the extruders left and right to distribute the grease evenly.
-
Dip a proper amount of new grease with the brush and apply it to the grooves on the left and right Y-axis linear rails.
-
Manually move the X-axis linear rail back and forth to distribute the grease evenly.
¶ Z-axis Lead Screw
-
Wipe all the original grease from the Z-axis lead screw.
-
Dip a proper amount of new grease with the brush and apply it to the Z-axis lead screw.
-
Turn on the printer. On the touchscreen, tap Control > Move, and then tap the
and  buttons in the Z direction to move the heated bed up and down to distribute the grease evenly.
¶ Replace the Hot End Sock
Why
The hot end sock is a silicone cover that wraps around the heating block, which helps the hot end maintain a stable temperature during printing and prevents the leakage of filaments from contaminating the heating block.
When
When the hot end sock has obvious damage or dirt that is difficult to remove.
How
-
Prepare new hot end socks (provided, in tool box).
-
Turn off the printer and unplug the power cable from the electrical outlet.
-
Make sure that the hot end has cooled to room temperature.
Make sure that the hot end has cooled to room temperature before proceeding, otherwise burns may result.
- Remove the current hot end sock, and then put on the new hot end sock with the logo
 facing you.
¶ Check the Nozzle Wiper Position
Why
When the extruder is homed, it will stay on the nozzle wiper, which can effectively prevent the extruder in standby state from overflowing when printing. The nozzle wiper may deviate from the standard position after long-term use or under external force, thus affecting the printing effect. Therefore, its position needs to be checked regularly.
When
Once every three months.
How
-
Turn on the printer, tap Control > Move on the touchscreen, and then tap Home button
 .
. -
After the left and right extruders have returned to their original positions, observe whether the nozzle end has completely entered the wiping pad and is pressed into the wiping pad for about 1 mm - 2 mm.
-
If yes, the nozzle wiper is already in the standard position; If not, pull the nozzle wiper by hand until it returns to the standard position.
¶ Check the Glass Plate Clamp
Why
The clamp used to fasten the glass plate may deviate from the standard position after long-term use or under external force, resulting in the failure of the glass plate to be fastened correctly, thereby affecting the printing effect. Therefore, its position needs to be checked regularly.
When
Once every three months.
How
-
Ensure that the glass plate and heated bed have cooled to room temperature.
-
Open and close the clamps on both sides of the glass plate, push the glass plate around by hand, and observe whether it moves.
-
If the plate is not moved, the clamp is already in the standard position. If the plate can be moved, adjust the clamp position by hand, and then repeat step 2 until the clamp returns to the standard position.