If you are using Artisan for the first time, read this checklist before all else to confirm if you've assembled the machine and the Enclosure ready for use.
¶ Operating Environment
¶ Temperature
The recommended operating temperature for Snapmaker Artisan 3D Printer is between 0°C to 40°C (32°F to 104°F).
The Fused Deposition Modeling (FDM) technology is highly susceptible to temperature.
- If the operating temperature is too high, though beneficial to print results in some cases, it will damage the 3D printer components. If necessary, use fans or air conditioners to lower the operating temperature.
- If the operating temperature is too low, it will take longer to heat up before you print. Another adverse impact is that the print will easily warp. Affected by cool air, the top layers of the extruded filament contract, whereas the bottom layers kept heating up by the Heated Bed will expand and thus warp. If necessary, use enclosures or air conditioners to raise the operating temperature.
The suitable operating temperature for each filament may vary within the given range. For more specific information, check the data provided by the filament manufacturer.
¶ Humidity
The recommended relative humidity for Snapmaker Artisan is between 30% to 70%.
Extreme humidity is harmful to the 3D printer.
- In extremely damp conditions, the 3D printer will be damaged due to dampened components.
- In extremely dry conditions and under static interference, the 3D printer may execute wrong operations. Use dehumidifiers or humidifiers to keep the relative humidity at a recommended range if necessary.
The suitable humidity for each filament may vary within the given range. For more specific information, check the data provided by the filament manufacturer.
¶ Workbench
Make sure that the workbench where you place the 3D printer and the Enclosure is:
- at least 1035 mm wide and 1690 mm long
- able to support more than 65 kg
- sound and level
- clean and dry
- put in a well-ventilated place when printing with ABS, as it emits toxic fumes
- near ventilation openings if you use the 3D printer with air-purifying devices
¶ Cables
Make sure you've plugged all the required cables and cords into the correct socket.
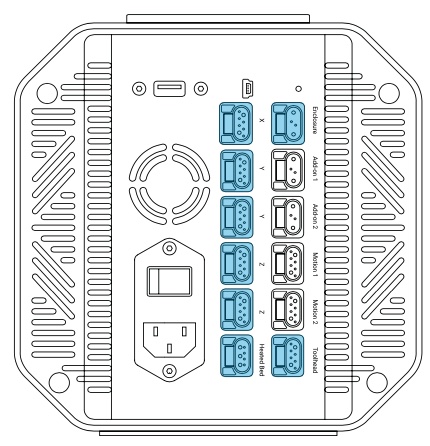
¶ Into the Integrated Controller
- Y-axis Cable × 2
- Z-axis Cable × 2
- X-axis Cable × 1
- Toolhead Cable × 1
- Heated Bed Cable × 1
- Enclosure Cable × 1
Intermixed plugging of Linear Module cables will result in malfunction of or damage to the machine.

¶ Into the Enclosure Converter
- Enclosure Cable × 1
- Hall Switch Cord × 1
- LED Strips Cord × 1
- Exhaust Fan Cord × 1
¶ Into the Dual Extrusion Module and Heated Bed
- Toolhead Cable × 1
- Heated Bed Cable × 1
¶ Build Plate
Make sure there is no filament residue, grease, dust, or other stains on the build plate surface.
To remove the filament residues, see here.
To remove the dust and grease, see here.
To remove the adhesives, see here.
¶ Nozzle
Make sure that:
- there is no filament residue on the surface, especially around the tip, of the nozzle
- the nozzle is not clogged or jammed
To unclog the nozzle, see here (to be written).
To replace the whole hot end, see here (to be written).
To clean the nozzle surface, see here.
¶ Filament
Make sure the filament that you want to use is not damp and is supported by Artisan.
To identify damp filaments or dry damp filaments, see here.
To check the supported filament list, see here.
¶ Software
¶ Touchscreen
Make sure you've updated the Touchscreen firmware to the latest version.
To check if the firmware is up-to-date:
- Connect the machine to a Wi-Fi network.
- Tap Settings > Firmware Update.
a. If the screen displays the information of a newer version, download it and update.
b. If the screen displays "Already Latest", then your firmware is up-to-date.
To update the Touchscreen firmware locally, see here (to be written).
¶ Snapmaker Luban
Make sure you've updated the Luban on your computer to the latest version.
To check if Luban is up-to-date:
- Connect the computer to the Internet.
- Launch Luban.
a. If the Update window pops up for a new version, download it and update.
b. If no Update window pops up, then the Luban on your computer is up-to-date.