¶ When to Calibrate
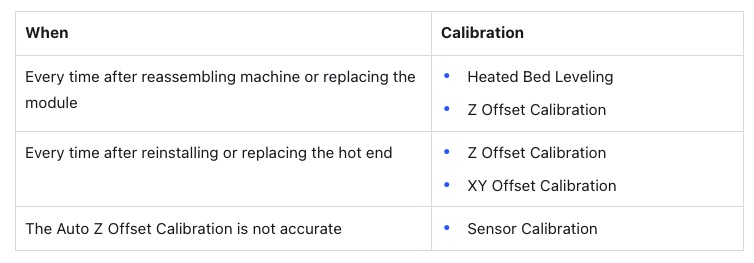
Refer to the table below to know about when to do what calibration to ensure your 3D printer works properly.
¶ Heated Bed Leveling
Your 3D printer prints on the build plate (under which lies the heated bed) nearly the same way people build houses on the ground. Therefore, whether or not the heated bed is level matters significantly to the first layer adhesion and the subsequent building-up process of the print.
The mechanism of Heated Bed Leveling runs like this:
- The built-in sensor records the height of the nozzle at different points on the build plate, so that machine knows how the downs and ups distribute over the plate.
- During printing, the toolhead will move higher at those up areas and lower at those down areas. In this way, whether the build plate is physically level or not, the distance between the build plate and the nozzle (better known as the Z offset) is kept the same throughout the printing process to guarantee a dynamic leveling of the build plate.
Artisan supports two leveling methods (Auto and Manual) and two advanced leveling settings (Heated Leveling and Calibration Grid). In general, we recommend the Auto Mode because of its quick and hands-free experience. If the first layer adhesion turns out not as expected after the heated bed is leveled in Auto Mode, you can enable Heated Leveling, choose a more-point calibration grid type, or manually level the bed.
By default, Artisan levels the bed with the following settings:
- Auto Mode
- Heated Leveling enabled at 65 ℃
- 25-point calibration grid
Before doing the Heated Bed Leveling, ensure that the surface of both nozzles is clean.
¶ Auto Mode
The toolhead will automatically probe and obtain data for specific calibration points on the 3D printing platform to adjust the movement of the toolhead accordingly during printing.
To level the heated bed automatically:
- On the Touchscreen, tap Calibration > Heated Bed Leveling.
- Tap the top-right corner to enter the Mode Selection screen, select Auto Mode, and tap Confirm.
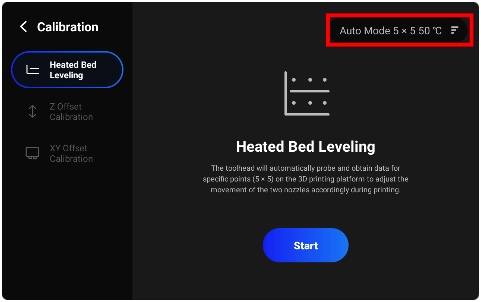
- Tap Start. The leveling will be done automatically.
The heated bed and nozzles will be heated during leveling. Do NOT touch their hot surfaces with bare hands.
¶ Manual Mode
You can manually control the toolhead to probe and obtain data for specific calibration points on the 3D printing platform. The movement of the two nozzles will be adjusted accordingly during printing.
To manually level the heated bed:
- On the Touchscreen, tap Calibration > Heated Bed Leveling.
- Tap the top-right corner to enter the Mode Selection screen, select Manual Mode, and tap Confirm.
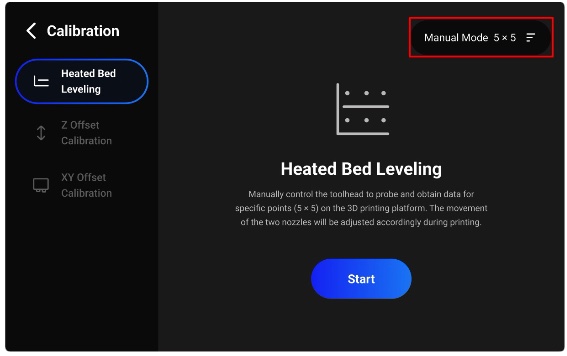
- Tap Start to begin the leveling.
- Follow the on-screen instructions to manually calibrate each point.
¶ Advanced Settings
¶ Heated Leveling
Heated Leveling can simulate the real printing scenario and therefore achieve better leveling results. When enabled, the bed will be heated to a specified temperature before the leveling starts.
To enable Heated Leveling:
- On the Touchscreen, tap Calibration > Heated Bed Leveling.
- Tap the top-right corner to enter the Mode Selection screen and select Auto Mode.
- Set the heated bed temperature, which should be higher than the indoor temperature.
- Tap Confirm.
To disable Heated Leveling, set the heated bed temperature as under the indoor temperature, such as zero.
Th Heated Leveling can only be enabled in Auto Mode, as the hot bed surface could burn your hands during manual calibration.
¶ Calibration Grid
Artisan supports three types of calibration grid, made up respectively of 9 (3×3), 25 (5×5), or 81 (9×9) points.
The more points your 3D printer probes, the more precise data your 3D printer gets, the better the leveling results, and the more likely the first layer is to adhere to the build plate.
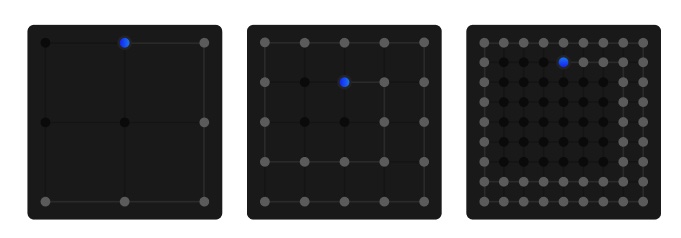
To set the calibration grid type:
- On the Touchscreen, tap Calibration > Heated Bed Leveling.
- Tap the top-right corner to enter the Mode Selection screen and select the Mode for which you want to change the grid type.
- Select the grid type you want from the drop-down list.
- Tap Confirm.
¶ Z Offset Calibration
Z offset refers to the distance between the nozzle and the build plate. Heated Bed Leveling ensures the same Z offset when the toolhead moves above the build plate during printing, while Z Offset Calibration ensures that this consistent Z offset contributes to successful prints.
Artisan supports two Z offset calibrating methods (Auto and Manual). We recommend the Auto Mode because of its quick and hands-free experience.
Before doing the Z Offset Calibration, ensure that the surface of both nozzles is clean.
¶ Auto Mode
The left and right nozzle will touch the glass build plate and calibrate their Z offset automatically.
To calibrate the Z offset automatically:
- On the Touchscreen, tap Calibration > Z Offset Calibration.
- Tap the top-right corner to enter the Mode Selection screen and select Auto Mode.
- Tap Start to begin the calibration.
¶ Sensor Calibration
When you find the result of Auto Mode is inaccurate, you can do Sensor Calibration to calibrate the smart sensor’s travel distance and improve the accuracy of Auto Z Offset Calibration.
To calibrate the smart sensor:
- On the Touchscreen, tap Calibration > Z Offset Calibration.
- Tap the top-right corner to enter the Mode Selection screen and select Sensor Calibration.
- Tap Start to begin the calibration. The machine will first automatically calibrate the Z Offset of the two nozzles.
- After the automatic calibration is done, follow the on-screen instructions to manually calibrate the Z offset of the two nozzles.
¶ Manual Mode
You can manually control the left and right nozzles to move and calibrate their Z offsets.
To calibrate the Z offset manually:
- On the Touchscreen, tap Calibration > Z Offset Calibration.
- Tap the top-right corner to enter the Mode Selection screen and select Manual Mode.
- Tap Start to begin the calibration.
- Follow the on-screen instructions to manually calibrate the Z offset of the two nozzles.
¶ XY Offset Calibration
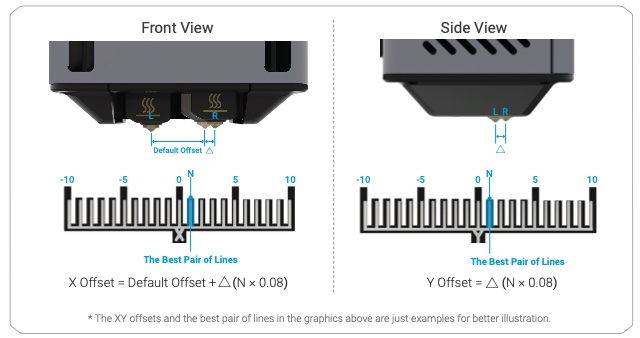
The X and Y offset refers to the distance between the two nozzles in the X and Y orientations. Calibrating the X and Y offset can achieve the optimal print quality of both nozzles in the horizontal direction and avoid crossovers between different colors and materials.
The XY Offset Calibration adopts a dynamic compensation method, similar to the one used in the Heated Bed Leveling. It does not eliminate the real physical X and Y offsets between the two nozzles; instead, the machine obtains the offset data by your choice of the best pair of line in the printed calibration models, and make real-time adjustments to the toolhead movement to compensate for the offset.
The following graphic shows how the location of the best pair of lines relates to the real XY offsets.
Before doing the XY Offset Calibration, ensure that the glass build plate is clean.
To calibrate the XY Offset:
- On the Touchscreen, tap Calibration > XY Offset Calibration > Start. The machine will start printing the calibration models,
- After the printing is finished, take out the print from the build plate and tap Next to confirm the removal.
- Choose the best pair of lines in the X model, tap Next, and tap Save to confirm the choice.
- Repeat the above step for the Y model.
- Optional: Tap Start Checking to print the Check Model to verify the XY calibration results.